EdgeUtils是基于androidx.core,对edge to edge沉浸式方案封装 📦
接入方式:
- 添加jitpack仓库
maven { url 'https://jitpack.io' }
- 添加依赖
implementation 'com.github.JailedBird:EdgeUtils:1.0.0'
Activity中使用API edgeToEdge() 将开发者实现的布局拓展到整个屏幕, 同时为避免冲突, 将状态栏和到导航栏背景色设备为透明;
注意:edgeToEdge() 的参数withScrim表示是否启用系统默认的反差色保护, 不是很熟悉的情况下直接使用默认true即可;
布局拓展之后, 开发者布局内容会显示在状态栏和导航栏区域, 造成布局和系统栏字体重叠(时间、电量……);
此时为确保系统栏字体可见,应该设置其字体; 设置规则:白色(浅色)背景设置黑色字体(edgeSetSystemBarLight(true)),黑色(深色)背景设置白色字体(注:系统栏字体只有黑色和白色)(edgeSetSystemBarLight(false));
如果未作夜间模式适配, 默认使用 edgeSetSystemBarLight(true)浅色模式即可!
综合1、2我们的基类可以写成如下的形式:
abstract class BasePosActivity : AppCompatActivity() {

    override fun onCreate(savedInstanceState: Bundle?) {
        if (usingEdgeToEdgeTheme()) {
                defaultEdgeToEdge()
        } else {
            customThemeSetting()
        }
        super.onCreate(savedInstanceState)
    }
}

protected open fun defaultEdgeToEdge() {
      edgeToEdge(false)
      edgeSetSystemBarLight(true)
}
步骤一布局拓展全屏会导致视觉上的冲突, 下面是几种常见的思路:请灵活使用
-
布局中添加View(id="@+id/edge")使用heightToTopSystemWindowInsets API动态监听并修改View的高度为状态栏的高度
<LinearLayout xmlns:android="http://schemas.android.com/apk/res/android" android:orientation="vertical"> <View android:id="@+id/edge" android:layout_width="match_parent" android:layout_height="0dp" /> xxx </LinearLayout> binding.edge.heightToTopSystemWindowInsets() -
直接获取状态栏的高度,API为:edgeStatusBarHeight; 和1不同的是,1中View的height会随状态栏高度变化而变化,2不会; 此外获取状态栏高度需要在View Attached之后才可以(否则高度为0),因此使用suspend函数等待Attached后才返回状态栏,确保在始终能获取到正确的状态栏高度!
lifecycleScope.launch { val height = edgeStatusBarHeight() xxx } -
针对有Toolbar的布局, 可直接为Toolbar加padding(or margin), 让padding的高度为状态栏高度!如果无效, 一般都与Toolbar的高度测量有关, 可以直接在Toolbar外层包上FrameLayout,为FrameLayout加padding, 详情阅读下文了解原理,从而灵活选择;
fun View.paddingTopSystemWindowInsets() =
    applySystemWindowInsetsPadding(applyTop = true)

fun View.marginTopSystemWindowInsets() =
    applySystemWindowInsetsMargin(applyTop = true)
导航栏的适配原理和状态栏适配是非常相似的, 需要注意的是 导航栏存在三种模式:
- 全面屏模式
- 虚拟导航栏
- 虚拟导航条
API已经针对导航栏高度、导航栏高度margin和padding适配做好了封装,使用者无需关心;
fun View.paddingBottomSystemWindowInsets() =
    applySystemWindowInsetsPadding(applyBottom = true)

fun View.marginBottomSystemWindowInsets() =
    applySystemWindowInsetsMargin(applyBottom = true)
适配思路是一致的,不再赘述;
手势冲突和视觉冲突产生的原理是相同的,不过是前者无形而后者有形;系统级别热区(如侧滑返回)优先级是要高于View的侧滑的, 因此有时候需要避开(情况很少)
EdgeUtils主要工作只是做了视觉冲突的解决和一些API封装;使用者可以基于封装的API拓展,替换掉WindowInsetCompat.Type为你需要的类型;
fun View.applySystemWindowInsetsPadding(
    applyLeft: Boolean = false,
    applyTop: Boolean = false,
    applyRight: Boolean = false,
    applyBottom: Boolean = false,
) {
    doOnApplyWindowInsets { view, insets, padding, _ ->
    	// val systemBars = insets.getInsets(WindowInsetsCompat.Type.systemBars())
    	// 替换为Type.SYSTEM_GESTURES即可,其他类似
        val systemBars = insets.getInsets(WindowInsetsCompat.Type.systemGestures())
        val left = if (applyLeft) systemBars.left else 0
        val top = if (applyTop) systemBars.top else 0
        val right = if (applyRight) systemBars.right else 0
        val bottom = if (applyBottom) systemBars.bottom else 0

        view.setPadding(
            padding.left + left,
            padding.top + top,
            padding.right + right,
            padding.bottom + bottom
        )
    }
}
如何彻底理解Edge to edge的**呢?
了解Edge to edge原理后,你或许会好奇他是怎么实现的?
或许你需要Flywith24大佬的文章 , 也可看缩略文章doc2😘
请看doc3 , 东西多但比较杂没整理😘
EdgeUtils此框架基于androidx.core, 对WindowInsets等常见API进行封装,提供了稳定的API和细节处理;封装的API函数名称通俗易懂,理解起来很容易, 难点是需要结合 [Edge-to-edge](#Edge to edge) 的原理去进行灵活适配各种界面
项目中存在三个demo对于各种常见的场景进行了处理和演示
- navigation-sample 基于Navigation的官方demo, 此demo展示了Navigation框架下这种单Activity多Fragment的沉浸式缺陷
- navigation-edge-sample 使用此框架优化navigation-sample, 使其达到沉浸式的效果
- immersion-sample 基于开源项目immersionbar中的demo进行EdgeUtils的替换处理, 完成大部分功能的替换 (注:已替换的会标记[展示OK],部分未实现)
很多时候, 状态栏的颜色和ToolBar的颜色是一致的, 这种情况下我们可以想到为ToolBar加 paddingTop = status_bar_height, 但是注意如果你的Toolbar高度为固定、或者测量的时候没处理好padding,那么他就可能失真;
快速判断技巧:xml布局预览中(假设状态栏高度预估为40dp),使用tools:padding = 40dp, 通过预览查看这40dp的padding是否对预览变成预期之外的变形,如果OK那么直接使用paddingTopSystemWindowInsets为ToolBar大多是没问题的
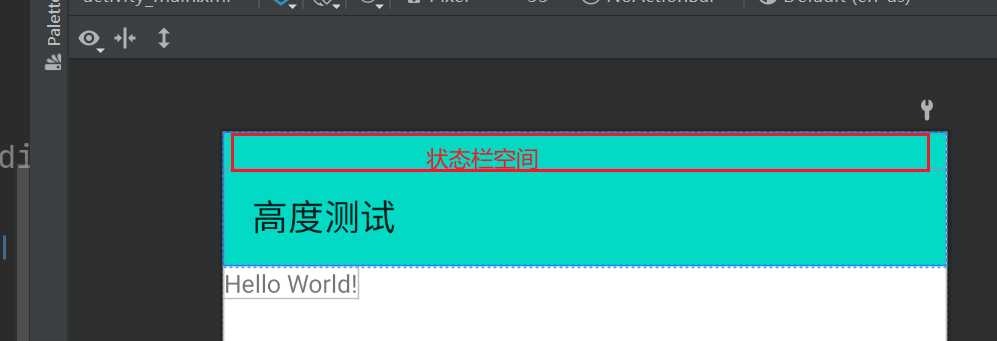
可以看下下面的2个例子:
- paddingTop = 0时候, 如下的代码:
<androidx.appcompat.widget.Toolbar
    android:id="@+id/toolbar"
    android:layout_width="match_parent"
    android:layout_height="wrap_content"
    android:background="@color/teal_200"
    android:paddingTop="0dp"
    app:layout_constraintEnd_toEndOf="parent"
    app:layout_constraintStart_toStartOf="parent"
    app:layout_constraintTop_toTopOf="parent"
    app:title="高度测试" />
- UI预览可以看到是这个样子的:
- paddingTop = 20时候, 如下的代码:
<androidx.appcompat.widget.Toolbar
    android:id="@+id/toolbar"
    android:layout_width="match_parent"
    android:layout_height="wrap_content"
    android:background="@color/teal_200"
    android:paddingTop="20dp"
    app:layout_constraintEnd_toEndOf="parent"
    app:layout_constraintStart_toStartOf="parent"
    app:layout_constraintTop_toTopOf="parent"
    app:title="高度测试" />
- 可以看到, Toolbar的总高度是不变的,内容高度下移20dp,这显然是不合理的;实际运行时动态为ToolBar添加statusbar的paddingTop肯定也会导致这样的问题
解决方案:
1、 使用FrameLayout等常见ViewGroup包住ToolBar,将paddingTop高度设置到FrameLayout中, 将颜色teal_200设置到FrameLayout
<FrameLayout
    android:id="@+id/layout_tool"
    android:layout_width="match_parent"
    android:layout_height="wrap_content"
    android:paddingTop="20dp"
    android:background="@color/teal_200">

    <androidx.appcompat.widget.Toolbar
        android:id="@+id/toolbar"
        android:layout_width="match_parent"
        android:layout_height="wrap_content"
        android:background="@color/teal_200"
        app:layout_constraintEnd_toEndOf="parent"
        app:layout_constraintStart_toStartOf="parent"
        app:layout_constraintTop_toTopOf="parent"
        app:title="高度测试" />

</FrameLayout>
如下:
2、 在ToolBar外层直接封装FrameLayout(LinearLayout等也可, 下文统一用FrameLayout替代);
我相信大家一般都不会直接使用原生的Toolbar, 每个公司或多或少的都封装了一些自定义ToolBar;按照上述1的思路, 我们不难发现:
- 如果自定义ToolBar继承自FrameLayout(或者说Toolbar最外层被FrameLayout包住), 直接将paddingTop加到自定义ToolBar即可;
- 当然有些做的好的公司可能会直接通过继承ViewGroup(如原生ToolBar), 这个时候可能就只能用方案1了;
当然上述几点都是具体问题具体分析, 大家可以在预览界面临时加paddingTop,看看实际是什么样的, 便于大家尽早发现问题;可以参考下BottomNavigationView的源码, 它间接继承自FrameLayout, 内部对paddingBottom自动适配了navigation_bar_height;
这个思路和ImmersionBar的 状态栏与布局顶部重叠解决方案 类似,不同的是,ImmersionBar使用的是固定的高度,而方案1是动态监听状态栏的高度并设置FrameLayout的paddingTop;
注:上述的paddingTop = 20dp, 只是方便预览添加的, 运行时请通过API动态设置paddingTop = statusBar
3、 添加空白View,通过代码设置View高度为导航栏、状态栏高度时,存在坑;约束布局中0dp有特殊含义,可能导致UI变形,需要注意哈!特别是处理导航栏的时候,全屏时导航栏高度为0,就会导致View高度为0,如果有组件依赖他,可能会出现奇怪问题,因此最好现在布局预览中排查下
直接使用Edge to edge(参照google官方文档)存在一个大坑:调用hide隐藏状态栏后会导致状态栏变黑, 并且内容区域无法铺满
详细描述看这里:point_right: WindowInsetsControllerCompat.hide makes status bar background undrawable
private fun setWindowEdgeToEdge(window: Window) {
        WindowCompat.setDecorFitsSystemWindows(window, false)
        window.statusBarColor = Color.TRANSPARENT
        window.navigationBarColor = Color.TRANSPARENT
    }

WindowCompat.getInsetsController(this, this.decorView)?.let {
            it.systemBarsBehavior = behavior
            it.hide(WindowInsetsCompat.Type.statusBars())
        }
具体表现下图这个样子:
解决方案如下 👇 How to remove top status bar black background
object EdgeUtils {
    /** To fix hide status bar black background please using this post
     * youtube: https://www.youtube.com/watch?v=yukwno2GBoI
     * stackoverflow: https://stackoverflow.com/a/72773422/15859474
     * */
    private fun Activity.edgeToEdge() {
        requestWindowFeature(Window.FEATURE_NO_TITLE)
        if (Build.VERSION.SDK_INT >= Build.VERSION_CODES.P) {
            window.attributes.layoutInDisplayCutoutMode = WindowManager
                .LayoutParams
                .LAYOUT_IN_DISPLAY_CUTOUT_MODE_SHORT_EDGES
        }
        setWindowEdgeToEdge(this.window)
    }

    private fun setWindowEdgeToEdge(window: Window) {
        WindowCompat.setDecorFitsSystemWindows(window, false)
        window.statusBarColor = Color.TRANSPARENT
        window.navigationBarColor = Color.TRANSPARENT
    }
在导航栏设置为全透明时, 部分机型就会出现scrim半透明遮罩,考虑到样式有点丑陋, 直接将其修改为#01000000, 这样看起来也是完全透明的, 但是系统判定其alpha不为0, 不会主动添加scrim的; 【具体请看官方文档】
private fun setWindowEdgeToEdge(window: Window) {
        WindowCompat.setDecorFitsSystemWindows(window, false)
        /** using not transparent avoid scrim*/
        Color.parseColor("#01000000").let { color ->
            window.statusBarColor = color
            window.navigationBarColor = color
        }
    }
一个View只能绑定一次ApplyWindowInset的监听,多次绑定可能会导致之前的失效或者出现奇怪问题!!!


