

In IOTA, a node is the machine owning all the information about the Tangle. In order for the network to work efficiently, nodes exchange information each other to be kept up-to-date about the new ledger state. Currently, a manual peering process is used for nodes to mutually register as neighbors. However, manual peering might be subject to attacks (e.g., social engineering) to affect the network topology. To prevent these attacks, and to simplify the setup process of new nodes, we introduce a mechanism that allows nodes to choose their neighbors automatically. The process of nodes choosing their neighbors without manual intervention by the node operator is called autopeering.
To find out more details about the autopeering, read the following:
- "Coordicide White Paper" by Coordicide Team, IOTA Foundation
- "Coordicide update - Autopeering: Part 1" by Dr. Angelo Capossele
- "How do we achieve a verifiably random network topology?" by Dr. Hans Moog
The autopeering module is logically divided into two main submodules: peer discovery and neighbor selection. The former is responsible for operations such as discovering new peers and verifying their online status while the latter is responsible for finding and managing neighbors for our node. It encapsulates the network and the storage layer through the use of Go interfaces.

This repository is where the IOTA Foundation's Research Team simulates tests on the Autopeering module to study and evaluate its performance.
By making this repository open source, the goal is to allow you to keep up with the development status and learn more about how it works.
Feel free to do your own simulations by following the steps below.
Install Go if it is not already installed on your machine. It is recommended that you use the most recent version of Go, or at least 1.13.
-
Clone the repository
git clone https://github.com/iotaledger/autopeering-sim.git
-
Enter into the
autopeering-simdirectorycd autopeering-sim -
Build the executable file
go build -o sim
-
If you want to change how the simulation behaves, edit the parameters in the
config.jsonfile -
If you're using Windows, add the
.exefile extension to thesimfile -
Run the simulation
./sim -
If you have set the visualization as enabled, open your browser and go to
http://localhost:8844.

To analyse the results of the simulation, read the .csv files in the data directory:
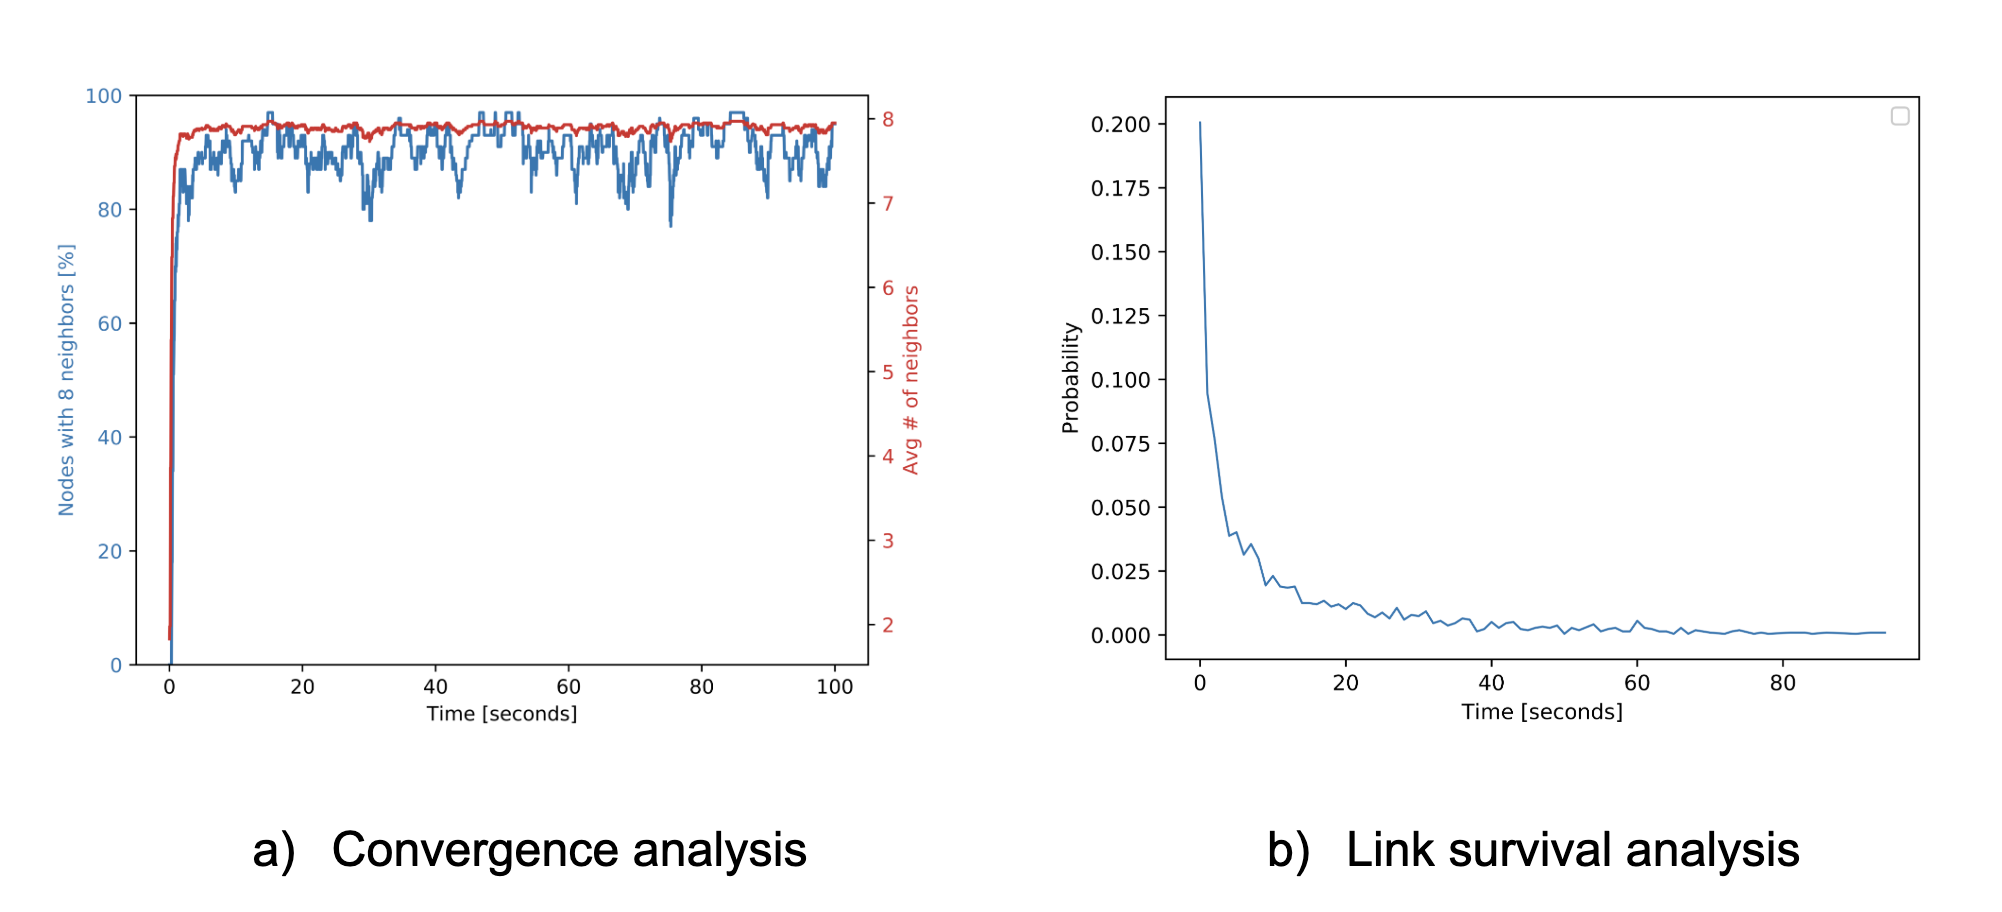
- comvAnalysis: Proportion of nodes with a complete neighborhood and average number of neighbors as a function of time
- linkAnalysis: Probability Density Function (PDF) of the time a given link stays active
- msgAnalysis: Number of peering requests sent, accepted, rejected, received and the number of connections dropped of each peer, as well as their average
To use the Python script, you must have Python and PIP installed. The script output .eps files, so to view the graphs, you need an application that can open them.
-
Install the dependencies
pip install numpy matplotlib
-
Run the script from the
simulationfolderpython plot.py
The script provides two figures:
-
The proportion of nodes with a complete neighborhood and the average number of neighbors as a function of time
-
The Probability Density Function (PDF) of the time a given link stays active

These parameters affect how the simulated autopeering behaves. As a result, changing these parameters has an affect on how long the protocol takes to converge.
A description and functionality of some of the parameters is provided in "Coordicide update - Autopeering: Part 1" that accompanies the release of this code.
To change any of these parameters, edit them in the config.json file.
| Parameter | Type | Description |
|---|---|---|
NumberNodes |
int | Number of nodes |
Duration |
int | Duration of the simulation, in seconds |
SaltLifetime |
int | Salt lifetime, in seconds |
VisualEnabled |
bool | Enable/disable the http visualization server |
DropOnUpdate |
bool | Flag to drop all neighbors on each salt update |
The messages exchanged during autopeering are serialized using Protocol Buffers. To generate the corresponding go files after changing the the protobuf files, use the following command:
make compile