Please read each section, especially anything marked with ":warning:".
These are important warnings that may cause you issues if missed.
Important Notes
⚠️ Required SuperSlicer version: 📄2.4.58.2 (last update: 2022-04-11)- You may want to back up your
%appdata%\SuperSlicerfolder before updating, just in case. - Use different SS versions at your own peril.
- Newer versions often introduce new bugs or defaults, and older versions may not be compatible with certain settings (or will just error when importing the profile)
- I will update this as I test newer versions.
- There is a 📄known bug in this version with the new wall thickess setting, causing it to show crazy values. Just ignore this setting for now (or click "expert" to hide it) - it does not affect anything.
- You may want to back up your
⚠️ This profile is more aggressive than most stock profiles, and some things may also need turning down if your printer is still teething.⚠️ This profile's speeds/accels are tuned for linear rail CoreXY (specifically MY personal V2). YOUR RESULTS MAY VARY. Your own printer, and especially other printer types (Switchwire, Legacy, others), will likely need lower speeds and accelerations.- I actually use the same profiles on my Ender 3, just with speeds and accelerations turned down.
- See my 📄tuning guide! (primarily written for Klipper printers)
- You can find the bed models and textures I am using in 📄here.
- Support my drinking habits:


Table of Contents
- How to Download
- How to Import
⚠️ Start G-code⚠️ Volumetric Speed Limiting⚠️ Accelerations⚠️ Extrusion Multiplier⚠️ Cooling⚠️ Nozzle Flats- "45 Degree" Profile vs Standard Profile
- Infill Line Widths
- Tips and Tricks
- Profile Change Log
How to Download
1) Navigate to the .ini file.
2) Right click "Raw" and click "Save link as"
If you do not use the "Raw" button, you will get errors trying to import.

Alternatively, download the whole repository as .zip:

How to Import
If you downloaded the whole repository as .zip, extract it.
Select file -> import -> import config or press ctrl+L.

Select the .ini file of the profile you want to import.
Open each tab and click the floppy icon to save the profile. You may have to pick a new name. (you can type in the box that pops up!)

Start G-code
⚠️ If you are not yet passing temperature variables to PRINT_START, replace everything in this box with just PRINT_START*
- * or the appropriate start g-code for your particular printer.
See the 📄"Passing Slicer Variables to PRINT_START" section of my tuning guide for more information (rationale & instructions).
- If you are new to this, don't worry about this yet - come back to it later on.

Volumetric Speed Limiting
⚠️ It is very important that you update the volumetric speed setting, otherwise you may have extruder skipping and/or filament grinding.

What is a Volumetric Speed Limit?
The volumetric speed limit controls the maximum rate that your hotend is allowed to extrude. No matter how much you push speeds, layer heights, or line widths, it will never allow you to outrun your hotend.
Even when not pushing for speeds, I highly recommend putting an appropriate value for your hotend. It's a great failsafe.
I keep my infill speed set to 300mm/s. This is the absolute max I want my infill to ever print - but in reality, it will usually print more slowly due to this limit. This essentially prints infill as fast as the hotend will allow, up to 300mm/s.
Approximate Values
These approximate values assume a standard 0.4mm brass nozzle.
| Hotend | Flow Rate (mm3/sec) |
|---|---|
| E3D V6 | 11 |
| E3D Revo | 15 |
| Dragon SF | 15 |
| Dragon HF | 24 |
| Dragonfly BMO | 13 |
| Rapido HF | 24 |
| Rapido UHF | 30 |
| Mosquito | 20 |
| Mosquito Magnum | 30 |
You will usually be okay using an approximate value from above and just lowering it if you have any issues. But - keep in mind that there is also no guarantee that you will reach them. There are many factors and variables that can cause your actual performance to vary.
Nozzle properties may affect these numbers. For example:
- Larger diameter nozzles will have higher flow rates
- Hardened steel has a lower thermal conductivity and you may get lower flow rates unless you compensate with higher temperatures.
- Plated copper and tungsten carbide have higher thermal conductivity and might allow a bit higher flow rate.
- Bondtech CHT nozzles use a different internal geometry that allows higher flow rates.
To test your own flow rate, see the 📄Determining Max Volumetric Flow Rate.
You may also want to have a look at 📄Flow Dropoff.
Accelerations
These accelerations are tuned for my personal V2 with input shaper.

Without Input Shaper
⚠️ You must reduce these accelerations if you aren't using input shaper, or for most other printer types.
You may get skipping otherwise (or just very violent toolhead movements).
For CoreXY, maybe around 4-5k max.
With Input Shaper
Set all of the non-travel* accelerations to the max recommended acceleration for your shaper type and below (from the upper right area of your ADXL graph).
- I would still personally recommend keeping low accelerations for things like perimeters. Your IS tune can drift over time with belt tensions and ringing can start to come back. I've also had some bulging issues when pushing perim accels. Set it and forget it.
* Travels can usually exceed the max recommended value if you wish. See 📄here to determine your max travel accels.
- The max recommended acceleration from input shaper tuning is actually the point where excessive rounding/smoothing may occur, NOT your absolute maximum movement acceleration.
Extrusion Multiplier
⚠️ The extrusion multiplier (EM) is tuned for my particular filament brand/batch. You will have to tune yours for your particular filament.
See 📄here for tuning instructions.

Cooling
This profile uses static fan speeds. The community has found that varying fan speeds, particularly with high-shrinkage materials, can cause layer inconsistencies.
⚠️ Your optimal fan speed will vary based on your fan, material, layer times, and chamber temps.
My fans speeds may be too high for you, especially if your chamber is cooler than mine (~65C).
See my the 📄"cooling and layer times" section of my tuning guide.
I use Stealthburner with a Sunon 5015 fan.

Nozzle Flats
⚠️ My profiles use some aggressive line widths (180% infill, 140% solid infill), which may not work well with some pointier nozzles.
You will only get good results if your nozzle flat is wide enough to support the requested line width. You can get a rough measurement of your nozzle flat with calipers.
This can cause thicker extrusion lines to curl up around the nozzle - and even occasionally cause gapping issues with the 125% perimeters, if it's pointy enough.
May cause issues.

Better.

"45 Degree" Profile vs Standard Profile
My primary profile is the "45 degree" profile. I orient the STLs to be at a 45 degree angle.

Pros
- The main reason I do this is simply for easier seam placement for large numbers of parts using "rear" seams.
- Orient the desired seam edge towards the rear of the plate (preferably the sharpest edge).
- The alternative is "cost-based" (similar to "sharpest corner" in Cura). Cost-based does a good job of placing the seams in corners, but crucially it does not align them. They tend to be scattered around the print at random corners.
- Rear seams:
- 😍

- vs. "corners" seams:
- (ehhhhh)

- Force-aligning the seams can help with layer consistency. The other options ("ligned", "Cost-Based", and "Corners") can all allow the seam to jump around. That can cause artifacts like this:
- You can see bands where the seam has hopped to a different edge of the print.
- (This example is from Discord. The pressure advance is a bit too low, but it helps to better demonstrate the effect)

- With CoreXY, 45 degree motions only use one motor.
- This can sometimes lead to better surface quality on straight walls. Patterns (VFAs) can sometimes occur when both motors are in use (with certain motor models).
- Can sometimes result in better overhangs. It seems that airflow sometimes prefers 45 degree prints.
Cons
-
It can sometimes be harder to fit as many parts this way.
-
Rear seams don't always align nicely on rounded corners.- UPDATE: The newer versions of SS seem to have improved this quite a bit!
- Previously:
(there was no seam preview feature at the time either): 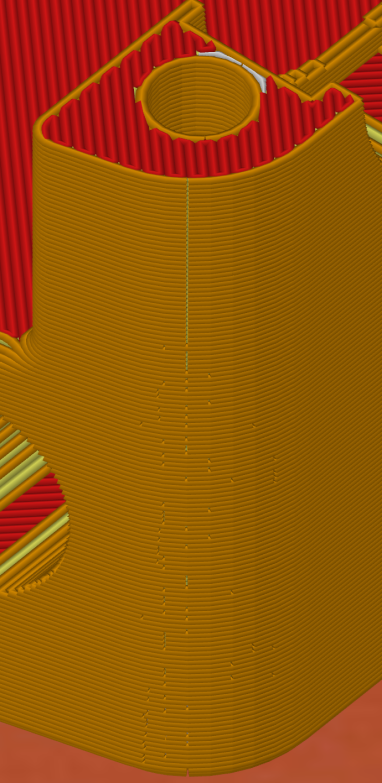
- I usually try to orient the sharpest corner to the rear of the place.
- For objects with only rounded corners, I will sometimes manually place the seam.
- For some plates, I may also set the seam to "cost-based" or "corners" for certain objects.
-
Sometimes the seams can still be placed oddly. Have a quick look at the gcode preview before printing.


Manual seam placement will always have the best results. This method is a compromise to save myself a lot of manual work for plates with large numbers of parts.
Rotating Parts
NEW: SuperSlicer allows you to set auto rotation when importing models in your printer profile:

To manually rotate, press ctrl+a to select all objects.
Type the rotation amount in "Z" the box at the bottom right:

Infill Line Widths
The infill line widths are set to a high value in my profile (180%) to save some print time, and to help with infill layer adhesion strength.
This proportionally reduces the amount of lines to be printed. The overall coverage area is still 40%.
If you need greater top layer support, or are printing decorative / low infill parts, you may want to reduce this value for for greater line density.
40% Infill @ 180% Line Width

40% Infill @ 110% Line Width

Tips and Tricks
Part Spacing / Plating
Right click the "arrange" button to change part spacing.

Then click the arrange button (or press A), to automatically arrange everything.
Too close can introduce cooling issues. I tend to spread parts out when I can.
Advanced Bridging Over Holes (Sacrificial Bridges)
This section was contributed by akhamar. Thanks!
To avoid the need to add tapered screw holes over countersinks, you can instead use a setting in SuperSlicer that allows for bridging over holes.
It is not a magic bullet, and still need to be used on a case basis, but usually works on countersinks for screws.
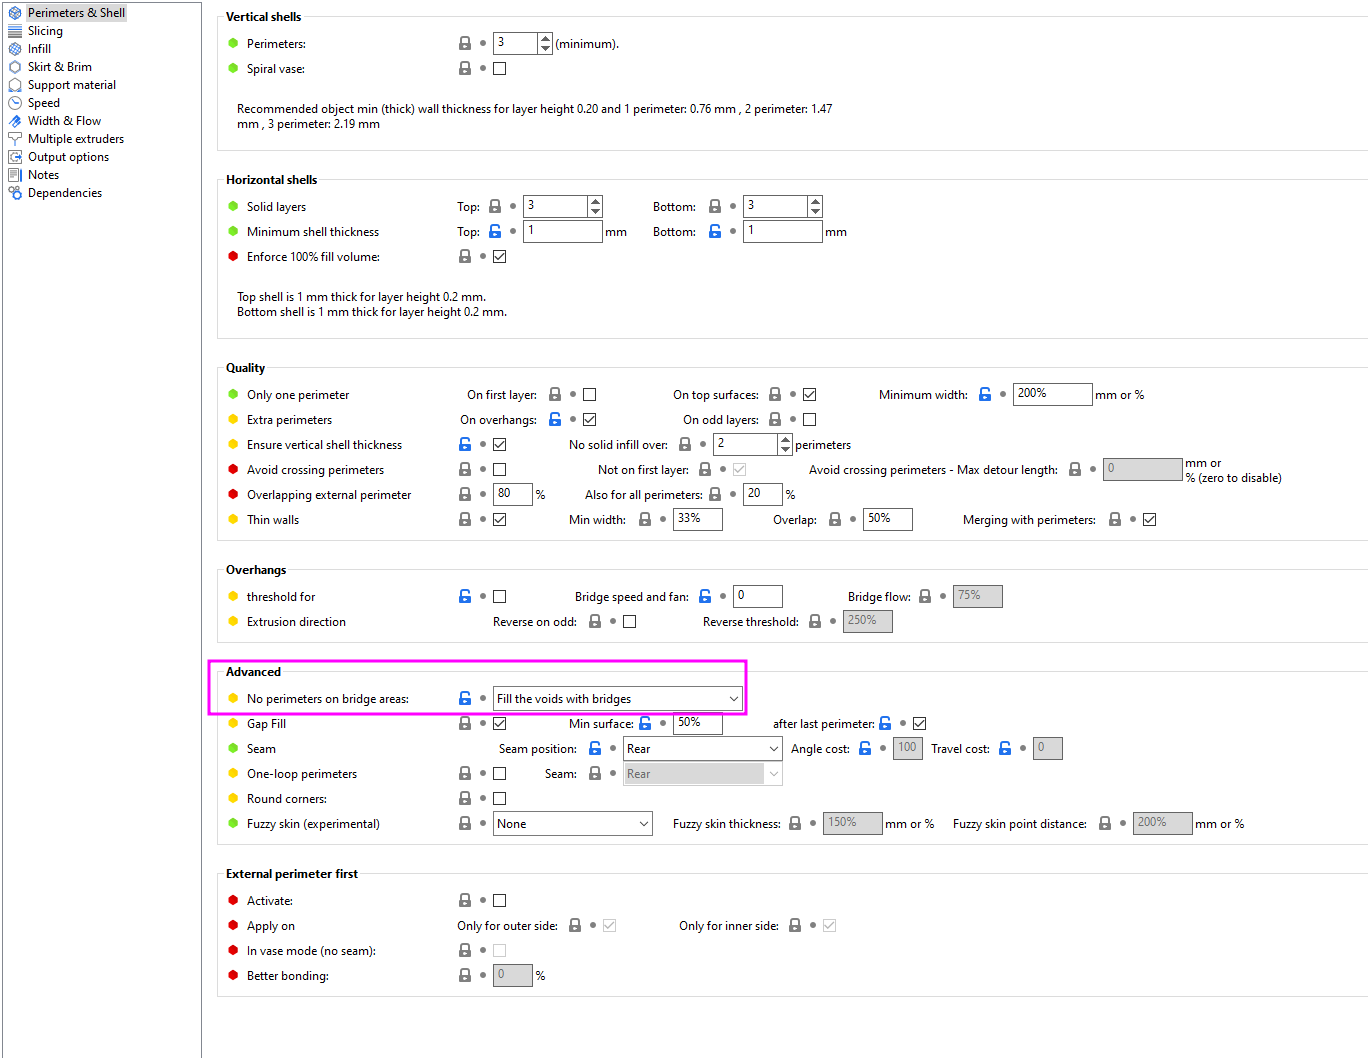
SuperSlicer Option
The SuperSlicer option is called "No perimeters on bridge areas", located in the advanced section of "Perimeters and Shell".
-
The internal setting name is
no_perimeter_unsupported_algo. -

Results
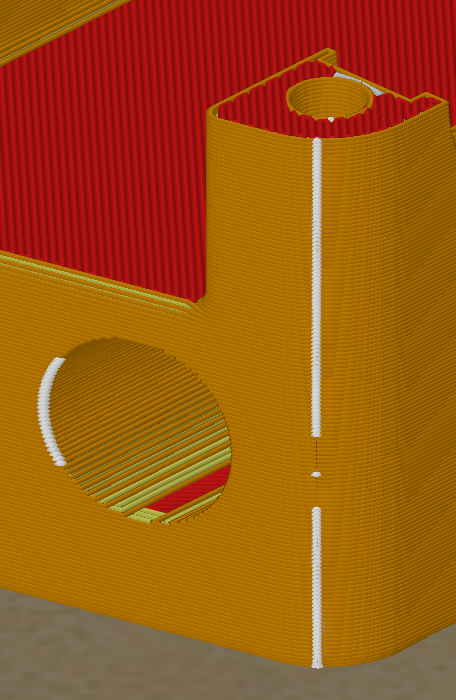
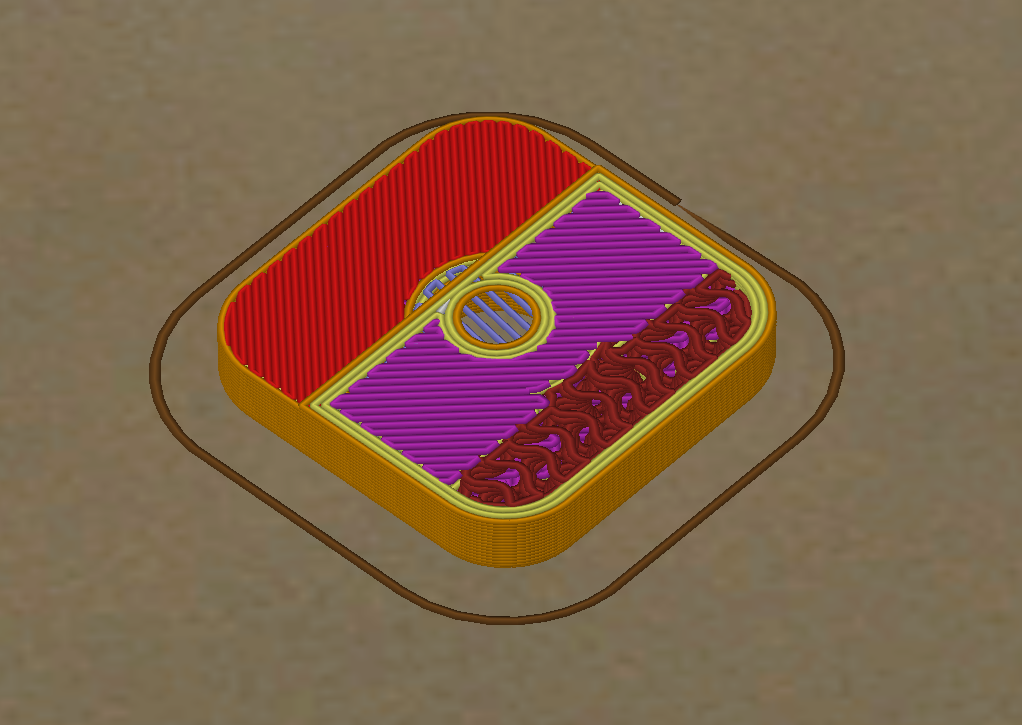
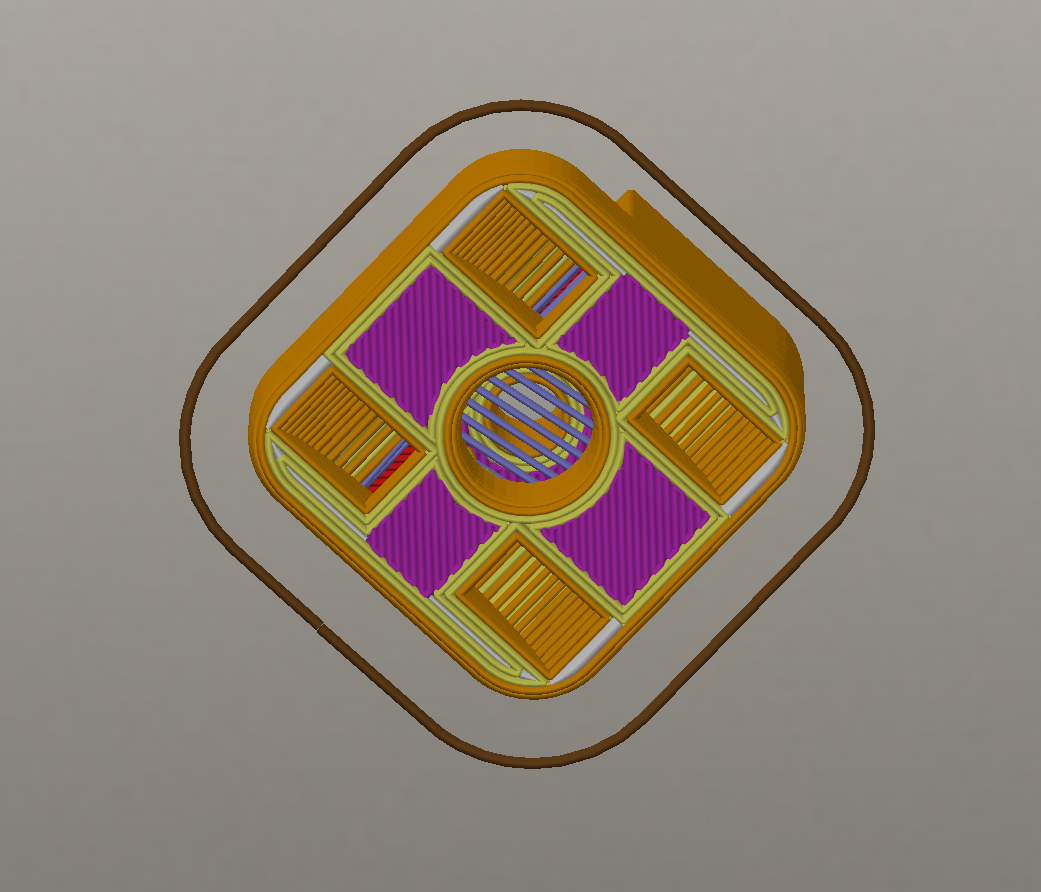
- Previously, this example part would have had no bridging layer, which could cause the layer over the void/hole to attempt to print midair.
- The perimeter circles (yellow/orange) would be printed midair and fall.
- The ends of the infill lines (purple) around the hole would be partially printed midair and fall.
- With this setting, a sacrificial bridge is printed for support, which can then be broken through with the screw.


Profile Change Log
Rather than having to re-import the profiles when updates are made, please check the change log occasionally to grab important settings changes / bug fixes.
Use ctrl + f in SuperSlicer to find these settings by their internal names below.
- 2022-08-16:
- solid_over_perimeters to 0 (was 2 / default)
- This could cause pillowing issues on internal slopes, particularly with small layer heights.
- solid_over_perimeters to 0 (was 2 / default)
- 2022-08-09:
- Set default line width to 125% and change all 120% values to 0 so that they use default (just for rounder numbers, e.g. 0.5mm widths instead of 0.48)
- 2022-08-08:
- Add decorative 45 degree profile.
- 2022-07-25:
- support_material_contact_distance set to 0.1mm (was 0.2mm).
- I found the default of 0.2mm was giving really messy surfaces when supports are used.
- support_material_bottom_contact_distance set to "same as top" (was 0.2mm)
- support_material_contact_distance set to 0.1mm (was 0.2mm).
- 2022-07-18:
- extra_perimeters_overhangs enabled.
- This being disabled could cause gapping issues when this profile is used for decorative parts with fewer walls (or extreme overhangs). It should not kick in for most Voron parts.
- extra_perimeters_overhangs enabled.
- 2022-05-25:
- perimeter_extrusion_width to
120%125%- For more strength.
- bridge_speed_internal to 100% (was 180mm/s)
- This will match your normal bridge speed. 180mm/s was causing the internal bridges to not always attach.
- curve_smoothing_angle_convex and curve_smoothing_angle_concaver to default.
- These were just a leftover from an old SS upgrade.
- perimeter_extrusion_width to
- 2022-04-27:
- thin_perimeters to 80% (default)
- thin_perimeters_all to 20% (default)
- Both of these settings are new defaults that got didn't come over properly with the update (came over as 100% / 0%)
- Fixed my maximum speeds in the machine limits. For some reason I thought they were in mm/min rather than mm/s... surprised nobody caught this before now.
- 2022-04-14:
- use_relative_e_distances back to enabled.
- Some people had
M83in their PRINT_START macros which didn't agree with this.
- Some people had
- use_relative_e_distances back to enabled.
- 2022-04-11:
- Profiles updated for new beta SuperSlicer version 2.4.58.2.
- Acceleration controls were moved to the print settings > speed tab and feature_gcode and post_process were cleared. Some accelerations were tweaked.
- Fine-grained acceleration controls are now natively supported. The old custom g-code method and python scripts are no longer needed! 🎉🎉🎉
- first_layer_size_compensation_layers to 3 (was 2)
- Greater fade distance for elephant's foot compensation, to help prevent some perimeter separation on chamfered parts.
- first_layer_height to 0.25 (was 0.24)
- Just reverting a previous change where I set it to 0.24 to fix a weird bug.
- max_print_speed to 300 (was default/80)
- This doesn't actually do anything since "auto speed" is no longer used (only volumetric speed limiting), but the default value of 80 was confusing people.
- thin_walls_speed to 80 (was 30)
- support_material_contact_distance_type to "from filament" (default) (was "from plane")
- Cleaning up. I had changed this at one point and don't really know what it does, so default is probably better.
- z_step to 0.04 (was default)
- This doesn't actually do much except affect the number of decimal places in Z moves. But some people were driving themselves nuts trying to find the "correct" value to put here, so... here.
- duplicate_distance to 6 (default)
- Just affects default part spacing when you auto-arrange your plate.
- support_material_angle to 45 (only on 45 degree profile)
- support_material_interface_speed to 100 (was 150)
- These fast speeds could occasionally knock over supports.
use_relative_e_distances to disabled.Absolute mode is theoretically more accurate, but it's probably negligible.
- time_estimation_compensation to 100% (default) (was 133%)
- This was a bodge compensating for the old custom accel controls messing with time estimates, and is no longer needed.
- retract_lift_above[0] to 0.25mm (was 0.2mm).
- Set to match first layer height.
- 2022-02-19:
Set accel_to_decel values to half of accel values in feature_gcode.Previously accel and accel_to_decel were the same value.(Sorry, changed this multiple times now, keep flip-flopping on it)
- Disable external_perimeter_cut_corners
- This could contribute VERY minorly to gapping between perimeters on corners. You would probably never notice without a magnifying glass.
- 2022-02-10:
- Change infill_speed to 300
and set max_print_speed back to default.- infill_speed was previously 0.
- This was not always reaching maximum volumetric speed, due to a misunderstanding on my part of how auto-speed works.
- Setting it to a maximum speed value (instead of 0) better accomplishes my intended goal (maxing out the hotend's capability for infill).
- See the Volumetric Speed / Auto Speed section for an updated (corrected) explanation.
max_print_speed was previously 300.This setting does not universally limit in the same way that the volumetric speed limit does (for some reason), so it's redundant and confusing to leave it on.
- infill_speed was previously 0.
- Change support_material_speed to 150.
- Was previously 240. This could cause supports to not adhere properly or get knocked over (though supports are disabled by default in this profile).
- Change infill_speed to 300
2022-01-02:Change first_layer_height to 0.24.SuperSlicer currently has a weird bug causing slicing to give up part way through. Setting first layer height to something that's not 0.25 fixes it for me. ¯\_(ツ)_/¯
- 2021-12-29:
- Change resolution to 0.0125 (new SS default) and update formatting of feature_gcode
- Some have reported "move out of range" errors with the old resolution setting of 0.002, likely a bug in SS.
- The feature_gcode change is purely stylistic.
- Change resolution to 0.0125 (new SS default) and update formatting of feature_gcode
- 2021-12-01:
- Enable ensure_vertical_shell_thickess and revert solid_over_perimeters to default (2)
- This can prevent occasional perimeter gapping on steep angles.
- Enable ensure_vertical_shell_thickess and revert solid_over_perimeters to default (2)
- 2021-11-19:
- Set new bridge_overlap_min setting to 50%
- Fixes 50% bridge density in new SuperSlicer version (2.3.57.6).
- Set new bridge_overlap_min setting to 50%
- 2021-11-11:
- Change fill_pattern to grid.
- Previously adaptive cubic. Caused occasional pillowing.
- Change max_layer_height[0] to 75%.
- Previously 0.3mm. Support for nozzle size based percentages was added.
- Reduce seam_gap to 0.
- Previously 15% internally. A new SS update now allows control over it. This should prevent seam gaps that occasionally cropped up previously.
- Change fill_pattern to grid.
- 2021-11-07:
- Fix various support material settings.
- Supports are disabled in this profile, but the disabled settings had some unnecessary leftovers.
Added quotes around post_process paths.This fixes an issue where it would error if trying to use a path with a space.
- Fix various support material settings.
- 2021-10-31:
- Reduce retract_length[0] to 0.5mm
- Previously set to 1mm, which was a bit too aggressive to start with.
- Change overhangs_width_speed to 0.
- This completely disables applying bridge settings to overhangs.
- This setting was causing issues for some people, essentially setting overhangs to use 85% flow and high speeds.
- Reduce retract_length[0] to 0.5mm
- 2021-10-24:
- Disable only_one_perimeter_first_layer.
- This was causing SS to crash when slicing first layer test patches.
- I also just changed my mind about the aesthetics.
Change time_estimation_compensation to 133%.Previously set to 87%.This should make the time estimates a bit closer to reality, at least with Voron parts. As mentioned above, they will still only be so accurate with the custom acceleration controls, however.
- Disable only_one_perimeter_first_layer.