
The master branch of this project is deployed at https://proto-lilac.vercel.app.
Go there to see the latest version of this app without needing to compile it yourself.
- Node >= v14+
- Clone this project and install all dependencies.
- Go to firebase.google.com and create an account and enable authentication and firestore.
- Enable Google or GitHub or both auth with proper client id and secret in sign-in methods.
- Add
localhostas authorized domain below sign-in providers. - Go to project
root folder > auth > firebaseClient.jsand replaceFIREBASE_CONFIGwith your client API keys. - Create a
env.localfile in root directory and fill these keys with your firebase-sdk keys.
- PROJECT_ID
- PRIVATE_KEY_ID
- PRIVATE_KEY
- CLIENT_EMAIL
- CLIENT_ID
- AUTH_URI
- TOKEN_URL
- AUTH_PROVIDER
- CLIENT_CERT_URL
- Run
npm run devand openhttp://localhost:3000/.
For several years, I’ve been on the hunt to find the perfect tool to manage my projects. I’ve used Trello to track my tasks, notion for writing notes, and Milanote for organizing my ideas. These wonderful tools get the job done for the most part and keep you productive.
When working on a personal project, I’ll create notes and store references in notion, then I’ll use Trello to track my tasks. I’ve been using this workflow since the launch of notion back in 2018. But the approach of moving from tool-to-tool adds an extra layer of unnecessary work. I wanted a single tool to handle these needs. You could implement Trello's kanban board, but I still don’t prefer Notion to track my tasks.
Recently I fell in love with Milanote. It’s a pretty neat tool that lets you jot down ideas and transpile them into boards and nodes of images, to-dos, columns, and a lot more. But it’s not all paradise here, Milanote doesn’t provide a generous quota for images, links, and files that are uploaded on their free tier. If you want to use it for multiple projects and needs you’ll have to buy a paid subscription. If you are someone like me who likes to build a lot of projects, you will love Milanote and I recommend you give it a spin. There’s also tools that are solemnly built to manage projects, like — Plutio, ClickUp, etc. These tools work wonders if you are working on a professional project with a team. But for a small personal project, they are overkill.
The idea to manage personal projects with pieces that are genuinely needed gave birth to Proto. I created Proto to manage my small personal projects. You can take a look here or click here for the GitHub repo.
The plan for Proto is quite simple. Create a tool that lets you track your project in harmony and don’t add an extra layer between your idea and execution. For managing a personal project you basically requires three things — idea, stories and references. With Proto, I try to include these three elements. Proto has shortcuts (links that are necessary for the project like — firebase console, azure, netlify, etc), which I may need frequently. A scrum board where I could track my tasks and a list of websites for reference.
Up until now, I’ve mostly used Vue.Js to create my front-end projects. But for Proto, I wanted to shake things up. Recently I was exploring NextJs & Gatsby and found them very appealing. So I went through their documentation to get a basic idea of how they work. Finally, I decided to use NextJs for Proto. Besides NextJs, I’m using firebase authentication for user authentication, firebase firestore to store user’s data, SASS for styling, js-cookie & nookies to handle cookies, and, finally, react-spring to sprinkle style in proto.
There are only three pages in Proto. First is a landing page, which is a bare minimum page and let user login/signup using their Google or GitHub account. I haven’t put much time into styling the landing page yet. It’s down on the road. The next main two pages are the Home and Project page.
This is the page user is displayed after the user has logged-in.
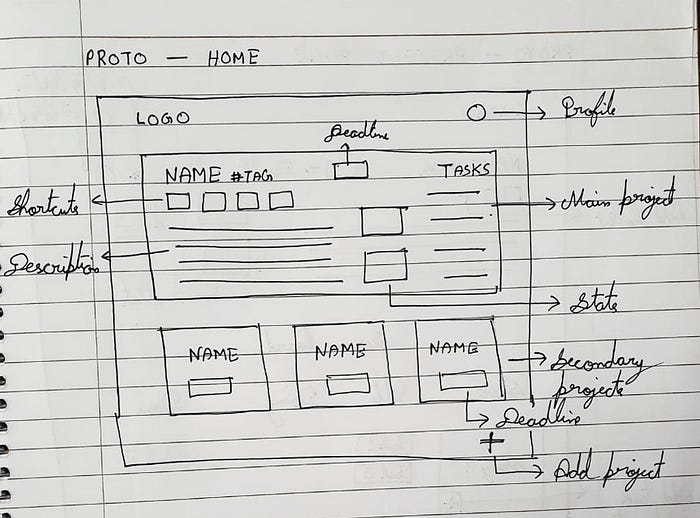
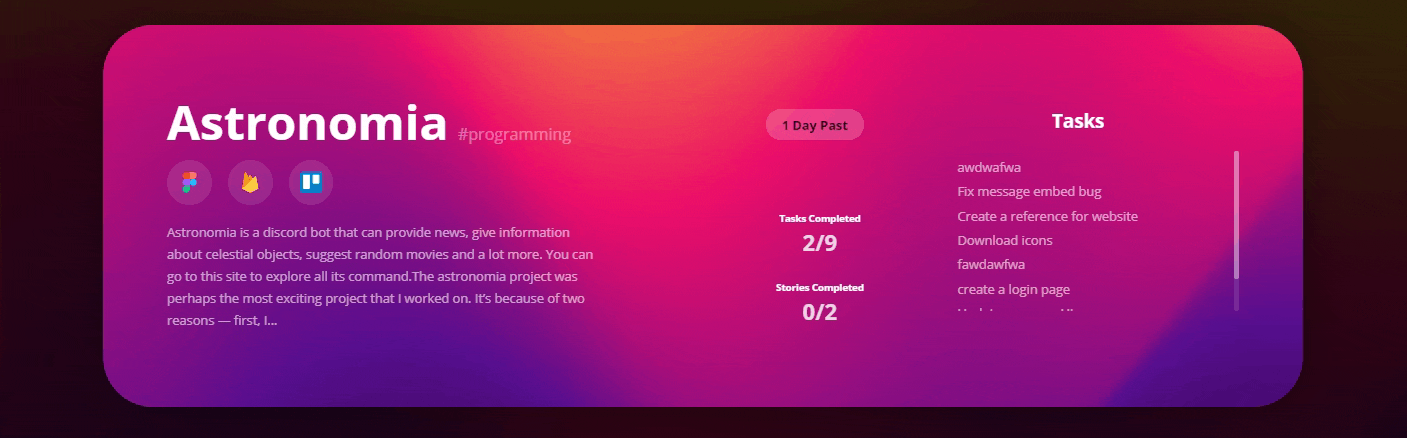
Let’s go from top to bottom here. On the topmost side, there’s our navbar. It has a logo and on the right user’s profile. Below the navbar, there’s a module that displays the details of the main project. The idea was to have the main module that will display the details of the project, the user is currently working on. Based on visual hierarchy this module will be the dominant one, then there are small modules that contains inactive projects or future projects.
The main module which displays active project have tasks ordered based on the type showing on the right, some stats in the middle and on left there are shortcuts and description below project’s name. I considered these as essential information which the user may need.
Below the main module, multiple mini-modules contain information about the projects which the user is not currently working on. Inside these modules, I’m showing only the project’s name and deadline.
Based on this skeleton I created my Figma design.
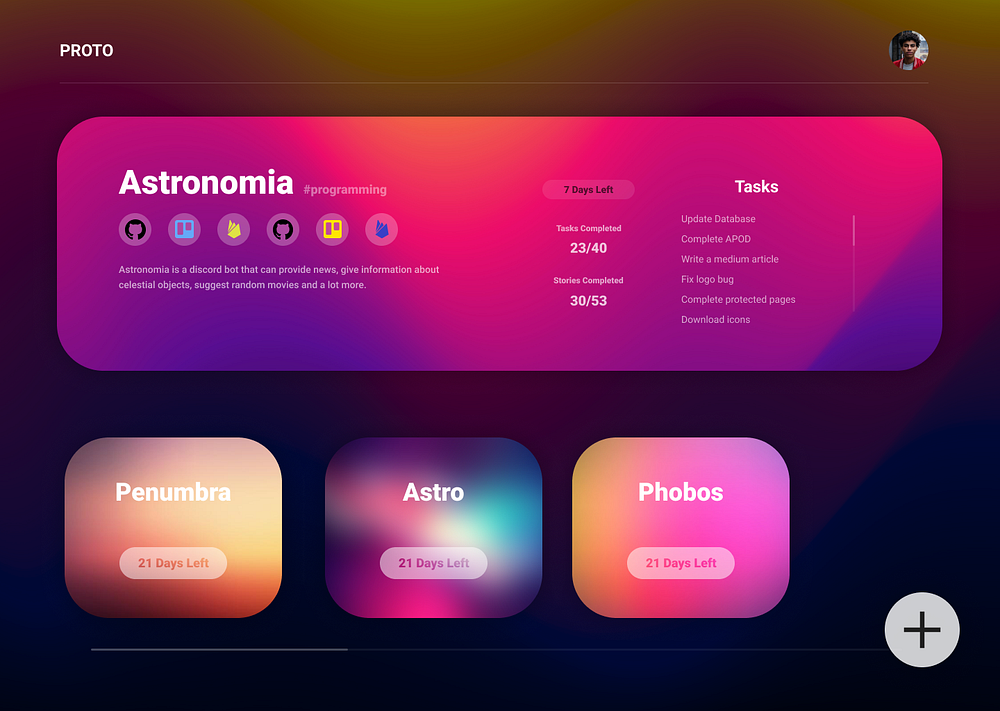
Whenever a user clicks on any project, he/she will be redirected to the project page.
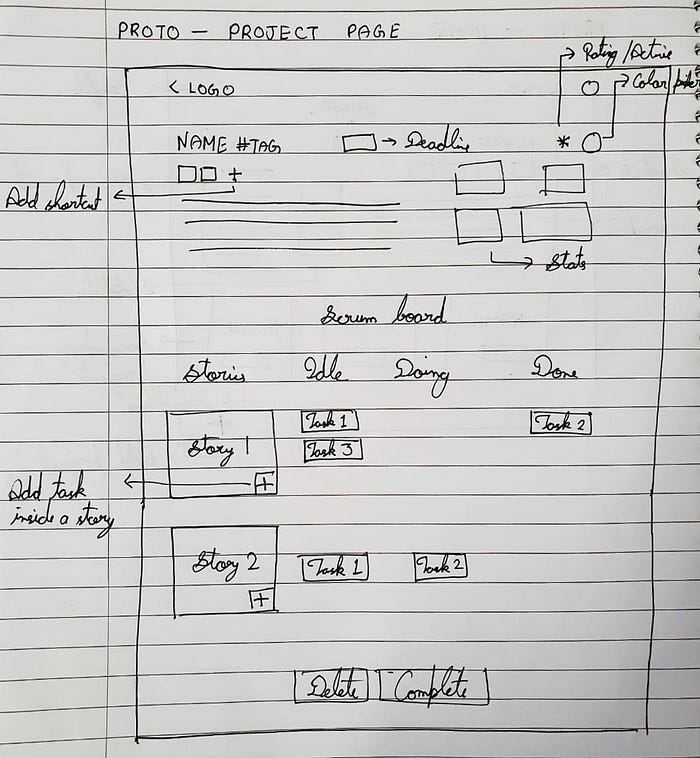
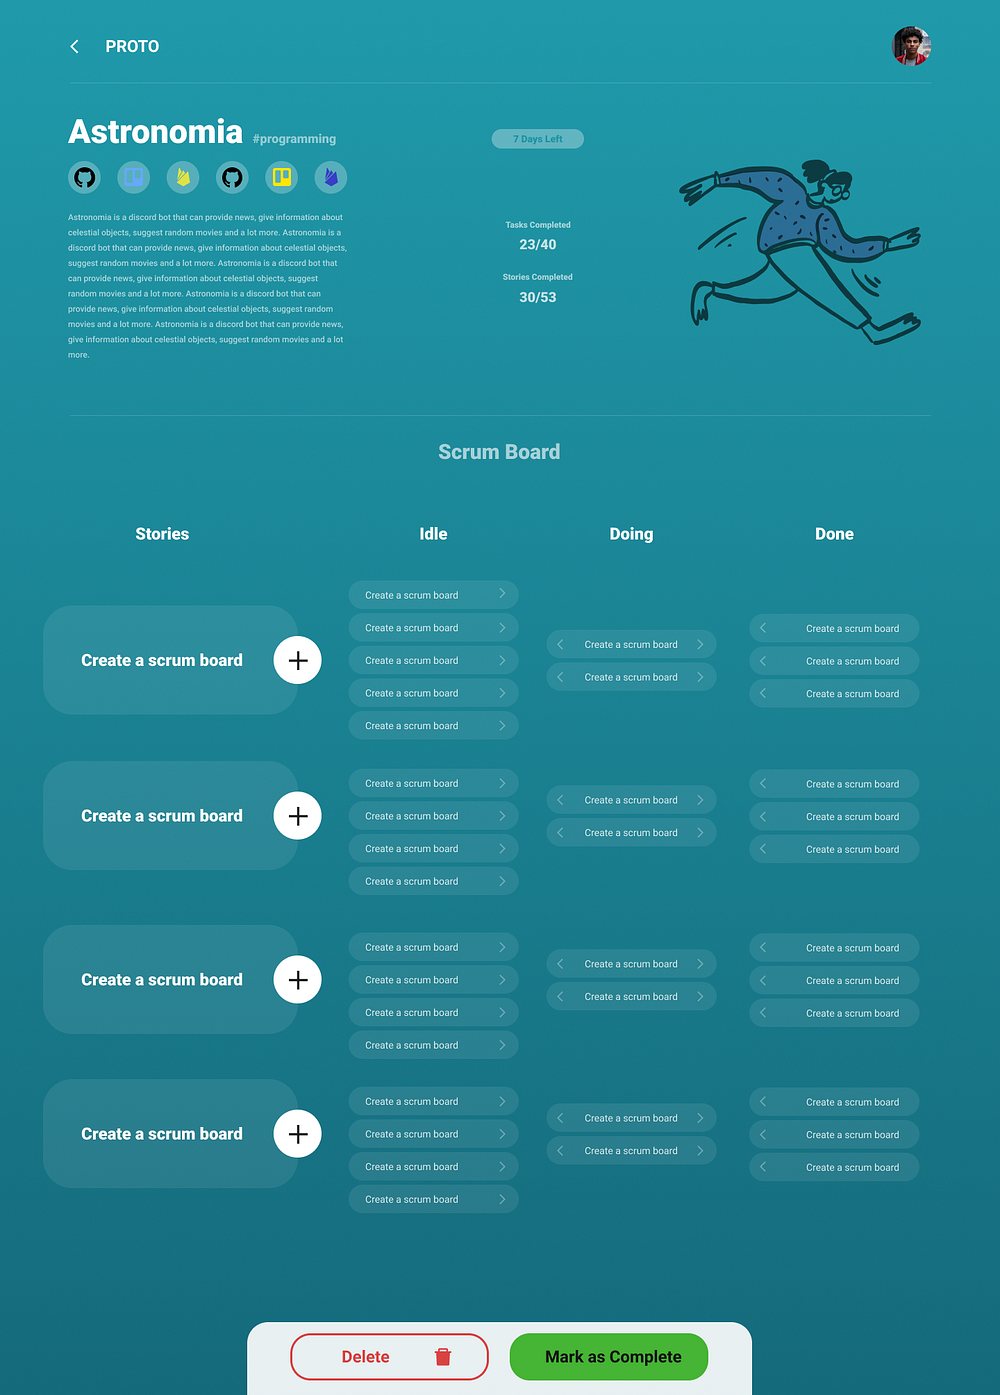
The project page is the bread and butter of Proto. Navbar stays the same with one exception of a back button on the left side. Below the navbar, the main module remains the same as the main module from the home page. I’ve added a button that lets the user mark this project as an active project, and a circle through which the user can change the theme.
Then there’s a scrum board. The main idea of the scrum board is to convert the whole project into stories. An example of the story can be ‘User can add projects’. Now this story will have multiple tasks which can be tracked.
So inside the scrum board, there are four columns — stories, idle, doing and done. The last three will be used to track the task’s progress. User can click on a story to create a task inside that story. The task can be then moved between different status.
I was thinking of adding a section on this page that will deal with the references. So the user can add websites for reference here. I wasn’t able to implement it yet but I’ll be adding it soon.
In the end, two buttons will mark the project as completed or delete the project.
For authentication, I’m using firebase auth. Firebase auth is quite easy to setup. But setting up authentication for NextJs is a little different because of how NextJs works. NextJs is built with Node.Js, which allows it to perform server-side rendering or static site generation. So it’s a server as well as a client. This idea was a little difficult for me to wrap my head around.
Anyways, it means that you need to initialize firebase-SDK as well as firebase client. Let’s look at the three files that deal with authentication.
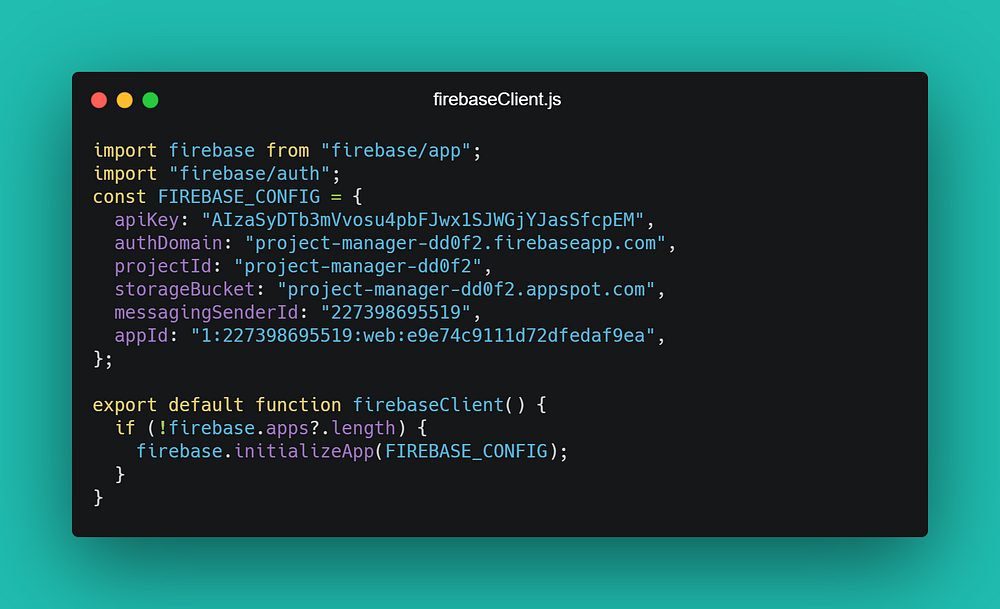
This file is where I’m initializing the firebase client. We need a config object which can be extracted from the firebase console. In this file, we are exporting a function which first checks whether there’s an existing app in the firebase, if yes then it does nothing, otherwise it uses the initializeApp function to initialize the firebase client. Here we are not required to hide the config for the client-side. The FIREBASE_CONFIG object’s visibility to the user doesn’t change anything.
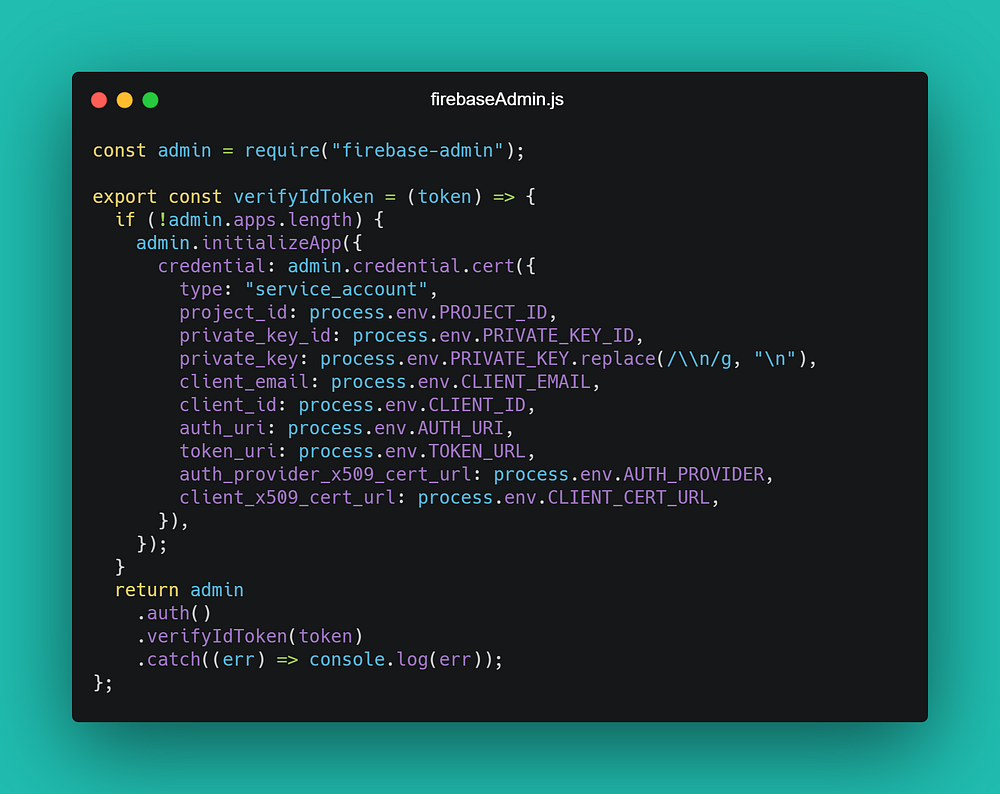
In this file, I’m exporting the verifyIdToken function. This function takes a token as an argument, then it initializes the firebase-SDK so that we can use server-side functions. In the end, it performs verification of the Token to validate the user.
We will be executing the verifyIdToken function on the server-side before sending the pages to the user.
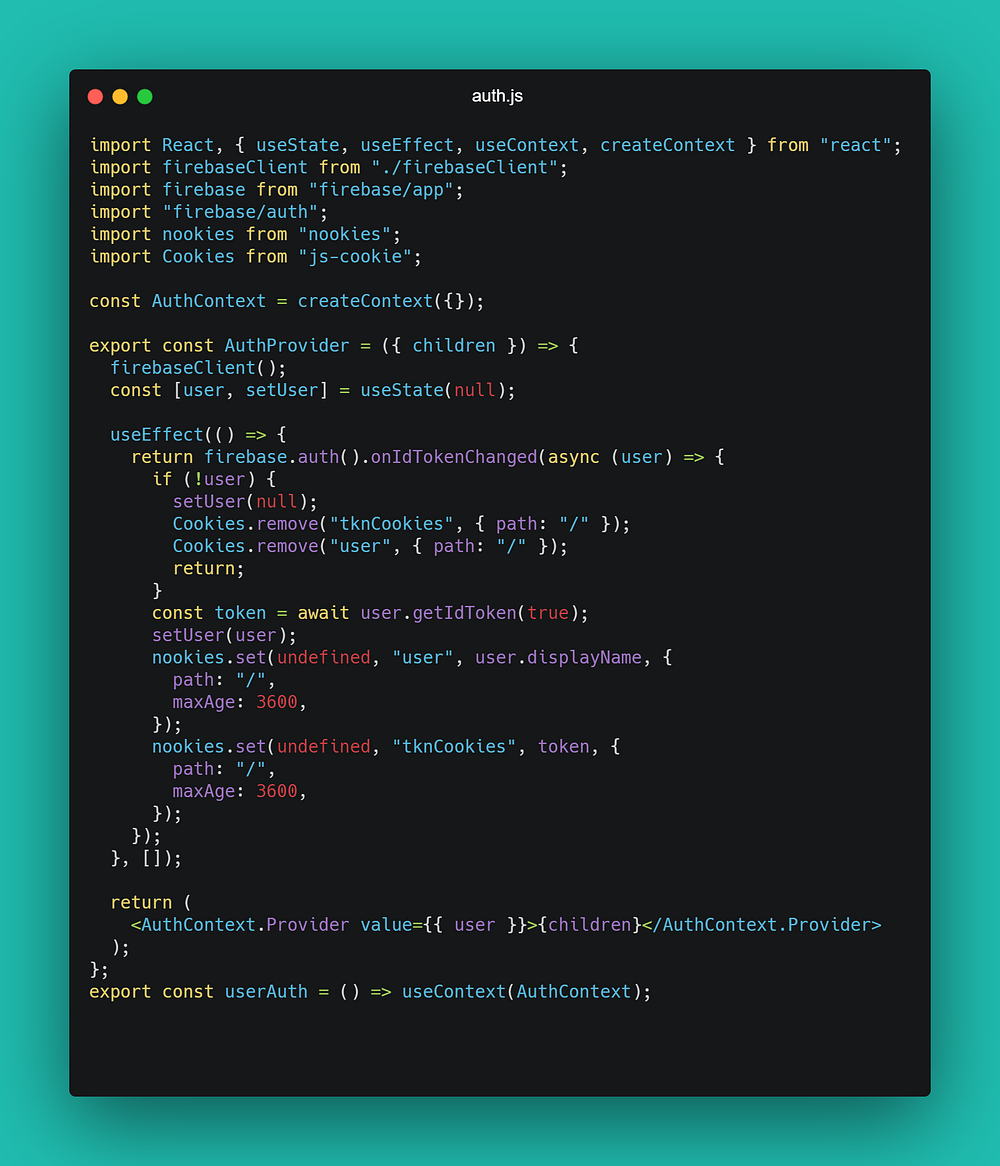
In auth.js, inside the useEffect hook which will execute its callback function on being mounted. I’m executing the onIdTokenChanged function that is executed every time the token changes. So every time user log-ins or signs-out. The onIdTokenChanged function pass argument in its callback function the user’s information. So if a user is logged in, it will contain information regarding the user and if the user hasn’t logged in, it will be null.
So if there’s no user, it will delete the cookie which stores token and user’s information and also changes the state of user to null. But if there’s a user, it will set the state of user variable with the user’s information and also set cookies regarding the same.
This function exports two things — one is a context provider with the value user, and the other is the userAuth hook which consumes that context.
I’m letting user login/signup using their Google and GitHub account.
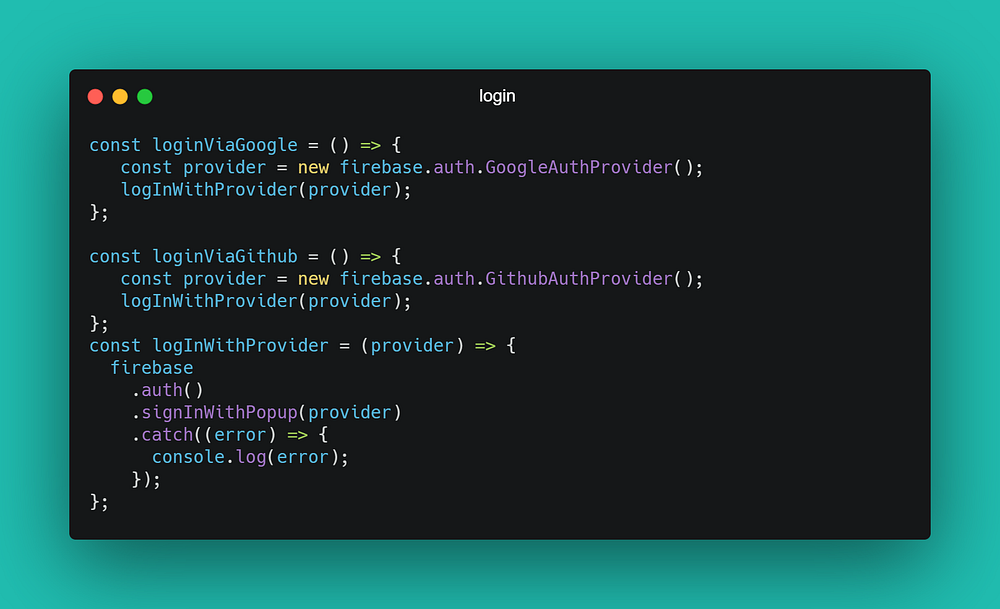
To achieve that I’m creating providers using firebase auth functions. Then I’m passing that provider as an argument in the signInWithPopup function.
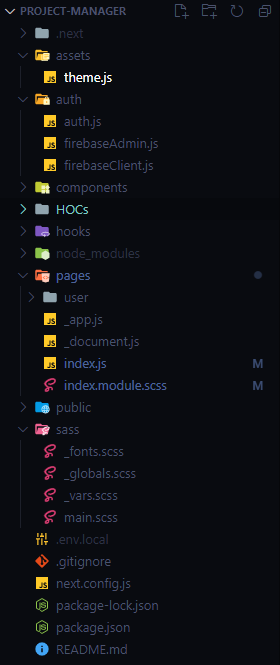
I tried to follow the DRY principle while organizing the proto structure. assets folder contains the theme.js file which exports the theme details. auth folder has three files — auth.js, firebaseAdmin.js and firebaseClient.js, which are required for authentication. Then there is a components folder that contains every component used in proto. The HOCs and hooks are used to differentiate logic from the components. The pages folder is responsible for routing and determining which page to display. The sass folder contains global styling for the project.
Let’s look at the home page. The home page is protected, so the only user who has signed in can access it.
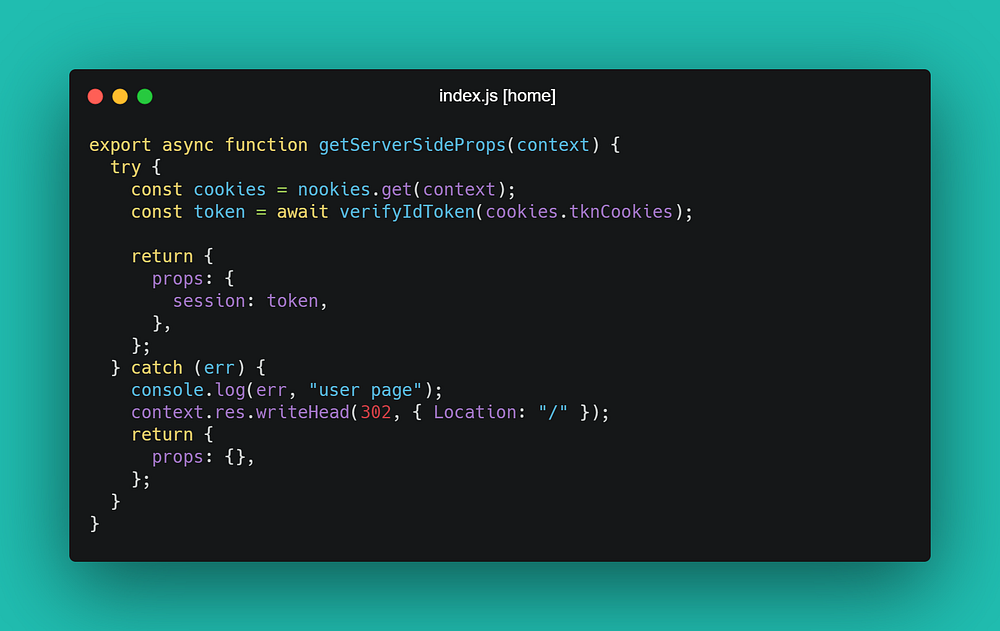
Next.js provides a getServerSideProps function. It will pre-render this page on each request using the data returned by getServerSideProps. So inside this function, we can check whether the user has access to this page or not. Here I’m accessing the cookie that I stored when the user first logs in. Then I’m using the verifyIdToken function exported from firebaseAdmin.js to check the validity of the token. If it is legit, it will forward the user’s information as a prop to our client. But if there’s an error it will redirect it to the landing page (‘/’).
On the client-side, I’m fetching user’s projects from firestore and displaying them to the user.

For basic styling, I’m using SASS. SASS is a CSS preprocessor, meaning it has everything CSS has and more.
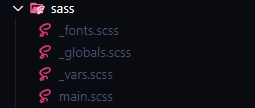
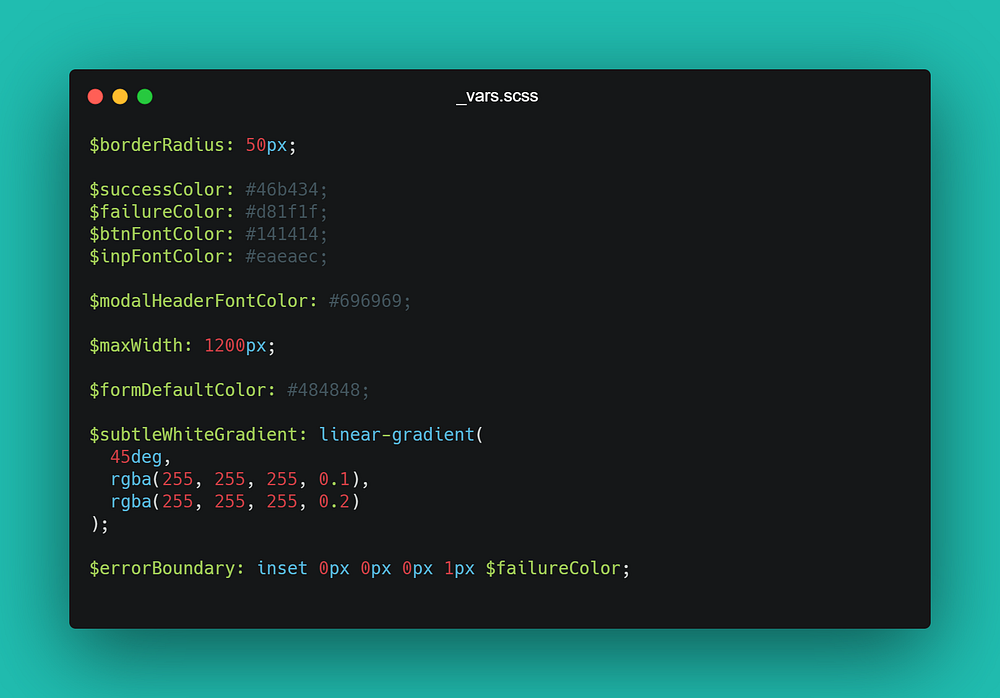
Currently, I’ve four sass files. The first one deals with fonts — like changing font-size, font-family etc. The _globals.scss deals with things that are needed globally — like changing default input, textarea styling etc. The _vars.scss have variables, that may be needed in multiple places.
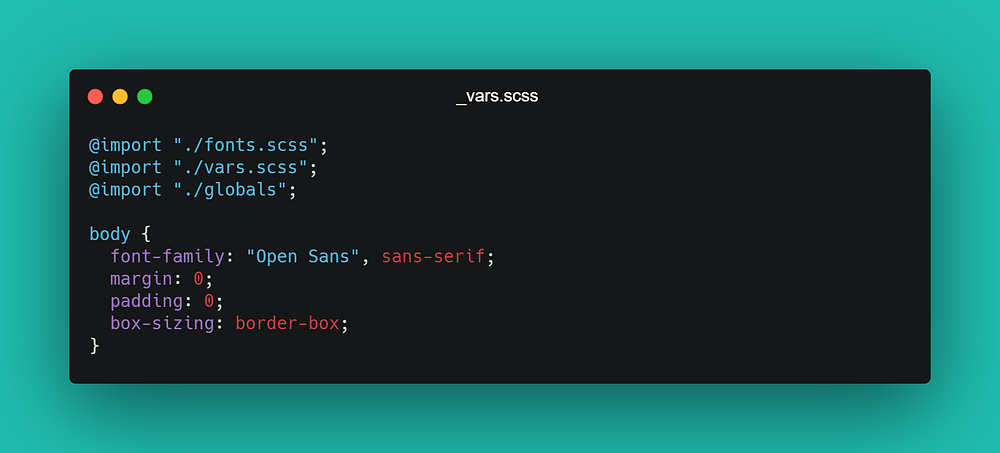
Finally the main.scss file which includes every other scss files.
For individual components, I’m using scss modules, which comes out of the box for us to use. Let’s look at one of our components.
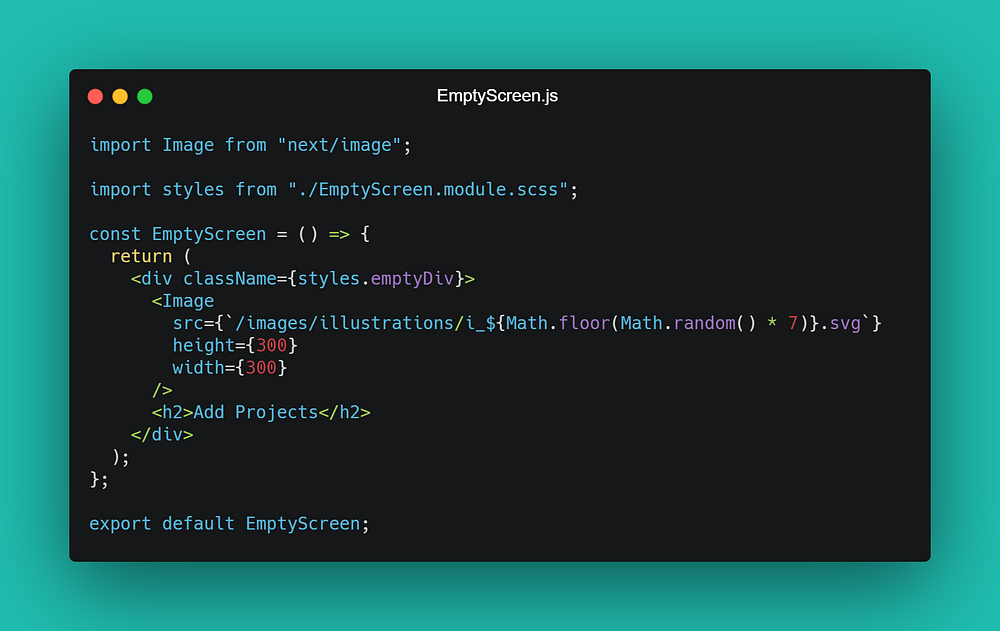
Here, I’m importing styles from the EmptyScreen scss module. Then applying it as a className using syntax {styles.<class name>} . This will create a random name for the class which makes it accessible only to the component it is imported in.

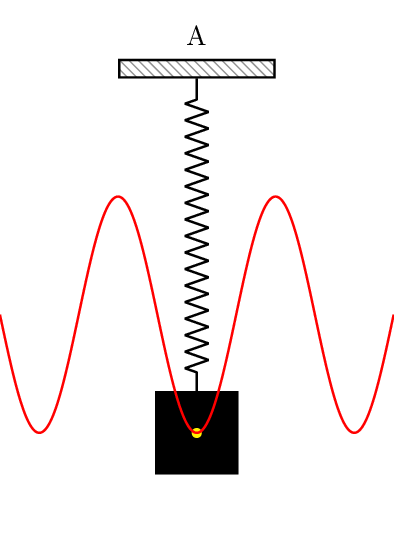
Let’s make proto good to look at. For adding transitions and animations, I’m using React-spring. It's an animation library that operates a little different from typical animation libraries. Most of the animation libraries transitions from point A to B with some curves on a fixed duration. Changing the curve determines the flow of the animation. But you don’t have to worry about duration or curve in react-spring. You only need to modify the values, it will calculate the duration and curve based on real physics.
You can also change the feel by changing the config, and modify mass, tension, friction and so on. For more information go through their documentation.
Let’s take a look at the SecondaryCard component to figure out how react-spring works.
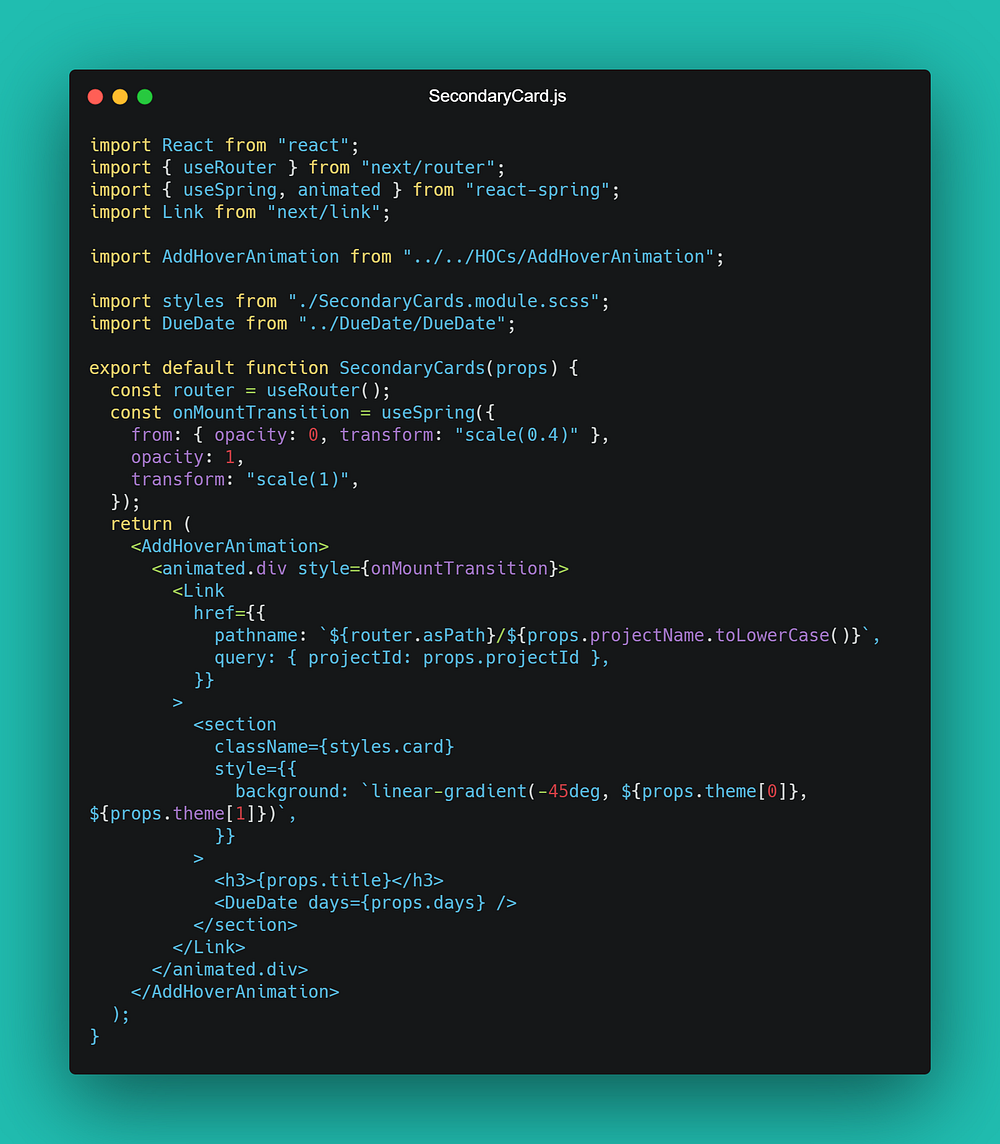
We are importing useSpring and animated from react-spring. After that, we are creating a constant onMountTransition which is using the useSpring function. Inside the useSpring function, we are passing an object to determine which properties to transition. Inside that object, we define the initial values of properties by adding a key with an object containing the initial values. Outside that object, we can determine the end values.
Then we need to convert the HTML element we want to animate to a special react-spring element using the animated prefix. So in the above code, I’m converting <div> with <animated.div> and then passing the onMountTransition constant in the style attribute.

We can encapsulate the whole animation in a HOC and add that animation to its children. So we don't have to create the same animation over and over again.
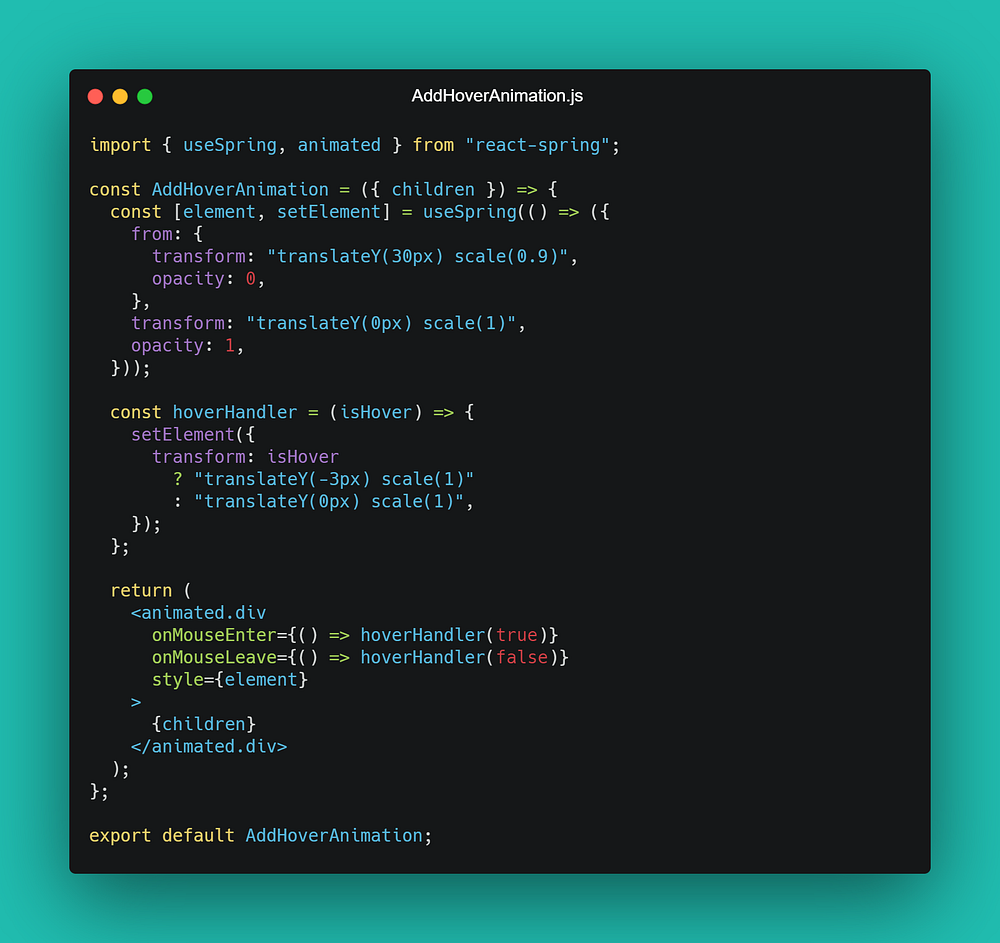
In this HOC we are encapsulating the children component with another div. This div is the special spring div because we have added the animated prefix.
Unlike last time we are destructuring the useSpring function with two values — element is the animation itself, and setElement function to modify the element’s animation, just like useState hook. Inside the useSpring function, I’m passing the object like last time to set initial and end values of animated properties. But this time we are adding onMouseEnter and onMouseLeave events on the animated div with a function hoverHandler. This function is changing the values of the element with setElement function.

So every time user hovers the card, the element’s Y position will be changed to -3px, thus making it move upward.
I deployed proto on vercel. The whole process of deployment was pretty straightforward. Go to vercel.com > login > create a new project > link GitHub > attach the repo > finally add the environment variables in the settings.
Vercel also provides multiple URLs, one would be your main URL and others could be used for testing the new commits before permitting them to the main URL.

Proto was my attempt to create the perfect project manager. It’s a little ambitious project and far from being a finished product that could be used by consumers. I only implemented 20% of what I initially envisioned. But this 20% made me learn a lot of things which I never knew. This project made me step out of my comfort zone and try things that I normally try to stay away from.
I mostly used Vue.js before so I’m still pretty new to React scene. But I’m finding new things each day about react. This project helped me a lot to transition myself from my vue mindset to react.
This project is also not a one-time effort, I’ll be coming back to it to improve this project, add new features and implement new techniques that I’ll learn on the way.