- Practice moving elements on the page
- Demonstrate how to move an element in response to a browser event
- Demonstrate how to update an element's position on the page conditionally
Think back to the first video game you played.
Think about the mechanics of that game. When you tilted a joystick or pressed a button it responded to your whims. It pulled you into its story by giving you a window into its world and a way of interacting with — shaping, even — that world. When you performed an event, the computer made the world respond: the little plumber from Brooklyn jumped (Super Mario Franchise), the undead warrior slashed at an evil foe (Dark Souls), or the banana-yellow guy ate the power pellet (Pac-Man).
Programming means that you can create such a world for other people. Sure, it'll be a while before you're ready to build something like one of the classic games above, but we can start with the essential steps. In this lab we'll learn how to move an element on a page in response to an event.
If you haven't already, fork and clone this lab into your local environment.
Navigate into its directory in the terminal, then run code . to open the files
in Visual Studio Code. Finally, run npm install to install the lab's
dependencies.
Go ahead and run the tests. You'll see that you need to create two functions to
get the tests passing: moveDodgerLeft() and moveDodgerRight(). We'll write
moveDodgerLeft() together, then you'll create moveDodgerRight() on your own.
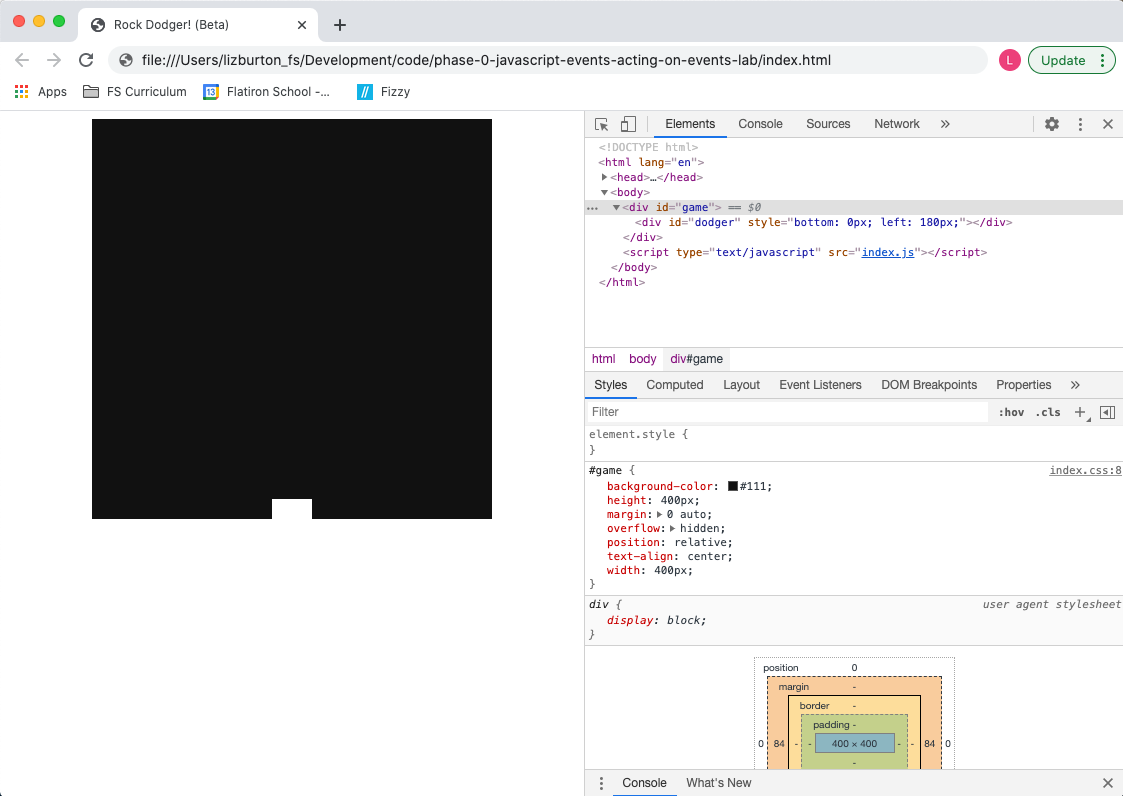
Open index.html in the browser. You'll see a black square which represents the
game field and a white rectangle at the bottom of that field which is our game
piece, the dodger. Now open DevTools and click on the Elements tab. You'll see
that the game field is a <div> with an id of "game." Expand that div and
you'll see that the game piece is a second, nested <div> with an id of
"dodger."
Click on the game div and take a look at its CSS in the styles tab. You'll see
that the game field has a height and width of 400px. Now click on the dodger and
note that it has a height of 20px and a width of 40px. Finally, take a look at
the inline style on the dodger <div>: the bottom and left properties
define the dodger's starting position relative to its parent element, the game
field. In other words, the lower left corner of the game field corresponds
toleft and bottom positions of 0px. The starting values of the dodger's
bottom and left properties are what places it at the bottom center of the
game field when our game launches.
Before we can use JavaScript to move the dodger, we first need to grab it and save a reference to it in a variable. Enter the following in the console:
const dodger = document.getElementById("dodger");Awesome. Now let's change its color:
dodger.style.backgroundColor = "#000000";Whoa, where'd it go? Well, we changed the color to #000000, another way of
expressing "black." So it just blends in with the background.
Let's change it to something more visible.
dodger.style.backgroundColor = "#FF69B4";Much better!
Accessing the style property of the dodger element allows us to change
things like the backgroundColor, height, width, etc. We can also use it to
change an element's position on the page.
Let's start by moving the element up:
dodger.style.bottom = "100px";Note: Even though we're talking about numeric coordinates, note that we need to move the dodger by assigning a new string value.
We can verify our dodger's current position by simply typing dodger.style.left
or dodger.style.bottom into the console.
Let's return it to where it started by resetting the bottom attribute:
dodger.style.bottom = "0px";Now let's visually verify that the dodger's position is determined relative to
the game field by changing its left attribute:
dodger.style.left = "0px";You should see the dodger nestled up against the bottom left corner of the game field.
Now that we know how to write the code to move the dodger, let's figure out how to tie that action to an event.
Let's say we want the user to be able to move the dodger to the left using the
left arrow key. We learned in an earlier lesson that, when a key is pressed, the
keydown event provides a code to indicate which key it was. So the first thing
we have to do is figure out what code is used to identify the left arrow key. We
could look it up, but we're programmers — let's explore!
So what do we mean when we say that an event provides a code? Any time an event listener is in place and the event it's listening for is triggered, a JavaScript object containing a bunch of information about the event is automatically passed as an argument to the callback function. We can access that object and the information it contains by defining a parameter for the callback. It looks like this:
document.addEventListener("keydown", function(event) {
  console.log(event);
});
By defining the event parameter in the parentheses, we've given the body of
the callback access to that event object, which is what allows us to log it to
the console. Note that, as with any JavaScript parameter (and, in fact, any
JavaScript variable), we can give it any valid JavaScript variable name we like.
By convention, and in keeping with programming best practice of using meaningful
variable names, the name JavaScript programmers use for this parameter is
usually either event or e. You will see these in a lot of JavaScript code,
and we recommend you use them as well.
This pattern, when you first encounter it, is tricky to wrap your head around. Don't worry if it doesn't make total sense yet — it will become clearer as you continue through the curriculum. You might also want to read the excellent accepted answer in this Stack Overflow thread.
Let's take a look at what that event object looks like. Enter the code above
into the console then click in the browser window (where the game field and
dodger are rendered). Now, if you press the left arrow key, you should see a
KeyboardEvent logged in the console. Expand the event and you'll see its
properties listed; the one we're interested in is the key property. Try
pressing some other keys as well and check out their key properties.
Top Tip: You can explore other event types as well: just change the name of the event in the code above.
Now that we know the code the event uses to identify the left arrow key, we can write the JavaScript code to move the dodger left when the key is pressed:
document.addEventListener("keydown", function(event) {
  if (event.key === "ArrowLeft") {
    const leftNumbers = dodger.style.left.replace("px", "");
    const left = parseInt(leftNumbers, 10);

    dodger.style.left = `${left - 1}px`;
  }
});
So what are we doing here? Well, when our event listener detects a keydown
event, we first check to see whether the key property of the event object has
the value "ArrowLeft." If it does, we get the current value of the dodger's
style.left property and use the String replace() method to strip
out the "px", then store the result in leftNumbers. Next, we parse
leftNumbers as an integer and store that result in left. Finally, we update
the dodger's style.left property using string interpolation, injecting the
current value minus 1. If the key that's pressed is not the left arrow key, we
do zilch. Try it out in the browser yourself!! (Be sure to refresh the page
first.)
We do still have a problem, though. Even though we're only going one pixel at a time, eventually our dodger will zoom (well, relatively speaking) right out of view.
How can we prevent this? We need to check where the left edge of the dodger is and only move it if it hasn't yet reached the left edge of the game field.
Our callback function is starting to get pretty complex. This is probably a good
time to break the dodger's movement out into a separate function. We want to
move the dodger left if our if statement returns true, so let's pull out the body
of that if statement into a function called moveDodgerLeft().
Refresh the page so we're starting with a blank slate, then grab the dodger again:
const dodger = document.getElementById("dodger");Now we'll build our moveDodgerLeft() function, adding a check on the current
position of the dodger:
function moveDodgerLeft() {
  const leftNumbers = dodger.style.left.replace("px", "");
  const left = parseInt(leftNumbers, 10);

  if (left > 0) {
    dodger.style.left = `${left - 1}px`;
  }
}
We're doing essentially the same thing, but we first ensure that the dodger's left edge has not reached the left edge of its container.
Now let's wire this up to our event listener:
document.addEventListener("keydown", function(e) {
  if (e.key === "ArrowLeft") {
    moveDodgerLeft();
  }
});
Now try moving the dodger past the left edge. No can do!
Copy the final code into index.js and run the tests. You should now have the
first one passing.
Now it's your turn. With the code implemented from the code-along, think about
what needs to change to make a moveDodgerRight() function. You'll need to add
another condition to your event listener's callback function to call
moveDodgerRight(). Then, inside the function, instead of moving the dodger
${left - 1}px, you'll be moving it ${left + 1}px.
Note: It may seem logical that you would use the dodger's style.right
property to move the dodger right, but that won't work. The reason is that
changing the style.right property doesn't change the style.left property,
which means we'd have conflicting information about where the dodger should be
on the screen. JavaScript solves this problem by giving precedence to
style.left. In other words, once the user presses the left arrow key for the
first time and the value of style.left is changed, any subsequent changes to
style.right will be ignored.
Finally, implement the code needed to prevent the dodger from escaping off the right-hand side. How can we check whether the right edge of the dodger has reached the right edge of the game field? (Keep in mind that the dodger is 40px wide.)
Once you've completed the work to get the tests to pass, the last step is to "try out" your application. Make sure it works the way you expect in the browser. In professional applications, tests can't cover 100% of the use of the application. It's important to realize that "passing all the tests" is not the same as "building a working application."
Be sure to do a human-level manual "play through" with your dodger to make sure your working code really works!
Currently, the work you've done on this assignmnent is only on your local machine. To preserve your solution on your GitHub fork, you will need to stage the changes you've made, commit them, and push the commit up to GitHub. Use the following commands to do this:
git add .
git commit -m "Completed assignment"
git push
If you visit your fork on GitHub, you should now see that you've made the most recent commit, and your code will be present in the files.
Events and event handling are vital to web programming. JavaScript allows for dynamic page rendering, so users can interact with the contents of the page in real time. Knowledge of the basic techniques we've learned so far sets you on the road toward being able to create complex interactions like those in video games you may have played before!


