Automated deployment of the infrastructure (Nested ESXi including VSAN storage, NSX-T & Pivotal Ops Manager) required for configuring Pivotal Container Service (PKS) using PowerCLI. You just need a vCenter Server 6.5 or greater endpoint along with a single physical ESXi host to deploy the infrastructure to. For information, you can refer to this blog post here for more details.
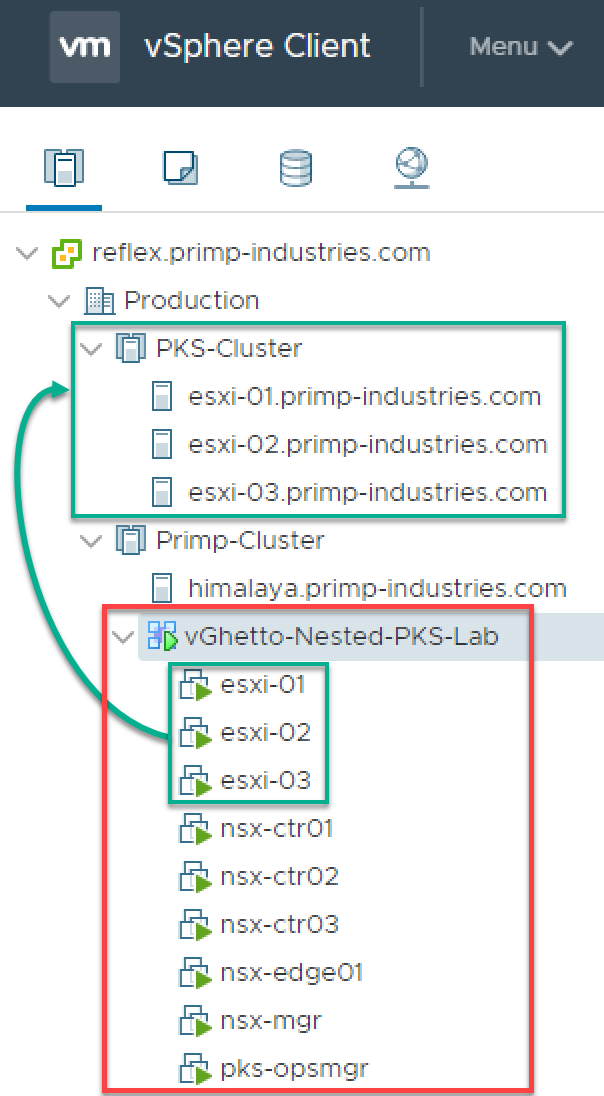
Below is an screenshot of an example deployment:
- 06/19/28
- Removed Windows-specific dependencies, can now run on MacOS & Linux using PowerShell Core
- Automate to deployment and configuration all PKS components (Ops Manager, BOSH Director & Harbor)
- vCenter Server endpoint running at least vSphere 6.5 or later
- Windows system that supports PowerCLI
- PowerCLI 10.1 or greater
- Download pks-vghetto-lab-deployment.ps1 script
- Nested ESXi 6.5d or 6.5 Update 1 Virtual Appliance OVA
- NSX-T 2.1
- Ops Manager CLI (OM)
- Windows - om-windows.exe
- MacOS - om-darn
- Linux - om-linux
- Pivotal Ops Manager 2.1.5 OVA
- Pivotal Container Service 1.0.4 Tile
- Harbor 1.4.2 Tile
- Stemcell 3468.42
This section describes the credentials to your vCenter Server in which the PKS lab environment will be deployed to:
$VIServer = "vcenter.primp-industries.com"
$VIUsername = "primp"
$VIPassword = "-->MySuperDuperSecurePassword<--"
This section describes the location of the OVA files that are required for deployment. If you are using MacOS or Linux, simply update the path to reflect those systems
$NestedESXiApplianceOVA = "C:\Users\primp\Desktop\Nested_ESXi6.5u1_Appliance_Template_v1.0.ova"
$NSXTManagerOVA = "C:\Users\primp\Desktop\nsx-unified-appliance-2.1.0.0.0.7395503.ova"
$NSXTControllerOVA = "C:\Users\primp\Desktop\nsx-controller-2.1.0.0.0.7395493.ova"
$NSXTEdgeOVA = "C:\Users\primp\Desktop\nsx-edge-2.1.0.0.0.7395502.ova"
$PKSOpsMgrOVA = "C:\Users\primp\Desktop\pcf-vsphere-2.1-build.318.ova"
This section describes the location fo the PKS specific binaries that must also be downloaded locally to your system. If you are using MacOS or Linux, simply update the path to reflect those systems. In addition, make sure that your OM CLI is for your specific platform or you will have issues :)
$OMCLI = "C:\Users\primp\Desktop\om-windows.exe"
$PKSTile = "C:\Users\primp\Desktop\pivotal-container-service-1.0.4-build.5.pivotal"
$HarborTile = "C:\Users\primp\Desktop\harbor-container-registry-1.4.2-build.14.pivotal"
$Stemcell = "C:\Users\primp\Desktop\bosh-stemcell-3468.42-vsphere-esxi-ubuntu-trusty-go_agent.tgz"
This section describes the Ops Manager deployment configuration
$OpsManagerDisplayName = "pks-opsmgr"
$OpsManagerHostname = "pks-opsmgr.primp-industries.com"
$OpsManagerIPAddress = "172.30.51.19"
$OpsManagerNetmask = "255.255.255.0"
$OpsManagerGateway = "172.30.51.1"
$OpsManagerAdminPassword = "VMware1!"
This section defines the number of Nested ESXi VMs to deploy along with their associated IP Address(s). The names are merely the display name of the VMs when deployed. At a minimum, you should deploy at least three hosts, but you can always add additional hosts and the script will automatically take care of provisioning them correctly.
$NestedESXiHostnameToIPs = @{
"esxi-01" = "172.30.51.10"
"esxi-02" = "172.30.51.11"
"esxi-03" = "172.30.51.12"
}
This section describes the resources allocated to each of the Nested ESXi VM(s). Depending on the deployment type, you may need to increase the resources. For Memory and Disk configuration, the unit is in GB.
$NestedESXivCPU = "2"
$NestedESXivMEM = "24" #GB
$NestedESXiCachingvDisk = "4" #GB
$NestedESXiCapacityvDisk = "60" #GB
This section describes the location as well as the generic networking settings applied to the Nested ESXi, NSX-T & Ops Manager VMs.
$VirtualSwitchType = "VDS" # VSS or VDS
$VMNetwork = "dv-vlan3251"
$VMDatastore = "himalaya-local-SATA-dc3500-3"
$VMNetmask = "255.255.255.0"
$VMGateway = "172.30.51.1"
$VMDNS = "172.30.0.100"
$VMNTP = "pool.ntp.org"
$VMPassword = "VMware1!"
$VMDomain = "primp-industries.com"
$VMSyslog = "172.30.51.170"
# Applicable to Nested ESXi only
$VMSSH = "true"
$VMVMFS = "false"
# Applicable to VC Deployment Target only
$RootDatacenterName = "Production"
$VMCluster = "Primp-Cluster"
This section describes the new vSphere Cluster which will be created for PKS Compute Cluster
$NewVCVSANClusterName = "PKS-Cluster"This section describes the Ops Manager application configuration
$OpsmanAdminUsername = "admin"
$OpsmanAdminPassword = "VMware1!"
$OpsmanDecryptionPassword = "VMware1!"
This section describes the BOSH Director application configuration You can refer to this blog post for more details on the individual settings
$BOSHvCenterUsername = "pks"
$BOSHvCenterPassword = "VMware1!"
$BOSHvCenterDatacenter = "Production"
$BOSHvCenterPersistentDatastores = "himalaya-local-SATA-re4gp4T:storage,vsanDatastore"
$BOSHvCenterEpemeralDatastores = "himalaya-local-SATA-re4gp4T:storage,vsanDatastore"
$BOSHvCenterVMFolder = "PKS-VMS"
$BOSHvCenterTemplateFolder = "PKS-TEMPLATES"
$BOSHvCenterDiskFolder = "PKS-DISKS"

# AZ Defintions
$BOSHManagementAZ = @{
    "AZ-Management" = "Primp-Cluster"
}
$BOSHComputeAZ = @{
    "AZ-Compute" = "PKS-Cluster"
}
# Network Definitions
$BOSHManagementNetwork = @{
    "pks-mgmt-network" = @{
        portgroupname = "dv-vlan3251" #represents the vSphere Portgroup or NSX-T Logical Switch Name
        cidr = "172.30.51.0/24"
        reserved_range = "172.30.51.1-172.30.51.30"
        dns = "172.30.0.100"
        gateway = "172.30.51.1"
        az = "AZ-Management"
    }
}
$BOSHServiceNetwork = @{
    "k8s-mgmt-cluster-network" = @{
        portgroupname = "K8S-Mgmt-Cluster-LS" #represents the vSphere Portgroup or NSX-T Logical Switch Name
        cidr = "10.10.0.0/24"
        reserved_range = "10.10.0.1"
        dns = "172.30.0.100"
        gateway = "10.10.0.1"
        az = "AZ-Compute"
    }
}
$BOSHManagementNetworkAssignment = "pks-mgmt-network"
$BOSHManagementAZAssignment = "AZ-Management"
This section describes the PKS Control Plane application configuration You can refer to this blog post for more details on the individual settings
$PKSDatacenter = $RootDatacenterName
$PKSDatastore = "vsanDatastore"
$PKSCluster = $NewVCVSANClusterName
$PKSvCenter = $VIServer
$PKSCPIMasterUsername = $BOSHvCenterUsername
$PKSCPIMasterPassword = $BOSHvCenterPassword
$PKSCPIWorkerUsername = $BOSHvCenterUsername
$PKSCPIWorkerPassword = $BOSHvCenterPassword
$PKSNSX = "nsx-mgr.primp-industries.com"
$PKSNSXUsername = "admin"
$PKSNSXPassword = "VMware1!"
$PKSManagementNetworkAssignment = $BOSHManagementNetworkAssignment
$PKSManagementAZAssignment = $BOSHManagementAZAssignment
$PKSServiceNetworkAssignment = "k8s-mgmt-cluster-network"
$PKSServiceAZAssignment = "AZ-Compute"
$PKSPlan1AZ = "AZ-Compute"
$PKSPlan2AZ = "AZ-Compute"
$PKSUAAURL = "uaa.primp-industries.com"

# The SSL Certificates are generated by the customer but you can use the following snippets to generate
# the certs using openssl. Be sure to specify wildcard for your domain, this is whats asked of in PKS UIs
# Copy the *.key and *.pem to the respective fields

# openssl req -subj '/C=US/ST=CA/L=Santa Barbara/O=Primp-Industries/OU=R&D/CN=*.primp-industries.com' -out pks.csr -newkey rsa:2048 -nodes -keyout pks.key
# openssl req -subj '/C=US/ST=CA/L=Santa Barbara/O=Primp-Industries/OU=R&D/CN=*.primp-industries.com' -x509 -sha256 -nodes -newkey rsa:2048 -keyout pks.key -out pks.pem
# openssl req -subj '/C=US/ST=CA/L=Santa Barbara/O=Primp-Industries/OU=R&D/CN=*.primp-industries.com' -x509 -sha256 -nodes -days 730 -newkey rsa:2048 -keyout pks.key -out pks.pem

$pksCertPEM = @'
-----BEGIN CERTIFICATE-----
MIIDyzCCArOgAwIBAgIJAOkdUNyqSIk+MA0GCSqGSIb3DQEBCwUAMHwxCzAJBgNV
BAYTAlVTMQswCQYDVQQIDAJDQTEWMBQGA1UEBwwNU2FudGEgQmFyYmFyYTEZMBcG
A1UECgwQUHJpbXAtSW5kdXN0cmllczEMMAoGA1UECwwDUiZEMR8wHQYDVQQDDBYq
LnByaW1wLWluZHVzdHJpZXMuY29tMB4XDTE4MDYxNzAyMjM0M1oXDTIwMDYxNjAy
MjM0M1owfDELMAkGA1UEBhMCVVMxCzAJBgNVBAgMAkNBMRYwFAYDVQQHDA1TYW50
YSBCYXJiYXJhMRkwFwYDVQQKDBBQcmltcC1JbmR1c3RyaWVzMQwwCgYDVQQLDANS
JkQxHzAdBgNVBAMMFioucHJpbXAtaW5kdXN0cmllcy5jb20wggEiMA0GCSqGSIb3
DQEBAQUAA4IBDwAwggEKAoIBAQDFHe3d1DfNmkAmLLmWnCXwjHa58FiPwHt30bje
KsJ1Bbn4qx51Y8Rjp7jQ9zipFF8EaWfK0weym1PHyr2Pxq0EshYvWKl+in5rKshY
qtLvsu3wZe5QpFQrbNgqsjpZ6/Vo1mjSgxYtZs1NyPNIv/ertM9iaTyileenUtnk
XgUzRgUXYgzRzNsCd9zaKc6I11N2g8/EKa0WXN1x+908BLAvyAlDX5Hqa66tDjZE
pIkRwRvmPWnoGj/wssfbw4wosfHaaCKvtv0AiAruheFy8Tmah19Zy6Jfuhc1sjzl
YO3GXFHpePls5U+oYjurL/2VAdY7Y4ZR9dDnpIs7vQm1HqdjAgMBAAGjUDBOMB0G
A1UdDgQWBBQXb8OC3C0S7ScHz76AtJQlv13HmjAfBgNVHSMEGDAWgBQXb8OC3C0S
7ScHz76AtJQlv13HmjAMBgNVHRMEBTADAQH/MA0GCSqGSIb3DQEBCwUAA4IBAQCy
eiypyNOeW6l1wEiIyXZJT8TqZKqLzPlIUWWci/mcJwzmvi3S1pXxI0Ke2o98sikX
hb3JEfLfUogXTLcRo2taUv2iDtvrRGhoJte8a2S51VxuPRFuhDWmaYUTwNHDf8uP
3S8WlkD8Foc2K6kK1UnfHN2CI43KC2Boce3jtyOz5Y4zABVMHoP0l4LxBUFnbhWu
iV/ib/mMEoU4X3pX+JAjkVFSC2v0s9qhf4ws1shXgibx487hgZn8PqoQwXkPsaF/
n5U2jUtSM6d3Hxd2Jo1U+C6qfUSWBboI44w8rnyzI4u4hjwBE3S4NNh46+jkpv24
iC9imeTm7r/IXWZBfs87
-----END CERTIFICATE-----
'@

$pksCertPrivateKey = @'
-----BEGIN PRIVATE KEY-----
MIIEvwIBADANBgkqhkiG9w0BAQEFAASCBKkwggSlAgEAAoIBAQDFHe3d1DfNmkAm
LLmWnCXwjHa58FiPwHt30bjeKsJ1Bbn4qx51Y8Rjp7jQ9zipFF8EaWfK0weym1PH
yr2Pxq0EshYvWKl+in5rKshYqtLvsu3wZe5QpFQrbNgqsjpZ6/Vo1mjSgxYtZs1N
yPNIv/ertM9iaTyileenUtnkXgUzRgUXYgzRzNsCd9zaKc6I11N2g8/EKa0WXN1x
+908BLAvyAlDX5Hqa66tDjZEpIkRwRvmPWnoGj/wssfbw4wosfHaaCKvtv0AiAru
heFy8Tmah19Zy6Jfuhc1sjzlYO3GXFHpePls5U+oYjurL/2VAdY7Y4ZR9dDnpIs7
vQm1HqdjAgMBAAECggEBAK0acHbbVDohmO4tXrnt3L+XivgVIqDzJzp9GX05TdXY
to2zMKdkeuYNN5eDU+Xf9uV372dF1b+6+mM9HyVxEyZJgoQHt6lh1E0moBSFx4Iq
vxvbV+LHvQb5qggsxmOLfNOZXypnZgVu/yKtM0ETHFxVB75jrpUVUf82GhWbn7N6
4PvyFLi13FCu9LOP1hTkp5zHbMPm7K+Bmiyc5VHZVoPQp4Nsg6nspJkA7jXHZRLk
QPNl581L80duAzKcKi3rptZsoPiYpsnWK7sp3HkoT6Dzn0PTupmJ3LUS2VEDliG+
qeKaEnGEWv/sxini01GDpqowo7H95MW2dGDaFwDn8BkCgYEA9dmXh0nyIX7F1nps
EnPvkO85UpEbGRkXhcpSxyfW5YPIKsFRIxi9LAUpFgtBoWCbUYwXt54G6MlgQihw
iZqx2sn8gKFz/CPJ5CaOmi36Eo0h6AfiUycMOsa/M/Cd4g47GOl0lETtg3JoiRue
BP6wFgiKDAYNJZuQxLNilK0C/gcCgYEAzUFGDhQeC9CR/Pfs12Tfu7m21BB+Ci1c
tsjwz84J6XKJ3D06DOEiB2tIgPiXz6PVRIUhL2mr2564gB6tSf2JW9Xht/8/KJTX
ABccwUnz43wjkSFQ8XfZQD1UIDTwa4Cq6zuznQxJ2nznxpwb/5Gzzsn9QQwIKr/l
Kw7H7MYadMUCgYEAncmvlScCfjjtJMChyB4crbq74aA78hnGnRnDkwqgw+GWgMpe
FtZz42LUgc9rqfVk+iudtT15VcKZQxzNTaO5bqCgrLXyyOr3UrTkZVQI4gsurcsR
mSjAkqCoat+NlV5o045SQi8S+YBeU1EkVDRaM2n7n8fqfC6h9XzkUmPQPdUCgYAn
n+5SUXfrd/x3BbXnb0XyC8xL7FMoy9EWSHyU4YXwV3hd2EQYsG3NWNzKaTOFlm9Z
pwndCV1wLJgZw9JYcmXOIOBOkSw0PWe0UMHwXsKCrDiBkBj8RNLgH/bZsN6pIlHc
z83BB9pKH8rvALw2/n3j8gK+SABboGgxg8z83NHGsQKBgQDiPKp4weX0cP1/ablO
MeMFIms+ISxjFi+f7iuXNs2LahbP/gK0fHyqM22ZLNsK3sb8KLc3PhykNZCpvE/s
mlahgq98CyVapmK97GDLFEdbUXY1JY8XakcrDDUA8/GBM5IL0Vi6uLIeW8+pTa0L
gr6moJLrg6EMbw1C7xWrzhxR0g==
-----END PRIVATE KEY-----
'@
This section describes the Harbor application configuration You can refer to this blog post for more details on the individual settings
$HarborAdminPassword = "VMware1!"
$HarborHostname = "pks-harbor.primp-industries.com"
$HarborManagementNetworkAssignment = $BOSHManagementNetworkAssignment
$HarborManagementAZAssignment = $BOSHManagementAZAssignment

# The SSL Certificates are generated by the customer but you can use the following snippets to generate
# the certs using openssl. Be sure to specify wildcard for your domain, this is whats asked of in PKS UIs
# Copy the *.key and *.pem to the respective fields

#openssl req -subj  '/C=US/ST=CA/L=Santa Barbara/O=Primp-Industries/OU=R&D/CN=*.primp-industries.com' -out harbor.csr -newkey rsa:2048 -nodes -keyout harbor.key
#openssl req -subj  '/C=US/ST=CA/L=Santa Barbara/O=Primp-Industries/OU=R&D/CN=*.primp-industries.com' -x509 -sha256 -nodes -newkey rsa:2048 -keyout harbor.key -out harbor.pem
#openssl req -subj  '/C=US/ST=CA/L=Santa Barbara/O=Primp-Industries/OU=R&D/CN=*.primp-industries.com' -x509 -sha256 -nodes -days 730 -newkey rsa:2048 -keyout harbor.key -out harbor.pem

$harborCertPEM = @'
-----BEGIN CERTIFICATE-----
MIIDyzCCArOgAwIBAgIJANKigLa4gSLgMA0GCSqGSIb3DQEBCwUAMHwxCzAJBgNV
BAYTAlVTMQswCQYDVQQIDAJDQTEWMBQGA1UEBwwNU2FudGEgQmFyYmFyYTEZMBcG
A1UECgwQUHJpbXAtSW5kdXN0cmllczEMMAoGA1UECwwDUiZEMR8wHQYDVQQDDBYq
LnByaW1wLWluZHVzdHJpZXMuY29tMB4XDTE4MDYxNzAyMjIwN1oXDTIwMDYxNjAy
MjIwN1owfDELMAkGA1UEBhMCVVMxCzAJBgNVBAgMAkNBMRYwFAYDVQQHDA1TYW50
YSBCYXJiYXJhMRkwFwYDVQQKDBBQcmltcC1JbmR1c3RyaWVzMQwwCgYDVQQLDANS
JkQxHzAdBgNVBAMMFioucHJpbXAtaW5kdXN0cmllcy5jb20wggEiMA0GCSqGSIb3
DQEBAQUAA4IBDwAwggEKAoIBAQCzwhsWPQOb6wTX+wlfkhtllNHAoz6pswJbhezO
JDvxw1L2sECUvvb0SFIPcKQnyIyaaS5IFlG03unFC/IbIKRVduTloc5gLEErfPy3
QKLlbEMzA/44K1vhqubY0568rbqJ4oVRSe/o7aaSaM68F7Nw5M+M9G5Yv6Ib9PAM
CyLrFt8sg0u0uGvcNe4oz4ZrvZVcXf6XTH6RlQZsGZjBs6OMX5Svn2DimtcpLEsv
Thzq6J3IeFNO5cbkksn0l7YVC6KW/wYxEHAN847Pf0dVnrQej2W7+W804RH0McJa
Tupuzz0MDdZLMoe95UcvwXwkYrPg5smL0+dtckTKbH4bpUDfAgMBAAGjUDBOMB0G
A1UdDgQWBBQjsCzrbQDpXmeFHVMDCnuq5GCbSzAfBgNVHSMEGDAWgBQjsCzrbQDp
XmeFHVMDCnuq5GCbSzAMBgNVHRMEBTADAQH/MA0GCSqGSIb3DQEBCwUAA4IBAQAC
kXYq0EPs7GYZznwscEcwi8DMb8gr5xsIZ7fU1akwaDPwT9a3mCyGeOEsnmf/wW55
LfQqXP1c3X9auTZ/N1GpP2qW/+PQA1hn825OcdLi6d+PFLPFS/Je+vr90GfTeZEG
X0cljtAlHDEYTrh0m3Bp5QpxRto3Z7cTLermsIldBKuvc2SEuja4BYTLhot+urkN
XvcJsPFO57D4f21qVVHXelVBEFbzn2Q+mWAb+emNi7tM45IMxWOh8pUl18888wKG
dvLltkwohryDBtBICQB8JpZmdgLfSarCIQp13H0koMyR40DbZyachT8ftlcXIxAQ
s3zI5HH8qWO16K17hjyz
-----END CERTIFICATE-----
'@

$harborCertPrivateKey = @'
-----BEGIN PRIVATE KEY-----
MIIEvQIBADANBgkqhkiG9w0BAQEFAASCBKcwggSjAgEAAoIBAQCzwhsWPQOb6wTX
+wlfkhtllNHAoz6pswJbhezOJDvxw1L2sECUvvb0SFIPcKQnyIyaaS5IFlG03unF
C/IbIKRVduTloc5gLEErfPy3QKLlbEMzA/44K1vhqubY0568rbqJ4oVRSe/o7aaS
aM68F7Nw5M+M9G5Yv6Ib9PAMCyLrFt8sg0u0uGvcNe4oz4ZrvZVcXf6XTH6RlQZs
GZjBs6OMX5Svn2DimtcpLEsvThzq6J3IeFNO5cbkksn0l7YVC6KW/wYxEHAN847P
f0dVnrQej2W7+W804RH0McJaTupuzz0MDdZLMoe95UcvwXwkYrPg5smL0+dtckTK
bH4bpUDfAgMBAAECggEAV6Uis9sX8WPLvssFrPV+Ki8/fh+aI//F/H32EiSUnbJQ
tzsEogHiQwUoDaMsRsF/3KHAESHgwMGXVZ4Xc6acuZb40AXuq/Gn7N5KEceQJTB+
K1edEiIB8Kv1Vm8IDJLgSu6JdjMIqJeHCgfUFN2xfi/yCpX7X4ZAMkVg7V5Yript
d3qWGXPHDZg0LOc5CkaZhYO0pRCVTZfi7pM8Dxo+C8Mw/hLBwrEziL2kgyFMvUoU
F5dTtMoy+yqyX2mEzg7YfA7kv70OhpyRQNZ+B1guXhgd+WDaanqxh7bRrRIG5RHd
h3q/nyLrXdrSWLoHgM8KkYE/TYisW6fBsTGYSl1M8QKBgQDawUKVBbxEbqvjGPxC
jQj3r5gHM0r1fdIASnyji2+c8zwZykN6s1E5pC6Tqz7GRwE6dlo6X4O3udGvlr8D
RSb0IfzYRcZ2+Xyu/WPahzcRt+NL5Y70wmduH9xN2LaOGAupmRYyOLS5+8hWcf+O
HuPRCLU7ICibjKkIfrSkLTU6WwKBgQDSXR67bRE0SIxJzJTW/1jq7+JLN4xbJ11O
NxlCbJ0KYS0esHPzeOPBTKUJDQa8MIP0OD651mNLe5fU02RvAYkSzVUbrgjSOguu
aRQD8+3YegIYk2amhA8/N7CZWBT0wdsXzfnX4CijJZUgp1q1IgtZWLMk5xQm6Ql6
IxbncGtyzQKBgQDD5oJ79hDtr7aav0tZRfgb59Jb0GF2i2C/BfWseDhR87mE1w+r
GF7LIe7cK2UiJ4BAHLEcyWCp7eyMNJGGmi0SQEWwYHwlG7O++gisMJ7ubSFOXJuz
MU1y33Fo/YQup/X5wbCQ9RtT2tlEIP7dBWi7T/MMqfXzpvnRM7cNt7aNNQKBgBwI
6PWVfXt4R6n2J8fXU+RLf98CUiQ7xMWNtkIR84PUm4zBe1JxQ/kY282u/LzLwmoj
rMhbd/QxTnTAj1vz2m61CqibsvVBYxklS9OTCJmW+PyJeF6srtN/+nsVMAXGaApu
GuPYLdJASfWGGCKXnOeVWJqMaTUeTXMHhh/l7YvpAoGAaobtDUTH78O27lVZ1IQ0
/LsT9S72DhcK3n5a40WUMXgdxoQwa+3YaURspr20eJzt4xenY+4dKaJ+VHPPOfiK
4UeazY1fbefUkA+ElzV8uaQEc0OVak8fbP9+5b05tiNgBpPP3Vo81Nb55FmbLJJe
Z/bFvEcEbEabMJwxMyPl5ys=
-----END PRIVATE KEY-----
'@
This section describes the general NSX-T configurations and most of the defaults can be left alone outside of the environmental specific configurations such as NSXPrivatePortgroup and $NSXIntermediateNetworkPortgroup property. You will also need an additional VLAN-backed portgroup (e.g. dv-vlan3250) to act as an intermediate network to bridge you management traffic to the NSX-T Logical Networks. This is only required if you are using static routes which I am using in my environment. If you are using BGP, this is not required but will require some modification to the NSX-T configuration post-deployment.
$NSXRootPassword = "VMware1!"
$NSXAdminUsername = "admin"
$NSXAdminPassword = "VMware1!"
$NSXAuditUsername = "audit"
$NSXAuditPassword = "VMware1!"
$NSXSSHEnable = "true"
$NSXEnableRootLogin = "true"
$NSXPrivatePortgroup = "dv-private"
$NSXIntermediateNetworkPortgroup = "dv-vlan3250"
This section describes the two IP Pools: Tunnel Endpoint for ESXi host and Load Balancer Pool for K8s
$TunnelEndpointPoolName = "ESXi-VTEP-Pool"
$TunnelEndpointPoolDescription = "Tunnel Endpoint for ESXi Transport Nodes"
$TunnelEndpointPoolIPRangeStart = "192.168.1.10"
$TunnelEndpointPoolIPRangeEnd = "192.168.1.30"
$TunnelEndpointPoolCIDR = "192.168.1.0/24"
$TunnelEndpointPoolGateway = "192.168.1.1"

$LoadBalancerPoolName = "Load-Balancer-Pool"
$LoadBalancerPoolDescription = "Load Balancer IP Pool"
$LoadBalancerPoolIPRangeStart = "10.20.0.10"
$LoadBalancerPoolIPRangeEnd = "10.20.0.50"
$LoadBalancerPoolCIDR = "10.20.0.0/24"
This section describes the IP Block used for K8s workload
$ipBlockName = "PKS-IP-Block"
$ipBlockNetwork = "172.16.0.0/16"
This section describes the Transport Zones that will be created
$OverlayTransportZoneName = "TZ-Overlay"
$OverlayTransportZoneHostSwitchName = "Hostswitch1-OVERLAY"
$VlanTransportZoneName = "TZ-VLAN"
$VlanTransportZoneNameHostSwitchName = "Hostswitch2-VLAN"
This section describes the Uplink Profile that will be used for Edge VMs (just make sure you properly map the VM Networks when you deploy the Edge VM. Please refer to this blog post for more details)
$ESXiUplinkProfileName = "ESXi-Uplink-Profile"
$ESXiUplinkProfilePolicy = "FAILOVER_ORDER"
$ESXiUplinkProfileActivepNIC = "vmnic2"
$ESXiUplinkProfileTransportVLAN = "0"
$ESXiUplinkProfileMTU = "1600"

$EdgeUplinkProfileName = "Edge-Uplink-Profile"
$EdgeUplinkProfilePolicy = "FAILOVER_ORDER"
$EdgeUplinkProfileActivepNIC = "uplink-1"
$EdgeUplinkProfileTransportVLAN = "0"
$EdgeUplinkProfileMTU = "1600"
$EdgeUplinkProfileOverlayvNIC = "fp-eth0"
$EdgeUplinkProfileVlanvNIC = "fp-eth1"
This section describes the Logical Switches that will be created for both K8s Mgmt & Uplink
$K8SMgmtClusterLogicalSwitchName = "K8S-Mgmt-Cluster-LS"
$K8SMgmtClusterLogicalSwitchReplicationMode = "MTEP"
$UplinkLogicalSwitchName = "Uplink-LS"
$UplinkLogicalSwitchVlan = "0"
This section describes the name fo the Edge Cluster
$EdgeClusterName = "Edge-Cluster-01"This section describes the T0 Router that will be created. This assumes you will be using static route to provide connectivity to NSX env rather than BGP
$T0LogicalRouterName = "T0-LR"
$T0LogicalRouterEdgeCluster = $EdgeClusterName
$T0LogicalRouterHAMode = "ACTIVE_STANDBY"
$T0UplinkRouterPortName = "Uplink-1"
$T0UplinkRouterPortLS = $UplinkLogicalSwitchName
$T0UplinkRouterPortSwitchPortName = "Uplink-1-Port"
$T0UplinkRouterPortIP = "172.30.50.2"
$T0UplinkRouterPortIPPrefix = "24"
$T0UplinkRouterStaticRouteNetwork = "0.0.0.0/0"
$T0UplinkRouterStaticRouteNextHop = "172.30.50.1"
This section describes the T1 Router that will be created for K8s Mgmt along with the up/down links
$T1LogicalRouterName = "T1-K8S-Mgmt-Cluster"
$T1LogicalRouterEdgeCluster = $EdgeClusterName
$T1LogicalRouterHAMode = "ACTIVE_STANDBY"
$T1LogicalRouterFailOverMode = "PREEMPTIVE"
$T1LinkedRouterPortLS = $K8SMgmtClusterLogicalSwitchName
$T1LinkedRouterPortNameOnT0 = "LinkedPort_K8S-Mgmt-Cluster"
$T1LinkedRouterPortNameOnT1 = "LinkedPort_T0-LR"
$T1DownlinkRouterPortSwitchPortName = "Downlink-1-Port"
$T1DownlinkRouterPortNameOnT1 = "Downlink-1"
$T1DownlinkRouterPortIP = "10.10.0.1"
$T1DownlinkRouterPortIPPrefix = "24"
This section describes the NSX-T Manager configuration. Currently, the re-sizing of the VM has not been enabled but will be possible in the future. For now, you can simply adjust the Hostname/IP Address.
$NSXTMgrDeploymentSize = "small"
$NSXTMgrvCPU = "2"
$NSXTMgrvMEM = "8"
$NSXTMgrDisplayName = "nsx-mgr"
$NSXTMgrHostname = "nsx-mgr.primp-industries.com"
$NSXTMgrIPAddress = "172.30.51.13"
This section describes the NSX-T Controller configuration. You can deploy N-number of Controllers by simply adding entries to the hash table. Currently, the re-sizing of the VM has not been enabled but will be possible in the future.
$NSXTCtrvCPU = "2"
$NSXTCtrvMEM = "6"
$NSXControllerSharedSecret = "s3cR3ctz"
$NSXTControllerHostnameToIPs = @{
"nsx-ctr01" = "172.30.51.14"
"nsx-ctr02" = "172.30.51.15"
"nsx-ctr03" = "172.30.51.16"
}
This section describes the NSX-T Edge configuration. You can deploy N-number of Edges by simply adding entries to the hash table. Currently, the re-sizing of the VM has not been enabled but will be possible in the future.
$NSXTEdgevCPU = "8"
$NSXTEdgevMEM = "16"
$NSXTEdgeHostnameToIPs = @{
"nsx-edge01" = "172.30.51.17"
}
Once you have saved your changes, you can now run the PowerCLI script as you normally would.
There is additional verbose logging that outputs as a log file in your current working directory called pks-vghetto-lab-deployment.log which can be useful for debugging purposes.
For advanced debugging, you can set $pksDebug flag to $true ($false by default) which will also print out the OM CLI commands if you are running into issues
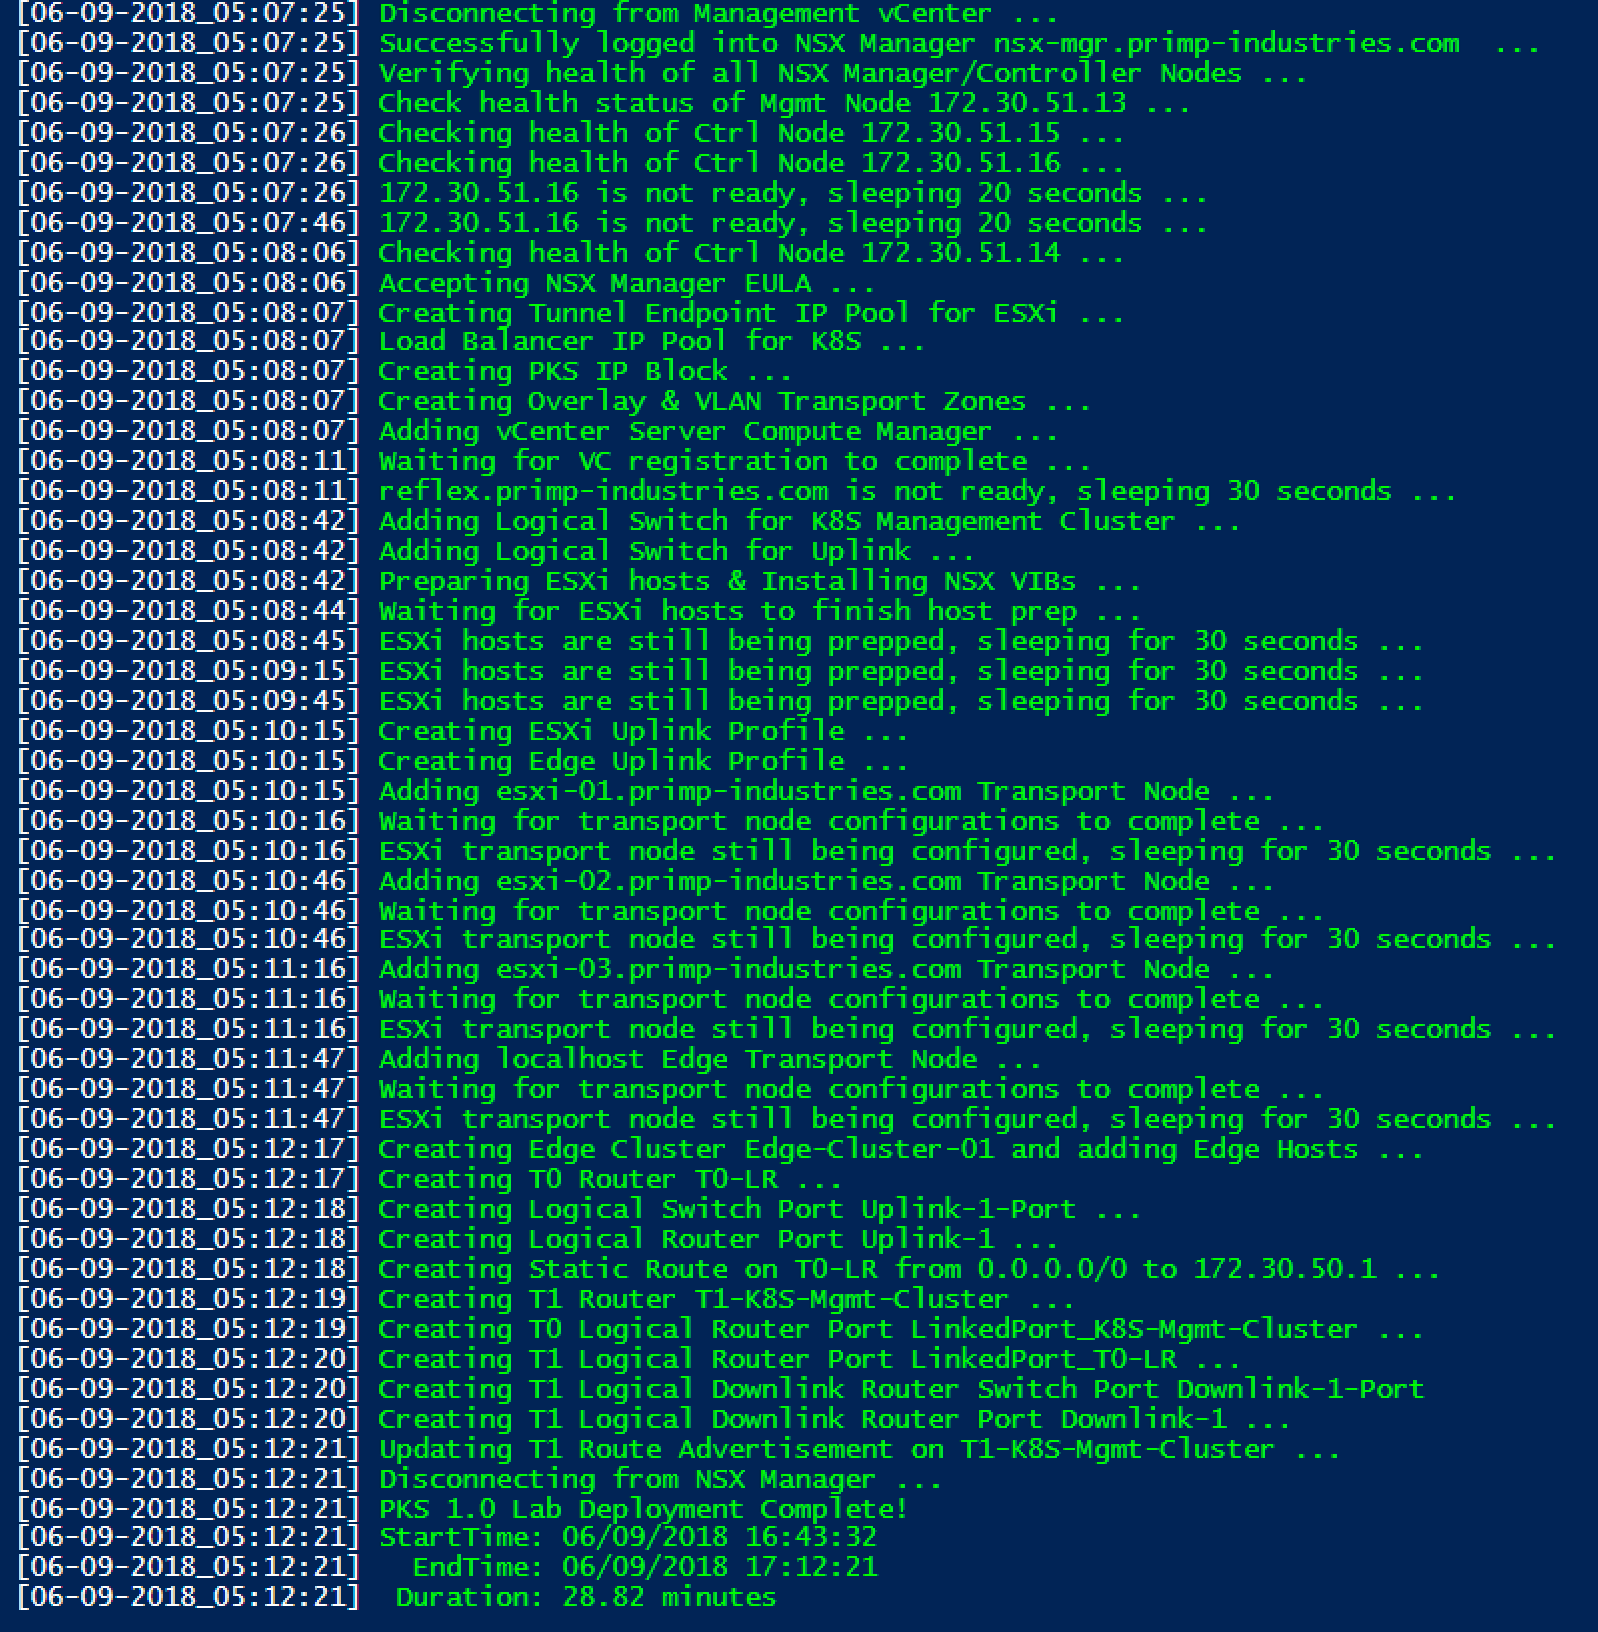
Here is an example deployment of just the PKS infrastructure:
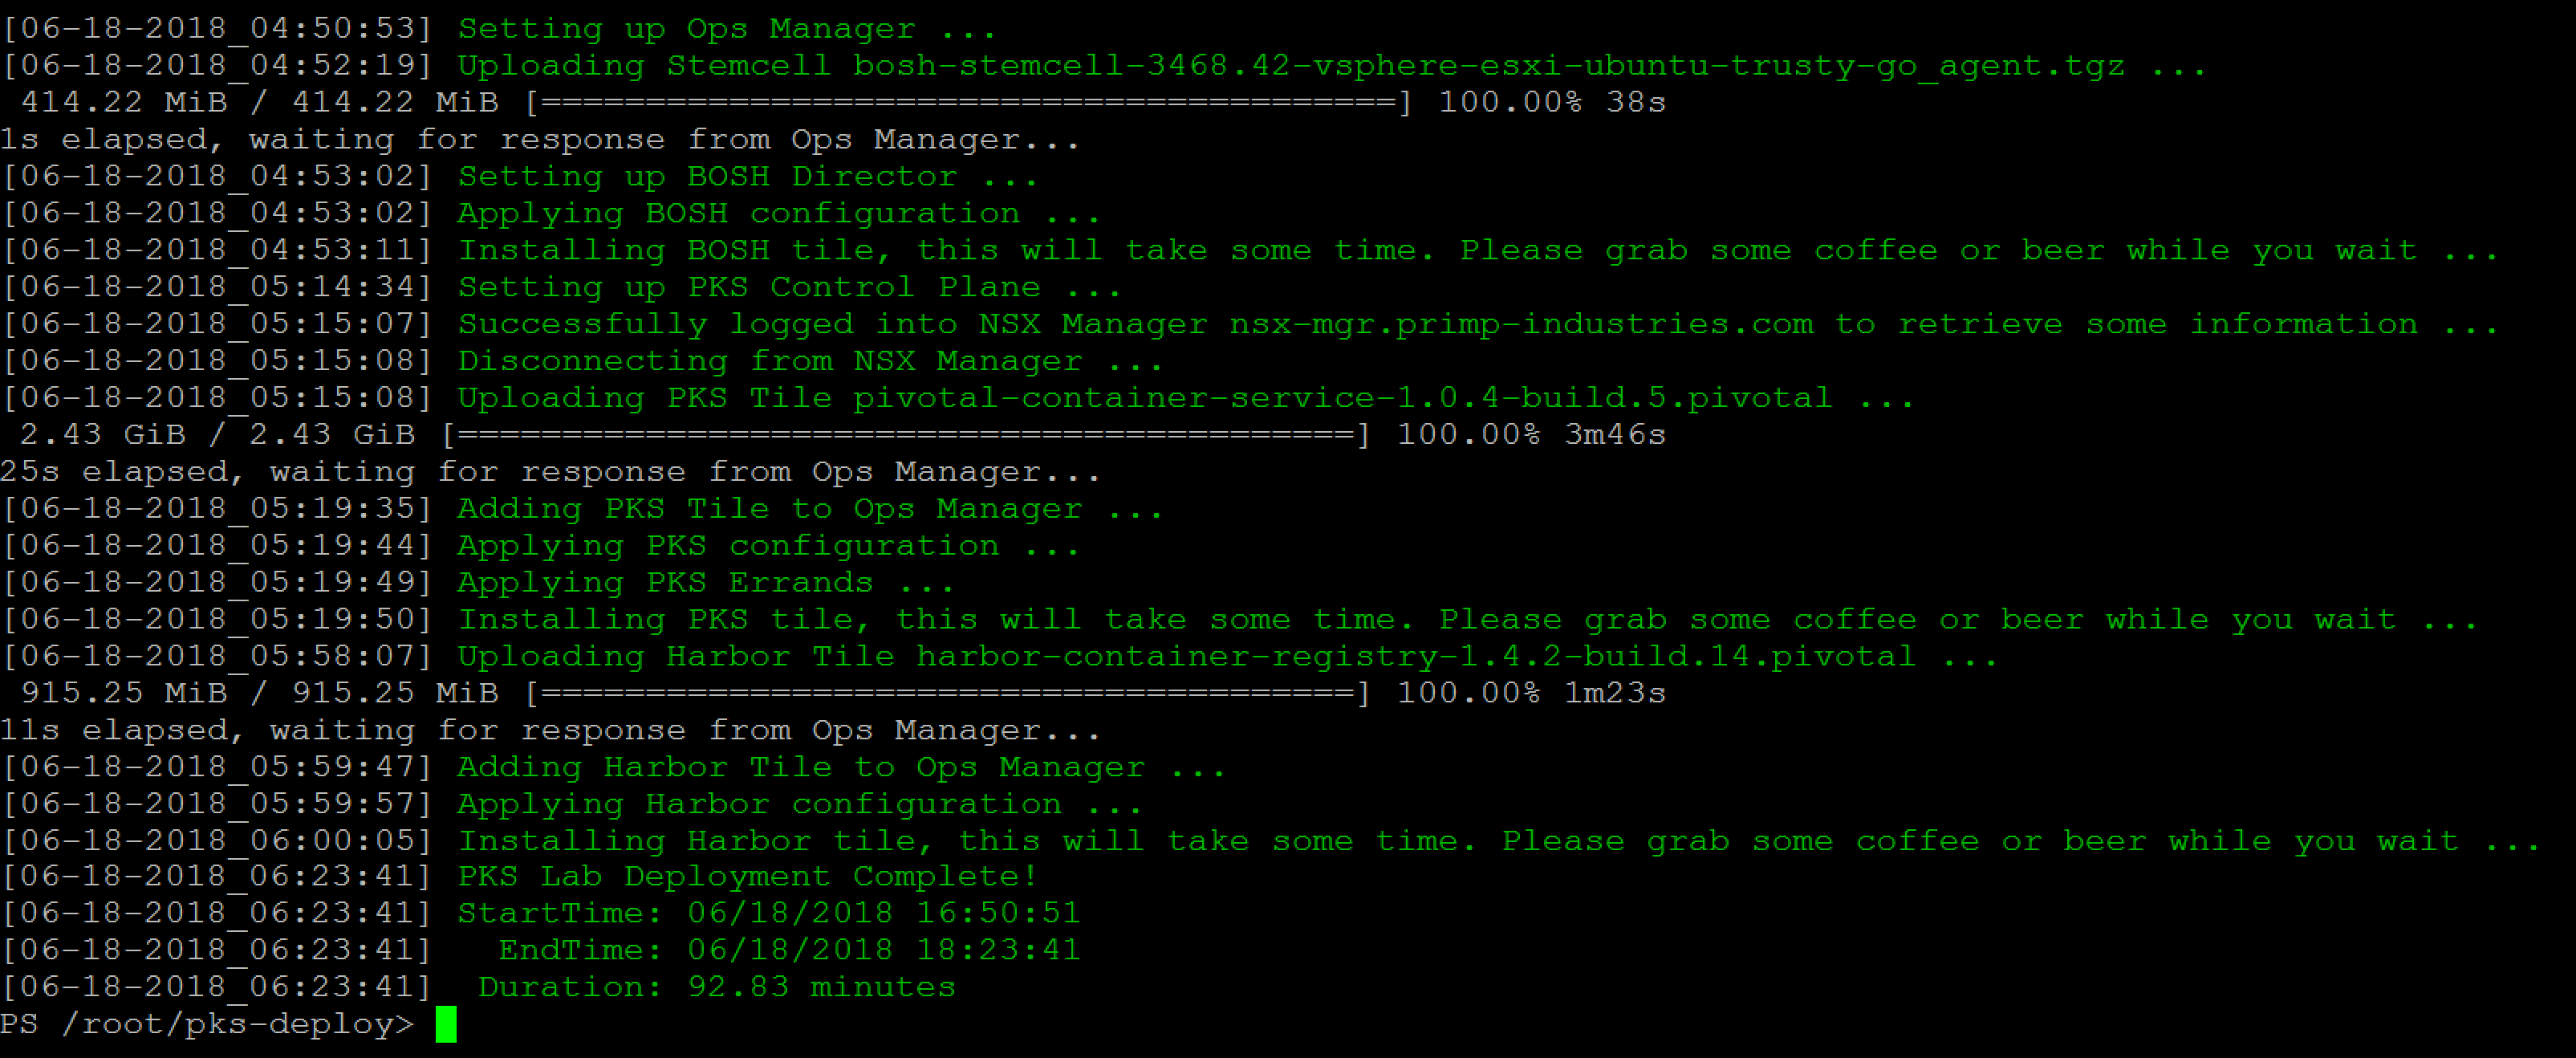
Here is an example deployment including the PKS components (deployment and configuration)
If everything is succesful, you should be able to login to the NSX-T Manager to confirm all the network deployments. You should be able to login to your Ops Manager instance and start your PKS deployment workflows or the default will automatically configure the solution end-2-end.


