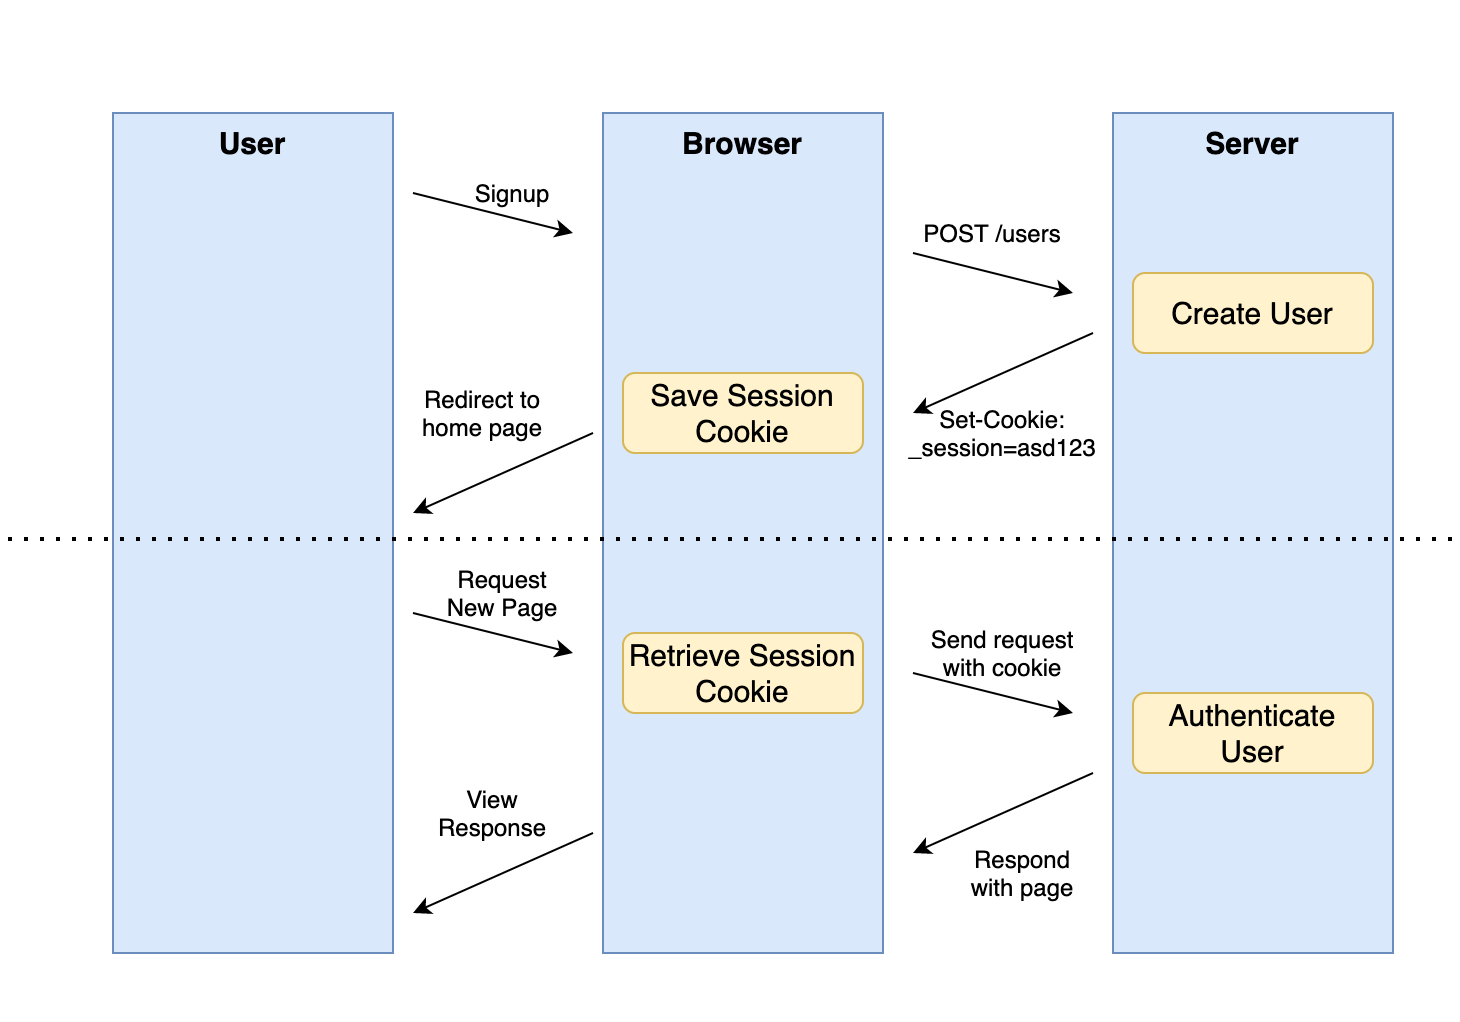
As a user, I can:
- Login to an existing account
- Sign up for a new account
- Stay logged in after refreshing the page
- Update my profile if I am logged in
- Log out
In this lesson, we'll discuss the basics of API Authentication and cover some of the considerations that go into authenticating users in multiple services. Our objective is to continue working with two separate applications -- our frontend, a React single page application, and our backend, a Rails API -- and have them communicate via the request response cycle.
As you'll recall from working with MVC applications in Rails, the umbrella topic of auth consists of two key components:
- Authentication: Verifying that a user is who they say they are
- Authorization: Giving permissions to users after they've been authenticated
For authenticating users, we ask our users to provide a username and a password when they register for an account; and then ask them to provide the same username and password to log back into that same account.
As a part of creating our user account, we store a salted and hashed version
of the user's password in our database, instead of the user's plaintext
password, by using the bcrypt gem to handle our password hashing.
class User < ApplicationRecord
  has_secure_password
end

user1 = User.create(username: "User1", password: "123")
user1.password_digest
# => "$2a$12$UU/wpCt3R8HRMACLfIadx.w54zUZhMmHO5DTOmRjjp0rt70CZa/7u"

user1 = User.find_by(username: "User")
user1.authenticate("321")
# => false
user1.authenticate("123")
# => #<User id: 1>
We'll still be using bcrypt in our API authentication code, so keep this in
mind!
In order to authenticate the user for requests after they've logged in, we also used an encrypted session token, which we stored in a browser cookie. Since that browser cookie is automatically sent with every request to our server, we could use that cookie to authenticate the user and also to authorize the user for specific actions (such as updating their profile).
Here's an example of what a controller for a Rails MVC app with auth might look like:
class UsersController < ApplicationController

  def new
    @user = User.new
  end

  def create
    @user = User.create(username: params[:username], password: params[:password])
    if @user.valid?
      # save user id to an encrypted session cookie
      session[:user_id] = @user.id
      redirect_to "/"
    else
      flash[:errors] = @user.errors.full_messages
      redirect_to "/users/new"
    end
  end

  def login_form
  end

  def login
    @user = User.find_by(username: params[:username])
    if @user && @user.authenticate(params[:password])
      # save user id to an encrypted session cookie
      session[:user_id] = @user.id
      redirect_to "/"
    else
      flash[:errors] = [ "Invalid username or password" ]
      redirect_to "/login"
    end
  end

  def profile
    # retrieve user id from encrypted session cookie
    @user = User.find_by(id: session[:user_id])
    if @user
      render :profile
    else
      flash[:errors] = [ "You must be logged in to do that" ]
      redirect_to "/login"
    end
  end

  private

  def user_params
    params.require(:user).permit(:username, :password)
  end

end
There are a couple of key elements here that will prove difficult to replicate now that we are designing our applications with a separate frontend and backend codebase. In particular, working with sessions and cookies across two separate frontend and backend applications is challenging. Using cookies also limits the kind of apps that can target our API.
For this reason, a different approach is more common to identify requests and grant access to resources in an API: using token-based authentication.
Instead of using cookies to transmit some encoded data between our frontend and backend to authenticate users, we'll use another popular technique instead: using JWT tokens. The basic flow looks like this:
- When a user creates a new account, or logs back into an existing account, we generate an encoded token with the user's id:
token = JWT.encode({ user_id: 1 }, ENV["JWT_SECRET"], "HS256")
# => "eyJhbGciOiJIUzI1NiJ9.eyJ1c2VyX2lkIjoxfQ.oA8DXDNNeq8NYFhxKa8S5hPZti8kfH0zGjKPuXEgqwM"- This token is then sent back to the frontend application as part of the response body:
render json: { user: UserSerializer.new(user), token: token }- It is the frontend's responsibility to include this token in all subsequent requests that require an authorized user. The frontend must store the token (typically, localStorage is used for this):
fetch("http://localhost:3000/login", {
  method: "POST",
  headers: {
    "Content-Type": "application/json",
  },
  body: JSON.stringify({ username: "Ian", password: "123" }),
})
  .then((r) => r.json())
  .then((data) => {
    const token = data.token;
    localStorage.setItem("token", token);
});- Then, for any subsequent requests, the token is sent as a special "Authorization" header, using a "Bearer" token, like so:
// read token from localStorage
const token = localStorage.getItem("token");
// send token with request
fetch("http://localhost:3000/me", {
  headers: {
    Authorization: `Bearer ${token}`,
  },
});- Now, we can check that token in our backend and use it to authenticate the user:
class UsersController < ApplicationController

  def me
    # read token from headers
    token = request.headers['Authorization'].split.last
    # decode token and get payload hash
    payload = JWT.decode(token, ENV["JWT_SECRET"], true, { algorthim: 'HS256' })[0]
    # => { user_id: 1 }
    # find user using token payload
    user = User.find_by(id: payload['user_id'])
    if user
      # user is authorized!
      render json: user
    else
      # user is not authorized
      render json: { errors: ["Not authorized"] }, status: :unauthorized
    end
  end

end
Since this authentication flow has a few steps that could cause errors, and we'll be using this code frequently for other actions, we'll also work on refactoring this code for easier use down the road.
