MVVM
Kotlin+MVVM+Retrofit+协程+ViewBinding+EventBus
注意:使用ViewBinding需要AndroidStudio版本为4.0+
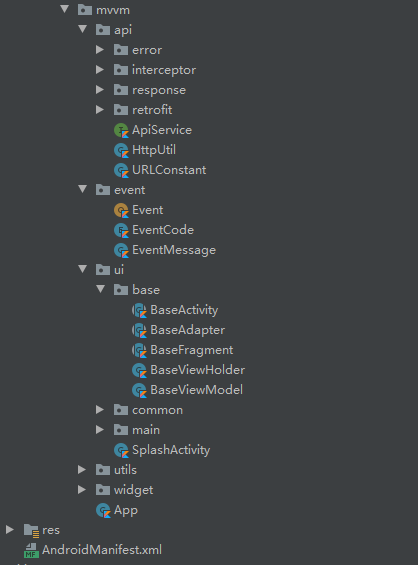
项目框架整体架构图:
本框架的特点:
1.使用Kotlin语言
2.使用MVVM+协程开发模式,相较于常用的MVP+RXJava开发模式,会减省大量的MvpView的创建,以及大量的接口回调,并且不再需要Presenter的注册和注销,减少内存泄漏风险
3.ViewBinding将会使你不再需要进行findViewById的繁琐工作,比ButterKinfer更加方便
4.关于消息传递,github有LiveData改造的LiveDataBus,作用及使用方法都类似于EventBus,而本项目选择继续使用EventBus的原因,则是因为EventBus的稳定性和灵活性
Example
编写Activity:
class TestActivity : BaseActivity<BaseViewModel, ActivityTestBinding>() {


    override fun initView() {

    }

    override fun initClick() {

    }

    override fun initData() {

    }

    override fun initVM() {

    }

}
Fragment同!
列表Adapter:
class ArticleListAdapter(context: Activity, listDatas: ArrayList<ArticleBean>) :
    BaseAdapter<ItemArticleBinding, ArticleBean>(context, listDatas) {

    override fun convert(holder: BaseViewHolder, t: ArticleBean, position: Int) {
        val v = holder.v as ItemArticleBinding
        Glide.with(mContext).load(t.envelopePic).into(v.ivCover)
        v.tvTitle.text = t.title
        v.tvDes.text = t.desc
    }

}
添加接口(ApiService):
@GET("test")
suspend fun test(@QueryMap options: HashMap<String, String?>): BaseResult<TestModel>
创建(ViewModel):
class MainViewModel : BaseViewModel() {

    var articlesData = MutableLiveData<ArticleListBean>()

    fun getArticleList(page: Int, isShowLoading: Boolean) {
        launch({ httpUtil.getArticleList(page) }, articlesData, isShowLoading)
    }

}
调用接口: 在Activity或Fragment中:
vm.getArticleList()
消息传递:
本项目中,像EventBus的注册与注销,以及消息接收全部放在了BaseActivity中,并提供了一个对外的消息处理方法,利用消息Code来区分不同消息,在需要使用消息的界面,重写该方法即可:
发送消息:App.post(EventMessage(EventCode.REFRESH))

    /**
     * 接收消息
     */
    override fun handleEvent(msg: EventMessage) {
        super.handleEvent(msg)
        if (msg.code == EventCode.REFRESH) {
            ToastUtil.showToast(mContext, "主页:刷新")
            page = 0
            vm.getArticleList(page,false)
        }
    }
这样做的好处就是
1:不在需要你去手动在每个界面去注册和注销EventBus,你只用关心什么时候post消息,和什么时间接受消息即可,大大减少出错几率,并提高代码可读性;
2:可以随时更换消息传递框架,方便快捷;
当然,缺点就是发送一个消息,所有界面都会收到,个人认为利大于弊,且弊可以忽略
该框架已应用到自己公司项目中,运行良好,如果后续发现有坑的地方,会及时更新!
2020.06.05:
接口调用流程简化,新增接口只需要在ApiService中添加后,即可直接在ViewModel中通过httpUtil调用,一步到位!
另附上文件上传案例代码,需要时以作参考:
    fun uploadFile(path: String) {
        val file = File(path)
        val map: HashMap<String, RequestBody> = LinkedHashMap()
        val requestBody: RequestBody = RequestBody.create(MediaType.parse("image/*"), file)
        map["file\"; filename=\"" + file.name] = requestBody//file为后台规定参数
        map["name"] = RequestBody.create(MediaType.parse("text/plain"), file.name)
        map["arg1"] = RequestBody.create(MediaType.parse("text/plain"), "arg1")//普通参数
        map["arg2"] = RequestBody.create(MediaType.parse("text/plain"), "arg2")

        //签名(根据服务器规则)
        val params = LinkedHashMap<String, String?>()
        params["name"] = file.name
        params["arg1"] = "arg1"
        params["arg2"] = "arg2"
        val sign: String = getSign(params)
        map["sign"] = RequestBody.create(MediaType.parse("text/plain"), sign)

        launch({ httpUtil.upLoadFile(URLConstant.COMMON_URL_UPLOAD, map) }, uploadData)
     }
ApiService:
    @Multipart
    @POST("/upload")
    suspend fun upLoadFile(@PartMap map: HashMap<String, RequestBody>): BaseResult<UploadModel>