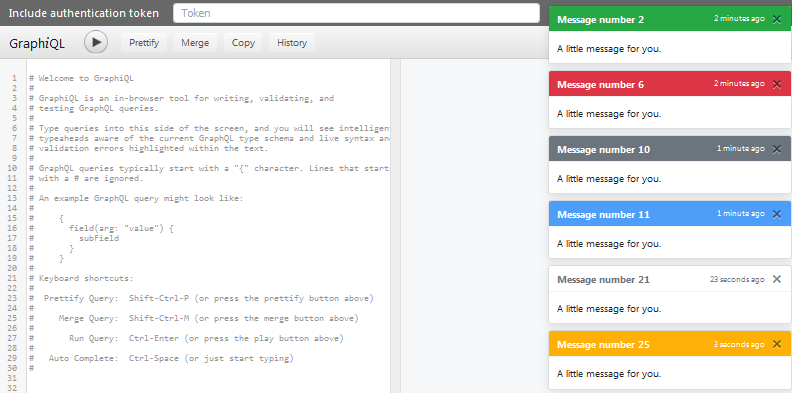
GraphiQL-Auth-Token
A React subclass of GraphiQL allowing you to add an authentication token from the user interface and to pop up notifications from the server.
Demo
Try the live demo. It is implemented in this other package: GraphQL Auth Service, a customizable authentication service working with express-graphql.
# Enter the following queries replacing the username, email and password #

# First
mutation{
  register(fields:{username:"yourname", email: "your@mail.com" password:"yourpassword"}){
    notifications{
      type
    }
  }
}

# Second
mutation{
  login(fields:{login: "your@mail.com", password:"yourpassword"}){
    token
  }
}

# Third - you need to pass the token fetched in the second query
query{
  me{
    _id
  }
}
Installation
npm install --save graphiql-auth-token
Alternatively, if you are using yarn:
yarn add graphiql-auth-token
Adding an authentication token
GraphiQLAuthToken offers the same properties as GraphiQL as it is its subclass. It just requires one more property, onTokenUpdate: a callback function that will be called whenever the user enter / update the auth token. You can use it to store the token and include it inside the fetcher.
import React from 'react';
import ReactDOM from 'react-dom';
import GraphiQL from 'graphiql-auth-token';
import fetch from 'isomorphic-fetch';

let token =  null;

const graphQLFetcher = (graphQLParams) => {
    const headers = { 'Content-Type': 'application/json' }
    if (token){
        headers['Authorization'] = 'Bearer ' + token;
    }
    return fetch(window.location.origin + '/graphql', { //Server address to adapt
        method: 'post',
        headers,
        body: JSON.stringify(graphQLParams),
    }).then(response => response.json());

const onTokenUpdate = (newToken) => token = newToken;

const style = { position: 'fixed', height: '100%', width: '100%', left: '0px',top: '0px' }

ReactDOM.render(
    <div style={style}>
        <GraphiQLAuthToken fetcher={graphQLFetcher} onTokenUpdate={onTokenUpdate} />
    </div>,
    document.body
);
To know the rest of the properties available, please refer to GraphiQL documentation.
Sending pop-up notifications
You can display notifications from the server by using for instance socket.io. You just have to pass each notification into the notification property of the component. It can contain the following attributes:
const notification = {
        title: "Notification title", // Mandatory
        message: "Notificaiton message", // Mandatory
        type: "info", // Possible values undefined | "secondary" | "success" | "info" | "warning" | "danger"
        date: new Date() // If not specified, it will be automatically set
}
The title and message can contain HTML tags.
Find a minimal example below or look at complete one with the client here and the server here.
import React, { Component } from 'react';
import ReactDOM from 'react-dom';
import socketIOClient from "socket.io-client";
import GraphiQLAuthToken from 'graphiql-auth-token';

class Demo extends Component {
    constructor() {
        super();
        this.state = { notification: null }
    }

    componentDidMount() {
        this.socket = socketIOClient("http://localhost:43500"); //Server addess to adapt
        this.socket.on("notification", data => {
            this.setState({ notification: data })
        });
    }

    componentWillUnmount() {
        this.socket.close();
    }

    render() {
        const graphQLFetcher = (graphQLParams) => ...; // To complete
        const style = { position: 'fixed', height: '100%', width: '100%', left: '0px',top: '0px' }

        return (
            <div style={style}>
                <GraphiQLAuthToken fetcher={graphQLFetcher} notification={this.state.notification} />
            </div>
        )
    }
}

ReactDOM.render((<Demo />, document.body);
Usage with express-graphql
To use GraphiQL-Auth-Token inside express-graphql instead of the regular GraphiQL please refer to this example.

