数据血缘
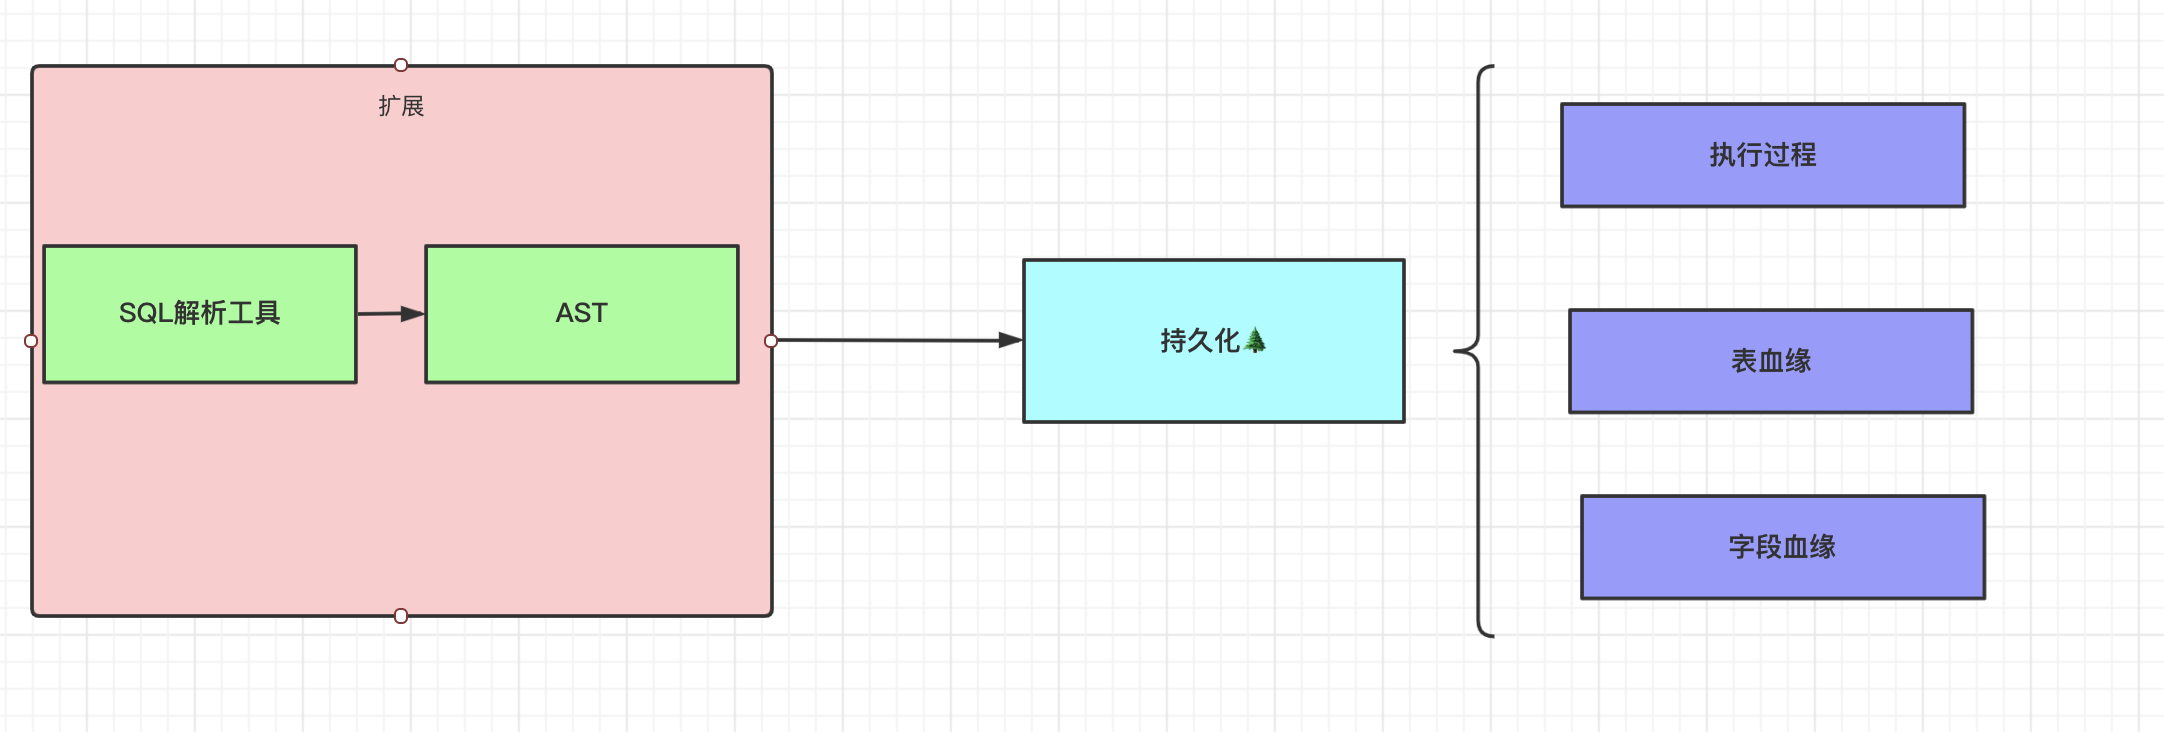
数据血缘提供多种扩展实现。本项目专注于SQL解析,目前通过Druid SqlParser 解析SQL,获取字段、表级别的血缘关系。转换成血缘模型,在图数据库neo4j上呈现。
整体结构
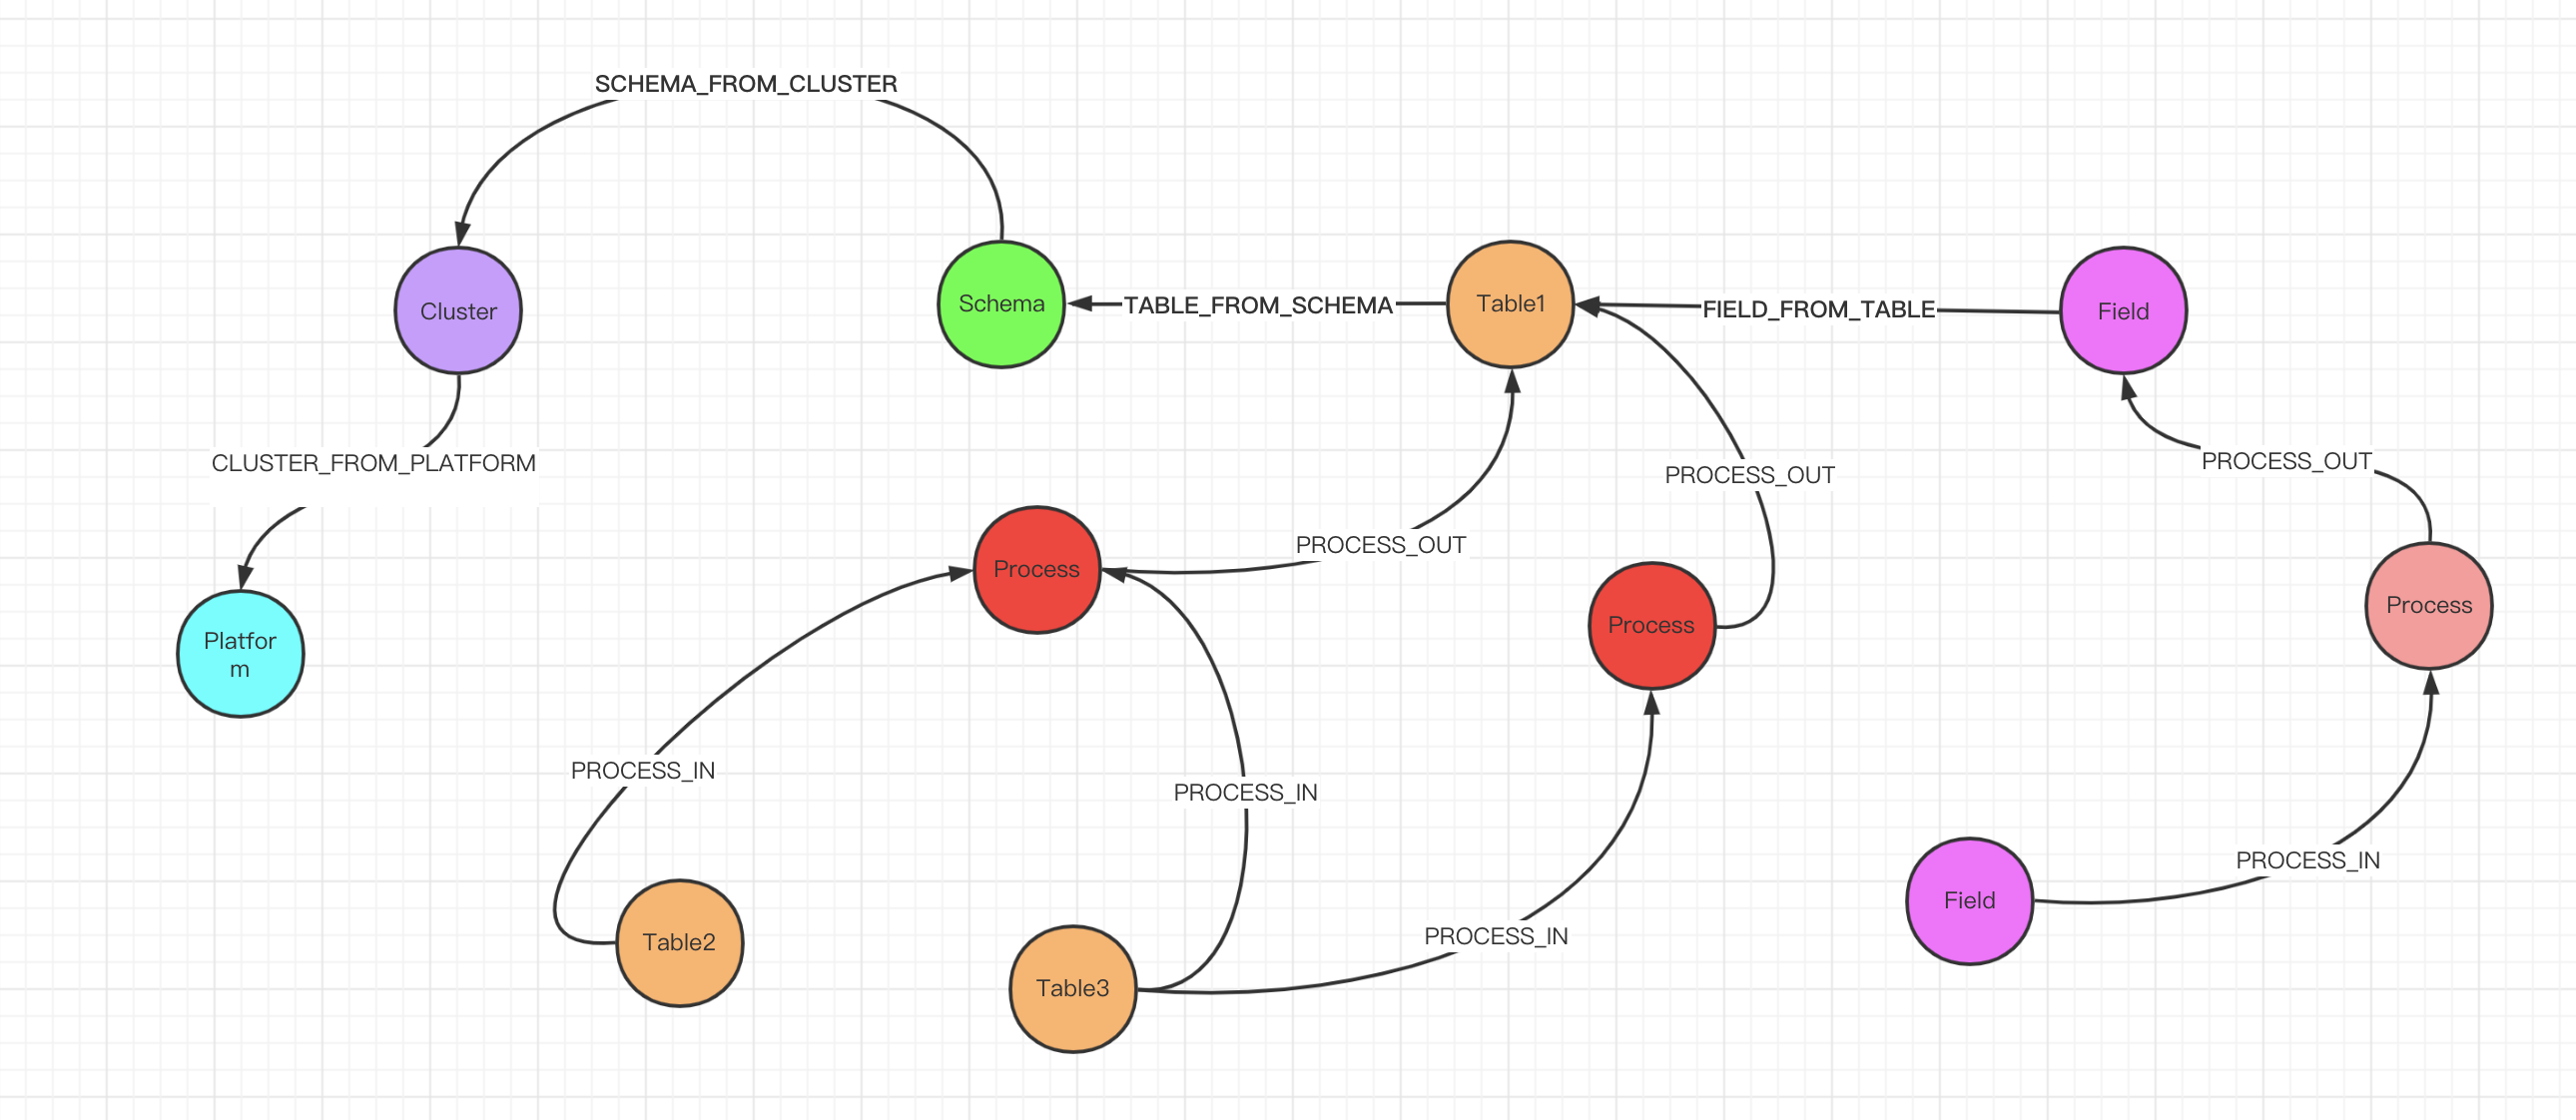
血缘模型
模型
Platform: 平台节点,表示所属服务平台。
Cluster: 集群节点,表示数据库集群,其中包含租户概念,如果以租户id_数据源编码组成,会以此作为clusterName, 指代集群代码。
Schema:Schema节点,表示数据库的schema。如果是catalog型的数据库,它catalog下有schema的概念,此时指代为 catalog.schema
Table: 表节点,表示数据库中的表。
Filed:字段节点,表示数据库的字段。
Process:过程节点,表过程节点,字段过程节点。表示字段或表的血缘流动的过程。
关系
CLUSTER_FROM_PLATFORM :集群所属平台
SCHEMA_FROM_CLUSTER: Schema所属集群
TABLE_FROM_SCHEMA: Table所属Schema
FIELD_FROM_TABLE: FIeld所属Table
PROCESS_IN: 过程输入,可看作血缘来源
PROCESS_OUT: 过程输出,可看作血缘影响
唯一索引键
唯一建组成,指定唯一性字段保证图中节点的唯一性。
Platform: pk, platfromName
Cluster: pk, platfromName/clusterName
Schema:pk. platfromName/clusterName/schemaName
Table: pk,platfromName/clusterName/schemaName/tableName
Filed:pk. platfromName/clusterName/schemaName/tableName/fieldName
Process:过程节点唯一建,取相关节点的主键进行md5生成,确保了其唯一性。
SQL解析
AST
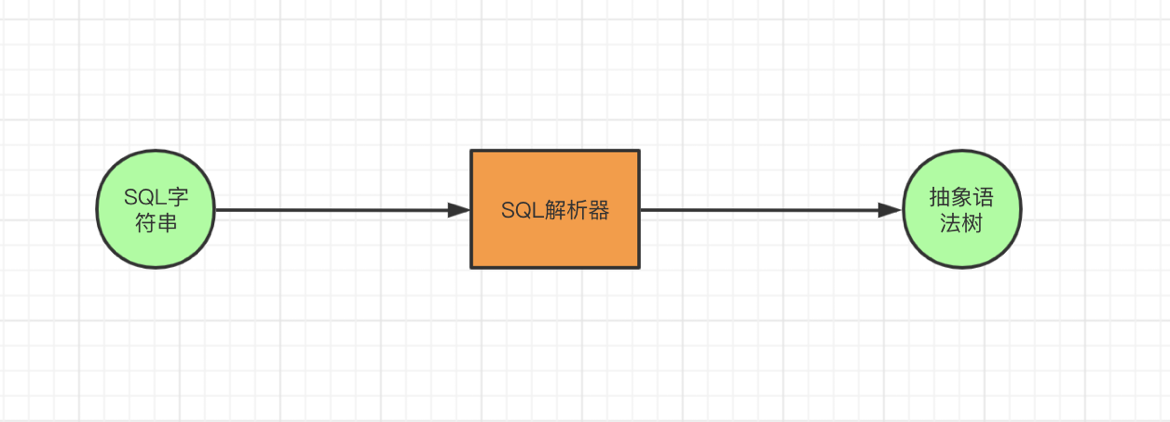
ast全称是abstract syntax tree,中文直译抽象语法树
SQL解析,本质上就是把SQL字符串给解析成ast,也就是说SqlParser的入参是SQL字符串,结果就是一个ast。
Druid Parser
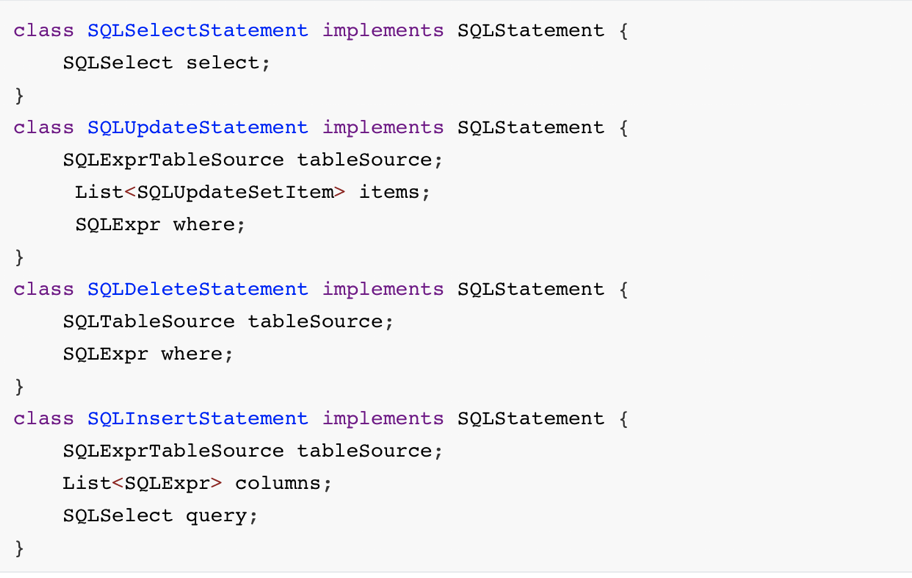
怎么用SqlParser把SQL语句解析成ast?
如上,SQLStatement表示一条SQL语句,我们知道常见的SQL语句有CRUD四种操作,所以SQLStatement会有四种主要实现类。然后Druid的AST树进行解析生成统一的树。
转换成通用的一棵树
解析的例子
快速开始
安装环境
见下面
准备数据
数据库
可以使用docker 安装一个postgresql。进行如下建表操作
CREATE TABLE test.table1(
a1 int4,
b1 int4,
c1 int4,
d1 int4
);
CREATE TABLE test.table2(
a2 int4,
b2 int4,
c2 int4
);
CREATE TABLE test.table3(
a3 int4,
b3 int4,
c3 int4,
d3 int4
);
CREATE TABLE test.table4(
a4 int4,
b4 int4,
c4 int4
);
CREATE TABLE test.table5(
a5 int4,
b5 int4,
c5 int4
);
CREATE TABLE test.table6(
a6 int4,
b6 int4,
c6 int4,
d6 int4
);
CREATE TABLE test.table7(
a7 int4,
b7 int4
);
CREATE TABLE test.table8(
a8 int4,
b8 int4,
c8 int4
);


insert into table1
select
t2.a2,
t2.b2 + t2.c2,
t3.b3+t3.c3,
t3.d3
from table2 t2,table3 t3
where t2.a2=t3.a3

insert into table2
select
t4.a4,
t4.b4 + t4.c4,
t5.b5
from table4 t4,table5 t5
where t4.a4=t5.a5
insert into table3
select
t5.a5,
t6.b6,
t6.c6,
t6.d6
from table5 t5,table6 t6
where t5.a5=t6.a6
insert into table6
select
t7.a7,
t7.b7,
t8.b8,
t8.c8
from table7 t7,table8 t8
where t7.a7=t8.a8
kafka数据
{"sourceType":"SQL","dbType":"postgresql","tenantId":0,"datasourceCode":"gp","sql":"insert into table1\n\nselect\n\nt2.a2,\n\nt2.b2 + t2.c2,\n\nt3.b3+t3.c3,\n\nt3.d3\n\nfrom table2 t2,table3 t3\n\nwhere t2.a2=t3.a3","platformName":"default","clusterName":"0_gp","catalogName":"test","schemaName":"test"}启动项目
lineage-main启动项目
采集结果
组件
kafka
安装
Kafka docker-compose.xml
指定修改配置文件中KAFKA_ADVERTISED_HOST_NAME 为主机网卡ip
配置
修改lineage-main中application.yml 中bootstrap-servers 为 ip:9092
常用命令
docker exec -it 容器id /bin/bash 进入后操作
创建topic
$KAFKA_HOME/bin/kafka-topics.sh --create --topic lineage --partitions 1 --zookeeper zookeeper:2181 --replication-factor 1查看创建的topic
$KAFKA_HOME/bin/kafka-topics.sh --zookeeper zookeeper:2181 --describe --topic lineage生产消息
$KAFKA_HOME/bin/kafka-console-producer.sh --topic=lineage --broker-list zookeeper:9092消费消息
$KAFKA_HOME/bin/kafka-console-consumer.sh --bootstrap-server zookeeper:9092 --topic lineage-topic --from-beginning从头消费消息
$KAFKA_HOME/bin/kafka-console-consumer.sh --zookeeper zookeeper:2181 --topic lineage --from-beginningneo4j
安装
docker run \
    --publish=7474:7474 \
    --publish=7473:7473 \
    --publish=7687:7687 \
    --volume=$PWD/conf:/conf \
    --volume=$PWD/data:/data \
    --volume=$PWD/import:/import \
    --volume=$PWD/logs:/logs \
    --volume=$PWD/plugins:/plugins \
    neo4j:3.5.16

默认登录密码:默认`neo4j`/`neo4j` 需要修改
`localhost`:`7474`   `neo4j`/`123456`
配置
修改lineage-main中application.yml 中neo4j相关配置

