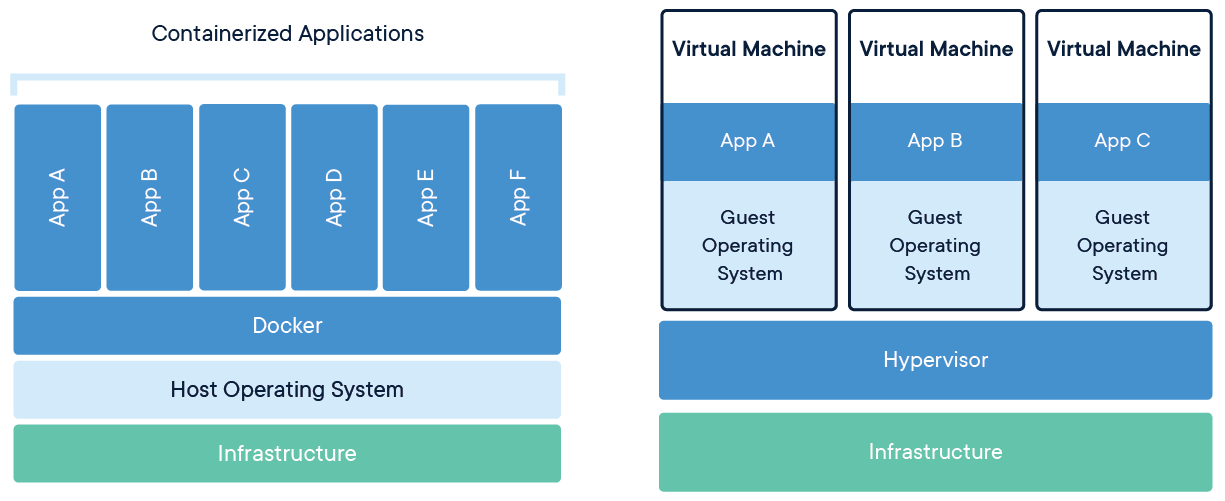
Containers and virtual machines have similar resource isolation and allocation benefits, but function differently because containers virtualize the operation instead of hardware. Containers are more portable and efficient.
| Containers | Virtual Machines |
|---|---|
| Containers are an abstraction at the app layer that packages code and dependencies together. Multiple containers can run on the same machine and share the OS kernely with other containers, each running as isolated processes in user space. Containers take up less space than VMs (container images are typically tens of MBs in size), can handle more applications and require fewer VMs and Operating Systems. | Virtual Machines (VMs) are an abstraction of Physical hardware turning one server into many servers. The hypervisor allows multiple VMs to run on a single machine. Each VM includes a full copy of an OS, the application, necessary binaries and libraries - taking up tens of GBs. VMs can also be slow to boot. |
First we need to install Docker: Windows | Mac | Linux
Once thats downloaded, simply run the .exe that is downloaded and follow the steps in the install wizard.
Please be aware that virtualization needs to be turned on for this to work if you are on Windows. To do that go into your BIOS and turn it on. The Install Wizard will ask you to turn on Hyper-V a feature only available for Windows 10 Pro | Education and Community editions.
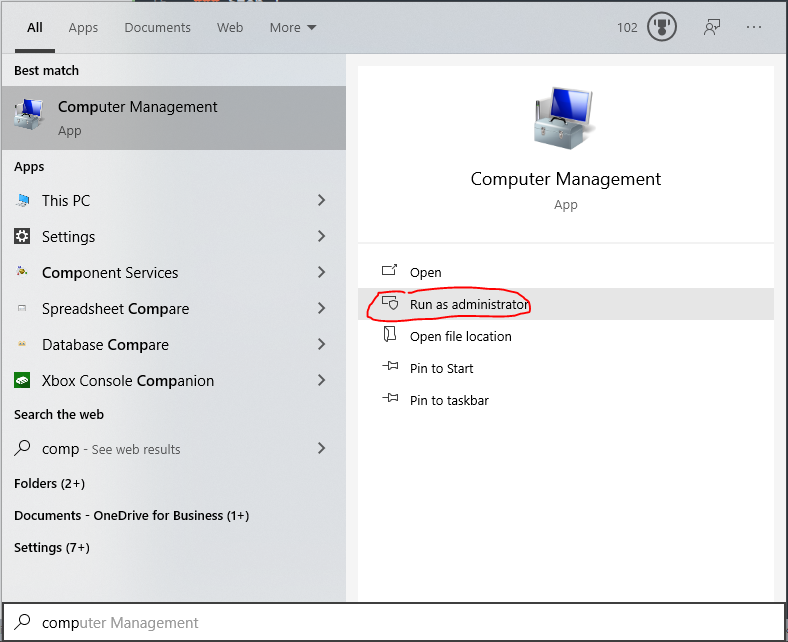
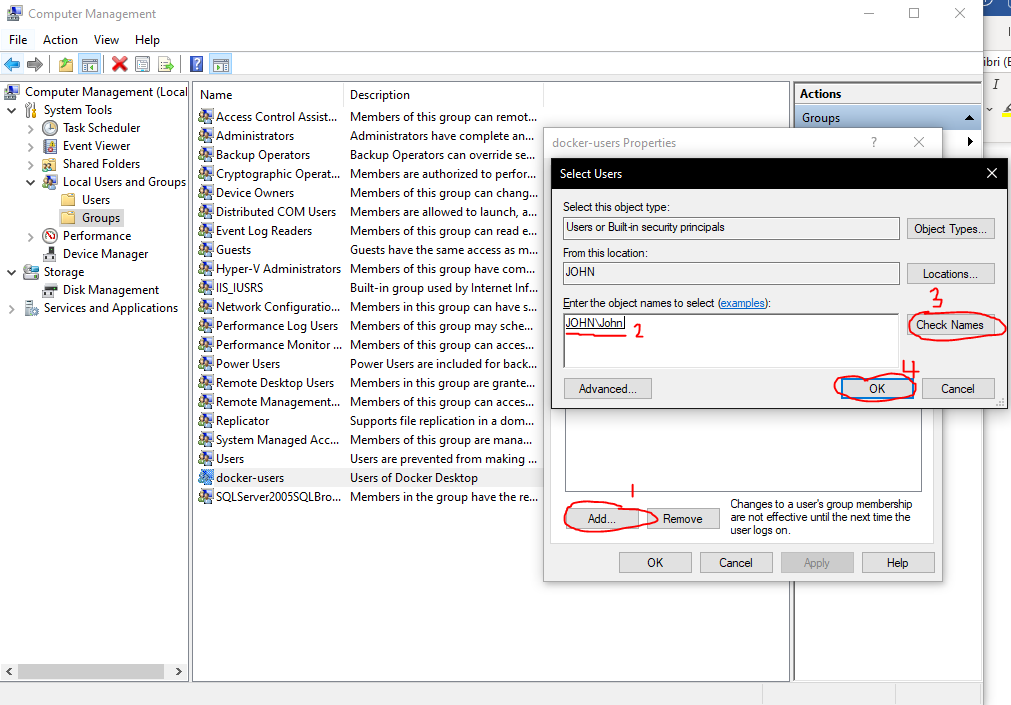
Navigate to Computer Management and run as administrator
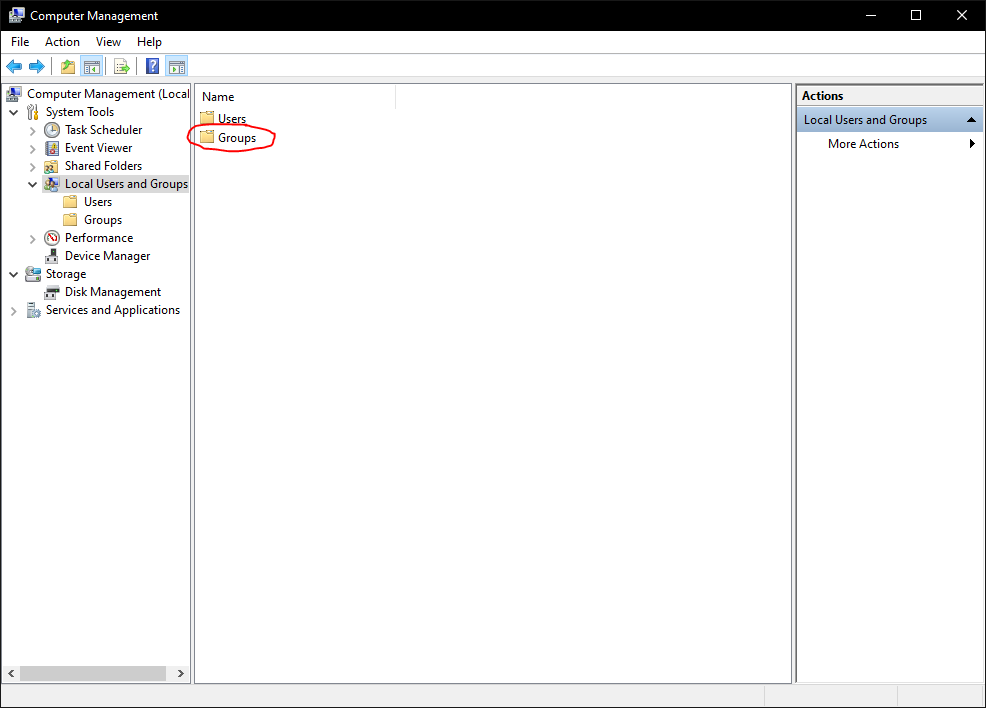
Double click the Groups folder
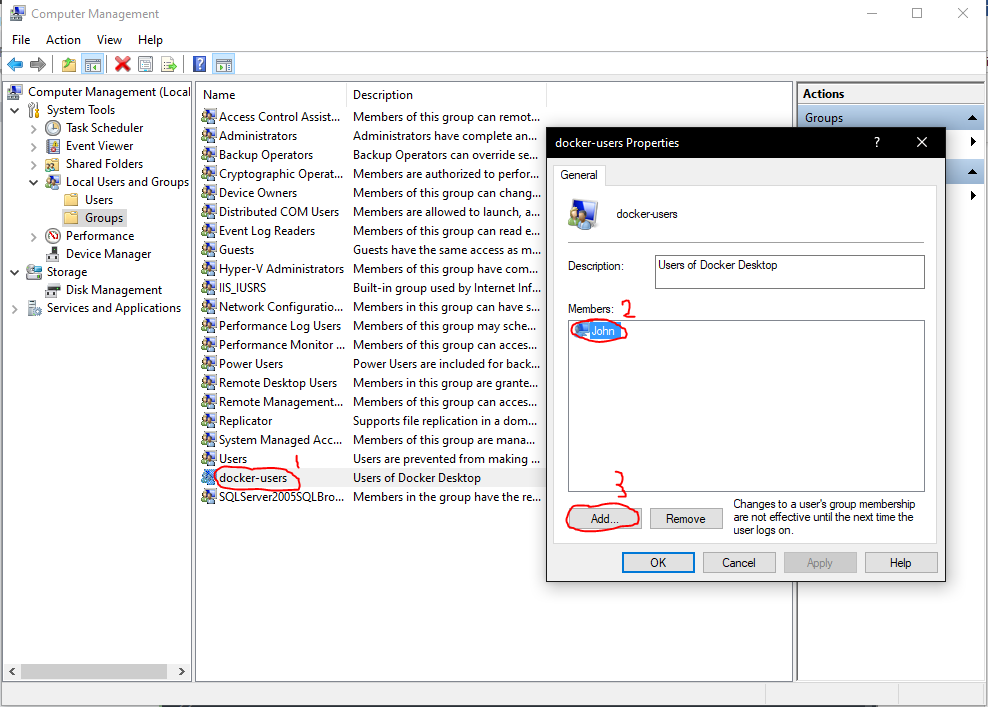
- Double click
Docker users - Select your user in my case it was
John - Click
Add
- After you have clicked
Add - Type in your user; in my case
John - Click
Check namesand then finally click - Click
Okand then exit out.
That is the first part of the docker set up, now Restart your PC and then open Docker on launch.
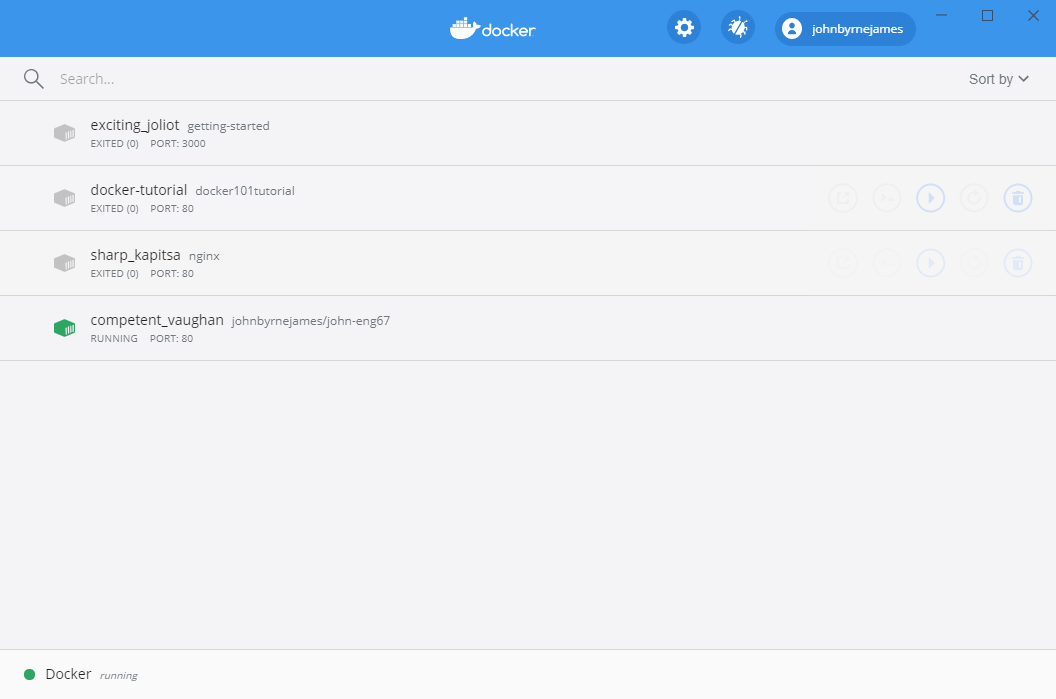
It should look like this.
Minus the containers as that is what I have created.
You can either follow the tutorial Docker provides and then do this or skip it and follow my tutorial below.
Now lets check if docker is running on our PC... open your GitBash in Administrator and you can run the following commands...
# print out list of docker commands ~ only works if it is installed
docker

# Check docker version too
docker --version
Now lets create a container! We are going to create a simple image that is running on NGINX. lets first pull the image from the official repo on Docker-Hub
# Pull NGINX image
docker pull nginx# Check currently stored images on your docker
docker images
# Check your currently associated container
docker ps
# Check all currently created containers (-a = all)
docker ps -a
# pull images from Docker Hub
docker pull <image_name>
# Remove a container (-f = force removal)
docker rm <container_id/container_name> -fNow we know about these commands lets initialise our container and then view it in our browser. When running the image we create it as a container, it is assigned an ID and random name that it can be referred to by.
# Create a container using the NGINX image, on (-p = port) port 80
# This is on our local machine and 80 in the web
docker run -p 80:80 <image_name>

# With NGINX
docker run -p 80:80 nginx
80:80 is mapping the ports for your container and means that when you go in your browser and go to localhost:80 It should load the NGINX default home page. This can be done on any OS as it is not dependent on it; which is where dockers power really comes from.
The app in my browser
If you want to know how to create a repository on [Docker Hub] then follow the next step.
If you want to set up a Docker Hub Repository then follow these steps. In this case I am going to take the NGINX image and then change the tag and push it to my own repository.
If you havent got a Docker Hub Account make one
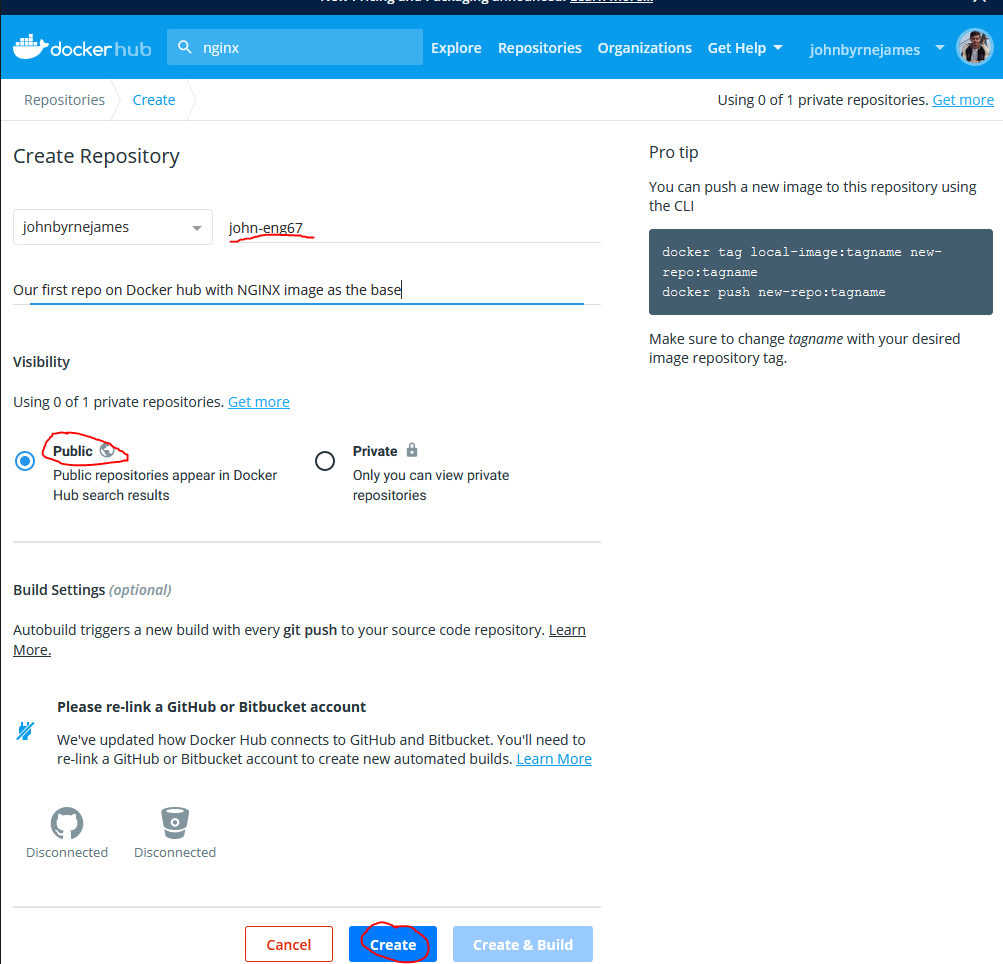
First Create a new Repository
- Go to
Repositories - Click
Create Repository
Now give it a good name, make it public and create it
Once thats done, go back to your GitBash Terminal.
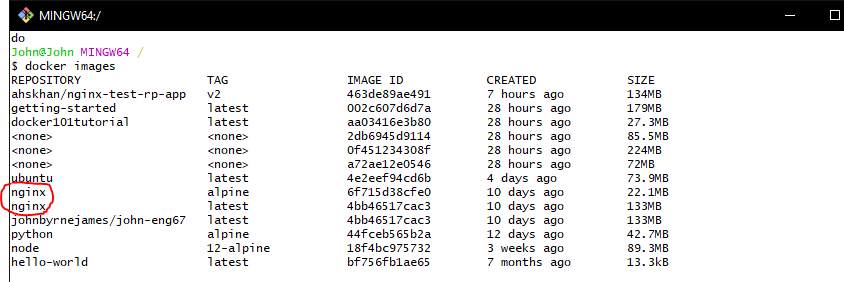
Lets then check our images to check if we have the NGINX image downloaded.
# List images stored on your docker
docker images
If you have NGINX then you are set, if not run the command docker pull nginx.
Log in to your Docker
# This logs you in and asks for your ID and password
docker login
Now lets rename it and then push it the repository we just made on our Docker Hub.
# Copy the image and rename it
docker tag <local_image> <newname_for_copy_of_image>

# In my case
docker tag nginx johnbyrnejames/john-eng67

# Push the new image you have created up to your Repo
docker images
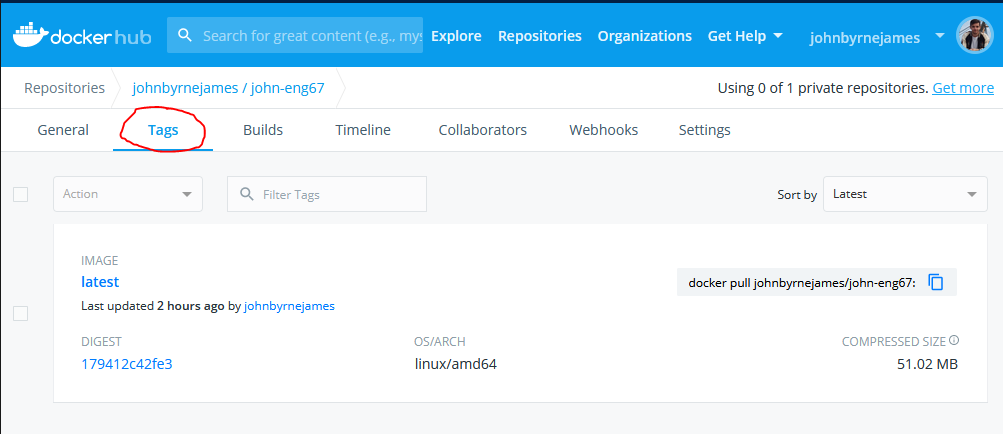
docker push johnbyrnejames/john-eng67
That is it you should now see the image on your Docker Hub if you go to the Repository...
Like GitHub this is a version control system and can facilitate the rollback, storage and distribution of an image. This image is now able to be pulled and run on your local machine.
# Pull your newly created image on your Repo <latest version>
docker pull johnbyrnejames/john-eng67:latest

# Now lets run a disposable container to check it (-it=interactable)
# (--rm=removal_on_exit)
docker run -it --rm -p 80:80 johnbyrnejames/john-eng67

# Once you exit with Ctrl+C lets run a detached instance of our image
# (-d=detached)
docker run -d -p 80:80 johnbyrnejames/john-eng67
The image under your name should now be available on port 80 of local host in your browser. You can also enter the container using a shell access command, this allows you to make changes the container.
# Set environment variable to use the winpty agent with docker
alias docker="winpty docker"

# Now lets go into your container (-it = interactable)
docker exec -it <name_of_container/id_of_container> sh

# Get name of your container with
docker ps -a
This is where you can find your image identifiers: name or id
So in my case
# Go into container with its name
docker exec -it competent_vaughan sh

# Go into container with its id
docker exec -it fff6e1212532 sh# Copy in file to container
docker cp index.html wonderful_bardeen:usr/share/nginx/html
# Stop/ Start container
docker stop/start wonderful_bardeenNow to create that new container into an image that can be pushed to your Docker Hub you simply need to make the changes, and commit them, then push them up to the Repository.
# Commit changes with new tag:v1 / v2 Ect..
docker commit thirsty_wing johnbyrnejames/john-eng67:new_index

docker push johnbyrnejames/john-eng67:new_indexCreate a file with the name Dockerfile and then add the following lines of code.
# Select the base image to build your own customised node-app micro-service

FROM node:alpine

# Working directory inside the container

WORKDIR /usr/src/app

# Copy dependencies
# Copy all packages with .json extension to app folder

COPY package*.json ./

# Install npm

RUN npm install

# 1. (. = copy whole current directory) 2. (. = to current working directory)

COPY . .

# expose the port (3000 default node app port)

EXPOSE 3000

# Start app with CMD | node

CMD ["node", "app.js"]
This is a file that can be run when building your own image, then it and if the app1 folder is in the same directory it will copy that inside the container and run the app using the command "node app.js".
# Run Dockerfile (. = pick dockerfile from current directory)
docker build -t johnbyrnejames/nginx-app:v1 .

# push our new image to our Dockerhub . =
docker push johnbyrnejames/nginx-app:v1