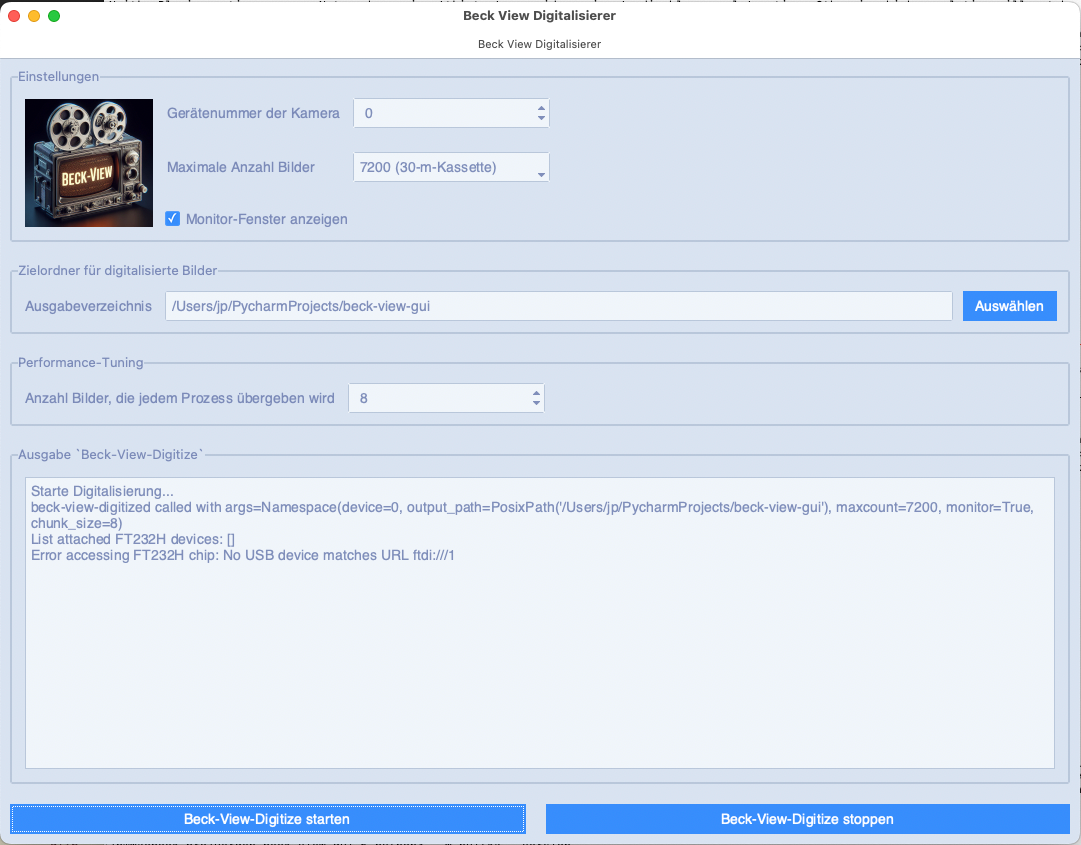
The Beck-View GUI App supplies a user-friendly interface to configure the various settings for the Beck-View-Digitalize
Application, such as output directory, camera device number, and other technical attributes. It is built
using ttkbootstrap for a modern and consistent look and feel across different operating systems.
- Device Configuration: Select the camera device and set the maximum number of frames to digitize.
- Output Directory: Choose the directory where the digitized images will be saved.
- Performance Tuning: Set the chunk size for parallel processing of images.
- Real-time Monitoring: Optionally display a preview window with the digitized images.
- Subprocess Management: Start and stop the digitization process with proper handling of subprocess termination for cleanup.
- Python 3.8 or later
- Dependencies listed in
requirements.txt
-
Clone the repository:
git clone https://github.com/JuPfu/beck-view-gui.git cd beck-view-gui -
Set up a virtual environment:
python -m venv venv
source venv/bin/activate  # On Windows use `venv\Scripts\activate`
-
Install the dependencies:
pip install -r requirements.txt
-
Start the Application:
- Run
python beck_view_gui.pyto launch the GUI.
- Run
-
Configure Settings:
- Select the camera device number.
- Choose the maximum number of frames to digitize.
- Set the output directory for digitized images.
- Adjust the chunk size for parallel image processing.
- Enable the monitor window if needed.
-
Start Digitization:
- Click the "Start Digitization" button to begin the process.
- The output from the subprocess will be displayed in real-time in the output text area.
-
Stop Digitization:
- Click the "Stop Digitization" button to terminate the subprocess. The subprocess will handle cleanup before exiting.
To distribute Beck View GUI as a standalone executable, you can use Nuitka, a Python-to-C++ compiler. Below are the steps to set up and create the executable.
-
Install Nuitka:
pip install nuitka
-
Install required C/C++ compilers:
Follow the
Nuitkaguidelines for the installation of required C/C++ compilers.
-
Compile the Python script:
Navigate to the project directory where
beck-view_gui.pyis located and run:- Windows
python -m nuitka --windows-console-mode=disable --windows-icon-from-ico=beck-view-digitize.png -o "beck-view-gui" beck_view_gui.py- MacOS
python3 -m nuitka --macos-app-icon=beck-view-digitize.png --enable-plugin=tk-inter --follow-imports --onefile --macos-app-mode=gui -o "beck-view-gui" beck_view_gui.pyWith
Nuitkaversion 2.1.6 the build process fails on macOS[!WARNING] FATAL: Error, call to 'codesign' failed: ['/usr/bin/codesign', '-s', '-', '--force', '--deep', '--preserve-metadata=entitlements', 'beck-view-gui'] -> b'beck-view-gui: bundle format unrecognized, invalid, or unsuitable\nIn subcomponent: /Users/jp/PycharmProjects/beck-view-gui/beck_view_gui.build'.
-
Running the Executable:
After the compilation is complete,
Nuitkawill give you a notice where to find the executable. You can run it directly:
Contributions are welcome! Please follow these steps:
- Fork the repository.
- Create a new branch (
git checkout -b feature-branch). - Commit your changes (
git commit -am 'Add new feature'). - Push to the branch (
git push origin feature-branch). - Create a new Pull Request.
This project is licensed under the MIT License. See the LICENSE file for more details.
For questions or suggestions, please open an issue on GitHub.
This README provides an overview of the project, installation instructions, usage guidelines, and steps to create an executable with Nuitka. Feel free to adjust it according to any additional details specific to your project.
