🛠️ Here for a workshop? Go to the workshop folder to get started! 🛠️
PetSpotR allows you to use advanced AI models to report and find lost pets. It is a sample application that uses Azure Machine Learning to train a model to detect pets in images.
It also leverages popular open-source projects such as Dapr and Keda to provide a scalable and resilient architecture.
- Bicep - Infrastructure as code
- Bicep extensibility Kubernetes provider - Model Kubernetes resources in Bicep
- Azure Kubernetes Service
- Azure Blob Storage
- Azure Cosmos DB
- Azure Service Bus
- Azure Machine Learning
- Hugging Face - AI model community
- Azure Load Testing - Application load testing
- Blazor - Frontend web application
- Python Flask - Backend server
- Dapr - Microservice building blocks
- KEDA - Kubernetes event-driven autoscaling
Note: This application is a demo app which is not intended to be used in production. It is intended to demonstrate how to use Azure Machine Learning and other Azure services to build a scalable and resilient application. Use at your own risk.
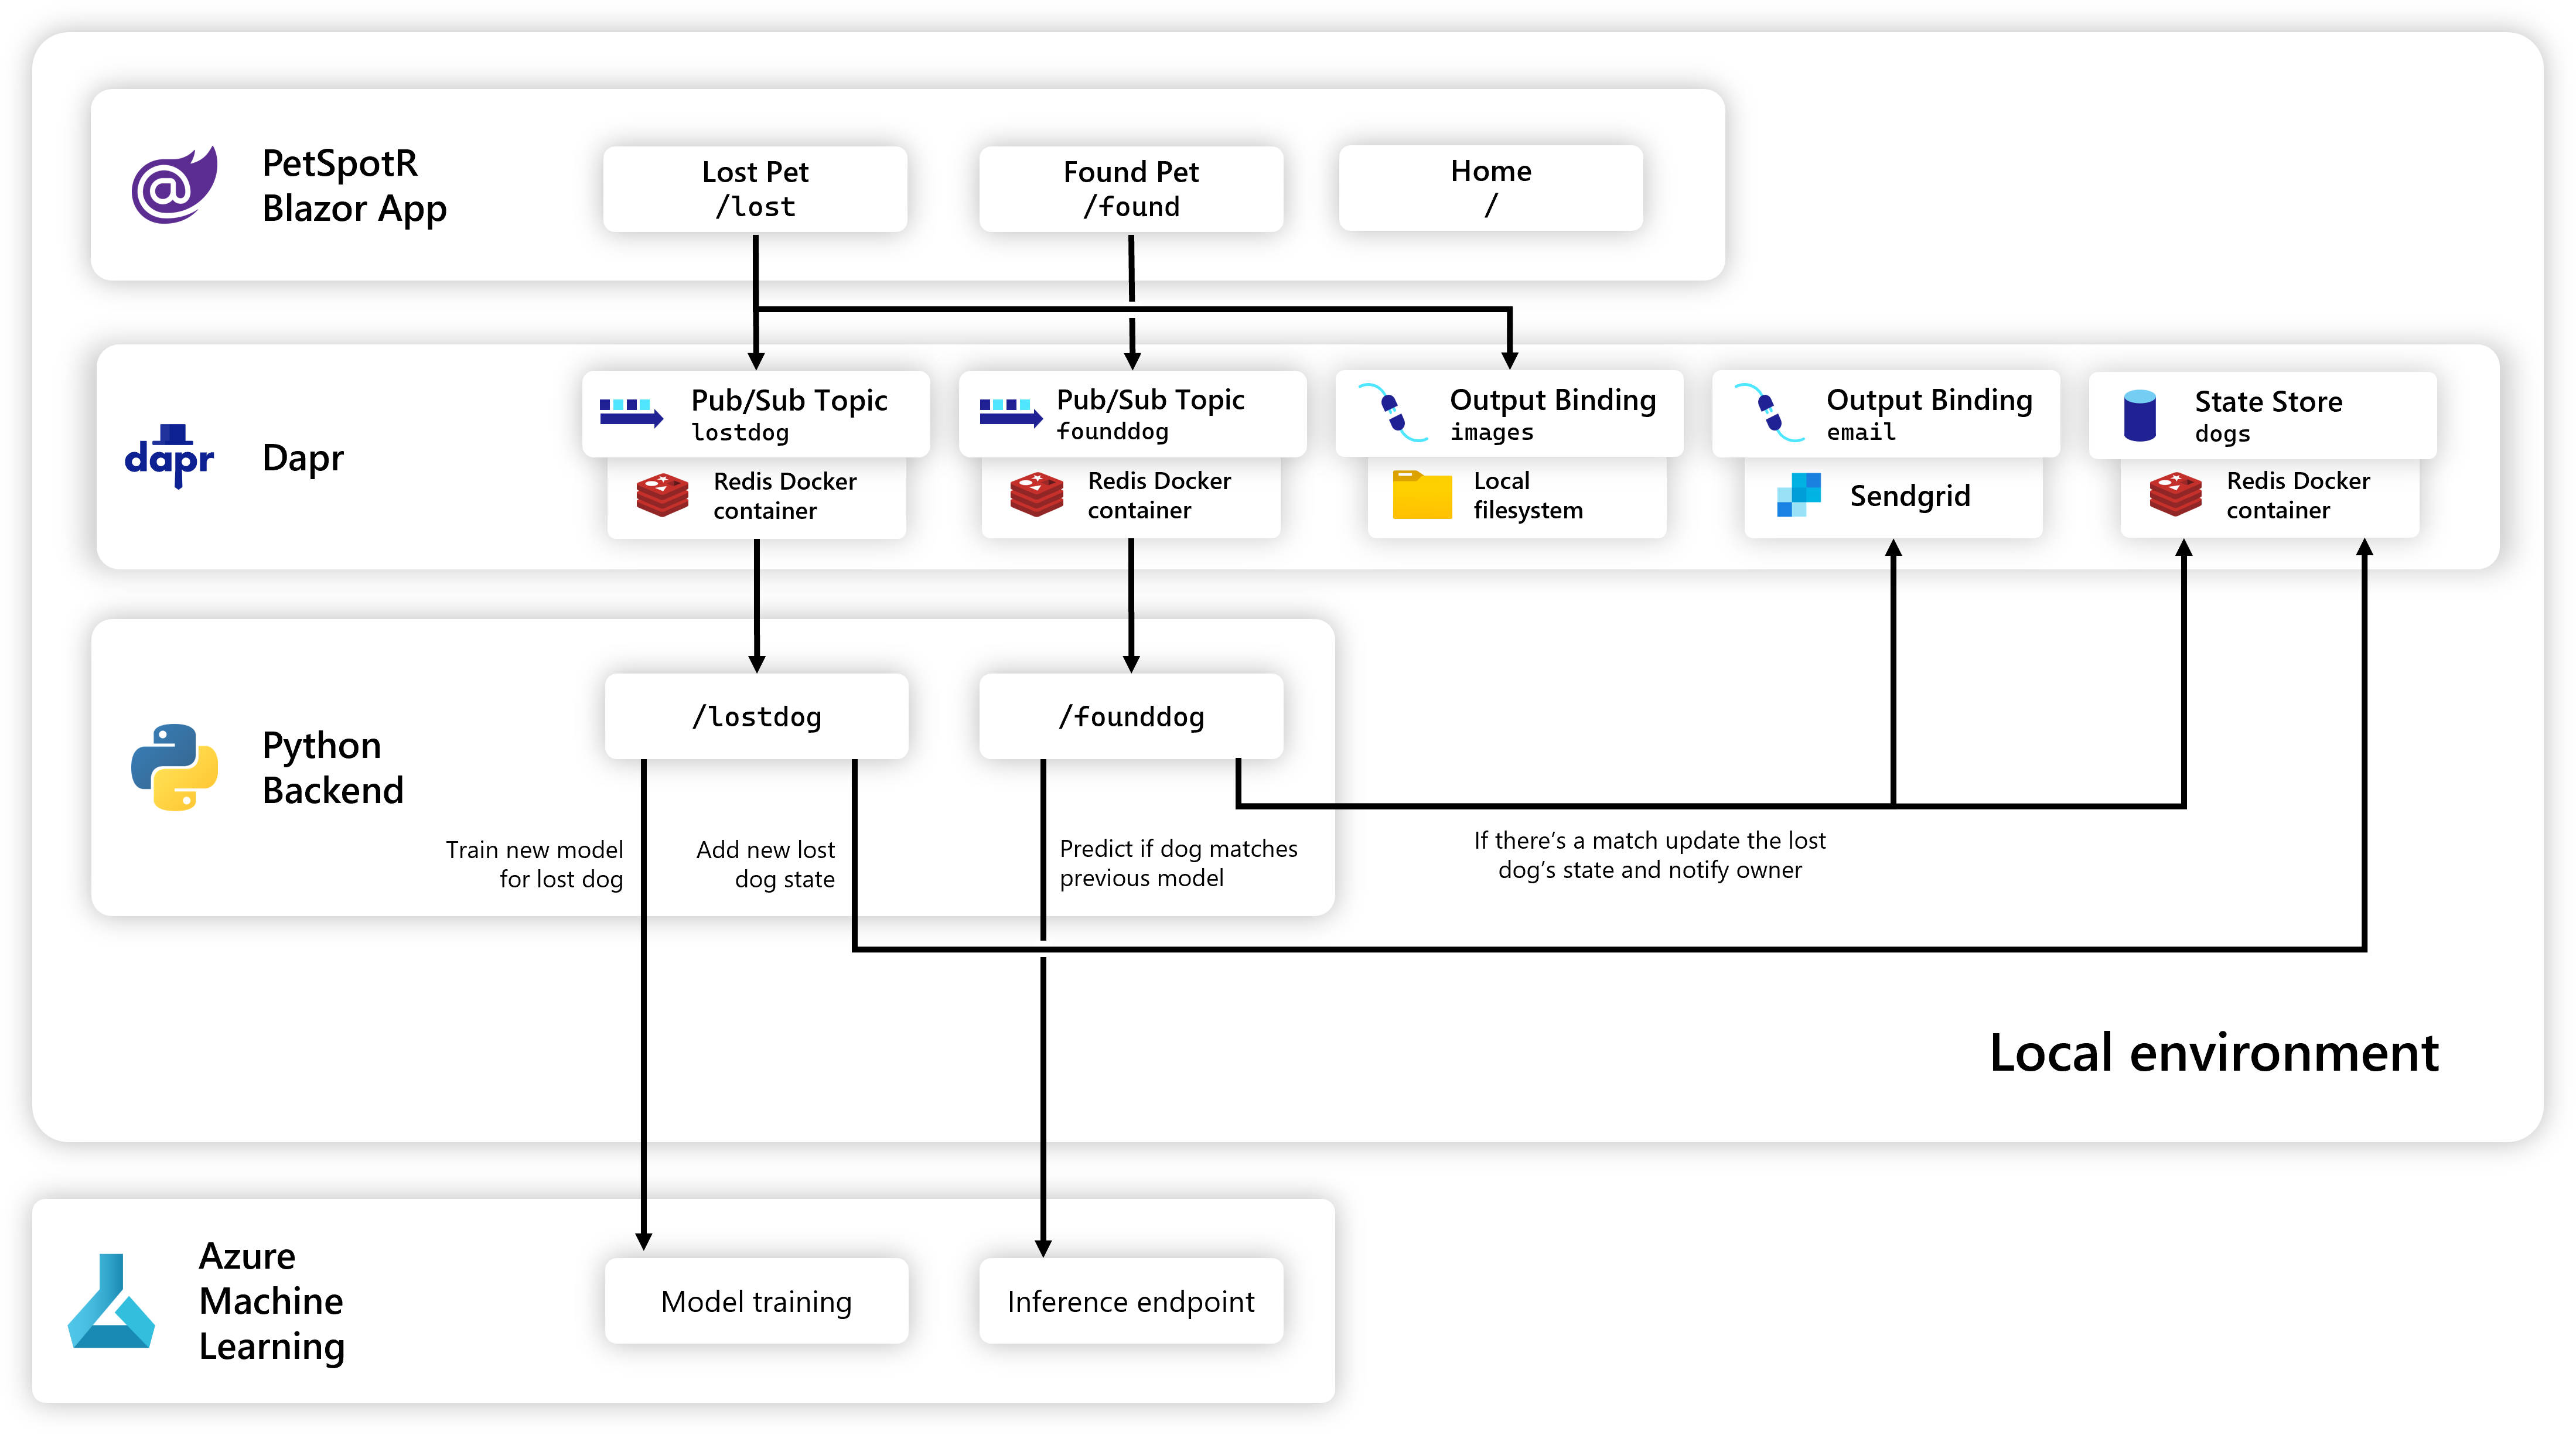
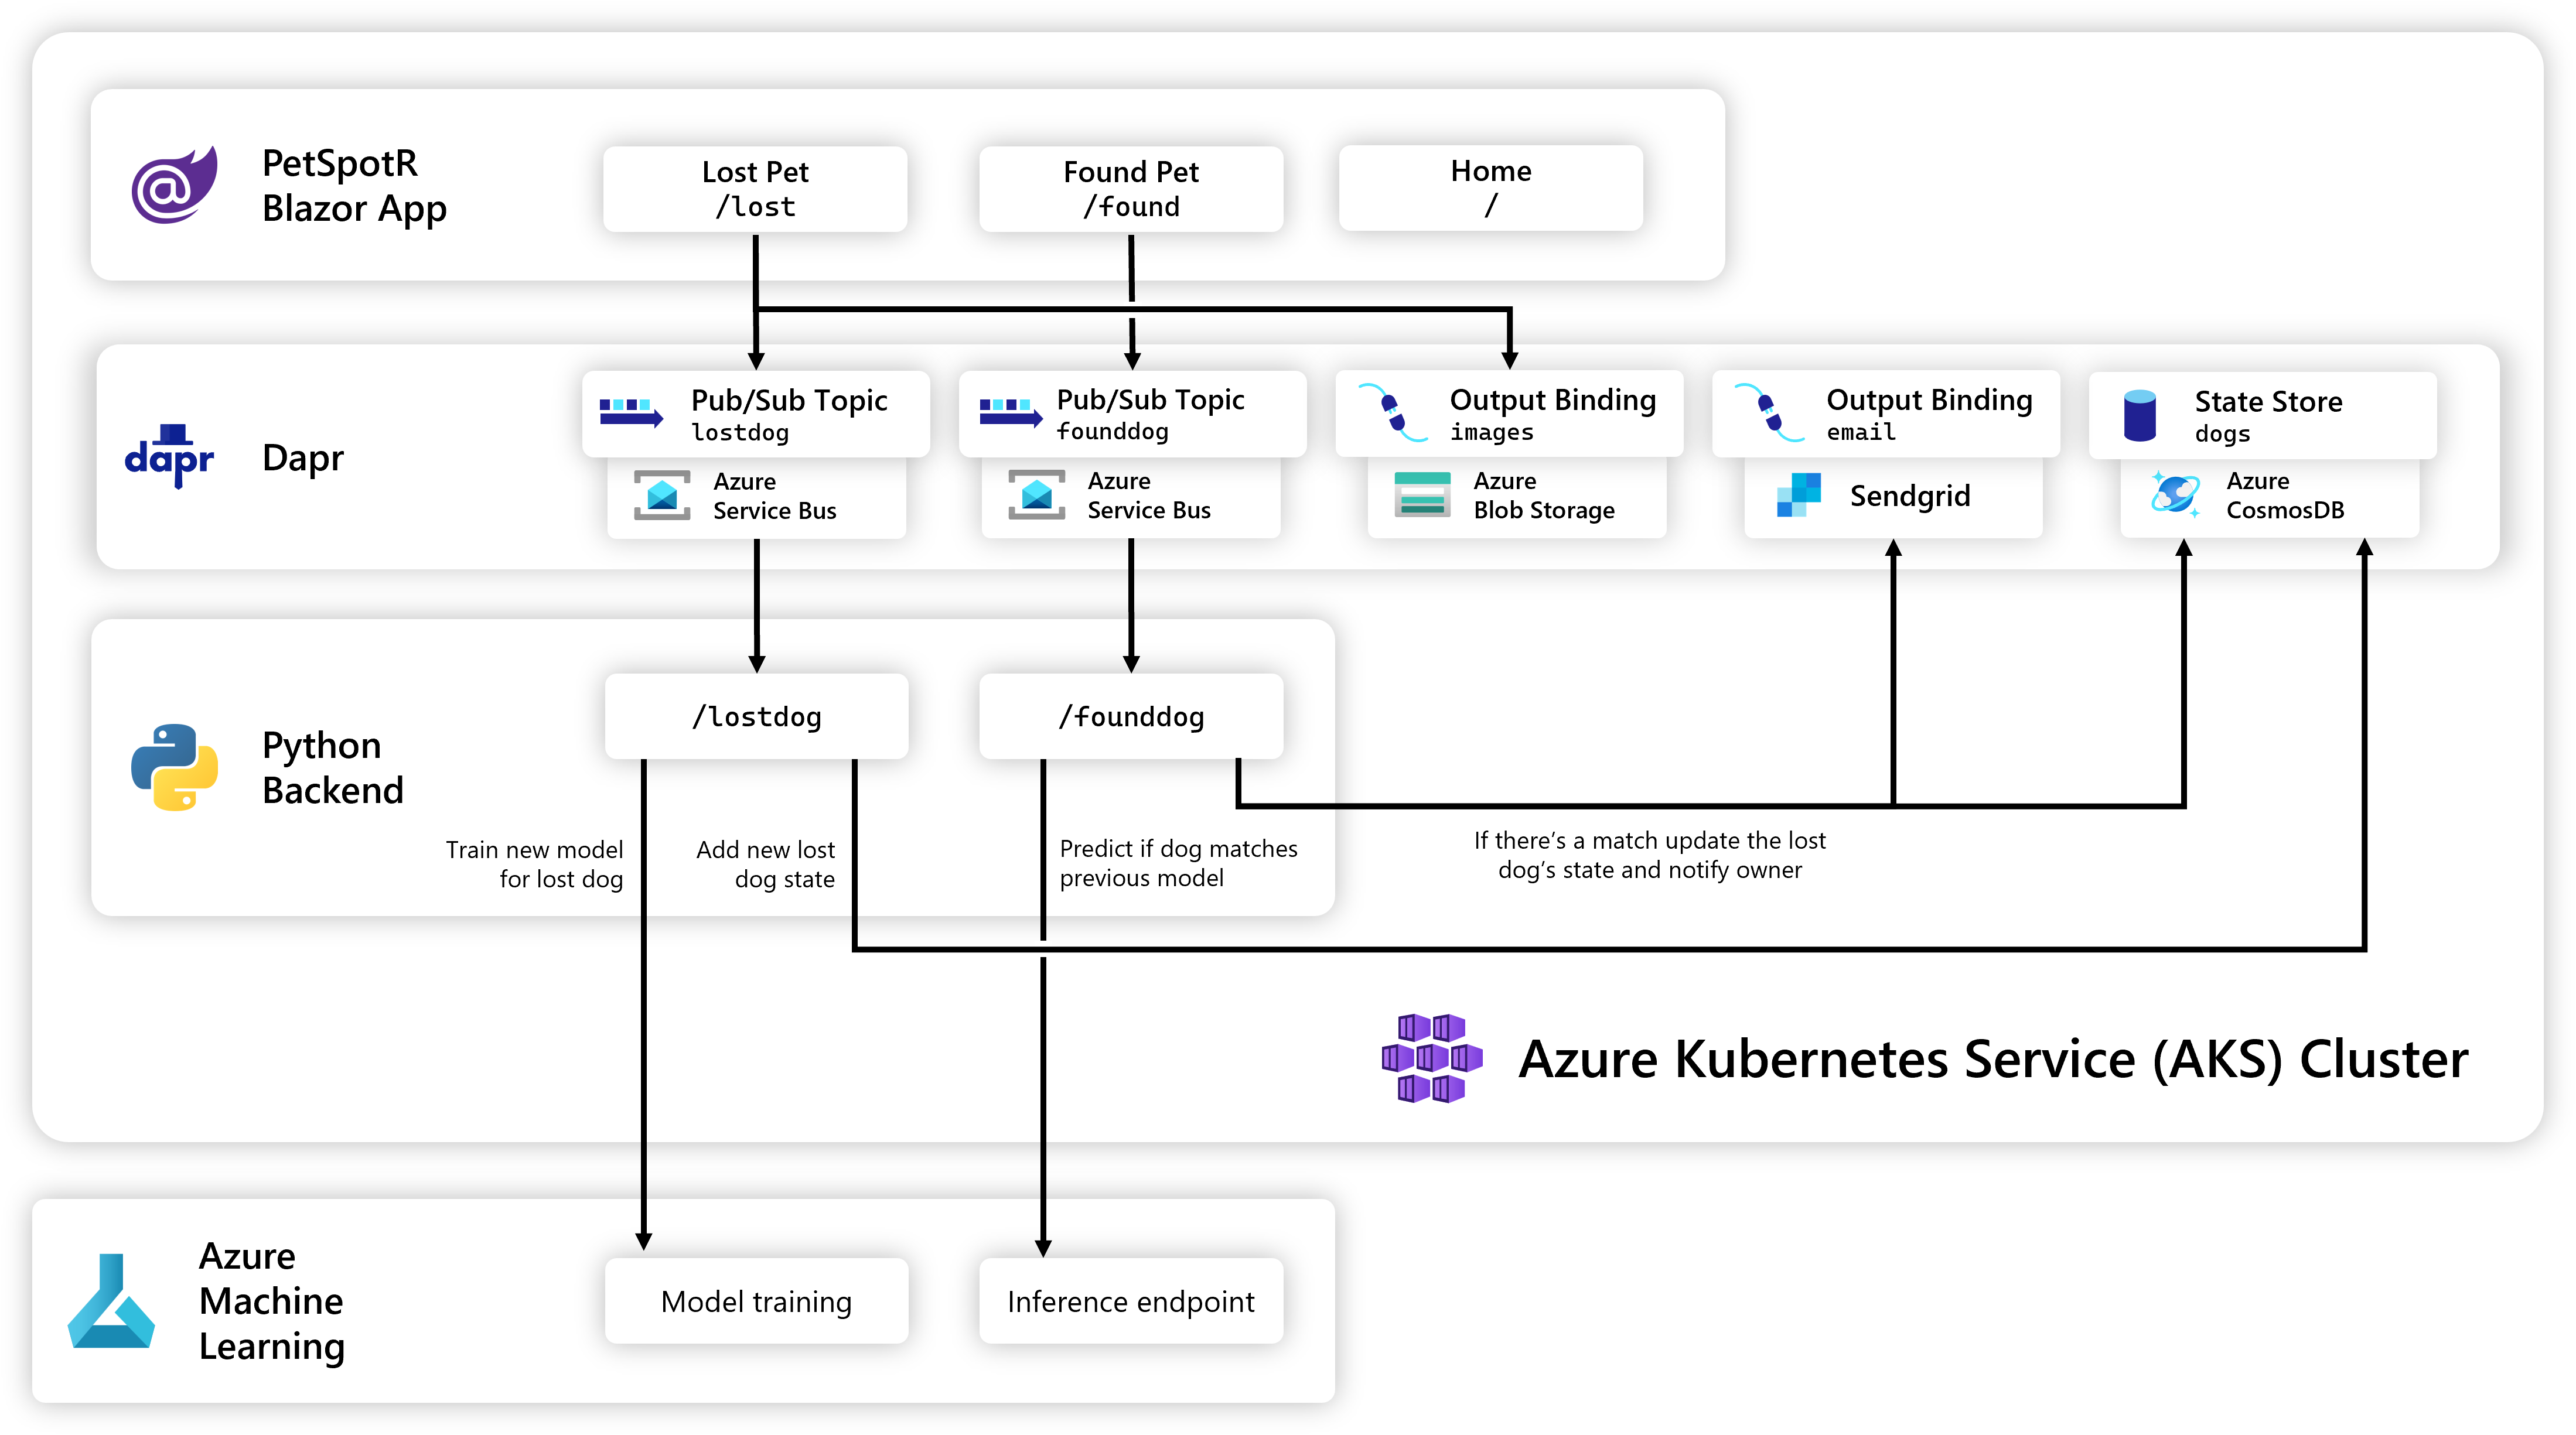
Moving from local to cloud is as simple as swapping out the local Dapr components with their cloud equivalents:
PetSpotR is a microservices application that uses Azure Machine Learning to train a model to detect pets in images. It also uses Azure Blob Storage to store images and Azure Cosmos DB to store metadata, leveraging Dapr bindings and state management to abstract away the underlying infrastructure.
The frontend is a .NET Blazor application that allows users to upload images and view the results. The backend is a Python Flask application that uses Azure Machine Learning to train and score the model.
The application uses Azure Machine Learning to train a model to detect pets in images. The model is sourced via Hugging Face, which is a community of AI researchers and developers. The model is trained using the Azure Machine Learning Compute Instance, which is a managed compute environment for data scientists and AI developers.
The application uses the Dapr state management API to abstract away the underlying infrastructure. When the application is running locally, the state is stored in a lightweight Redis container. When the application is running in the cloud, the state is stored in Azure Cosmos DB.
The application uses the Dapr pub/sub API to abstract away the underlying infrastructure. When the application is running locally, the messages are sent via a lightweight Redis container. When the application is running in the cloud, the messages are sent via Azure Service Bus.
The application uses the Dapr bindings API to abstract away the underlying infrastructure. When the application is running locally, the images are stored in the local filesystem. When the application is running in the cloud, the bindings are stored in Azure Blob Storage.
The application scales using KEDA, which allows you to scale based on the number of messages in a queue. The application uses Azure Service Bus to queue messages for the backend to process, leveraging Dapr pub/sub to abstract away the underlying infrastructure.
Azure Load Testing is used to simulate a large number of users uploading images to the application, which allows us to test the application's scalability.
- Azure subscription
- Note: This application will create Azure resources that will incur costs. You will also need to manually request quota for
Standard NCSv3 Family Cluster Dedicated vCPUsfor Azure ML workspaces, as the default quota is 0.
- Note: This application will create Azure resources that will incur costs. You will also need to manually request quota for
- Azure CLI
- Dapr CLI
- Helm
- Docker
- Python 3.8
- Dotnet SDK
- Bicep extensibility
You can run this application in a GitHub Codespace. This is useful for development and testing. The ML training and scoring will run within an Azure Machine Learning workspace in your Azure subscription.
- Click the
Codebutton and selectOpen with Codespaces - Wait for the Codespace to be created
- Hit 'F5' or open the
Run and Debugtab and select✅ Debug with Dapr
The services in this application can be run locally using the Dapr CLI. This is useful for development and testing. The ML training and scoring will run within an Azure Machine Learning workspace in your Azure subscription.
- Install the Dapr CLI
- Initialize Dapr
dapr init
- Configure your Dapr images component for Windows or Mac
- Open ./iac/dapr/local/images.yaml
- Uncomment the appropriate section for your OS, and comment out the other section
- Deploy the required Azure resources
az deployment group create --resource-group myrg --template-file ./iac/infra.bicep --parameters mode=dev
- Run the backend
cd src/backend dapr run --app-id backend --app-port 6002 --components-path ../../iac/dapr/local -- python app.py - Run the frontend
cd src/frontend/PetSpotR dapr run --app-id frontend --app-port 5114 --components-path ../../../iac/dapr/local -- dotnet watch - Navigate to http://localhost:5114
- Ensure you have access to an Azure subscription and the Azure CLI installed
az login
az account set --subscription "My Subscription"
- Clone this repository
git clone https://github.com/azure-samples/petspotr.git cd petspotr - Deploy the infrastructure
az deployment group deployment create --resource-group myrg --template-file ./iac/infra.json
- Deploy the configuration
az deployment group deployment create --resource-group myrg --template-file ./iac/config.json
- Get AKS credentials
az aks get-credentials --resource-group myrg --name petspotr
- Install Helm Charts
helm repo add dapr https://dapr.github.io/helm-charts/
helm repo add kedacore https://kedacore.github.io/charts
helm repo update
helm upgrade dapr dapr/dapr --install --version=1.10 --namespace dapr-system --create-namespace --wait
helm upgrade keda kedacore/keda --install --version=2.9.4 --namespace keda --create-namespace --wait
- Log into Azure Container Registry
You can get your registry name from your resource group in the Azure Portal
az acr login --name myacr
- Build and push containers
docker build -t myacr.azurecr.io/backend:latest ./src/backend
docker build -t myacr.azurecr.io/frontend:latest ./src/frontend
docker push myacr.azurecr.io/petspotr:latest
docker push myacr.azurecr.io/frontend:latest
- Deploy the application
az deployment group deployment create --resource-group myrg --template-file ./iac/app.json
- Get your frontend URL
kubectl get svc
- Navigate to your frontend URL


