This is a sample application demonstrating the use of the LTPA Based Security Check to protect an IBM MobileFirst Platform resource adapter. This will allow your application to authenticate a user against repositories on the liberty server like LDAP.
This sample contains 4 components:
- The LTPA Based Security Check - This security check validates that the incoming request contains a valid LTPA2 cookie, and extracts the user from it.
- The Resource Adapter - This is the resource adapter which is protected by the LTPA Based Security Check.
- The WAR project - This is the WAR project which has the protected resources by Liberty / WebSphere.
- The Sample Swift Application - This Swift application sample calls to the resource adapter and displays an alert with "Hello {User}" after a successful authentication.
- Understanding the IBM MobileFirst Platform Authentication and Security.
- Understanding the IBM MobileFirst Platform Java Adapters.
- Pre-installed IBM MobileFirst Platform development environment.
-
Deploy the security check and the resource adapter:
- To be able to build ltpa-based adapter you will have to run the following:
mvn install:install-file -Dfile=<MFP Install Path>/mfp-server/lib/com.ibm.websphere.security_1.0.11.jar -DgroupId=com.ibm.websphere -DartifactId=security -Dversion=1.0.11 -Dpackaging=jarNOTE: version for com.ibm.websphere.security_1.0.11 jar can be different, so in such case you will have to change the path above.
The dependency in the pom file should look like:
<dependency>
   <groupId>com.ibm.websphere</groupId>
   <artifactId>security</artifactId>
   <version>1.0.11</version>
   <scope>provided</scope>
</dependency>
- From a terminal window, navigate to the /ltpa-based project's root folder and run the commands:
mfpdev adapter build mfpdev adapter deploy-
Navigate to /HelloLTPAUserResourceAdapter and run against the above commands.
-
Your adapters are deployed now.
-
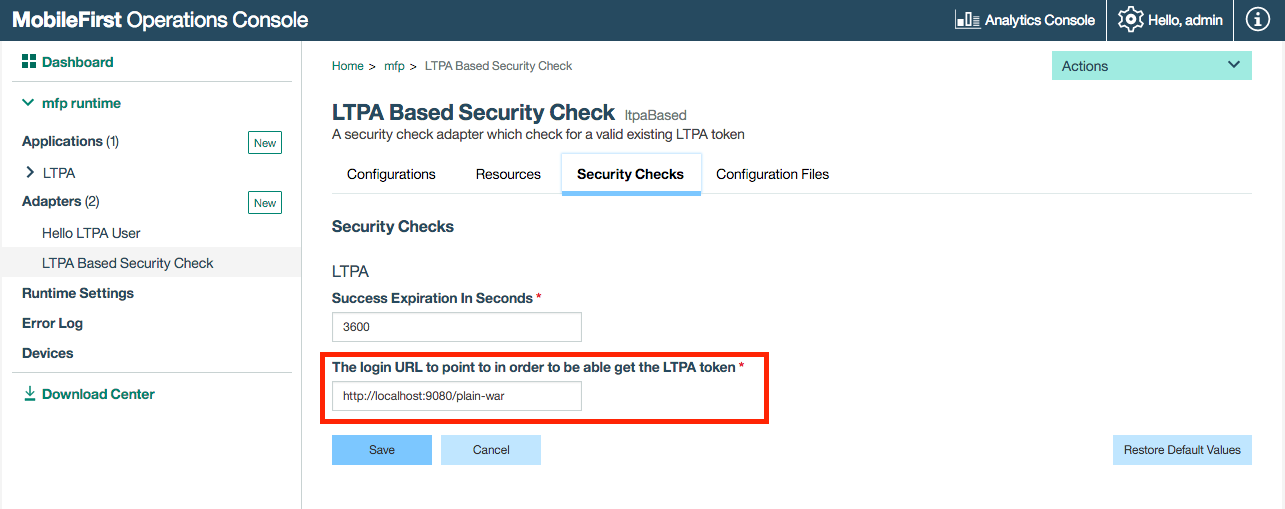
Configure The LTPA Based Security Check:
- From a terminal window run the following command:
mfpdev server console- Navigate to the Security checks tab and configure the
login URL:- For BASIC authentication, set the login URL to point to your deployed WAR context (e.g: http://localhost:9080/plain-war).
- For FORM-BASED authentication, set the login URL point to the FORM action (e.g: http://localhost:9080/plain-war/j_security_check).
- The sample by default is configured to use the BASIC authentication method. In order to change it to FORM-BASED authentication edit the following:
- web.xml in the plain-war project.
- LTPAChallengeHandler.swift in the LTPABasedSample XCode project.
-
Install and deploy the war file:
- From a terminal window, navigate to the plain-war project's root folder and run the command:
mvn install- From target folder copy the created file plain-war.war into your running liberty server (you can use IBM MobileFirst Platform server for this purpose) and map it in server.xml. For instance, if you copy plain-war.war file into mfp-server folder on your server, then in your server.xml you will need to add the following:
  <server>
  .
  .
  .
  <application id="plain-war"
               name="plain-war" location="${wlp.install.dir}/plain-war.war"
               type="war">
      <application-bnd>
          <security-role name="AllAuthenticated">
              <special-subject type="ALL_AUTHENTICATED_USERS" />
          </security-role>
      </application-bnd>
  </application>
  .
  .
  .
  </server>
-
Register the sample app:
- From a terminal window, navigate to the Swift App XCode project's root folder and run:
mfpdev app register -
Run the sample app:
-
Open LTPABasedSample.xcworkspace
-
In the XCode project open mfpclient.plist and change the host property to
localhostor to the domain you just configured on the security check adapter (The LTPA2 is a Cookie, so the domains need to be equals due to Cross-site request forgery policy) -
You can now run the application.
-
If you are are running this sample in front of new development liberty / MFP server then the user repository can be found inside the server.xml file:
<server>
  ...
  <basicRegistry>
    ...
    <user name="admin" password="admin"/>

  </basicRegistry>
...
</server>
-

Connecting to LDAP can be done with simple configuration in server.xml. To learn more see Configuring LDAP user registries in Liberty.
For example, to be able test the connection to an Online LDAP Test Server you need to add the following in your liberty server.xml file:
<server>
  <featureManager>
    ...
    <feature>ldapRegistry-3.0</feature>
    ...
  </featureManager>
  ...

  <ldapRegistry baseDN="dc=example,dc=com" bindDN="cn=read-only-admin,dc=example,dc=com" bindPassword="password" port="389" host="ldap.forumsys.com" reuseConnection="false" returnToPrimaryServer="false" realm="BasicRegistry" ldapType="Custom"/>

  ...
</server>For a technical overview see the following blog - Working with LDAP and LTPA in IBM MobileFirst Platform Foundation 8.0 Beta
IBM MobileFirst Platform Foundation 8.0
Copyright 2016 IBM Corp.
Licensed under the Apache License, Version 2.0 (the "License"); you may not use this file except in compliance with the License. You may obtain a copy of the License at
http://www.apache.org/licenses/LICENSE-2.0
Unless required by applicable law or agreed to in writing, software distributed under the License is distributed on an "AS IS" BASIS, WITHOUT WARRANTIES OR CONDITIONS OF ANY KIND, either express or implied. See the License for the specific language governing permissions and limitations under the License.