- About
- GitHub and Git Installation Instructions
- Important Webcast Links
- Additional PyLadies Resources
- Slides and Script Table of Contents
- Slides and Script
- Useful Resources
- Links
- Bash
- Avoiding Cloning Conflicts
- Local Development
- Review Shared Repo Pull Request
- Review Forked Repo Pull Request
- Merge Pull Request Locally and Push to Master Branch
- Alternatively, Fetch Individual Pull Request
- Delete a Branch
- Common Branch Commands
- Common Add and Commit Commands
- Common Push and Pull Commands
- Fetch and Merge Versus Pull
- Adding a Remote Upstream and Syncing a Fork
- Keeping Branches Up-to-Date
- Attribution
- Contact Kati
- Copyright
Slides and script for a talk Katherine "Kati" Michel (Twitter, GitHub) gave for PyLadies Remote, Saturday, August 26, 2017 at 11:00 a.m. CST.
- Eventbrite Link (expired)
- PyLadies Remote tlk.io Chat Forum
- DjangoCon GitHub Repo
- DjangoCon U.S. 2017 Website Repo GitHub
- Collaboration and Code Review Classroom GitHub
PyLadies and PyLadies Remote
- PyLadies, PyLadies GitHub, and PyLadies Slack
- PyLadies Remote Twitter
- PyLadies Remote Website GitHub
- PyLadies Remote YouTube Webcasts
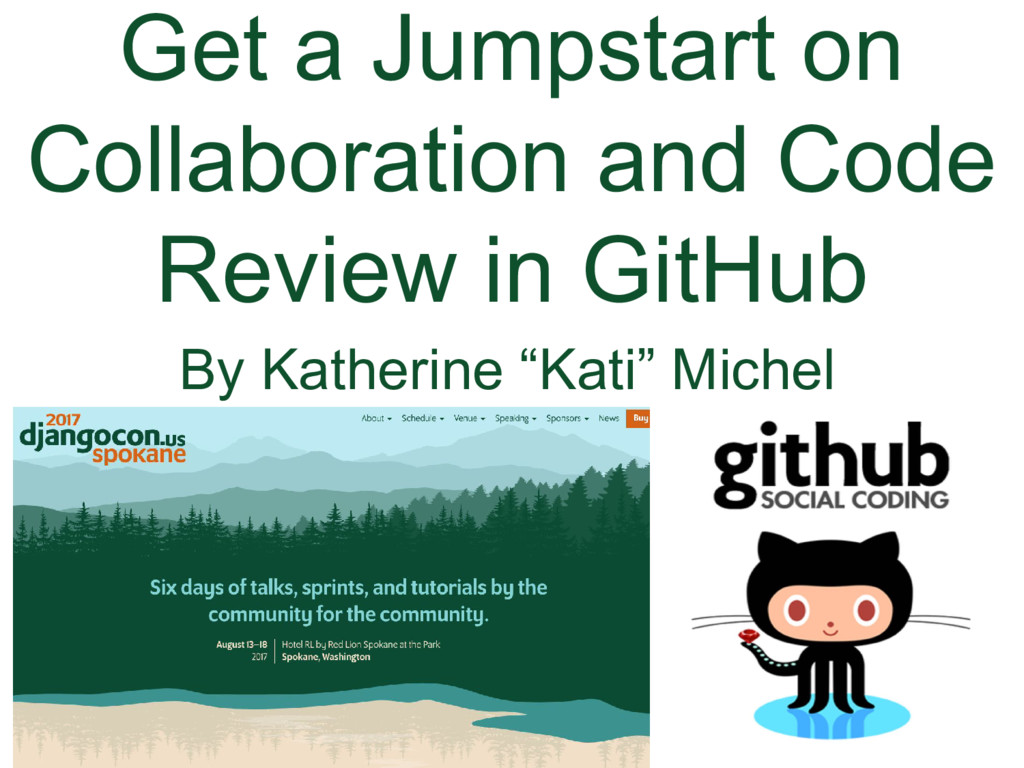
- Get a Jumpstart on Collaboration and Code Review in GitHub
- Welcome
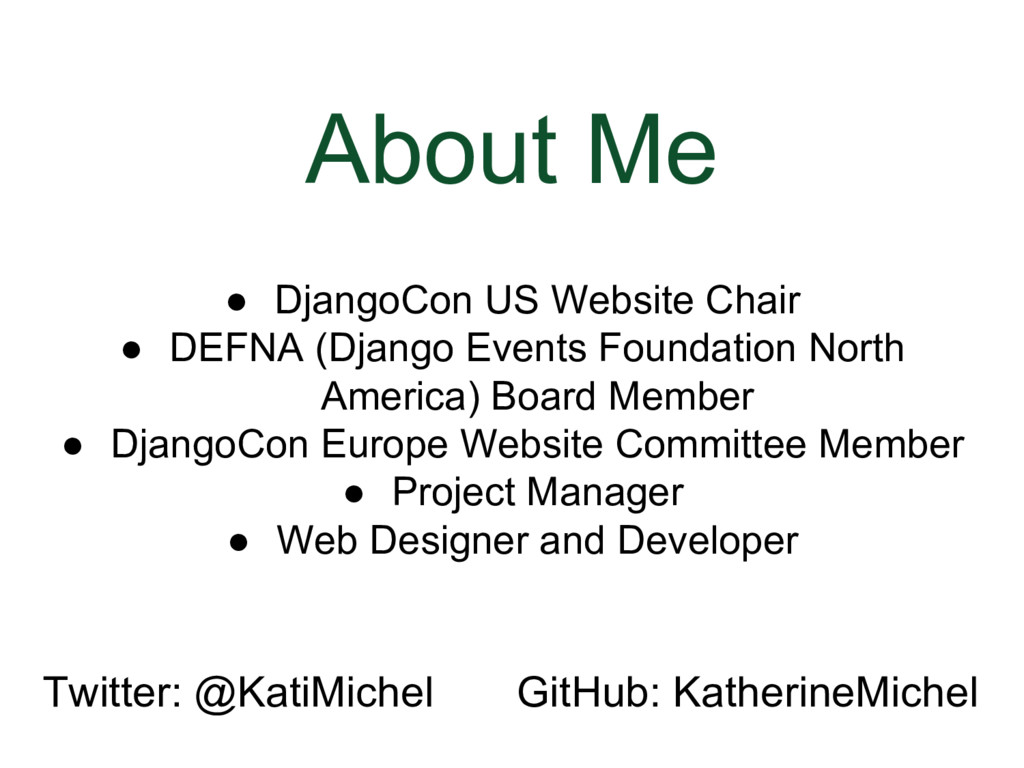
- About Me
- Goal
- I Don’t Want You to Be Like Me!
- Understanding the Process and Hands On Practice
- Resources
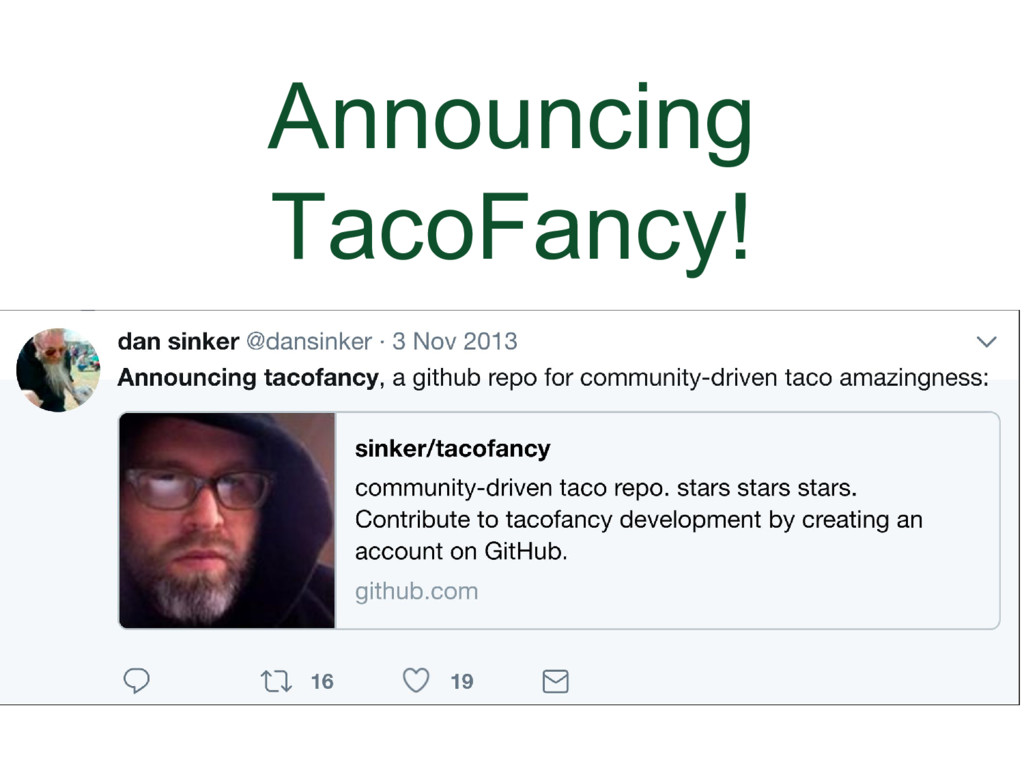
- Announcing TacoFancy
- The One Sentence that Motivated Me to Start Using GitHub
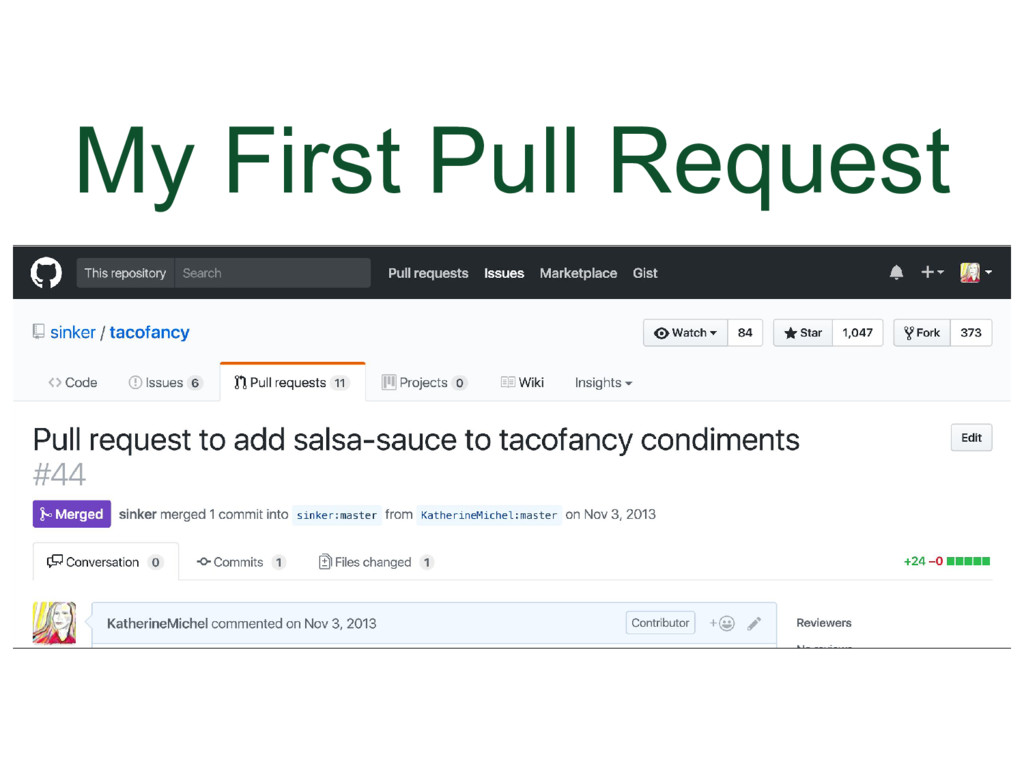
- My First Pull Request
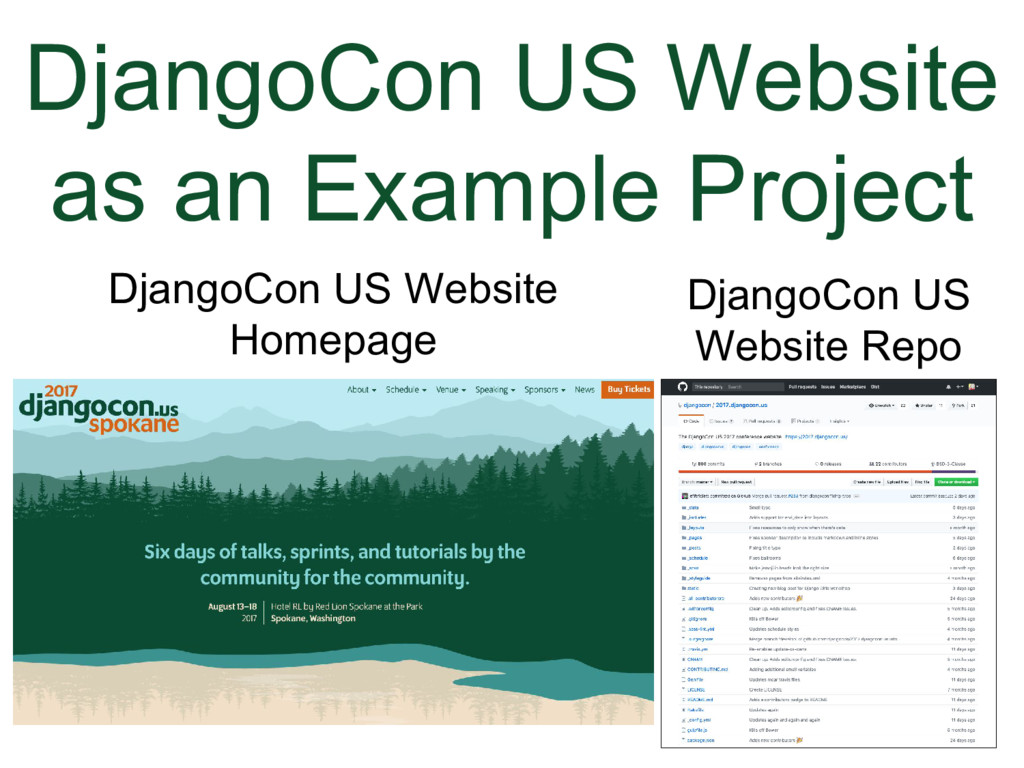
- DjangoCon US Website as Example Project
- What are Git and GitHub?
- Social Network
- Repositories
- Local Development Environment Example
- Collaboration and Code Review Best Practice Workflow
- Working on a File in GitHub
- Branches
- How to Create a Branch
- Overview
- Section 1
- The Two Collaborative Development Models
- The Two Types of Accounts
- Write Permission
- Examples of What Write Permission Will Allow You to Do
- Why We Need Write Permission
- Write Permission and Collaboration Examples
- How to Fork a Repo
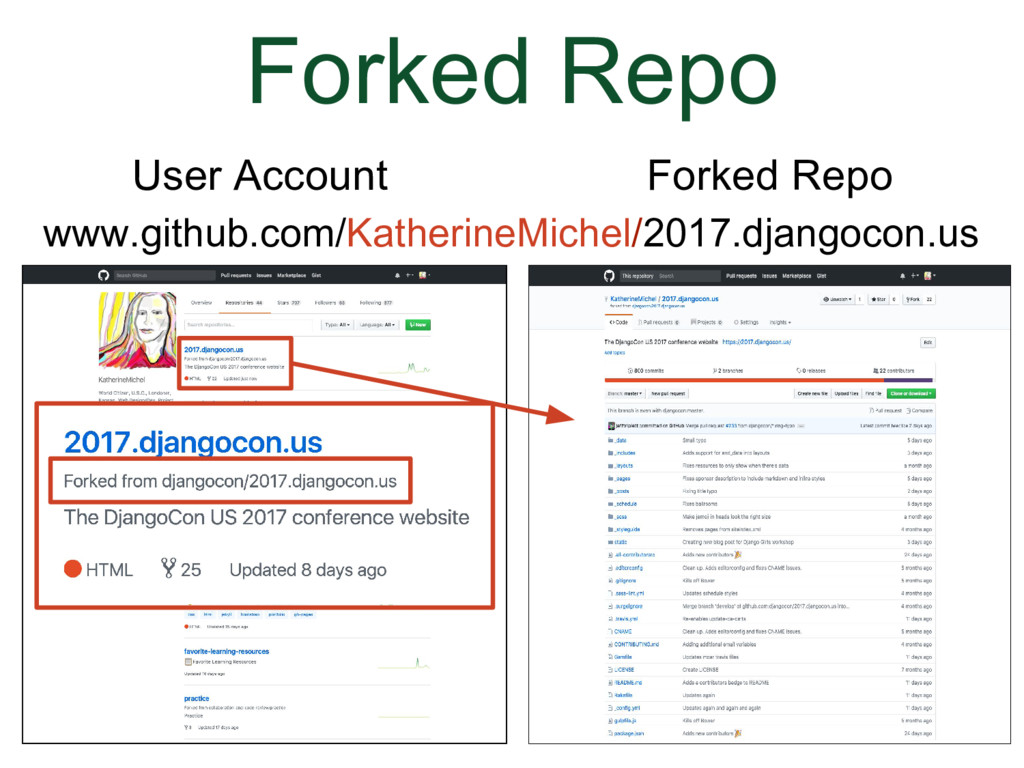
- Forked Repo
- Interesting Thing #1: Opposites
- Interesting Thing #2: User Account Shared Repo Disadvantage
- Interesting Thing #3: Write Permission Examples
- Interesting Thing #4: Inactive Pull Requests
- Section 2
- Fork and Pull Model
- Shared Repository Model
- Bash Commands
- Local Development Environment
- Cloning
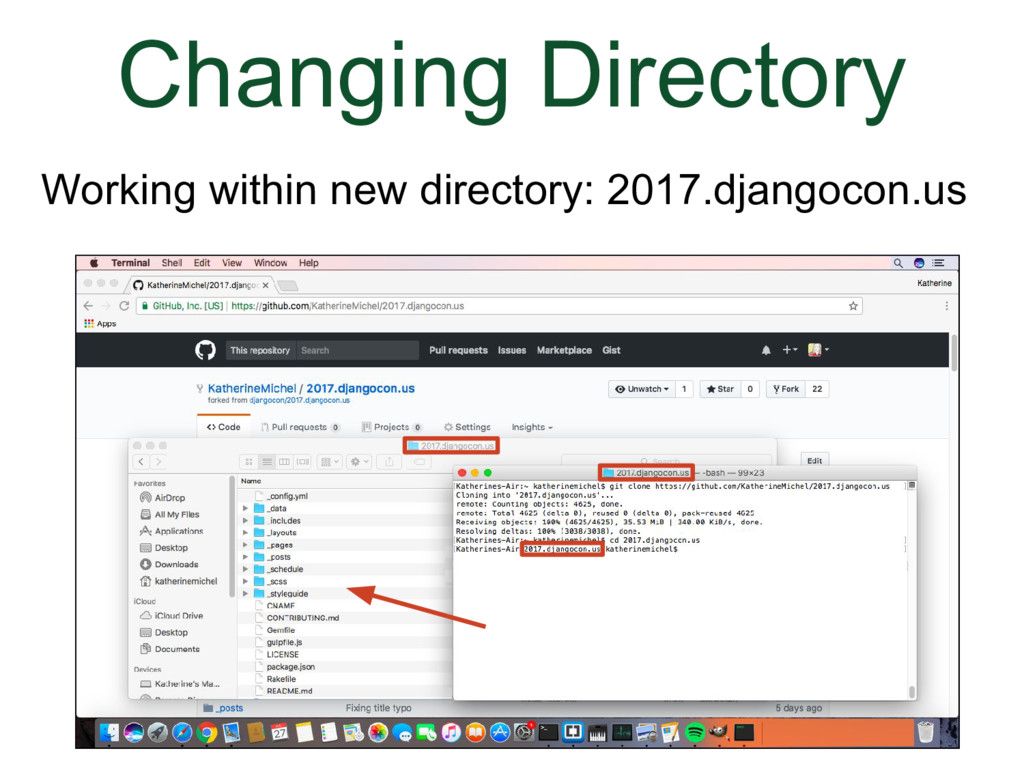
- Changing Directory
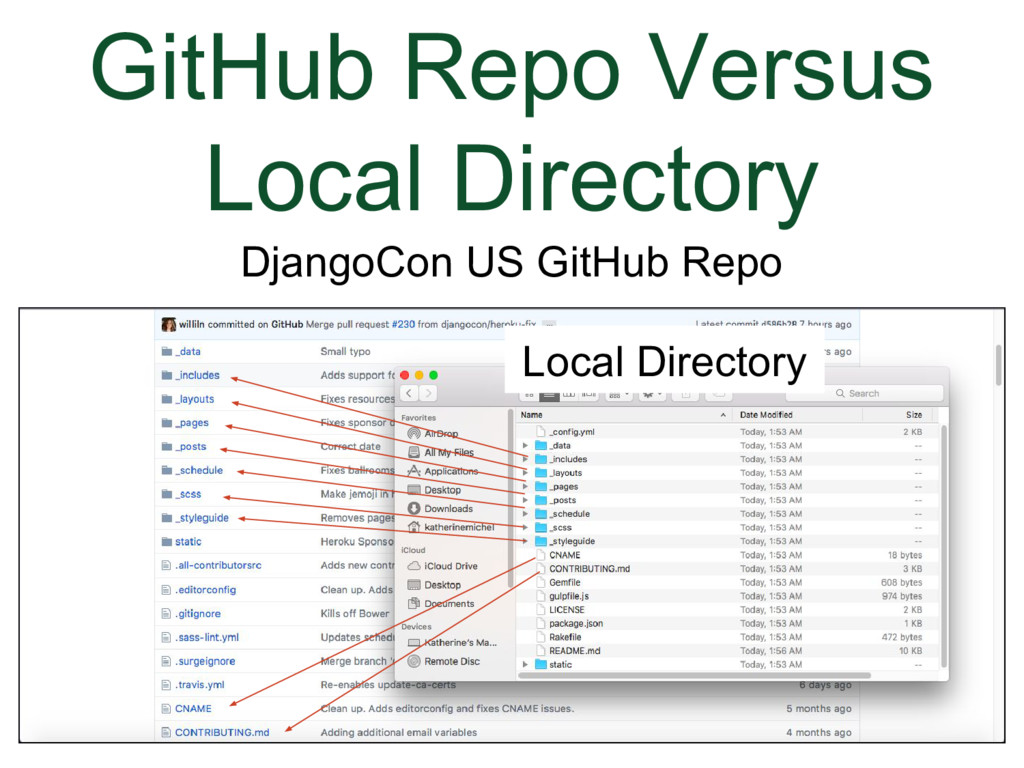
- GitHub Repo Versus Local Directory
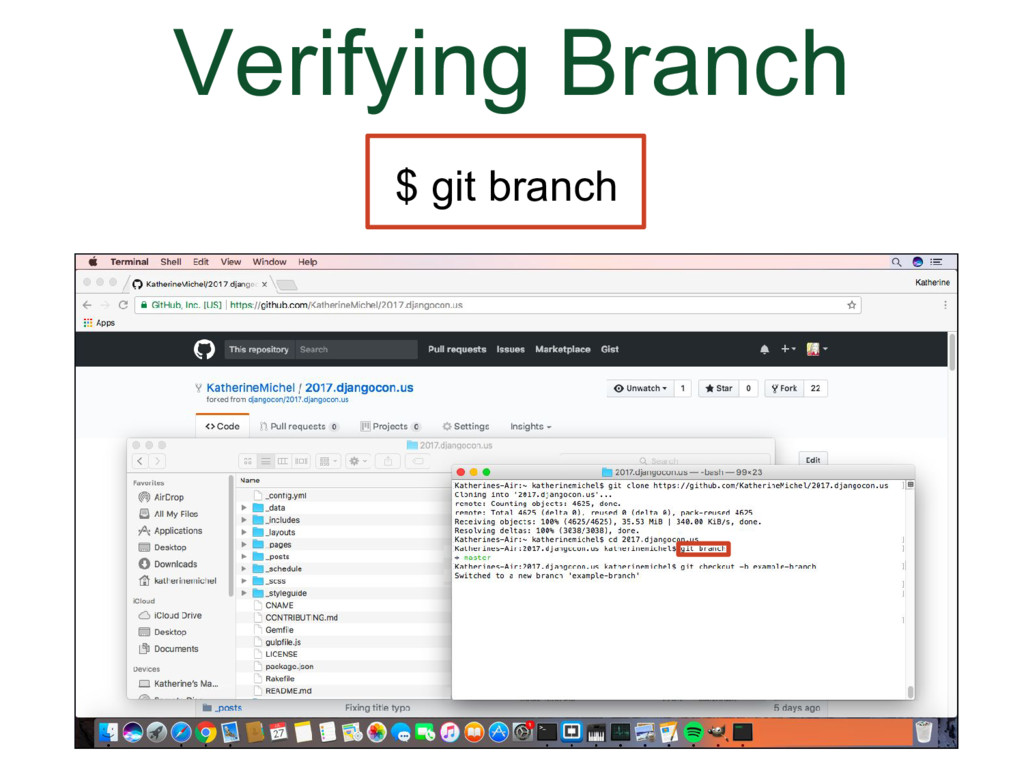
- Verifying Branch
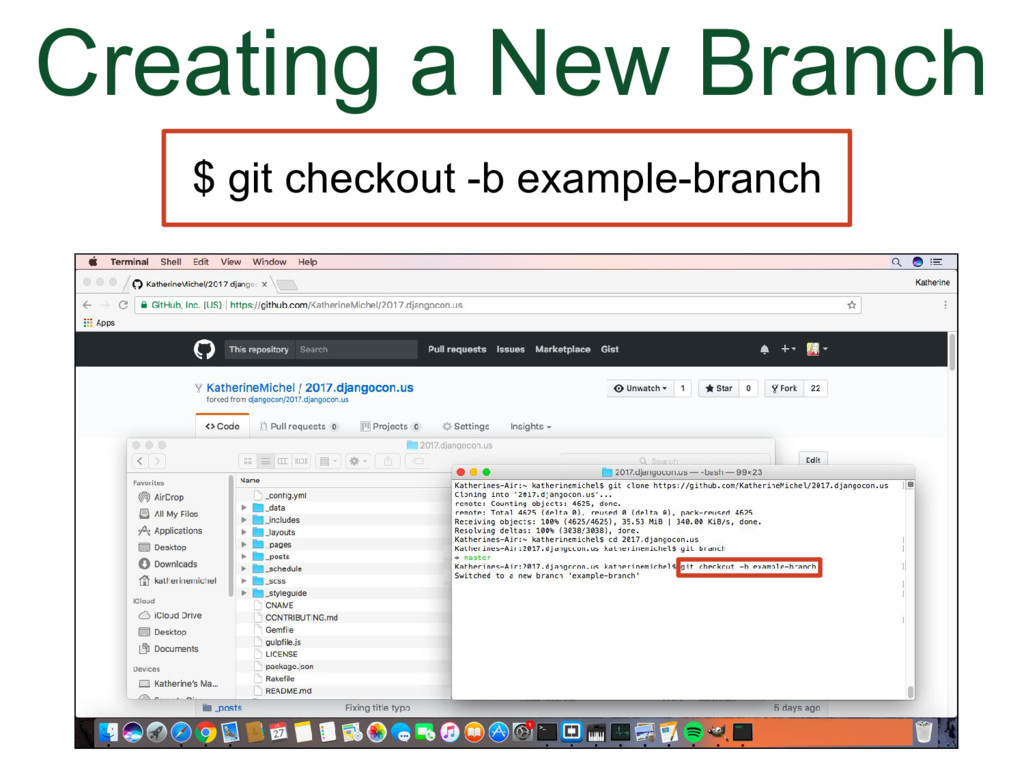
- Creating a New Branch
- Working on a File Locally
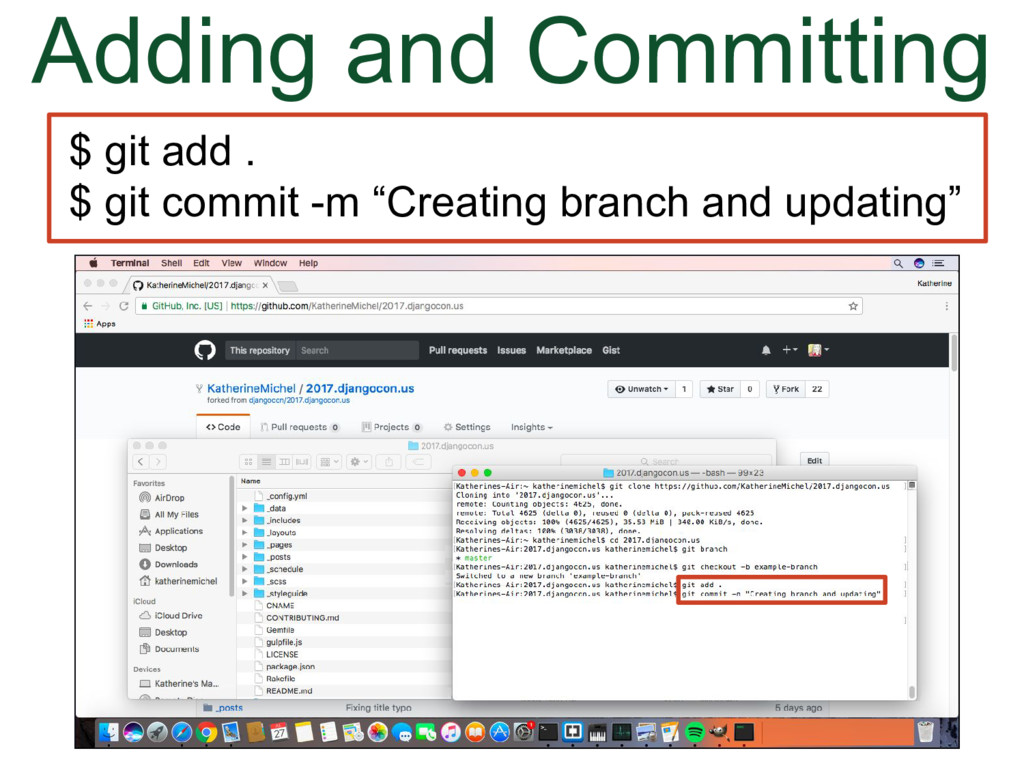
- Adding and Committing
- Pushing
- New Branch
- Submit a Pull Request
- Section 3
- Pull Request Review Process
- Pull Request Command Line
- Pull Request Review Options
- Pull Request Branches
- Pull Request Review
- Merging
- Tidy Up
- Advanced Topics
- Section 4
- Practical Commands
- GitHub Flow
- Another Workflow
- Learn More About Workflow
- Section 5
- Getting to 10x Results
- Communication Strategy
- Documentation
- Templates
- Communication Forums
- Section 6
- Code Safety
- Additional Safety Considerations
- Productivity Helpers
- Triaging
- Sandboxing
- Go For It!
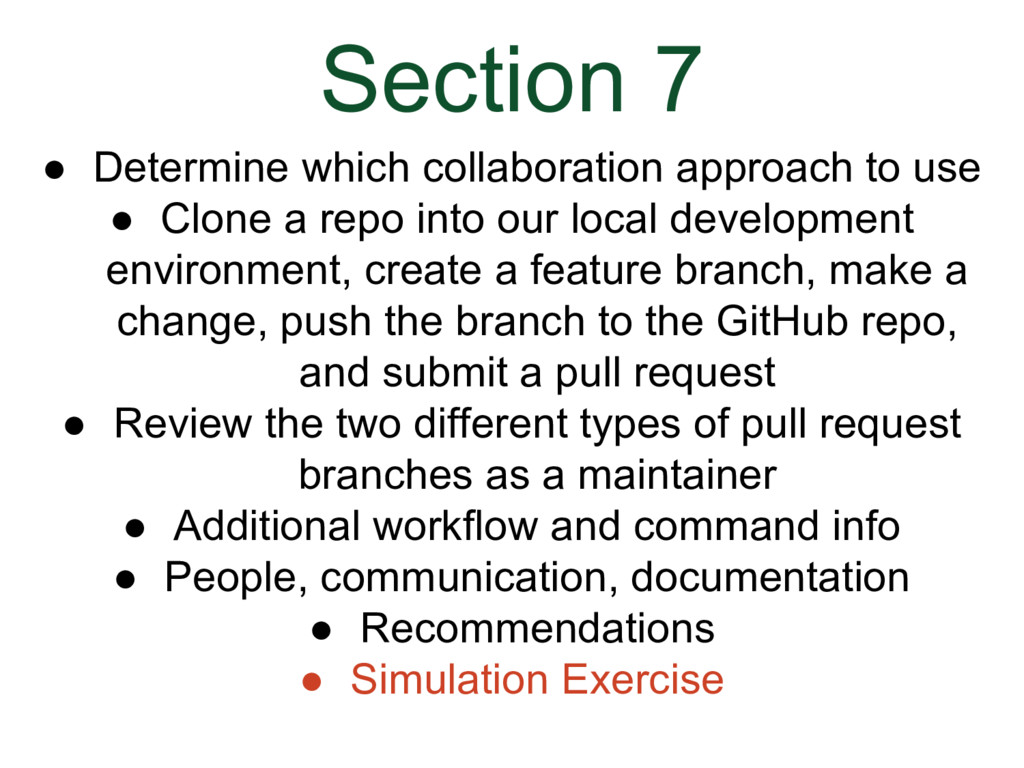
- Section 7
- Simulation Exercise
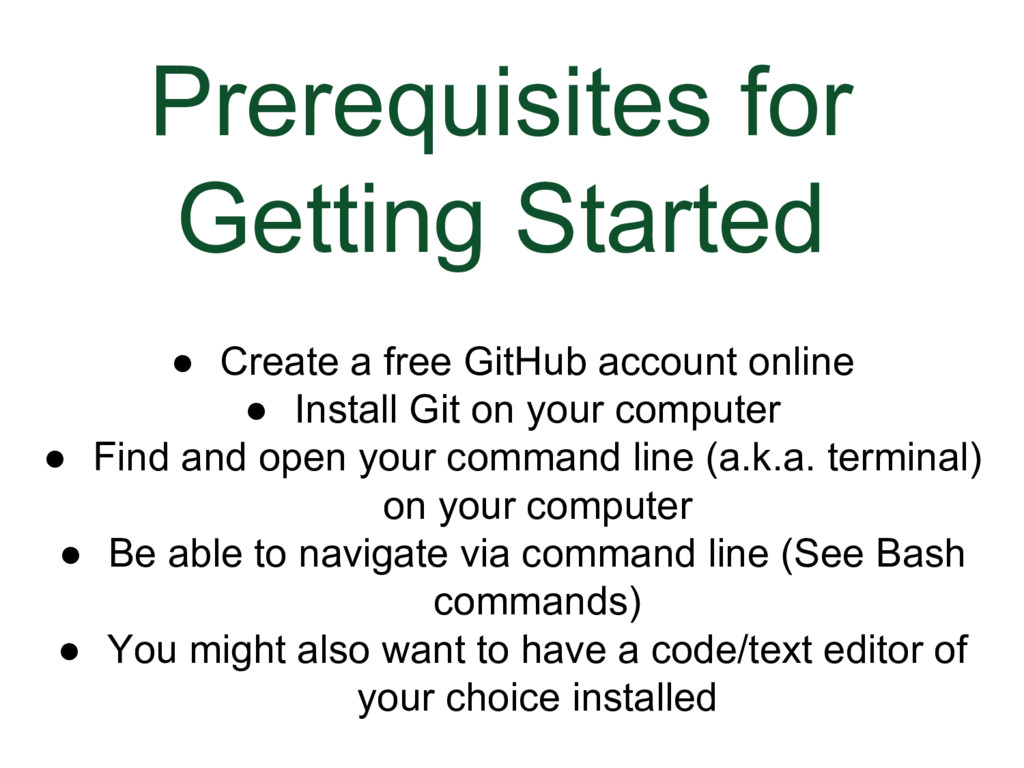
- Prerequisites for Getting Started
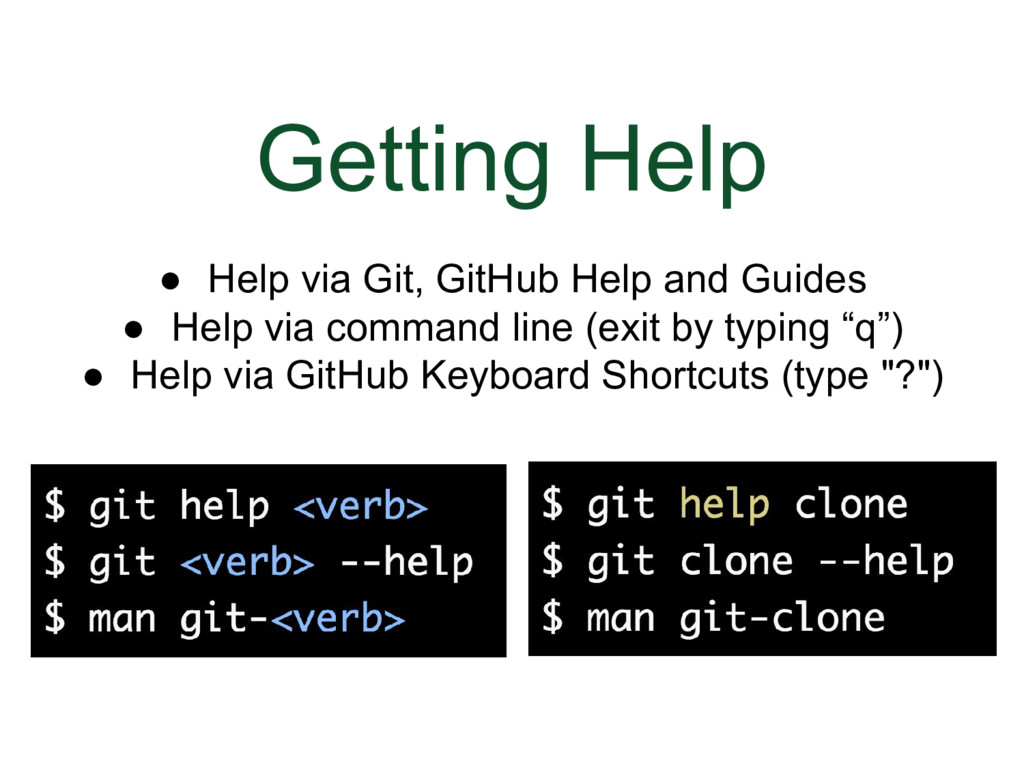
- Getting Help
- Debunking Myths
- Thank You
The script is a general outline and varies somewhat from what was said during the webcast.
|
|
By Katherine "Kati" Michel | |
|
|
Welcome, everyone. I'm Kati Michel. I'm thrilled to have the opportunity to teach you what I've learned as the DjangoCon US Website Chair. | |
|
|
| |
|
|
| |
|
|
| |
|
|
| |
|
|
| |
|
|
| |
|
|
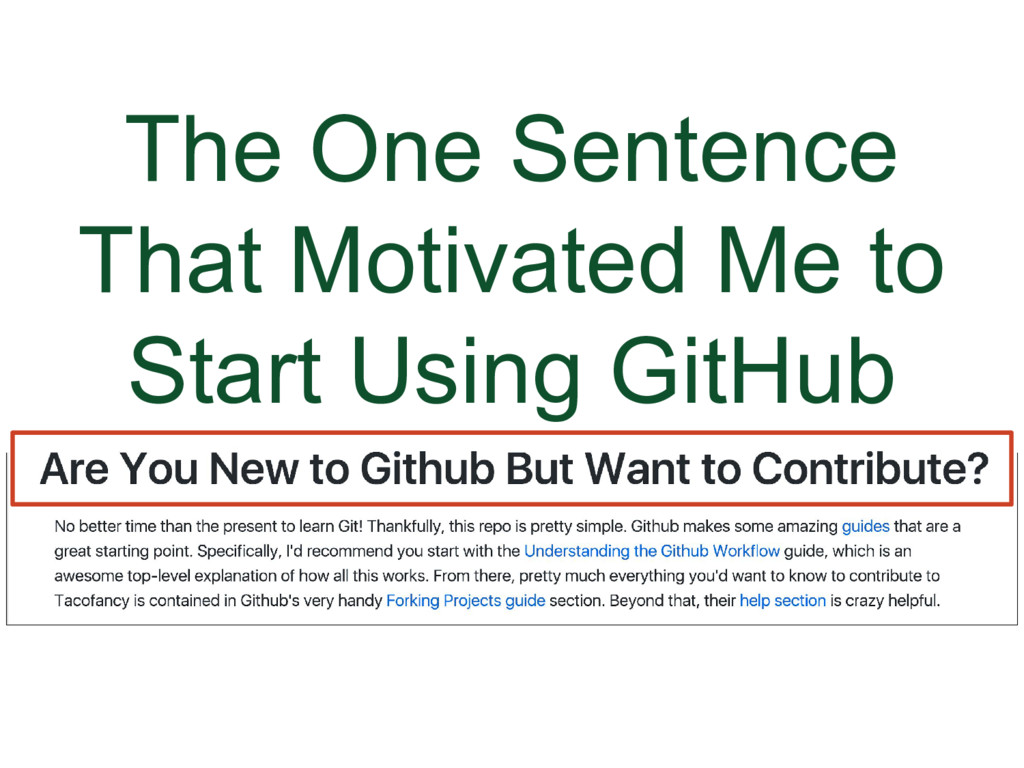
One sentence in the project information that had a huge impact on me: "Are You New to Github But Want to Contribute?" | |
|
|
That was me. I became very determined to contribute and submitted my first pull request there. | |
|
|
I kept using Git and GitHub and getting better at it. I eventually became a DjangoCon US website contributor in 2016, then became the Website Chair and maintainer in 2017.
| |
|
|
GitHub is a website built on the version control software Git. | |
|
|
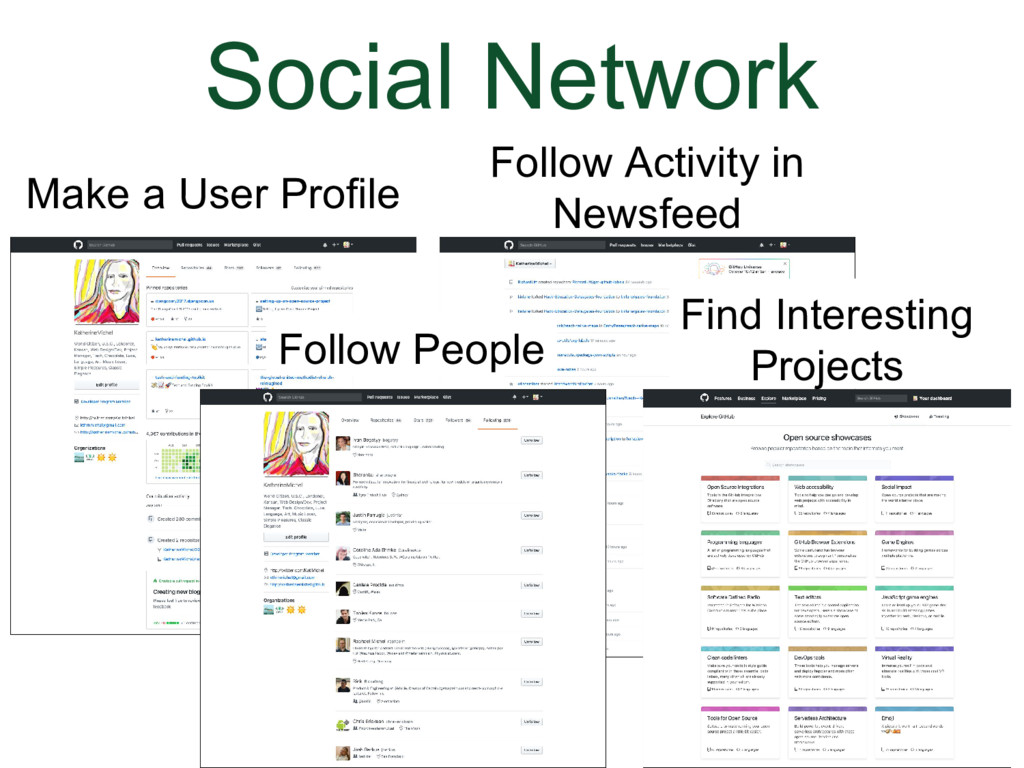
GitHub is a social network. You can:
| |
|
|
But the really important part of GitHub is that users can store and work on code together in repositories | |
|
|
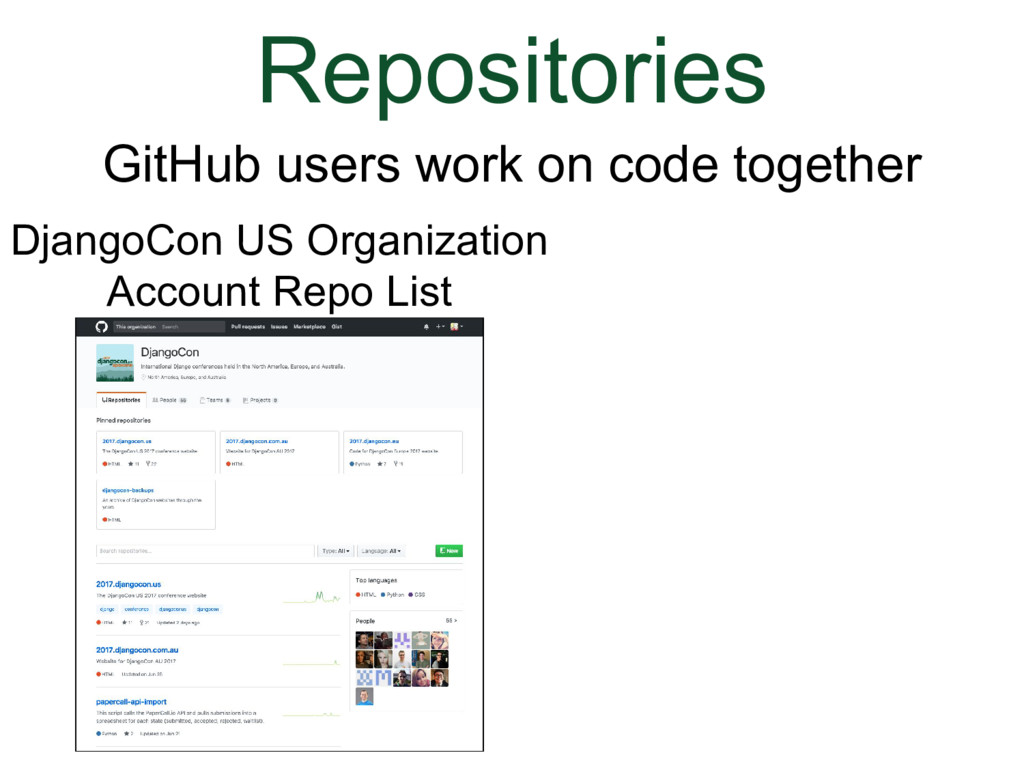
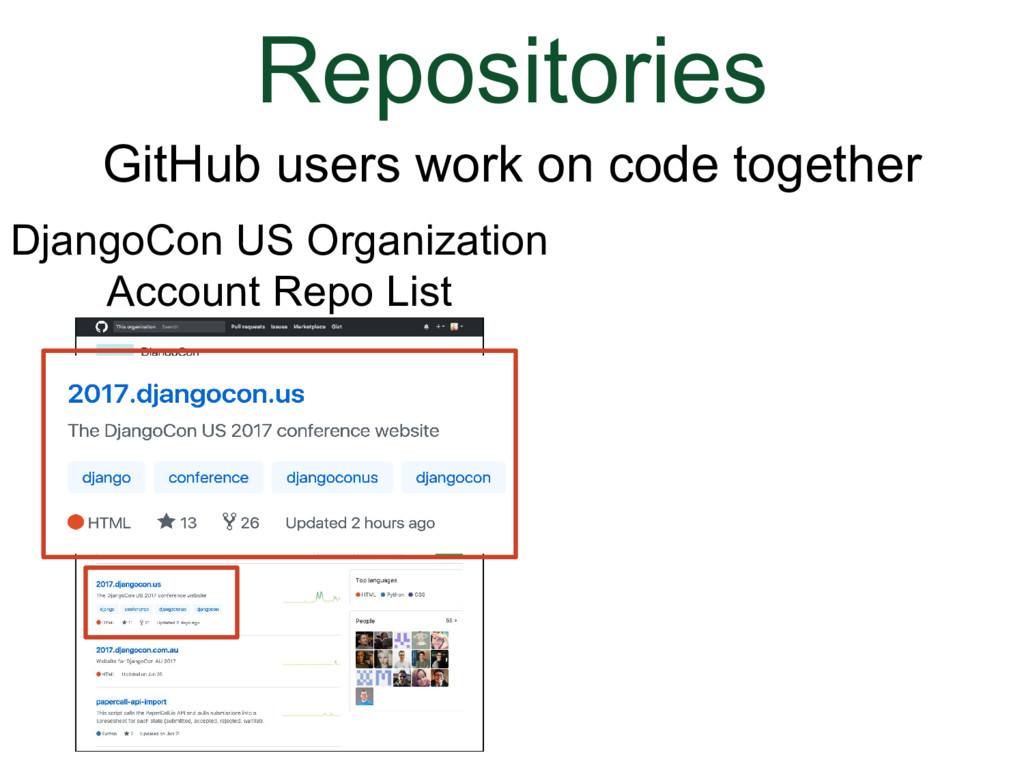
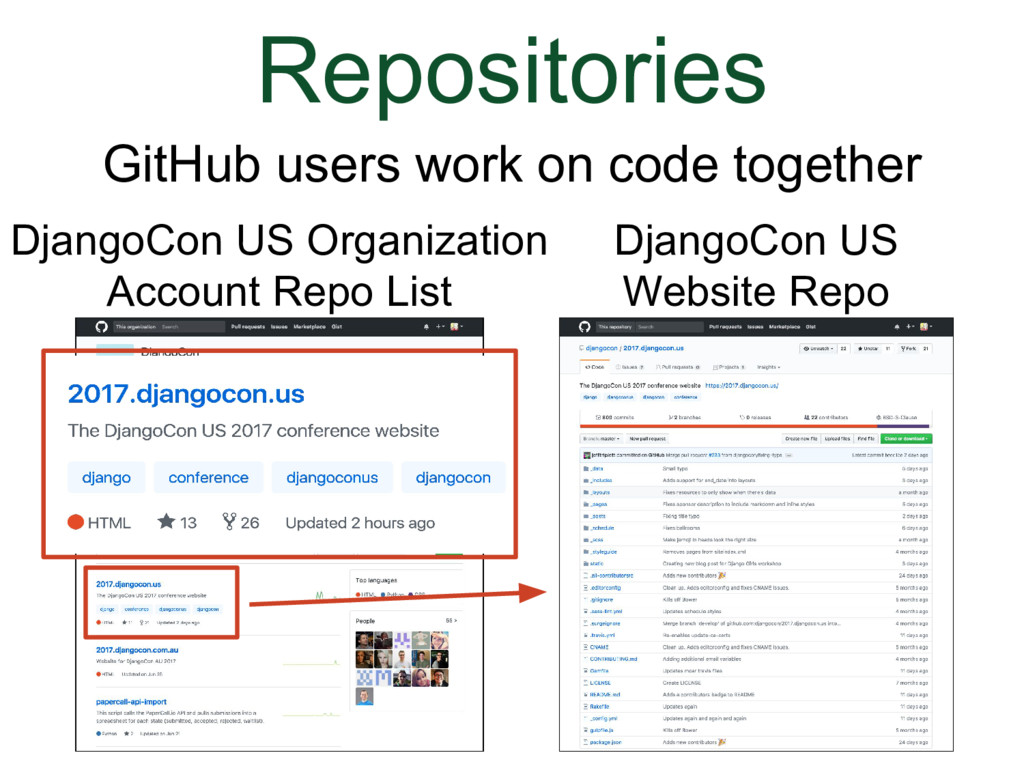
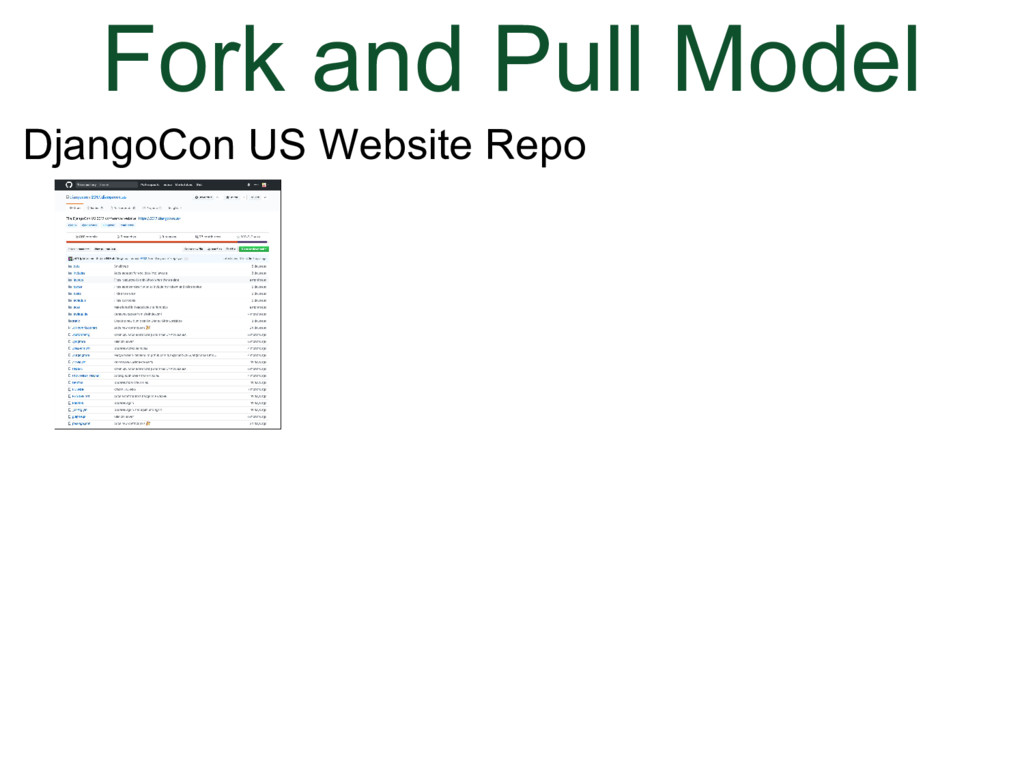
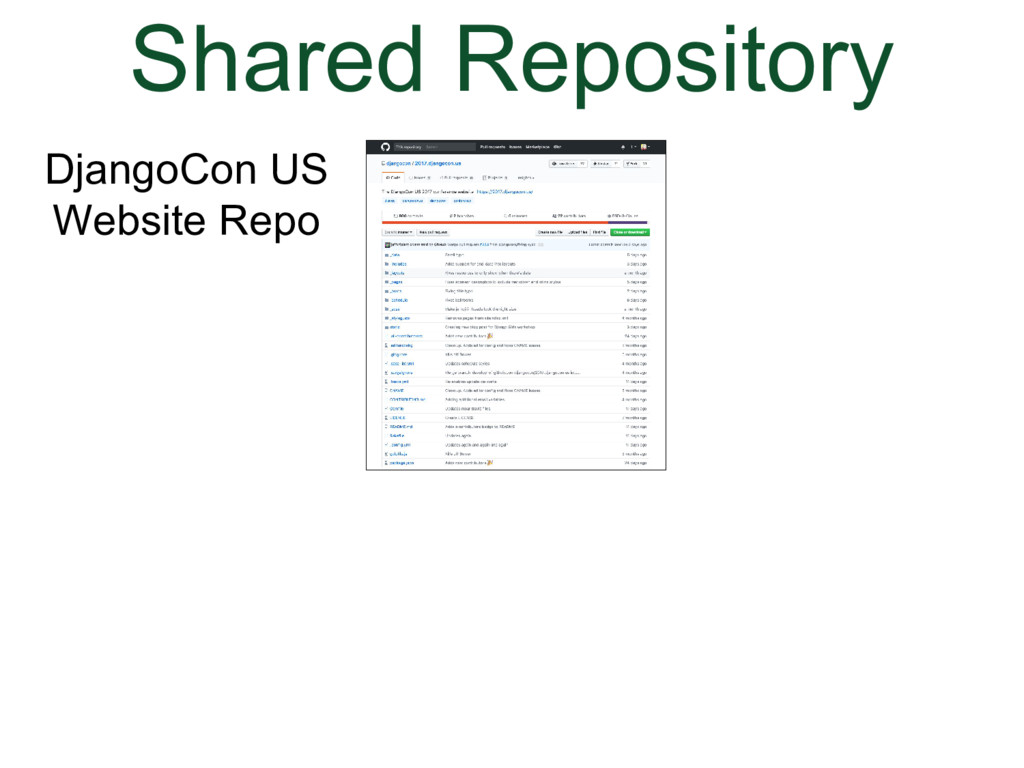
(Animation) For example, if you go to the DjangoCon US organization account you will see a list of repos and at the top is the DjangoCon US website repo. | |
|
|
(Animation) If you click on the hyperlink, it will open up the repo and you will see the folders and files filled with the website code and you can look through. | |
|
|
When we are working on code, we can't do everything in the GitHub website.
| |
|
|
(Animation)
| |
|
|
(Animation)
I will elaborate on this process later. | |
|
|
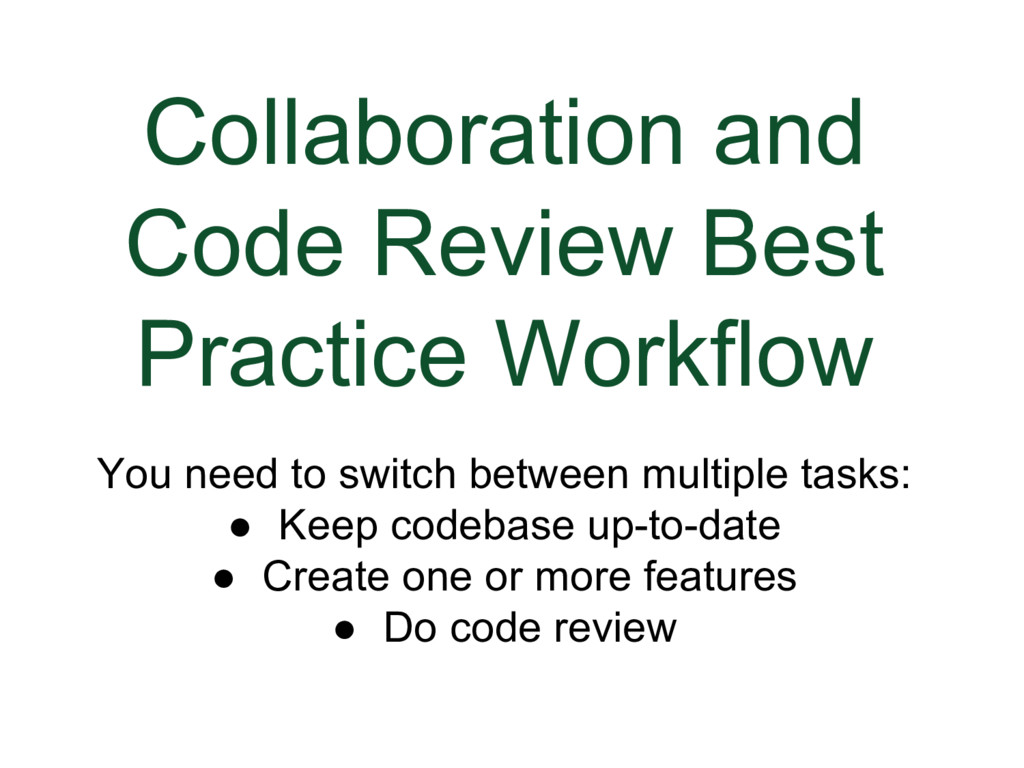
There is a concept that I think is very important. In order to be able to increase your level of responsibility, we need to have the freedom to switch between multiple tasks.
| |
|
|
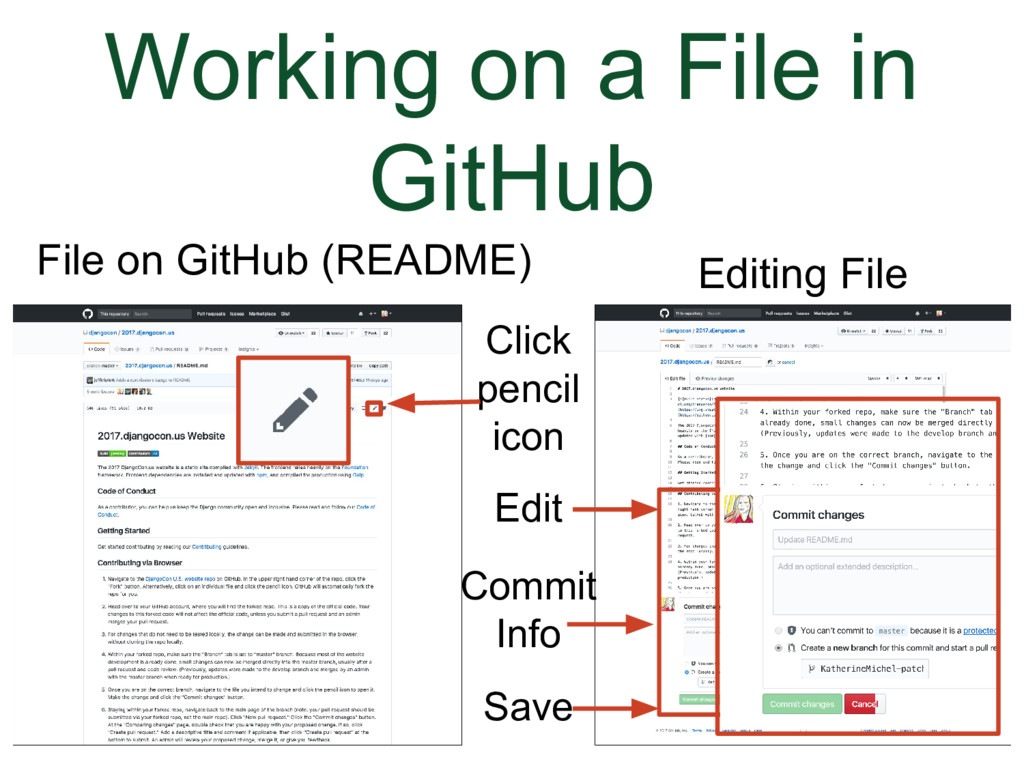
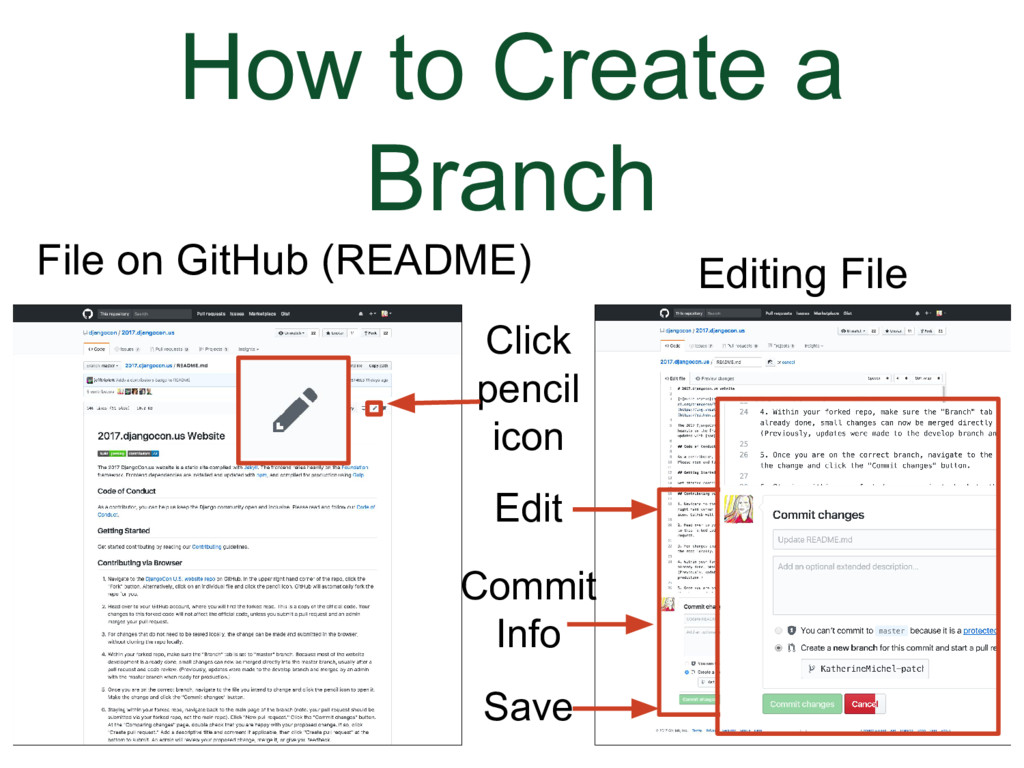
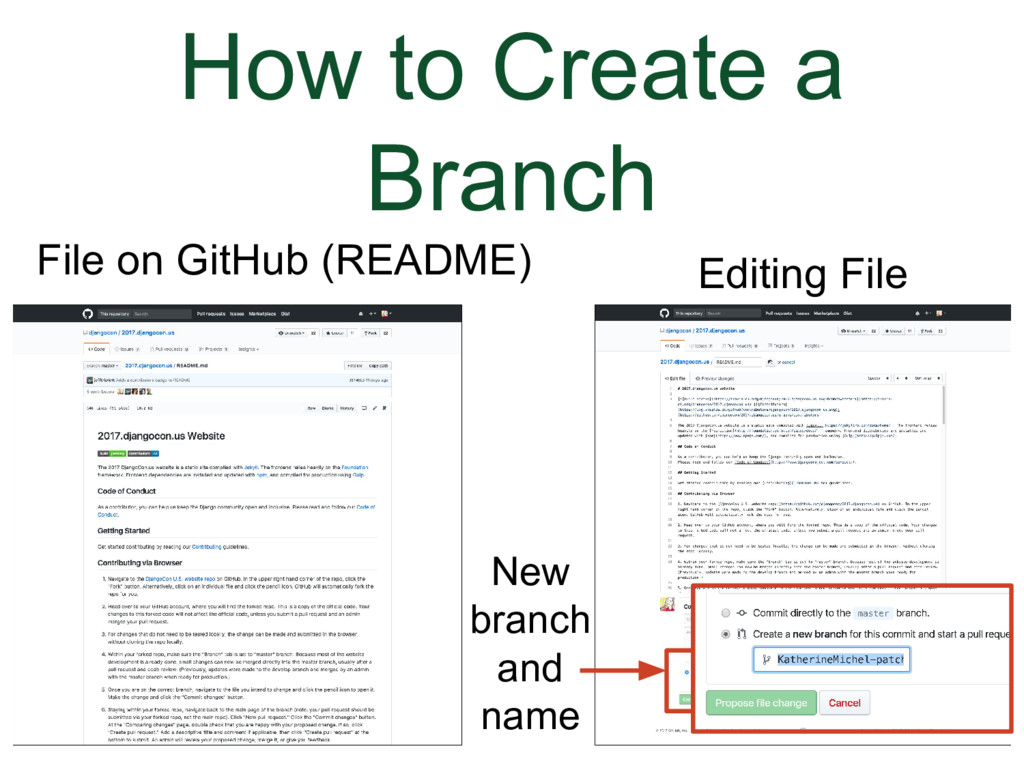
When I first started using GitHub, I would go into my own GitHub repo, click on a file, click on the pencil icon to open the file, make a change, and save it. This is fine, but imagine if there were multiple people all working on a repo and all of them were going into files and making changes and saving them. It wouldn't be very practical. For instance, how would you give feedback?
| |
|
|
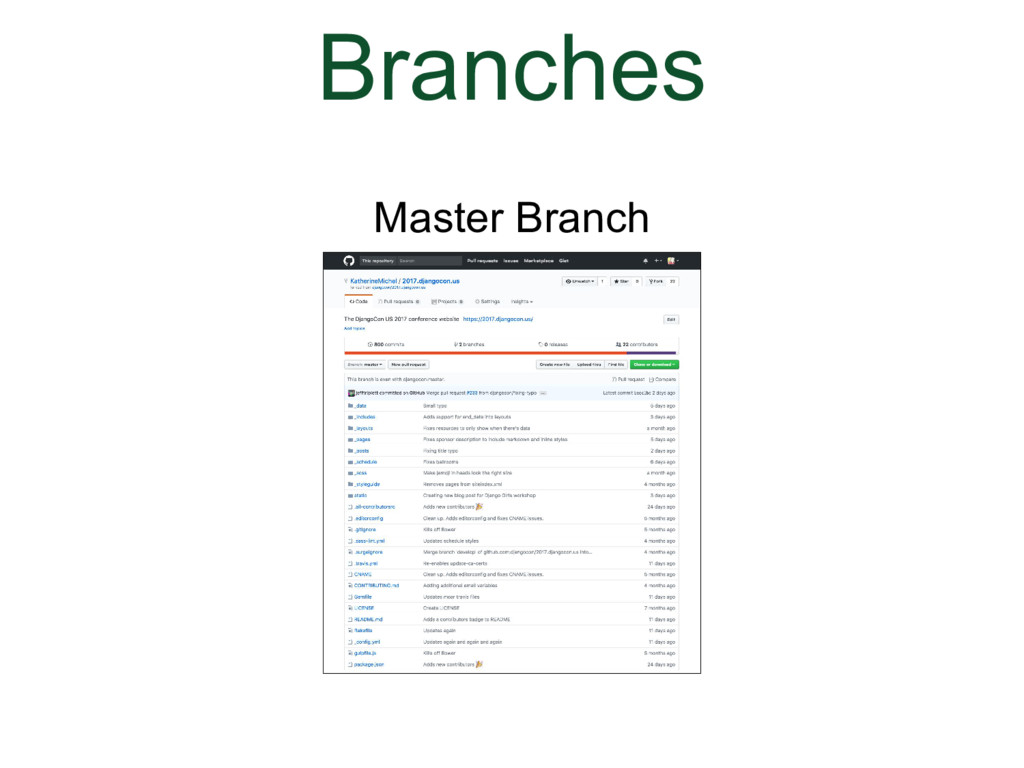
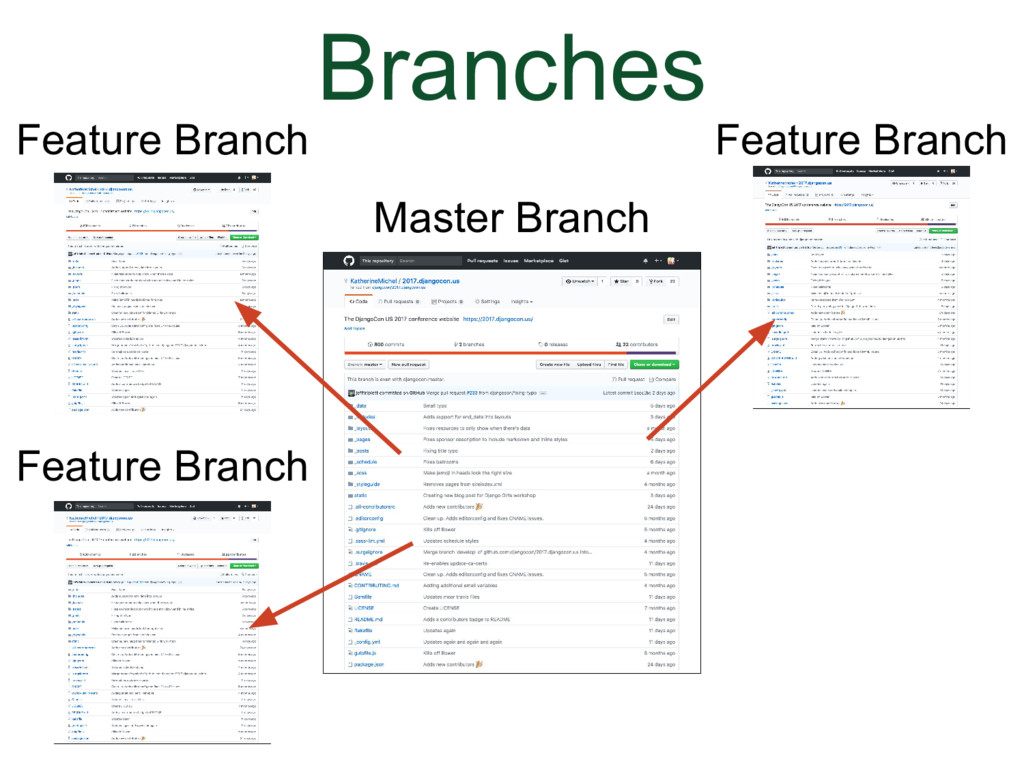
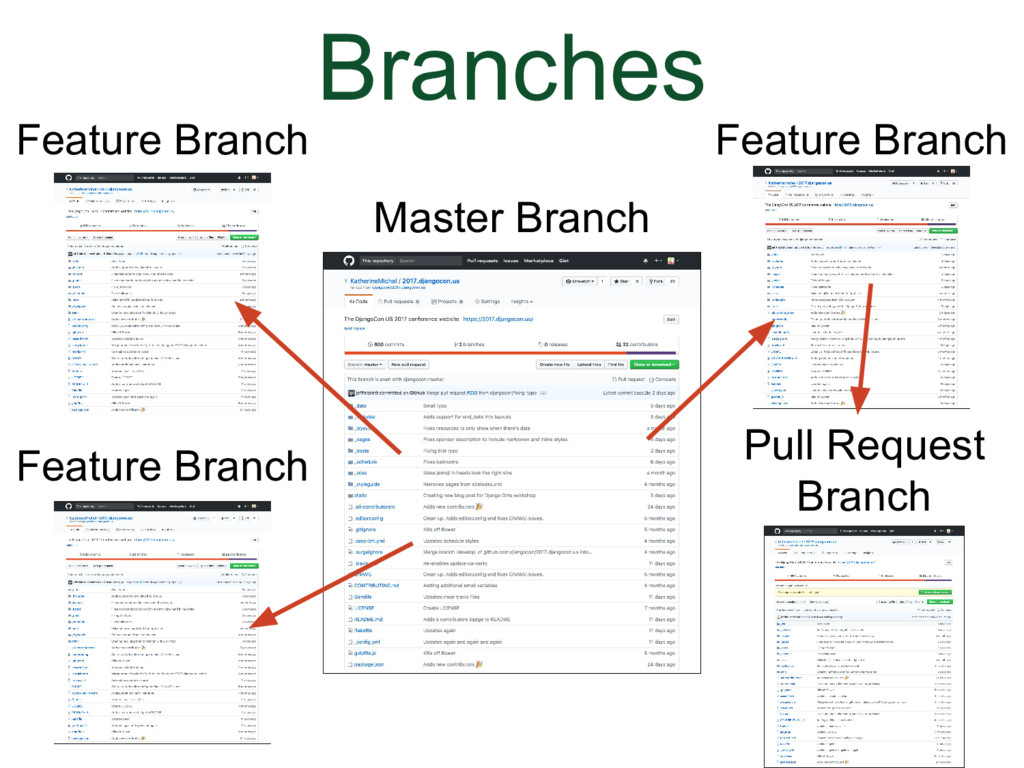
We need to use branches instead. Branches
When you create a repo, by default you are working within a branch named master. | |
|
|
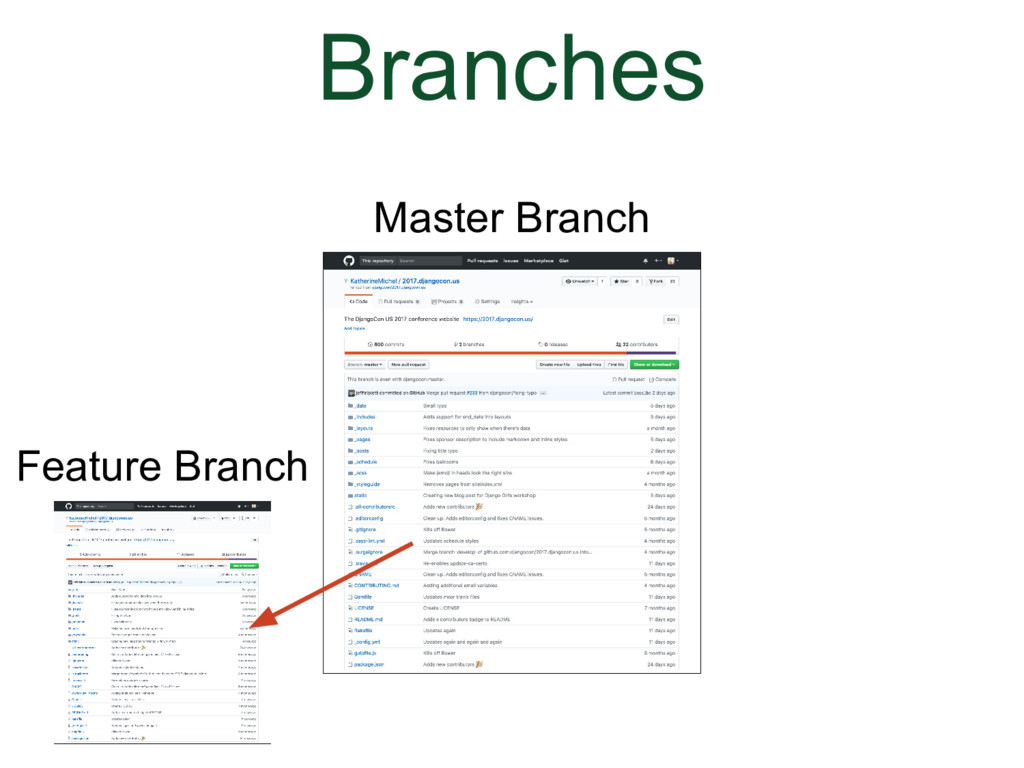
(Animation) Say for instance that you want to make a change in the branch, you can make a copy of the entire master branch and give it a different name. Now there are two branches, in the same repo, the master branch and a feature branch (GitHub will also refer to a feature branch as a topic branch). | |
|
|
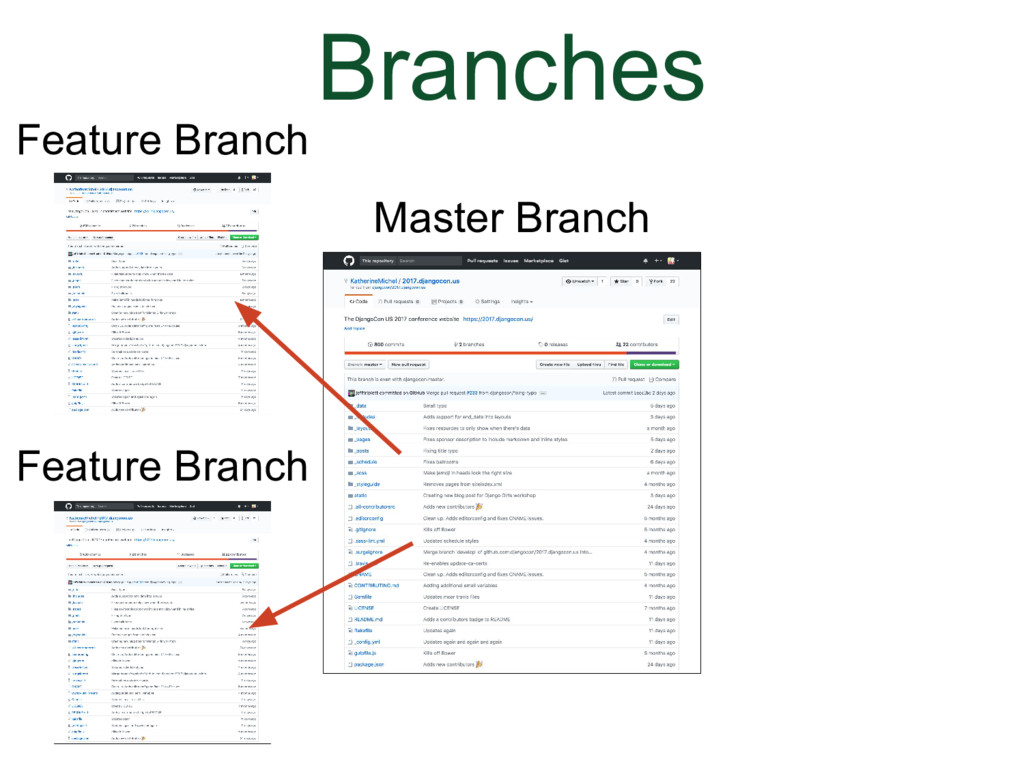
(Animation) You can create an unlimited number of branches and you can switch in between them to work on them. | |
|
|
(Animation) At some point, when the feature branch author thinks it's done, a pull request will be submitted and the feature branch will become a pull request branch. | |
|
|
(Animation) If the changes are accepted, they will be merged into the master branch. The master branch will be like before, except with the changes from the branch.
| |
|
|
Let's go back to the screenshot of editing a file in GitHub. | |
|
|
(Animation) There is a radial button you can choose to indicate you want to create a new branch. There is also a place to give the branch a new name. When you click to save the changes, they will not save in the current file. Instead, a new branch will be created. You can also create and work on branches through the command line in your local development environment, which I will show you later. | |
|
|
| |
|
|
| |
|
|
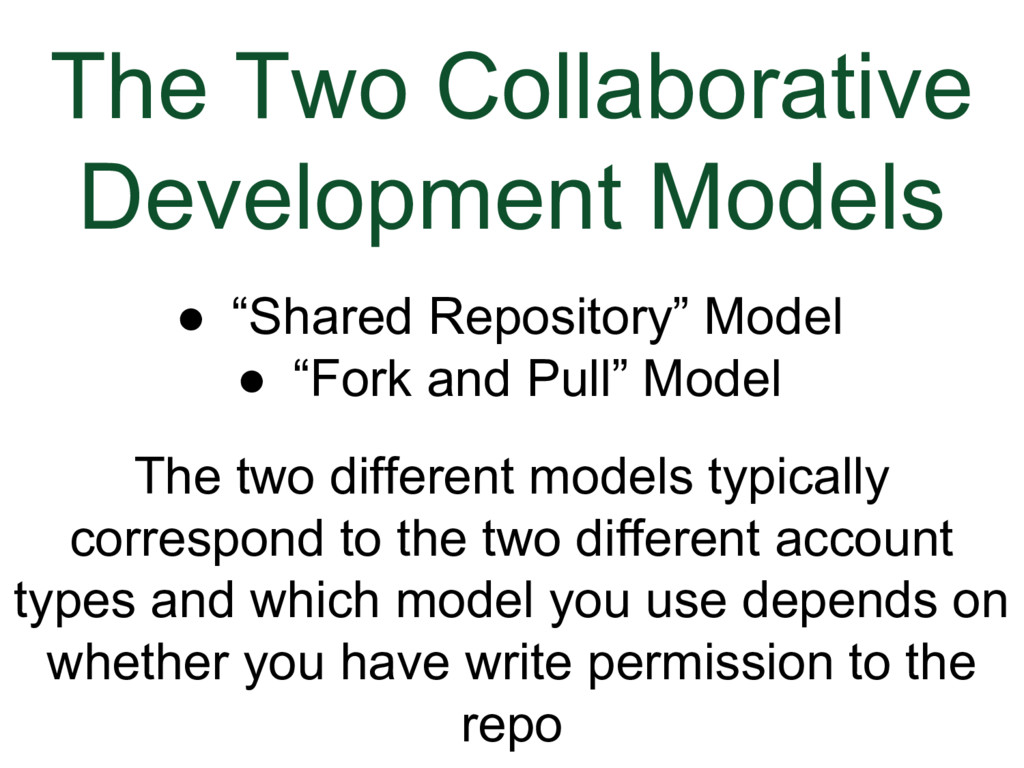
A Collaborative Development Model is a fancy term for how users contribute to a repo. There are two different models.
| |
|
|
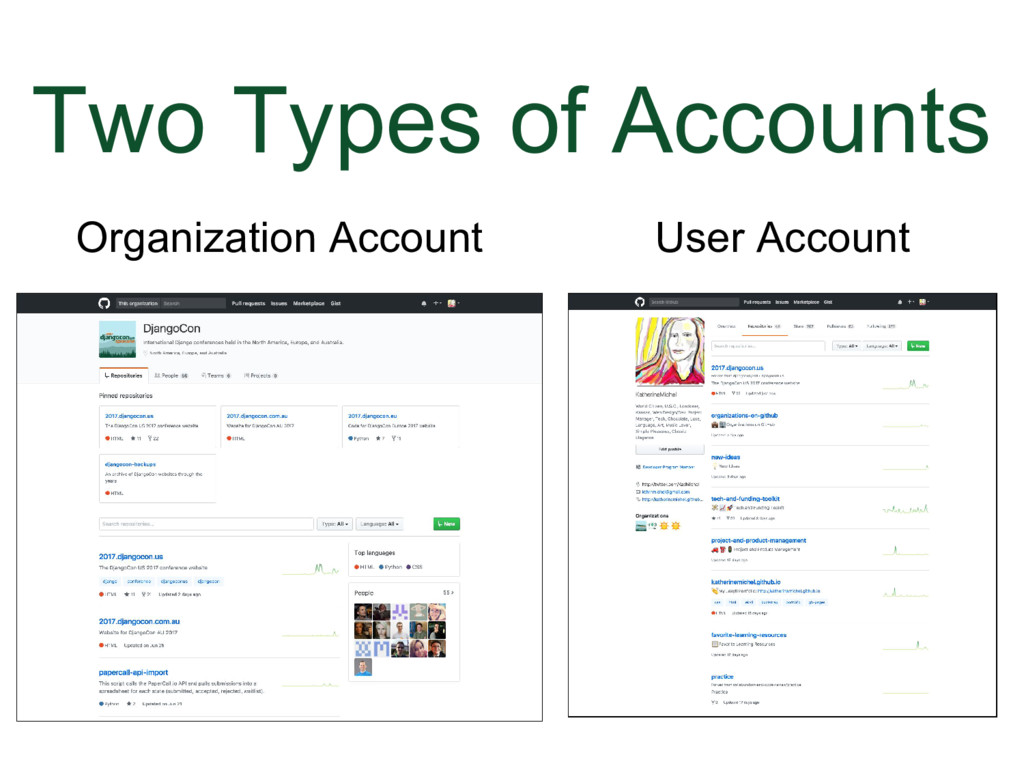
There are two types of accounts
| |
|
|
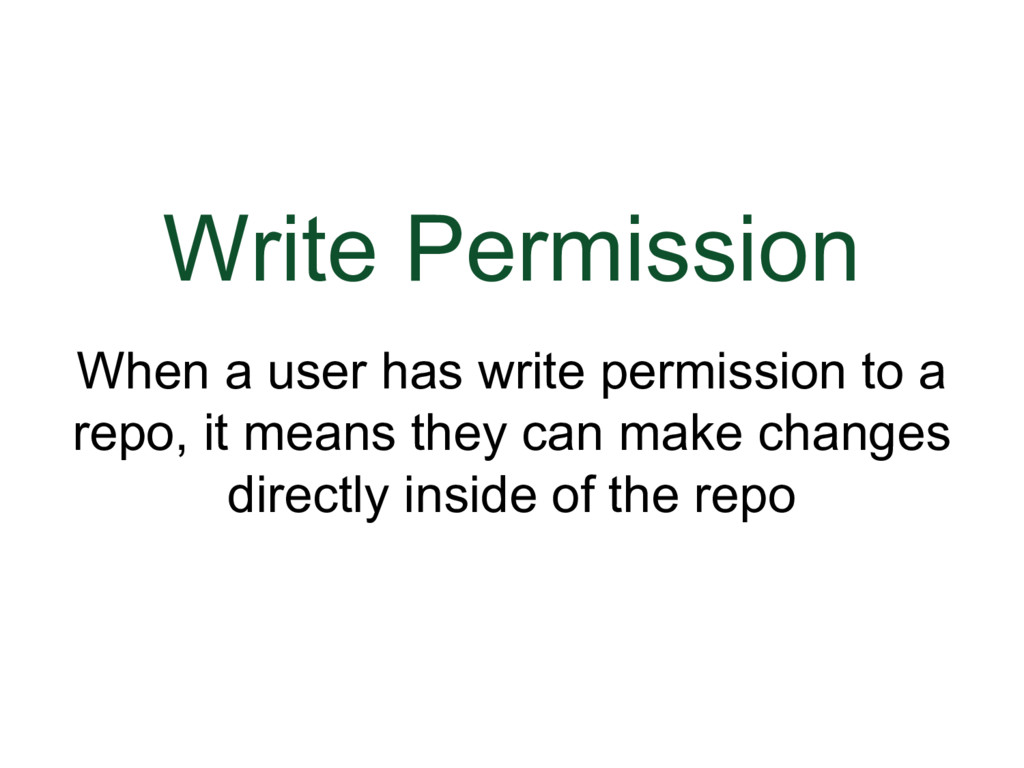
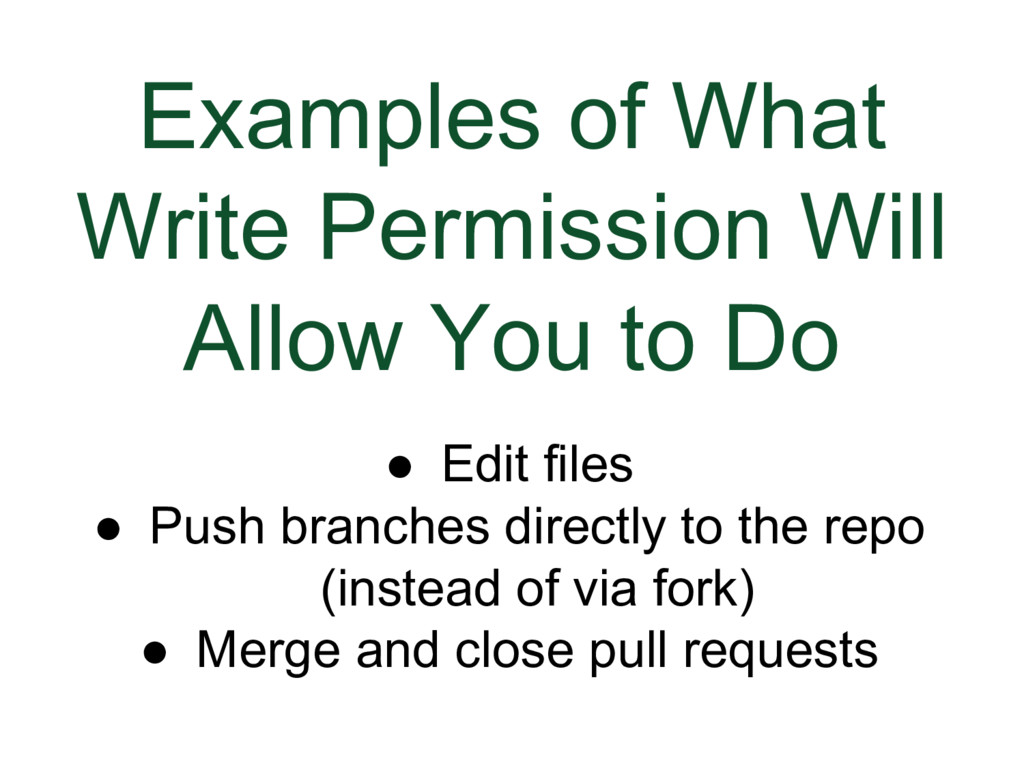
We are not talking about "write" permission in the context of English. When a user has write permission to a repo, it means they can make changes directly inside of the repo. | |
|
|
https://help.github.com/articles/repository-permission-levels-for-an-organization | |
|
|
Example: DjangoCon US website is a deployed live from the master branch and has a fairly high volume of traffic. We wouldn't want just anyone to be able to go into the DjangoCon repo and directly make changes. There is often a level of trust involved in having write permission. | |
|
|
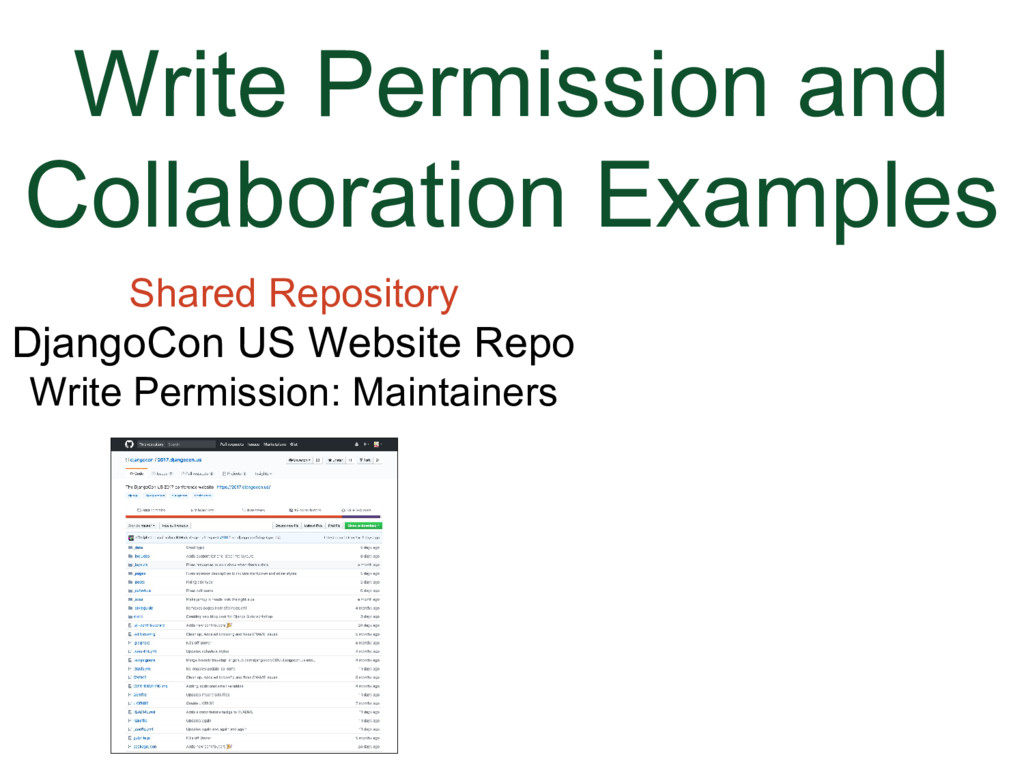
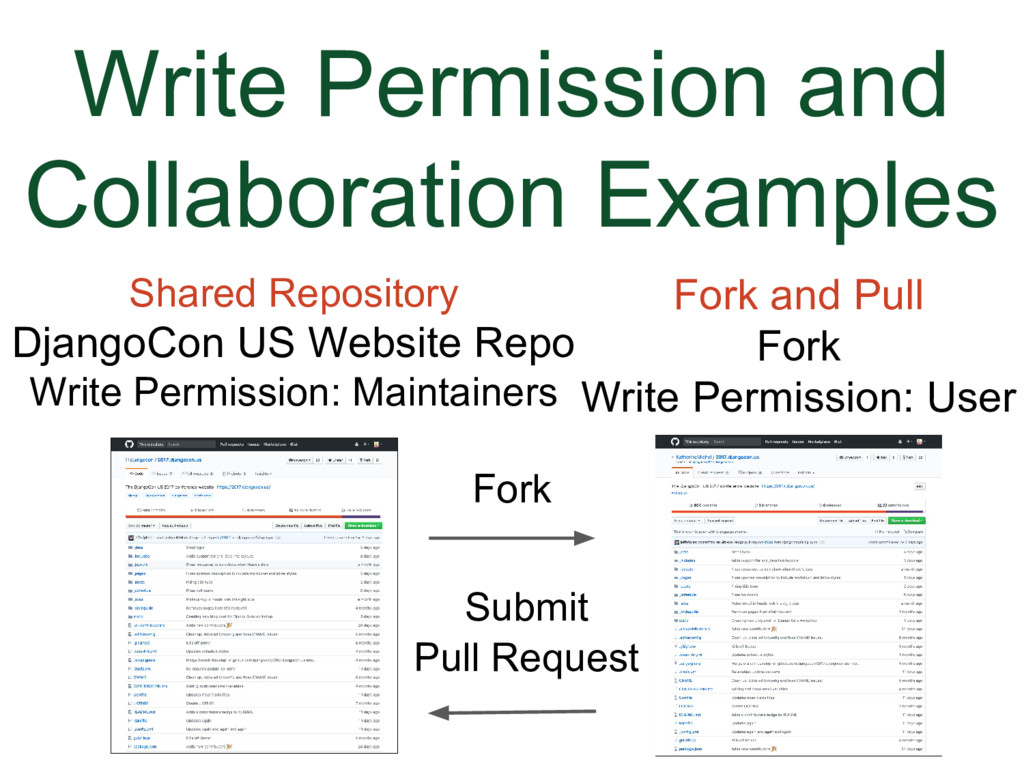
First, we’ll look at the “Shared Repository” Model. A shared repository is typically found in an organization account, which makes sense when you think about the word shared.
| |
|
|
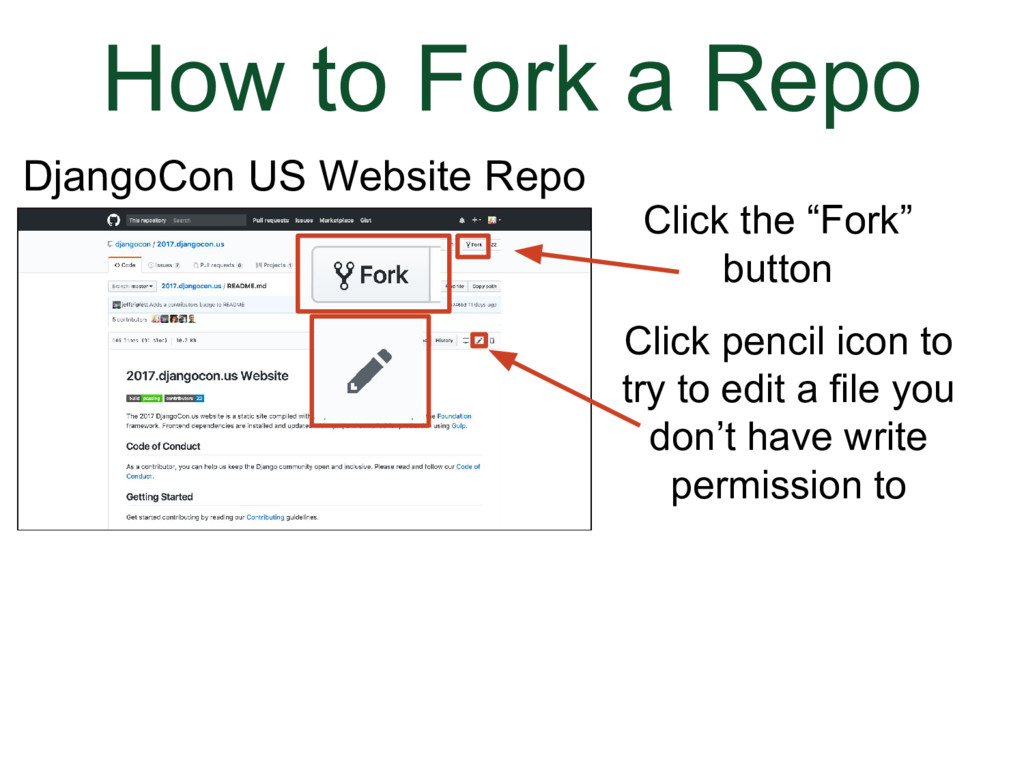
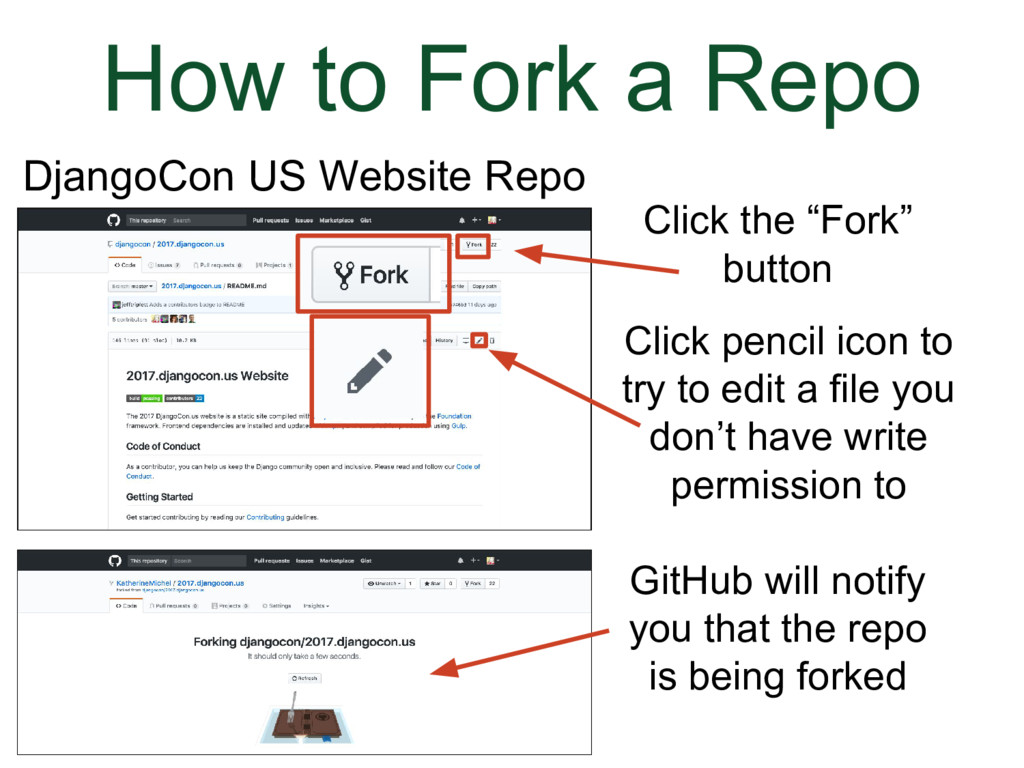
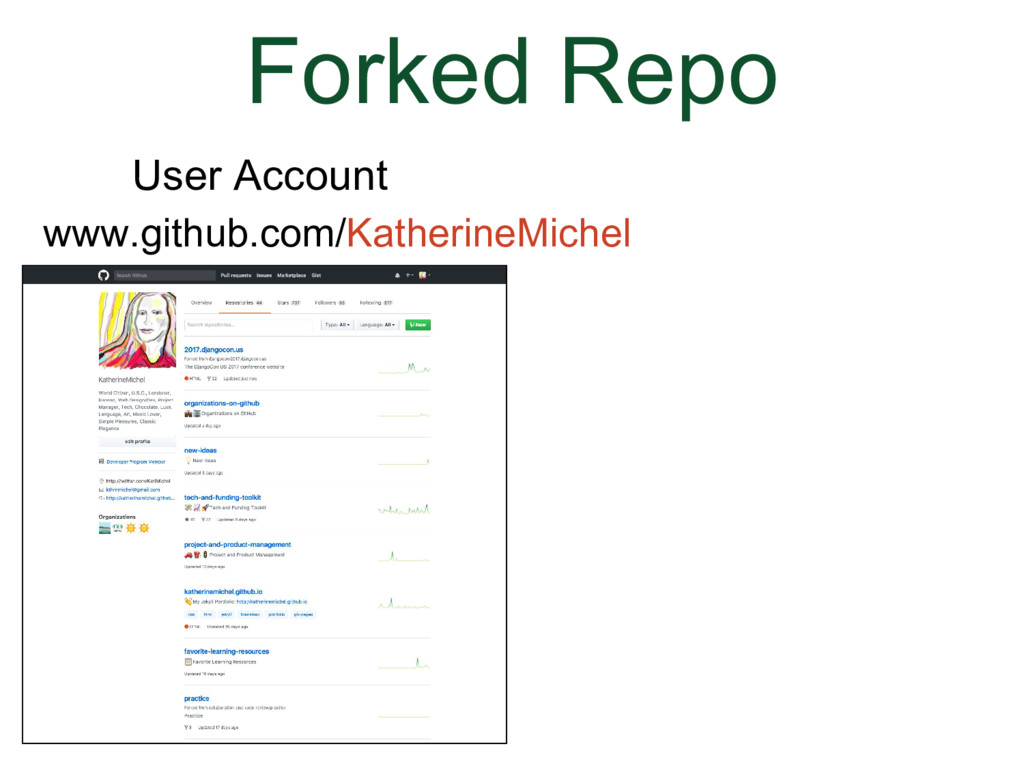
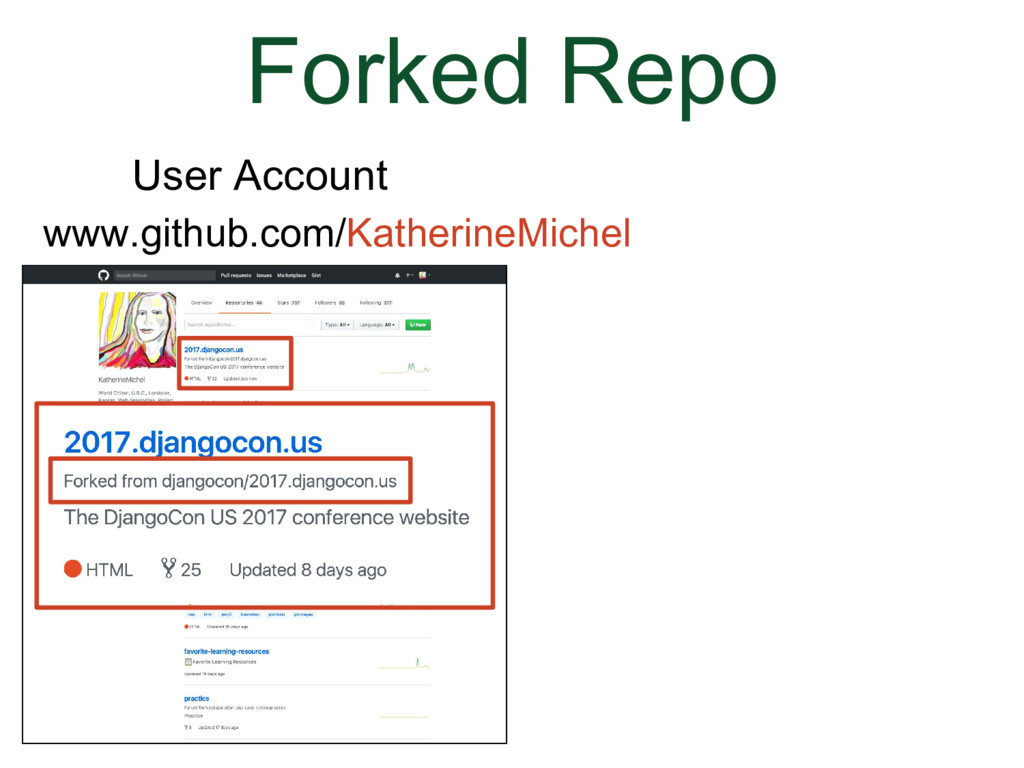
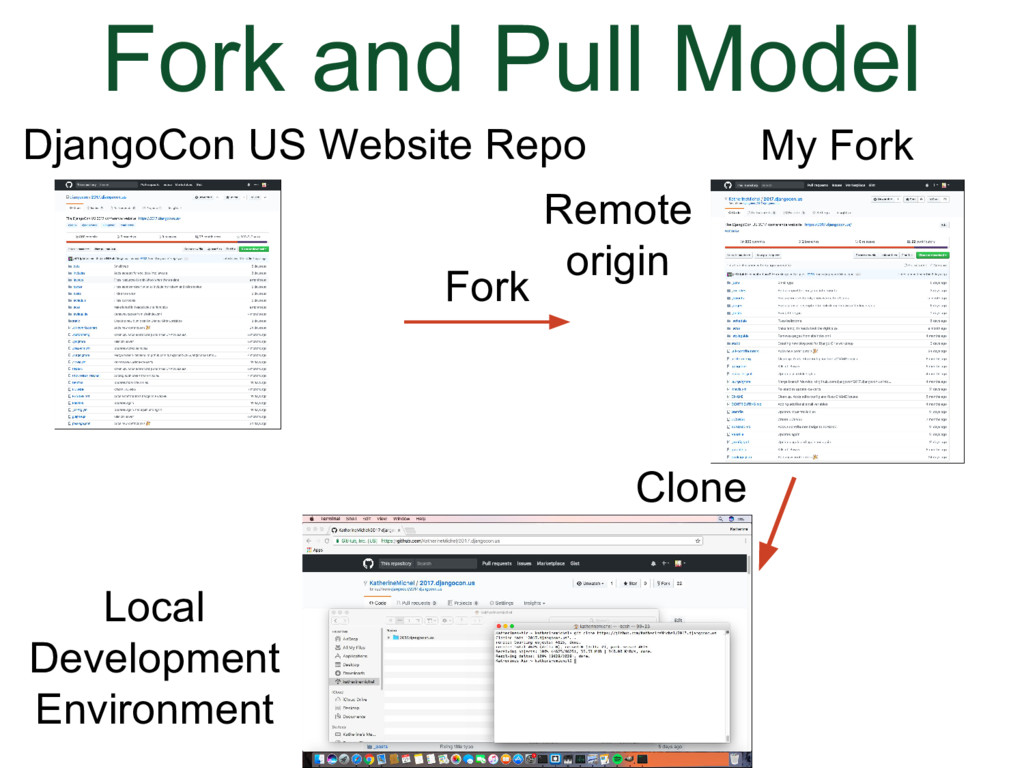
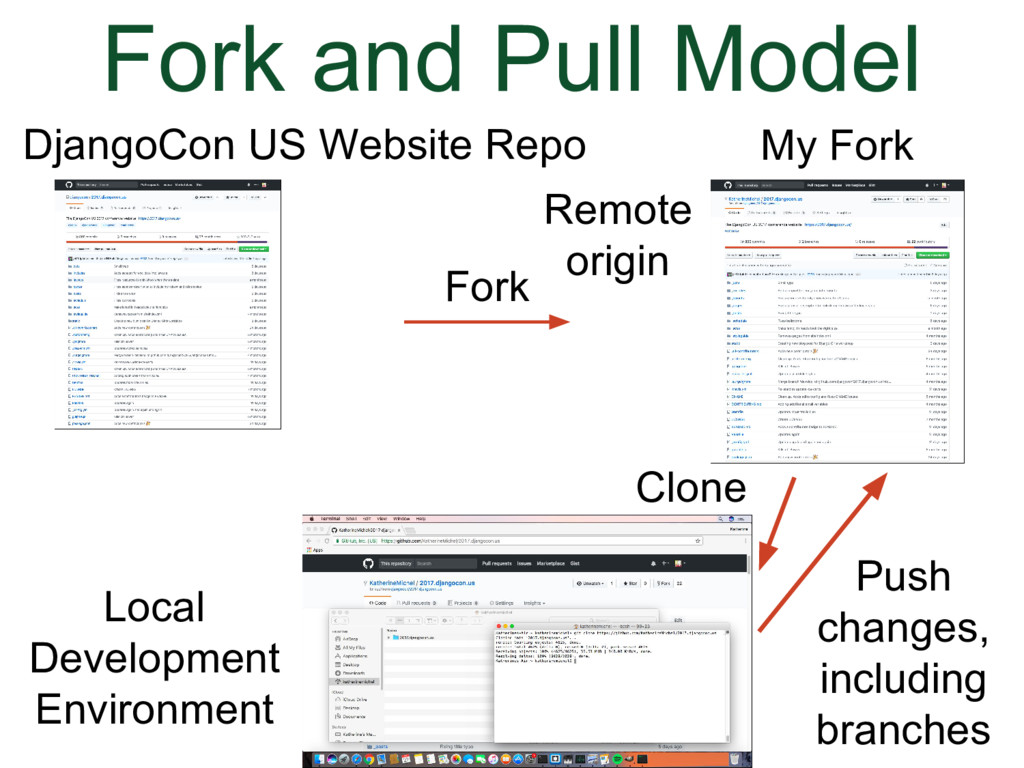
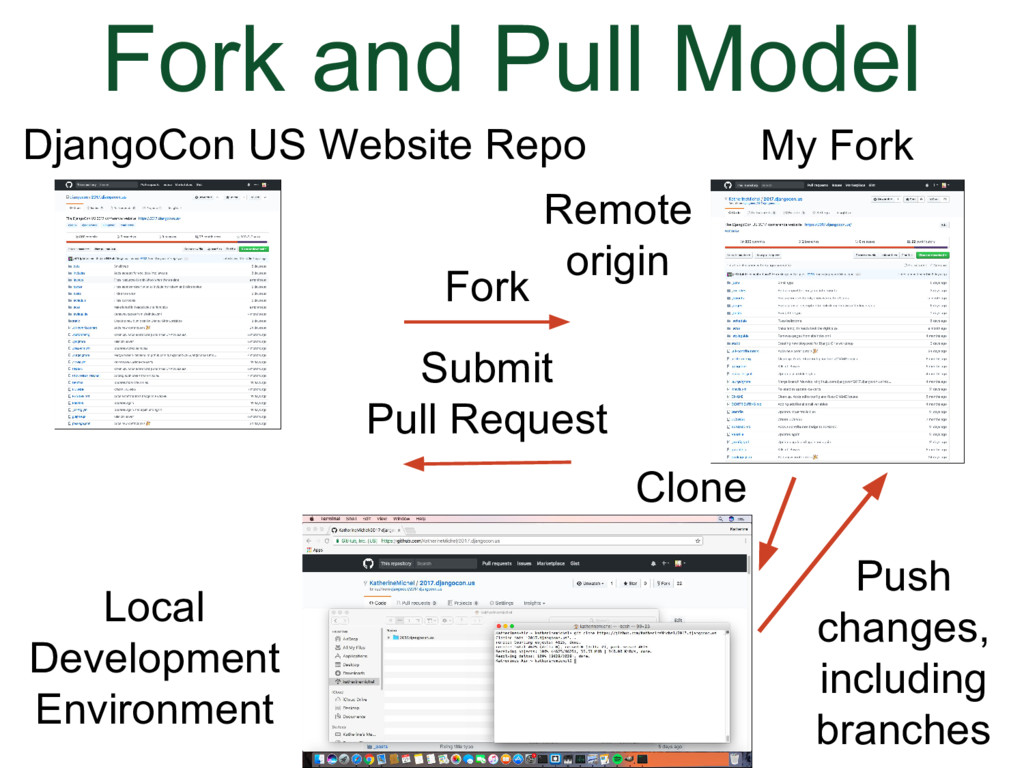
(Animation) The “Fork and Pull” Model is typically used in user account repos. For example, when I first came across the DjangoCon US website repo, I wanted to contribute, but I was not a maintainer, so I didn't have write permission. So I made a copy (a.k.a. fork) of the DjangoCon US website repo in my user account, which I have write permission to, made a change, and submitted a pull request to the Django US website repo. | |
|
|
We've gone to the DjangoCon US website repo.
| |
|
|
(Animation) There will be a message notifying you that it is being forked. | |
|
|
| |
|
|
(Animation)
| |
|
|
(Animation)
| |
|
|
It’s typical that a shared repository will be found in an organization and a fork will be found in a user account. However, it can be the other way around, it’s just not nearly as common. A repo can be forked into an organization account and user account owner can make a user account repo a shared repo by inviting other users to be collaborators on the repo.
| |
|
|
| |
|
|
| |
|
|
A few minutes ago, I talked about how it’s impractical to go into a file and make changes directly if you are working with multiple people and that it’s better to use branches. If you fork a repo, you also want to use branches. Say for instance, you make a change in the file and submit a pull request (without using a branch), you’re stuck waiting for the pull request to be resolved. Normally, you want your main branch to stay up-to-date so that you create new feature branches, but you’ve made a change in your main branch. If you delete the fork and refork to make it up to date, the pull request remains, but is inactive. It will be harder for the maintainer and you to work on. Instead, you want to keep the main branch up-to-date and use branches, just like we talked about a few minutes ago. | |
|
|
| |
|
|
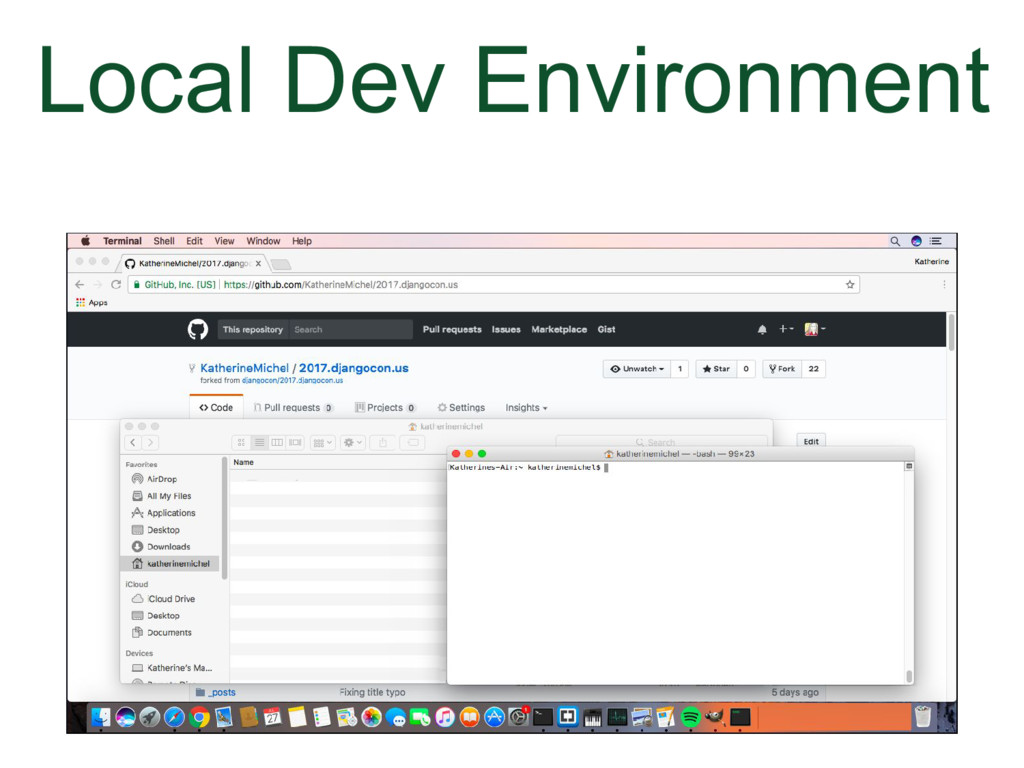
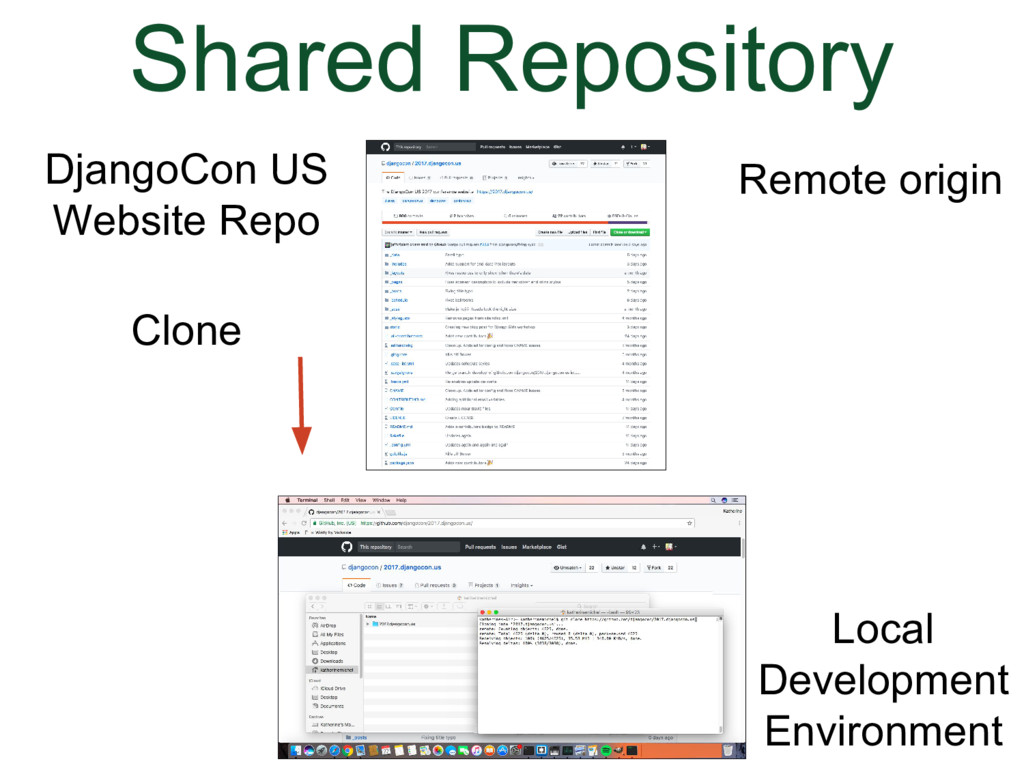
I've made a couple of diagrams that I hope will give you an idea of what the process is for working locally for each collaborative development model. | |
|
|
(Animation)
| |
|
|
(Animation)
Git will track some details about the project, for instance, where we cloned our code from. In relation to the clone, the GitHub repo we cloned from is now a remote repo and Git will assign the name "origin" to it. We can use the name origin in the command line to refer to the repo so we can push and pull changes back and forth between the local development environment and the GitHub repo. | |
|
|
(Animation)
| |
|
|
(Animation)
| |
|
|
Here's what it looks like when we use the "Shared Repository" Model | |
|
|
(Animation)
| |
|
|
(Animation)
| |
|
|
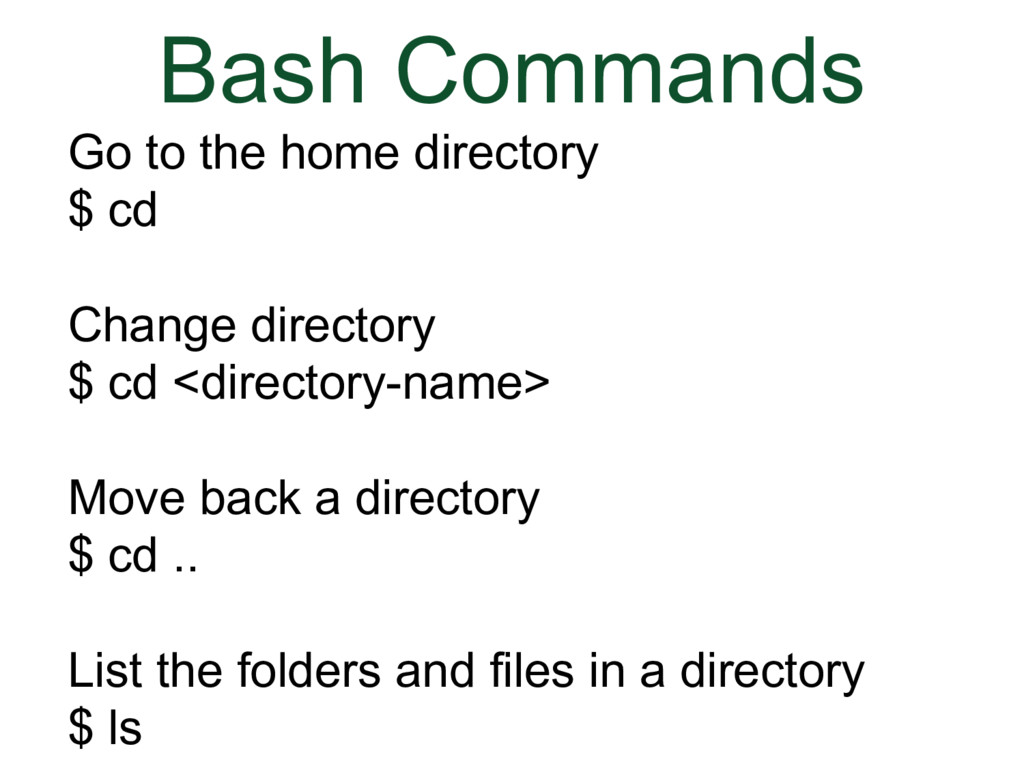
Bash commands are commands that you use in the command line to communicate directly with your computer operating system. The commands below are enough to be able to use git. The other commands we are going to use in this talk are git commands. A couple useful things to know
Go to the home directory $ cd Change directory $ cd Move back a directory $ cd .. List the folders and files in a directory $ ls | |
|
|
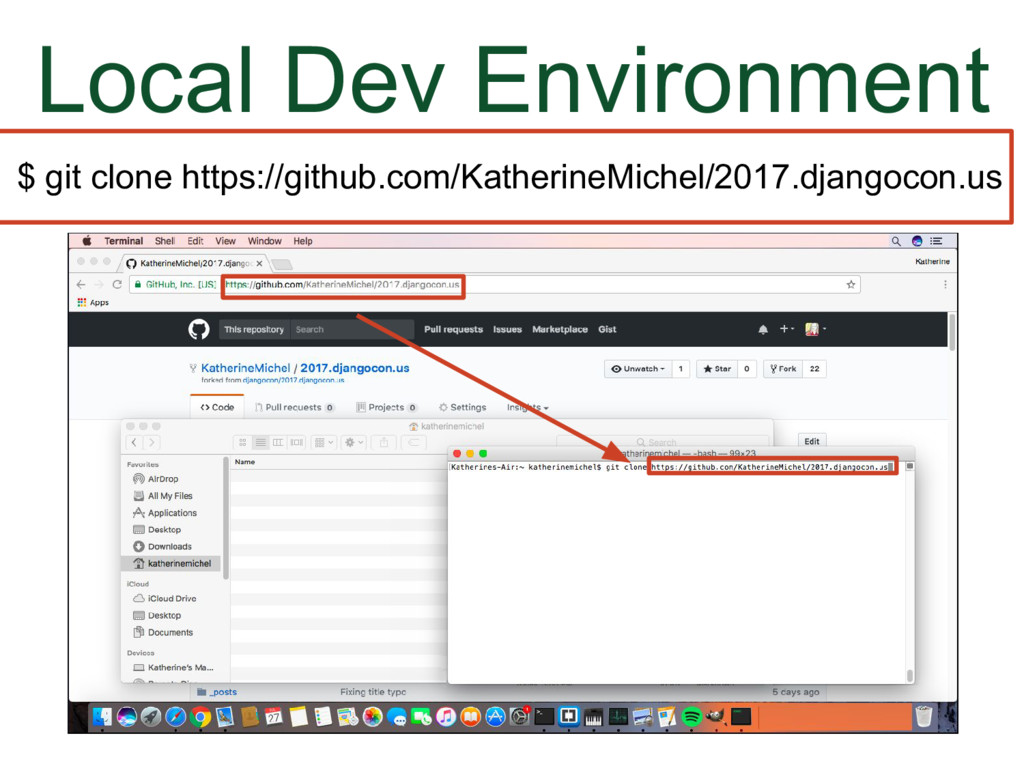
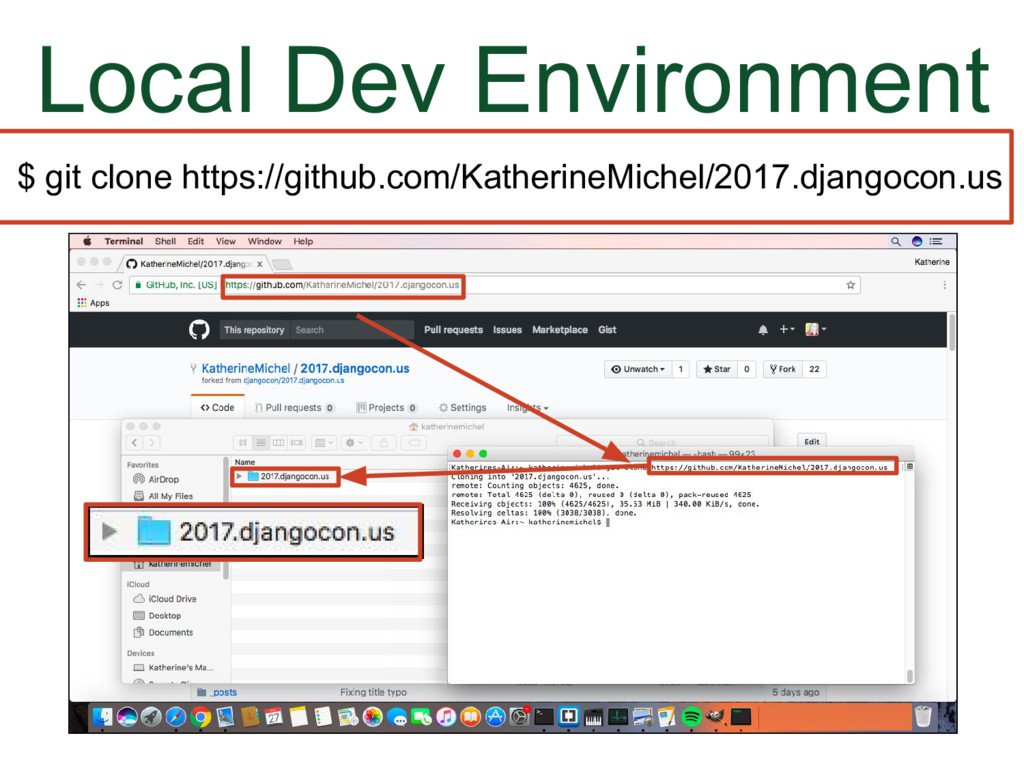
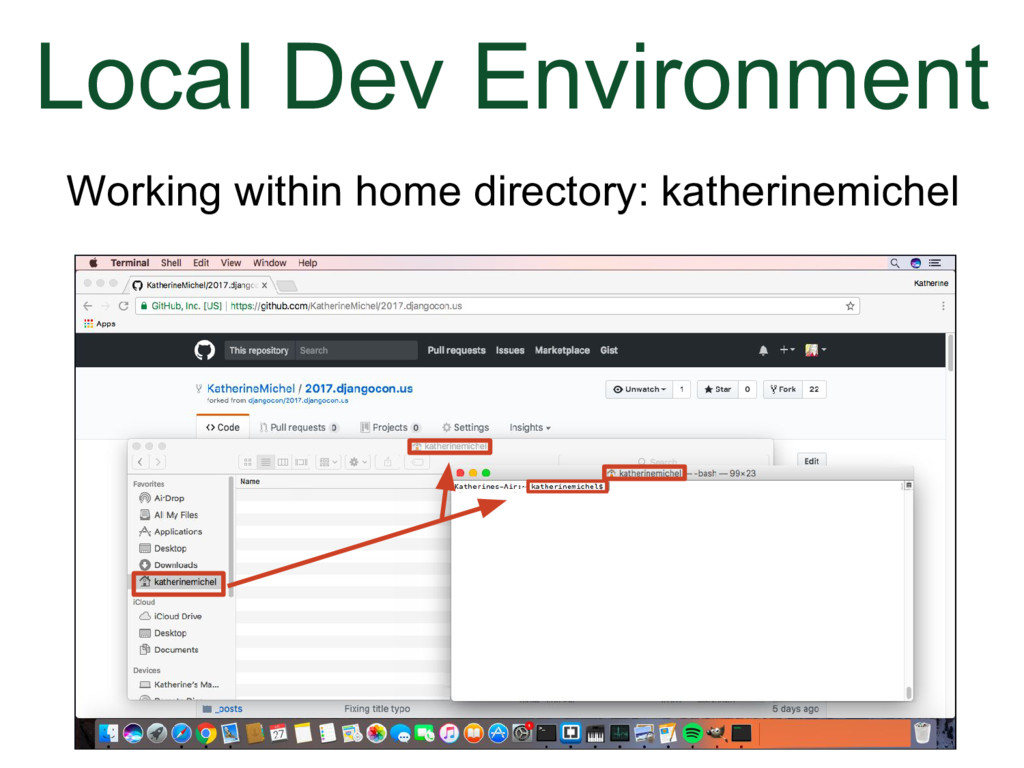
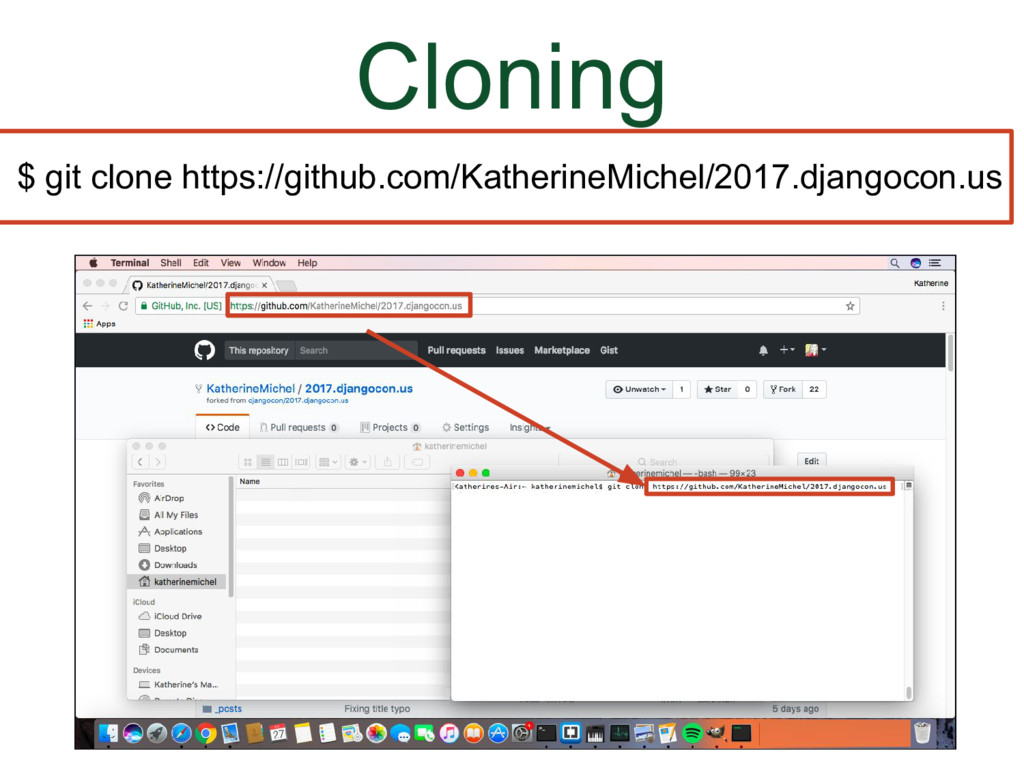
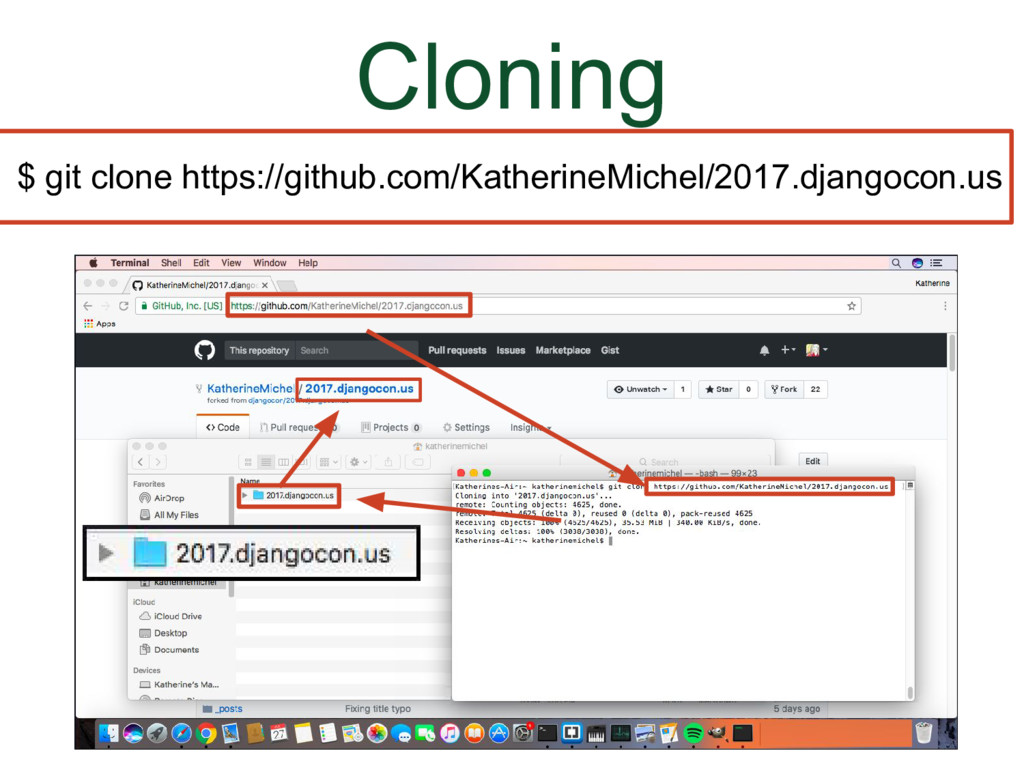
What I'm going to show you now is a generic process that you can use for a shared repository or a fork. You will clone the repo you have write permission to. Let's go back to the screenshot of my local development environment.
| |
|
|
(Animation)
| |
|
|
(Animation)
| |
|
|
(Animation)
| |
|
|
(Animation)
| |
|
|
(Animation)
| |
|
|
(Animation)
| |
|
|
(Animation)
| |
|
|
(Animation)
| |
|
|
(Animation)
| |
|
|
(Animation)
| |
|
|
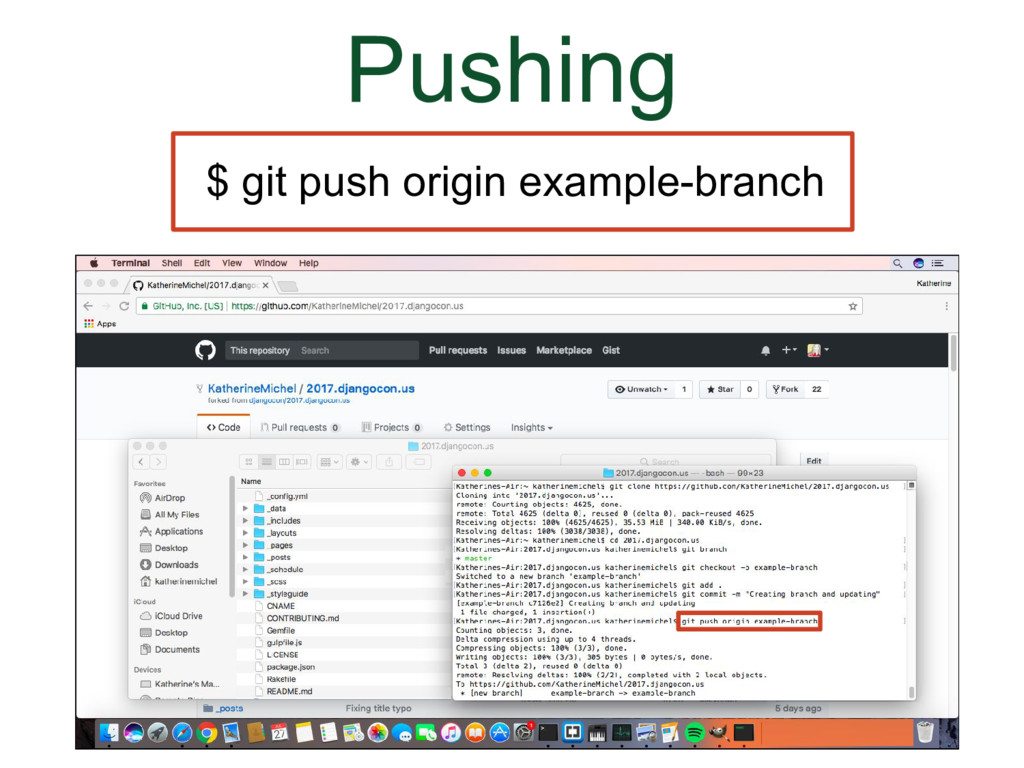
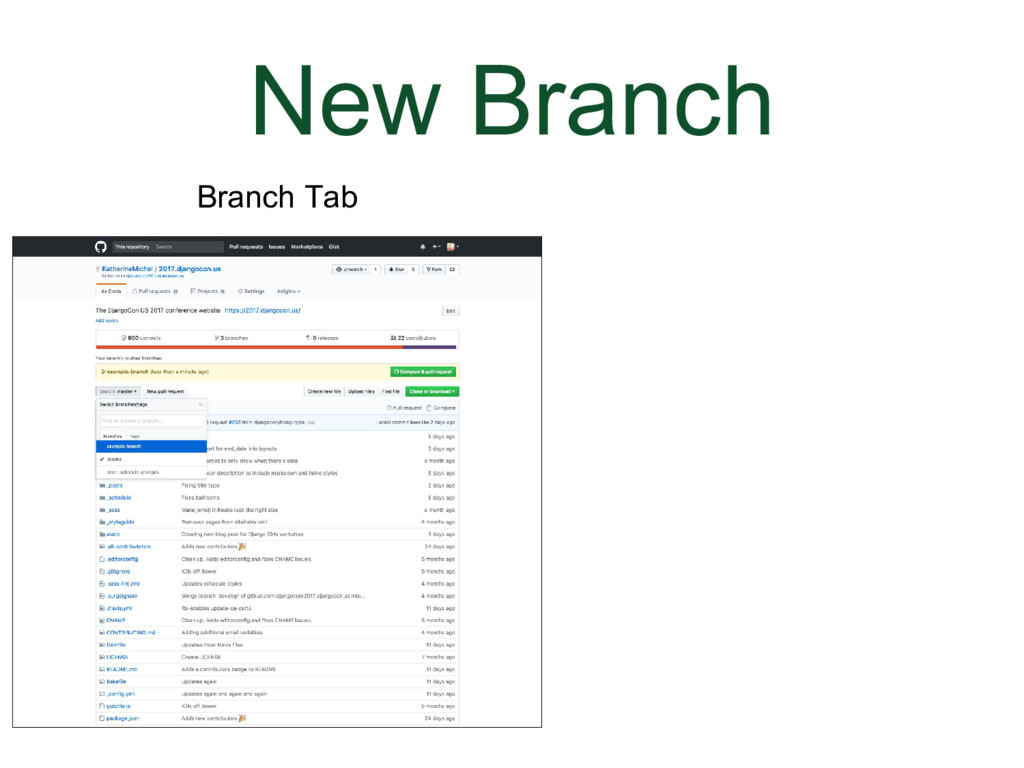
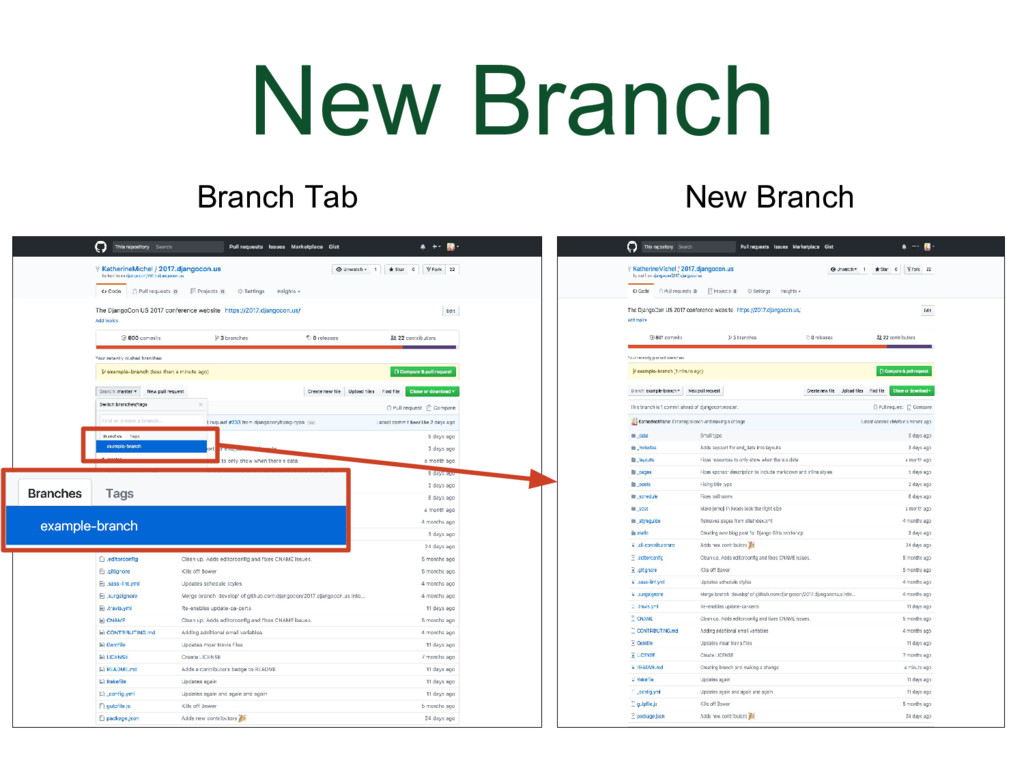
There will now be a new branch in the repo that is your origin and a message telling you it's there. The branch will not be affecting anything else. It's just there. If you click on the branch tab you can choose the name of the branch to switch to the new branch. | |
|
|
(Animation) You can toggle back and forth between the branches by clicking on the branches in the branches tab. | |
|
|
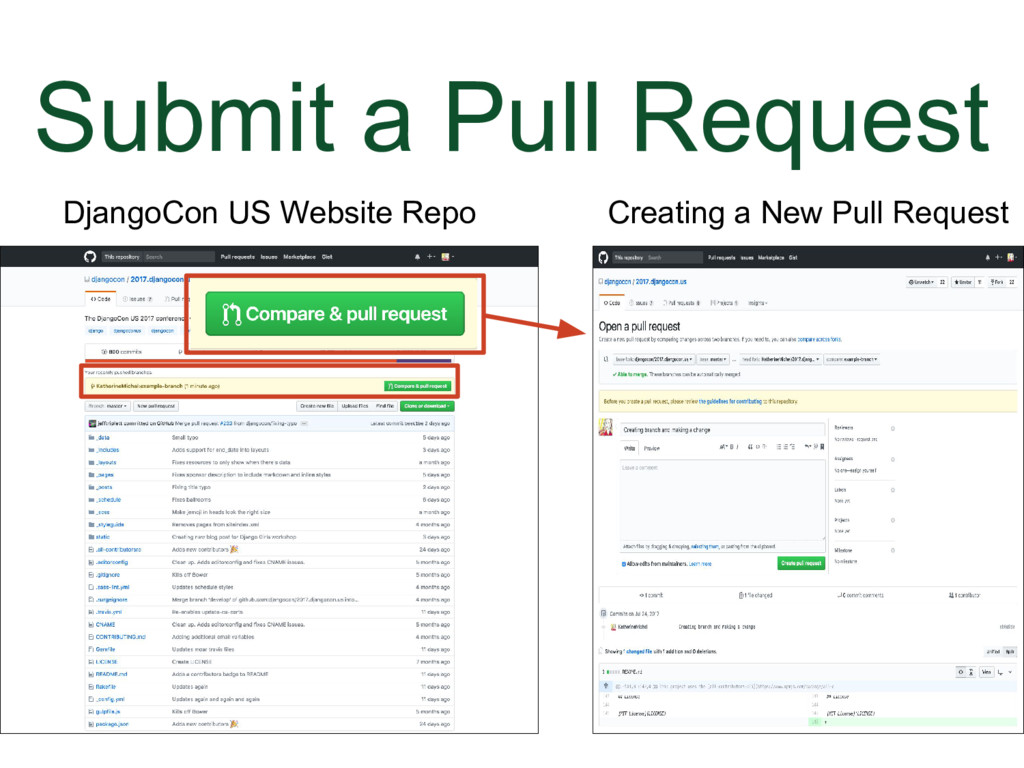
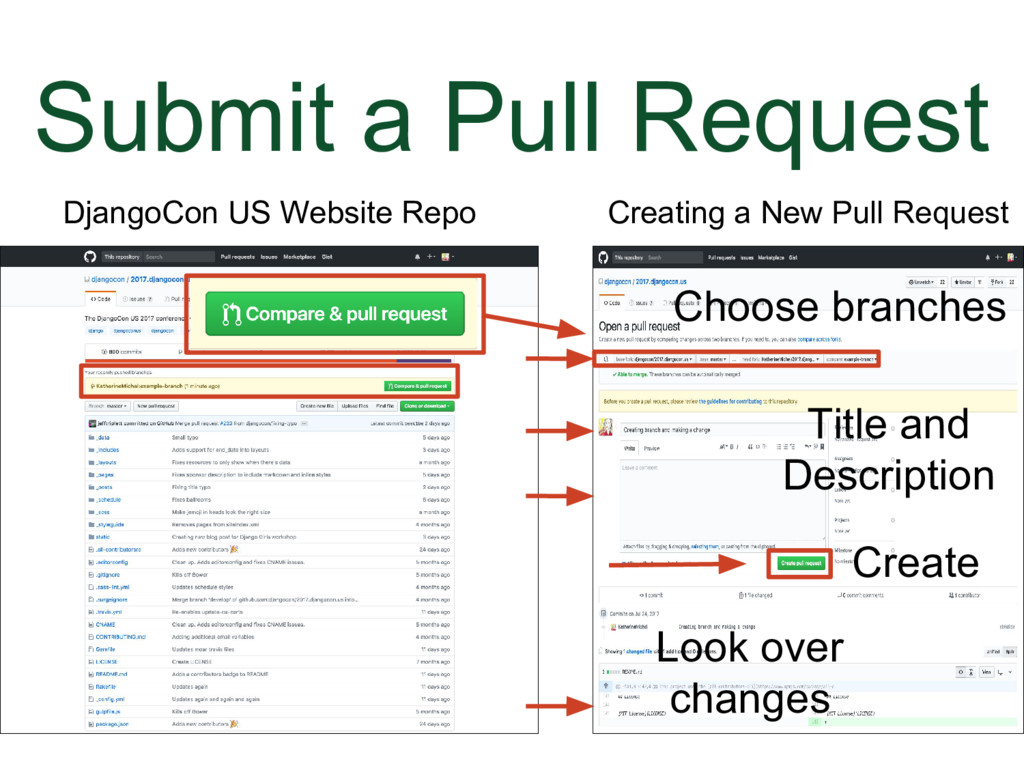
Go to the repo you want your pull request to be merged into, in this case, the DjangoCon US website repo. The reason why I saw this is because you can accidentally submit a pull request to yourself in your fork. In the DjangoCon US website repo, there will also be a message here telling you about the branch and suggesting that you submit a pull request, even if the branch is in a fork, because GitHub will detect it. Click on the "Compare & pull request" button. | |
|
|
(Animation)
| |
|
|
| |
|
|
| |
|
|
(Animation) Underneath that will be info about how to merge the pull request.
| |
|
|
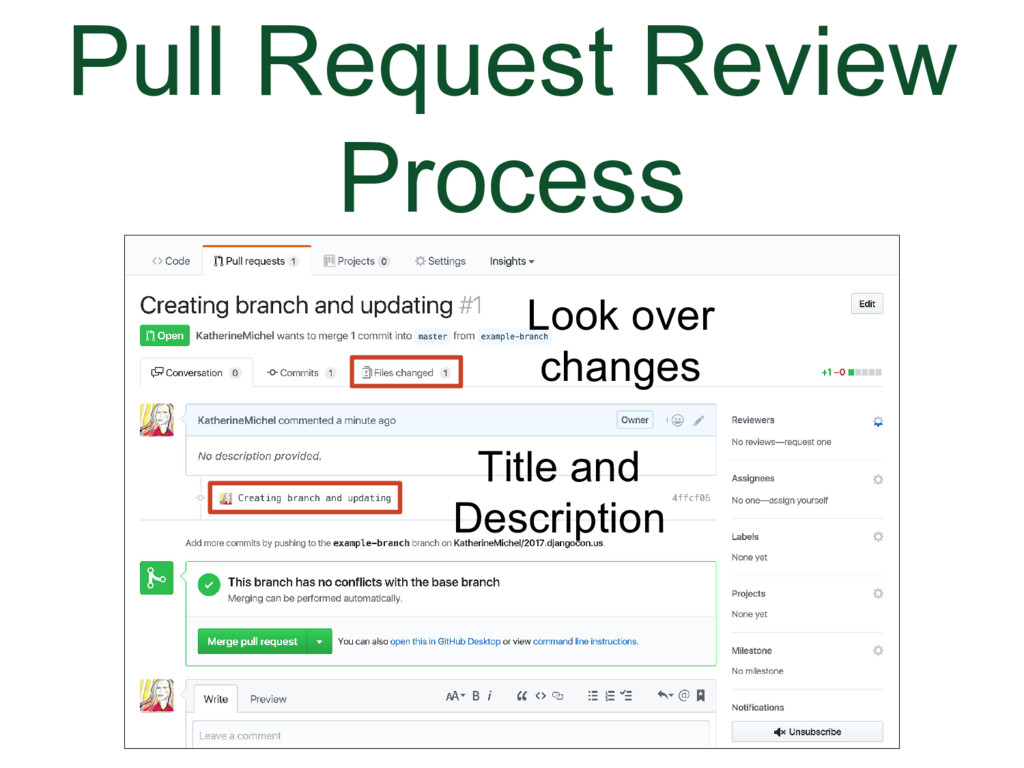
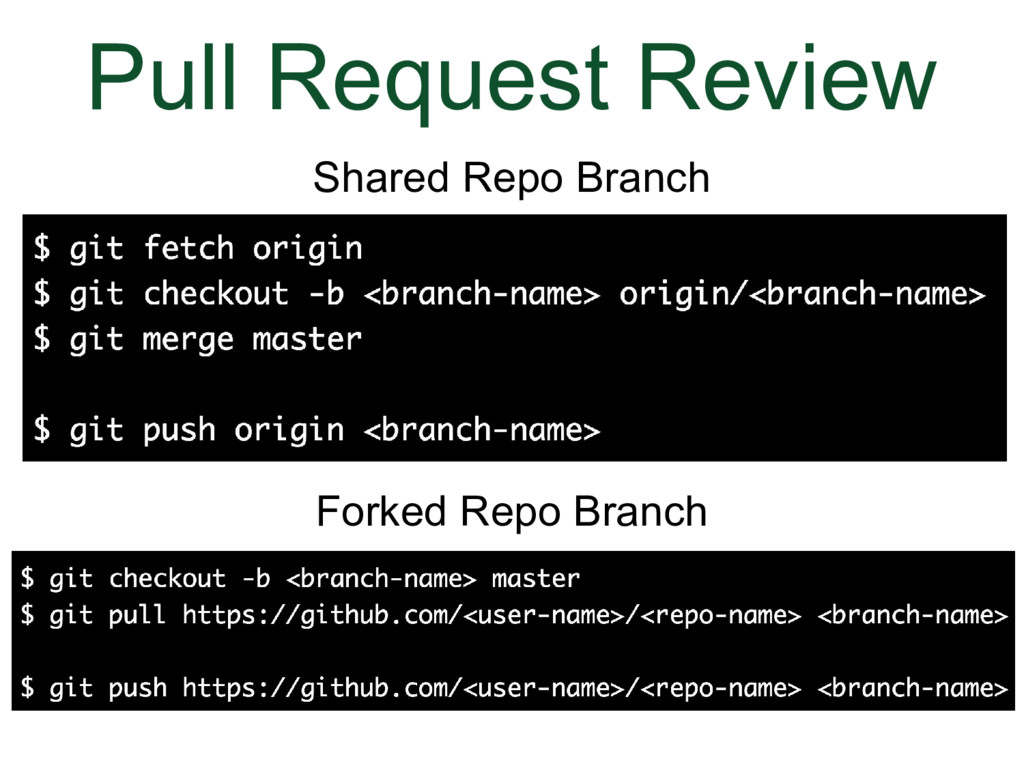
When you click on that link, it will open up a set of instructions for how to review and merge the pull request in your local development environment. The instructions will be different depending on whether the pull request was submitted from within the shared repository or from a forked repo. I will go over that in a minute. | |
|
|
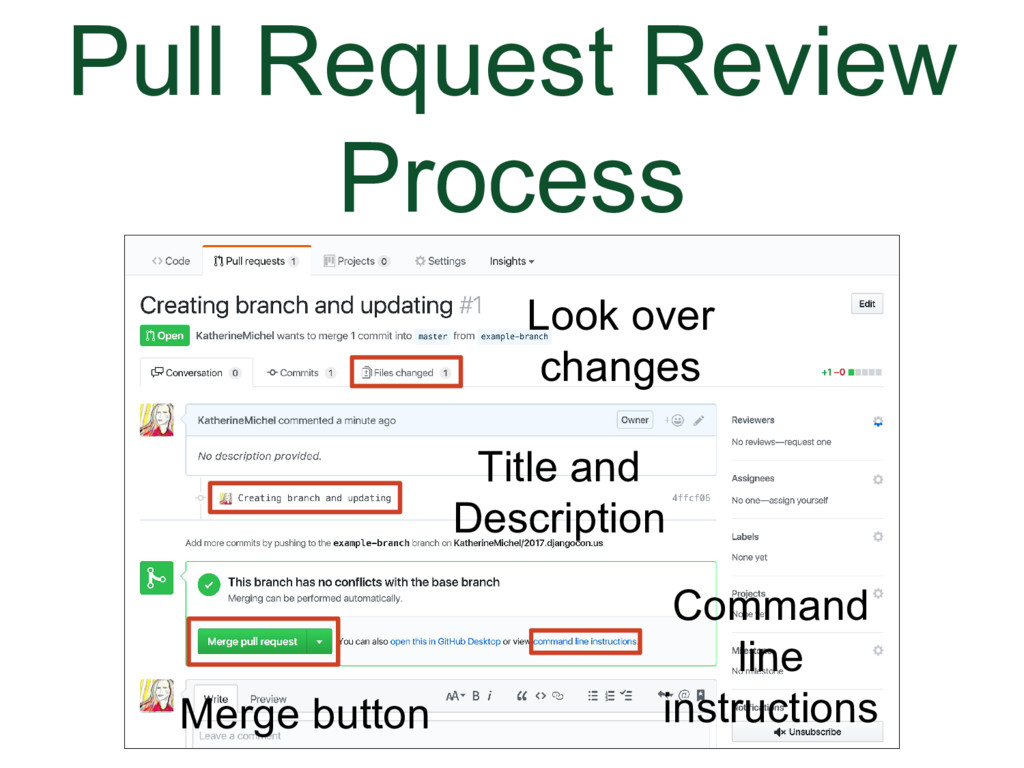
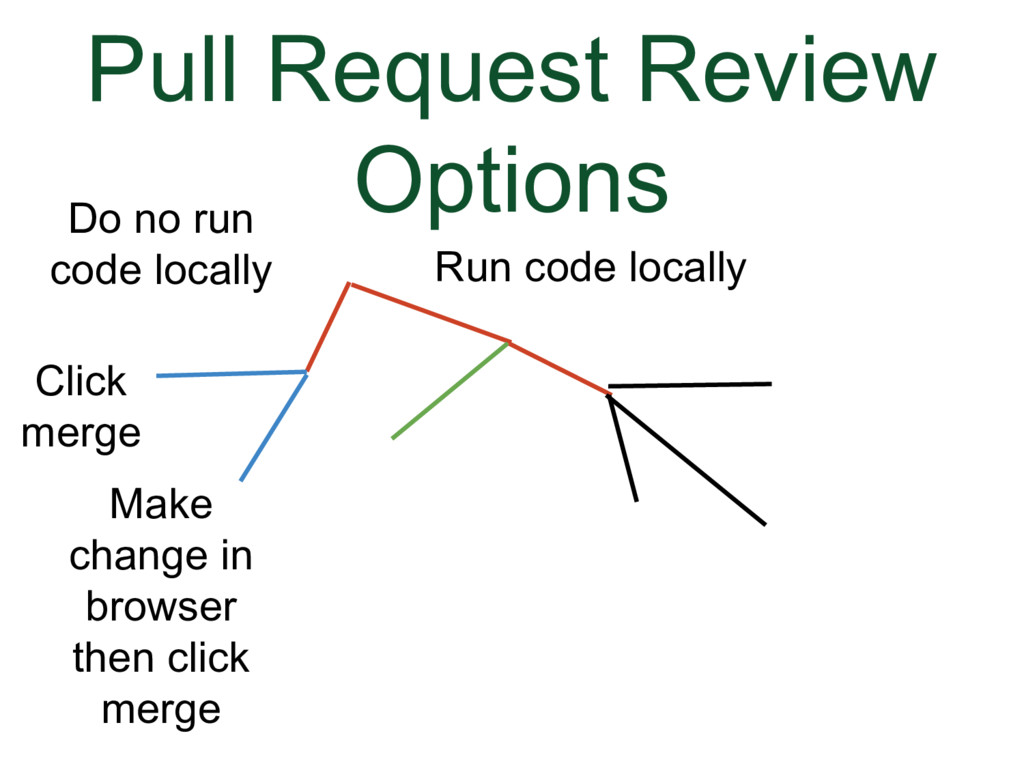
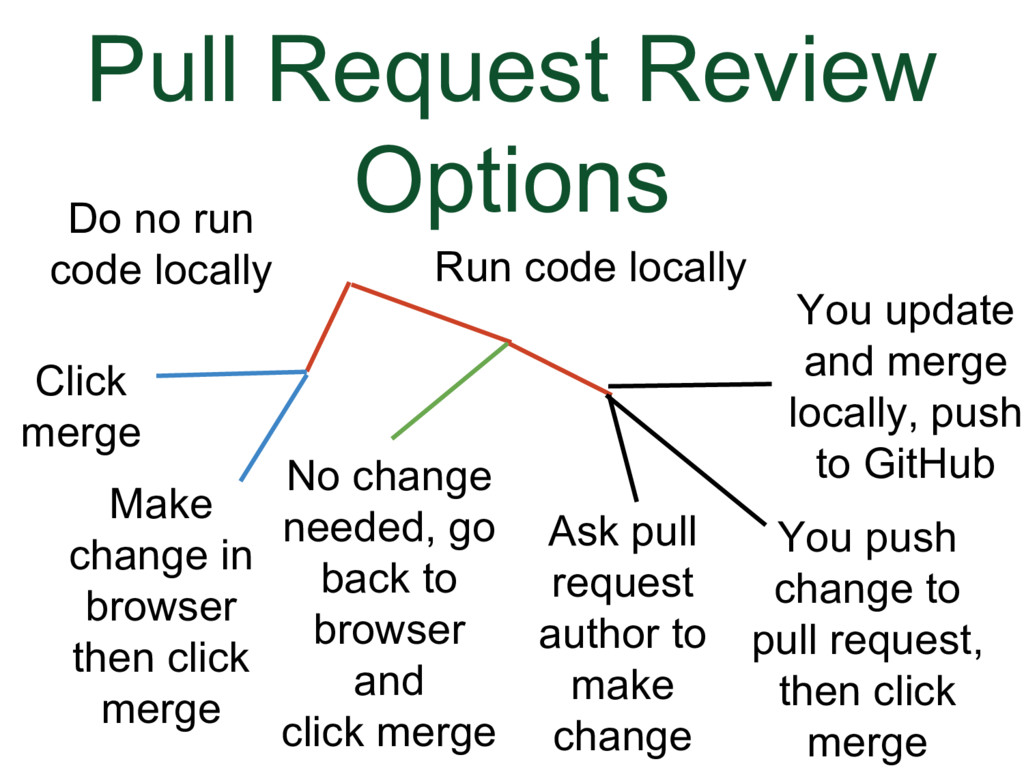
But first, let's go over the options for what you can do when you review a pull request. The first two options involve clicking the merge button in GitHub without running the code locally
| |
|
|
The other options involve fetching the pull request into your locally development environment and running the code there. If a change does not need to be made, you can
If a change needs to be made, you can
| |
|
|
This is why the pull request instructions are different.
| |
|
|
$ git fetch origin
$ git checkout -b <local-branch-name> origin/<branch-name>
$ git merge master
$ git push origin <branch-name>
$ git checkout -b <local-branch-name> master
$ git pull https://github.com/<user-name>/<repo-name> <branch-name>
$ git push https://github.com/<user-name>/<repo-name> <branch-name> | |
|
|
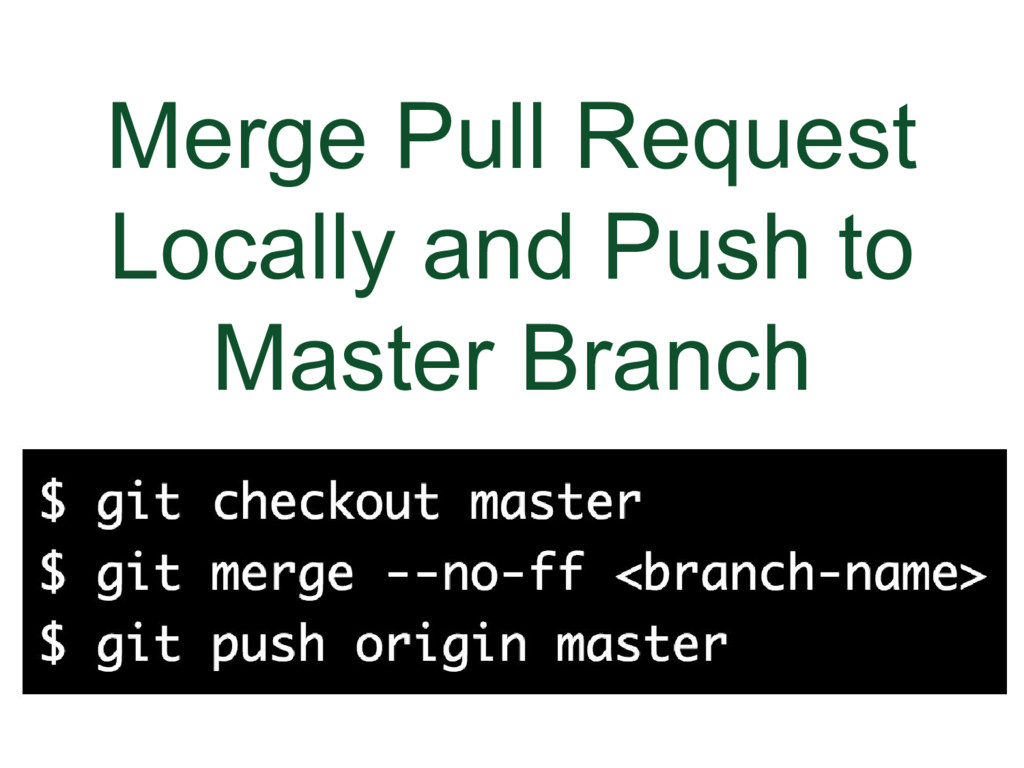
This piece of code is for merging a pull request locally and pushing to the master branch. You are checking out to the master branch, merging the feature branch into the master branch, then pushing the change to the live master branch on GitHub. $ git checkout master
$ git merge --no-ff <local-branch-name>
$ git push origin master | |
|
|
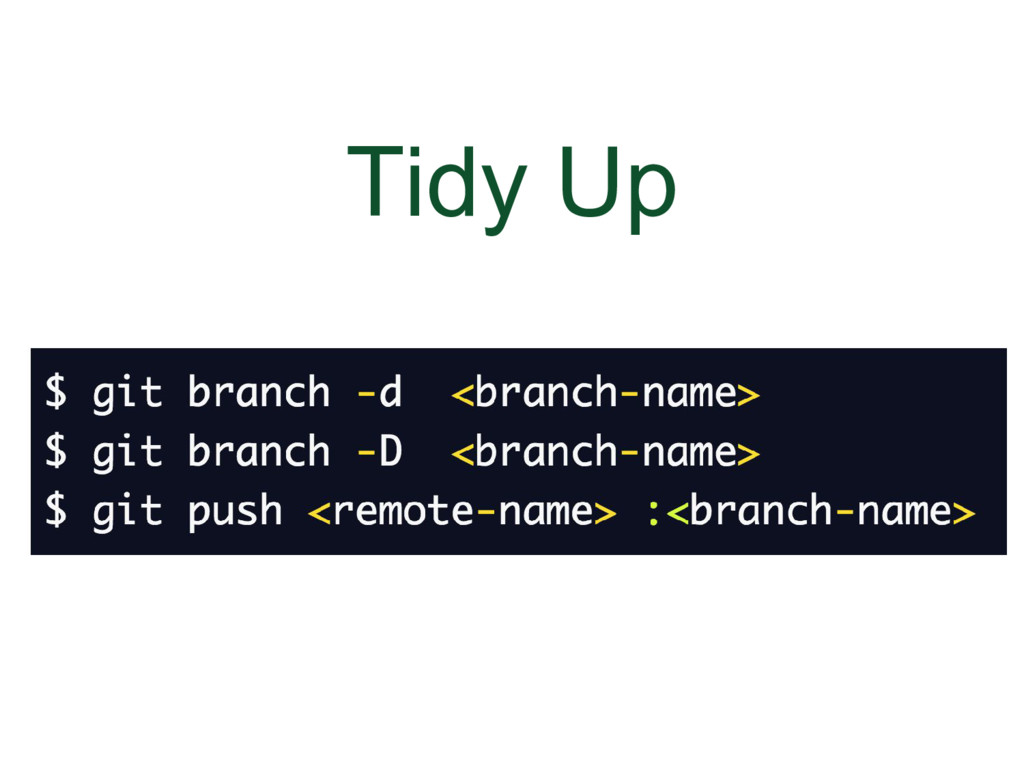
After a pull request is closed, it’s good practice to delete the feature branch in the browser and locally. There will be a button on the pull request page that you can use to delete the feature branch in the browser, or you can delete it in the branches tab. Or, you can use the third command. The first two commands are to delete the branch locally. Delete local branch $ git branch -d Force delete local branch $ git branch -D Delete remote branch (instead of deleting directly through browser) $ git push : | |
|
|
I’m not really covering these, but it’s good to be aware of them if you want to go further with your knowledge
| |
|
|
| |
|
| ||
|
|
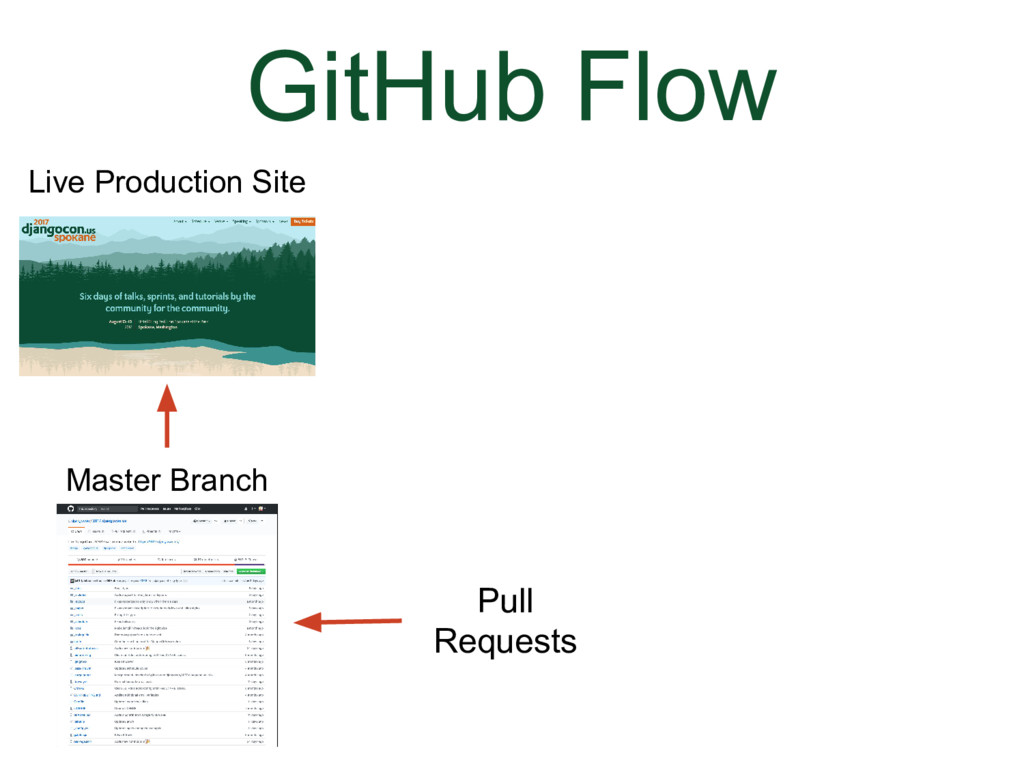
The workflow we have been using is basically GitHub Flow. It consists of merging pull requests into a master branch, which, in the cast of DjangoCon US website, deploys directly to the live site. | |
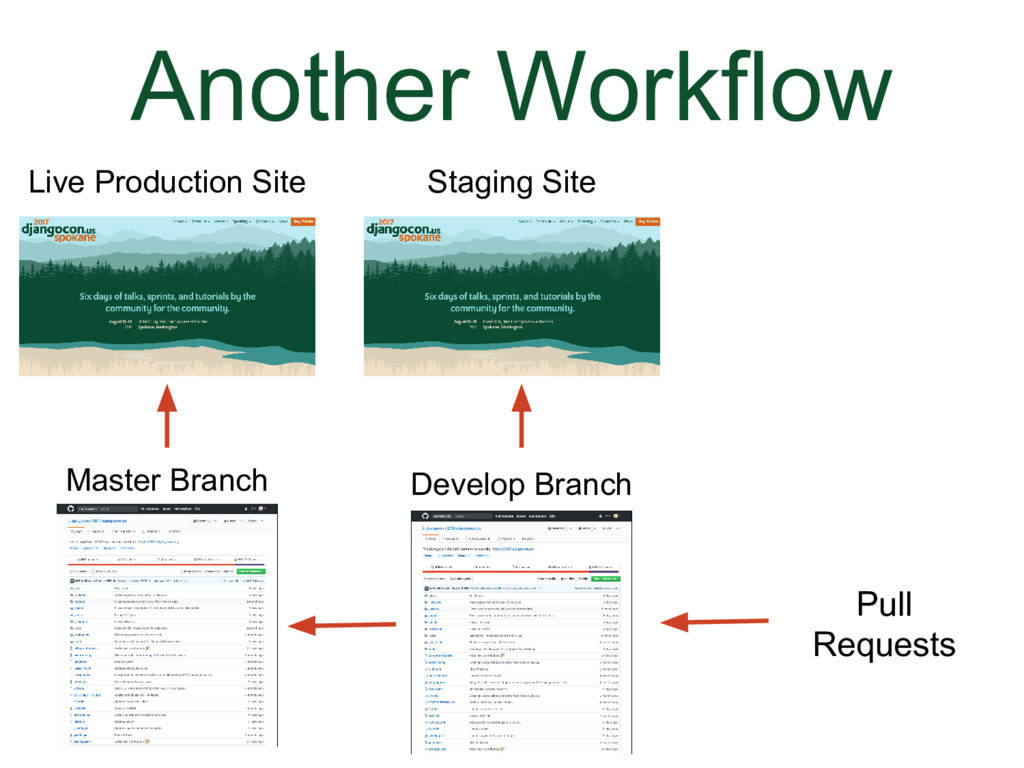
|
|
Some projects use both a master and develop branch. For example, in a mission critical project with a high volume of users, pull requests might be merged into the develop branch, where the development is done. The develop branch might deploy to a staging site where the changes can be tested. The develop branch will be merged into the master branch when the recent changes are ready to deploy live. | |
|
|
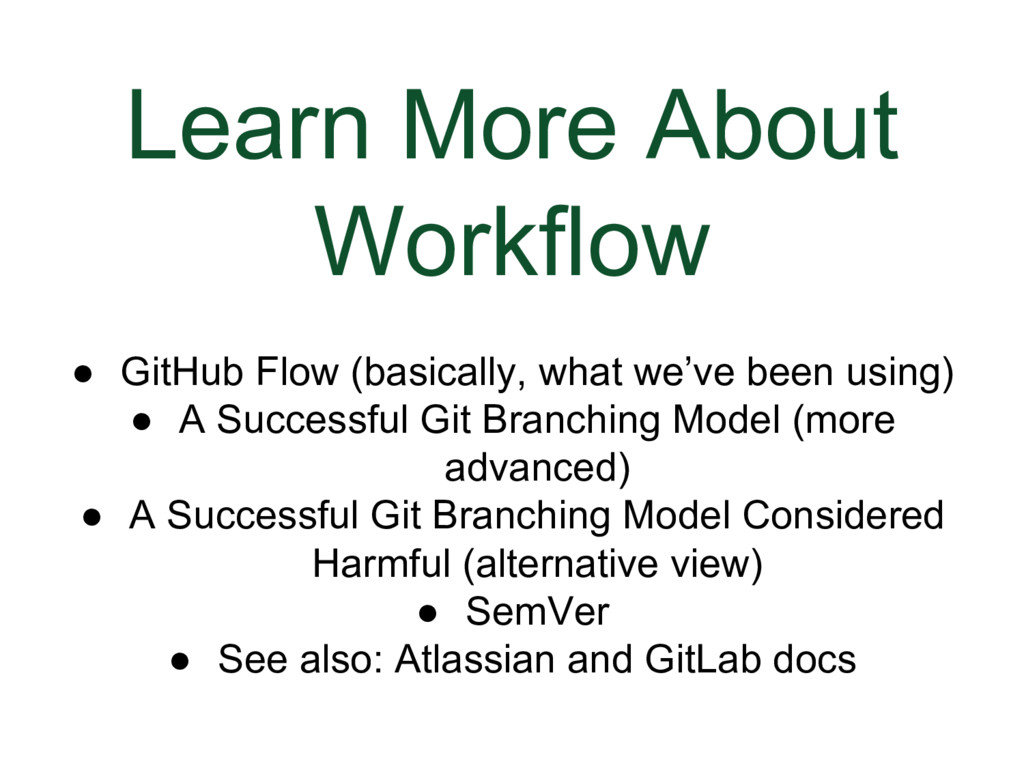
Some developers have passionate views about workflow (see comment threads in some posts). Sometimes people ask, “Which is the best workflow?” There is not really a “best” workflow. You should use the workflow that fits what you are trying to accomplish. They all have pros and cons.
http://nvie.com/posts/a-successful-git-branching-model https://barro.github.io/2016/02/a-succesful-git-branching-model-considered-harmful | |
|
|
| |
|
|
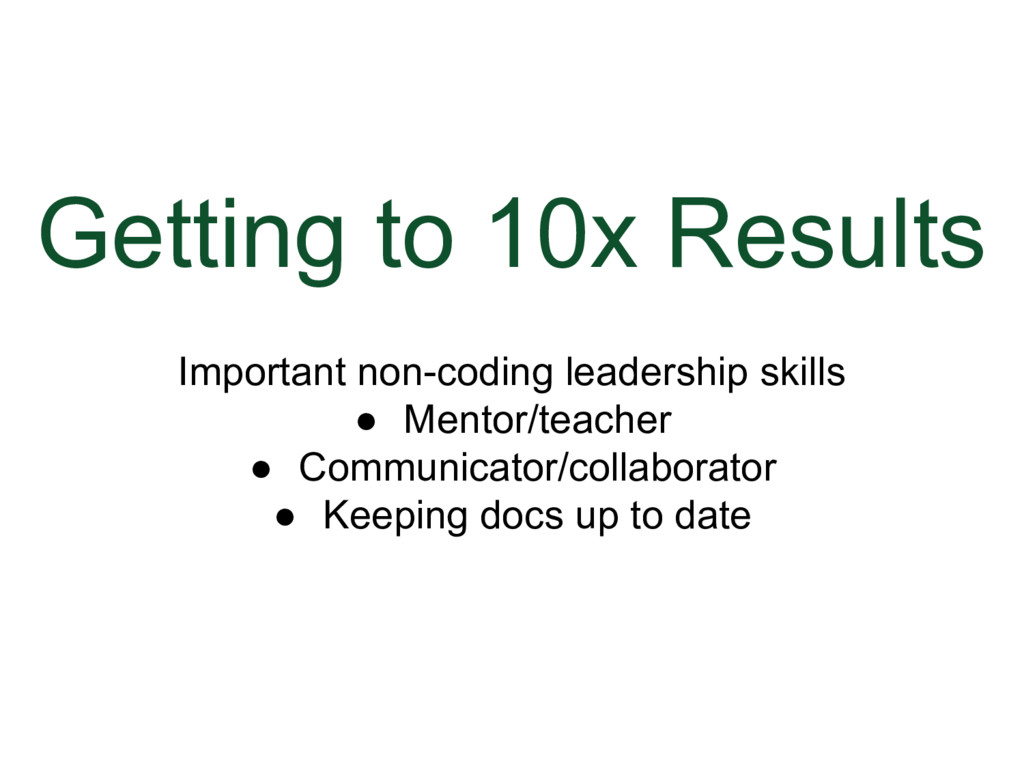
There are two resources I want to direct you to: One is a survey by Eric Elliott of ~1000 developers to find out what makes some developers achieve 10x more results than others. Not all of the answers were code related. The results showed that developers that achieve 10x the results tend to be mentors/teachers and communicator/collaborators. The other resources I want to direct you to is a Open Source Survey completed by GitHub. Even though documentation is considered extremely useful, it is often missing. https://medium.com/javascript-scene/getting-to-10x-results-what-any-developer-can-learn-from-the-best-54b6c296a5ef http://opensourcesurvey.org/2017/#insights | |
|
|
I hope that you will make your project documentation and attitude toward community members welcoming and positive. This is a way to increase the number of contributions and increase diversity. | |
|
|
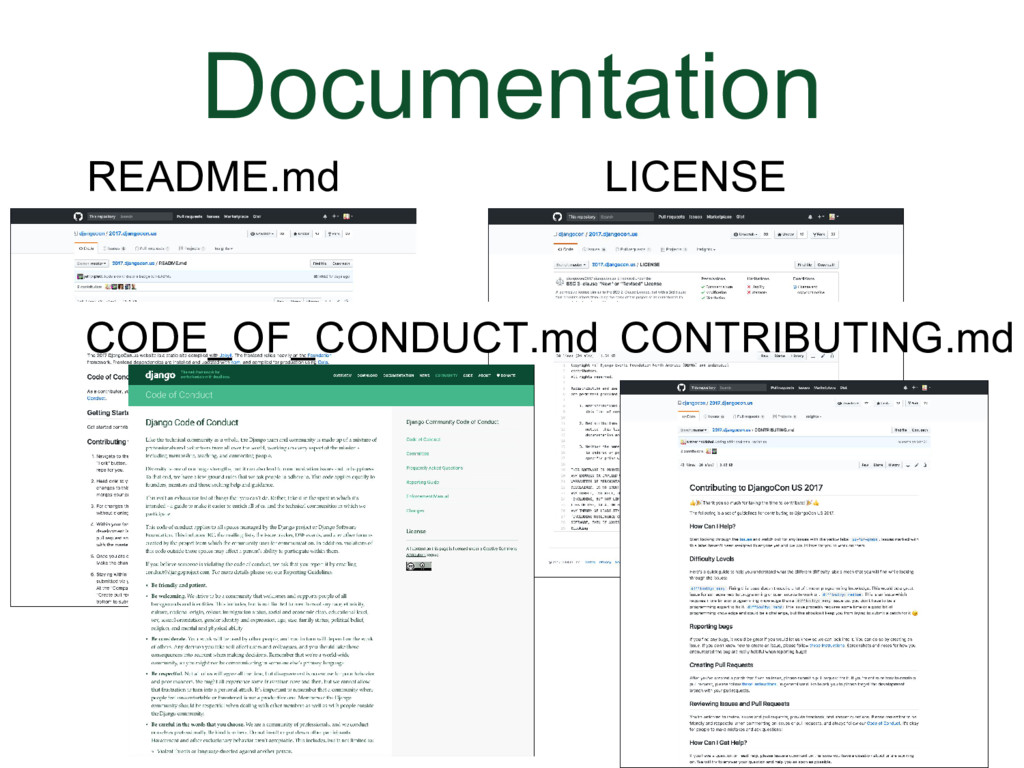
I recommend that you go to the Useful Resources Section, follow the links to the DjangoCon US website repo documentation and read it.
https://github.com/djangocon/2017.djangocon.us/blob/master/README.md https://github.com/djangocon/2017.djangocon.us/blob/master/LICENSE https://github.com/djangocon/2017.djangocon.us/blob/master/CODE_OF_CONDUCT.md https://github.com/djangocon/2017.djangocon.us/blob/master/CONTRIBUTING.md | |
|
|
See the Simulation Exercise
| |
|
|
| |
|
|
| |
|
|
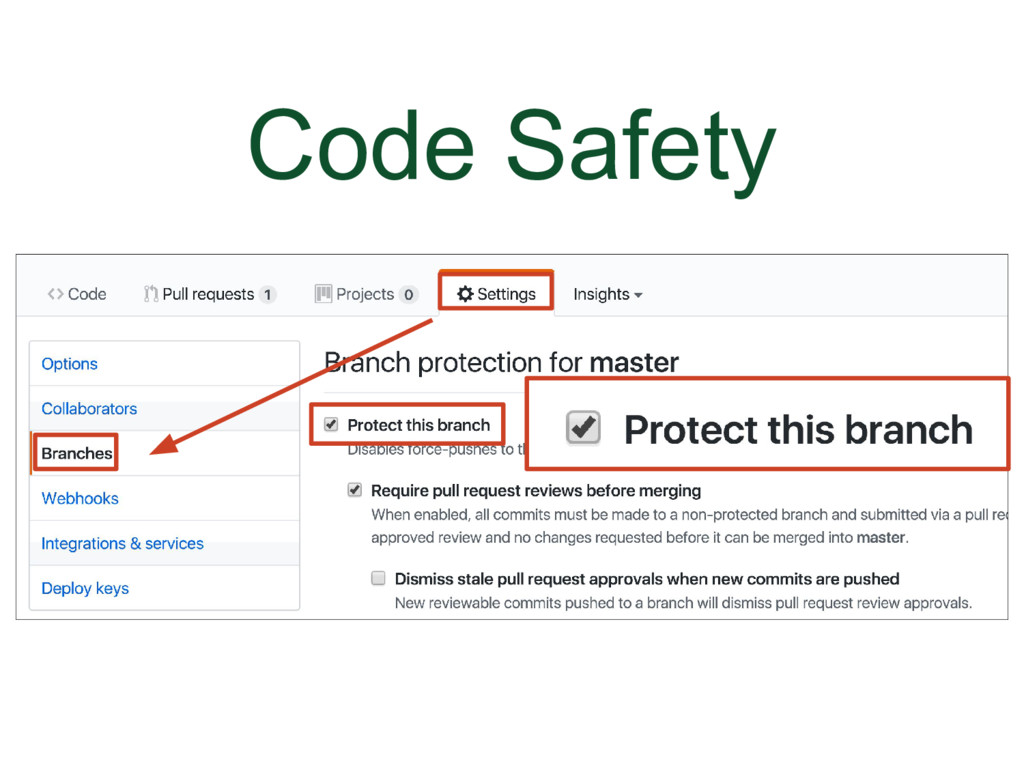
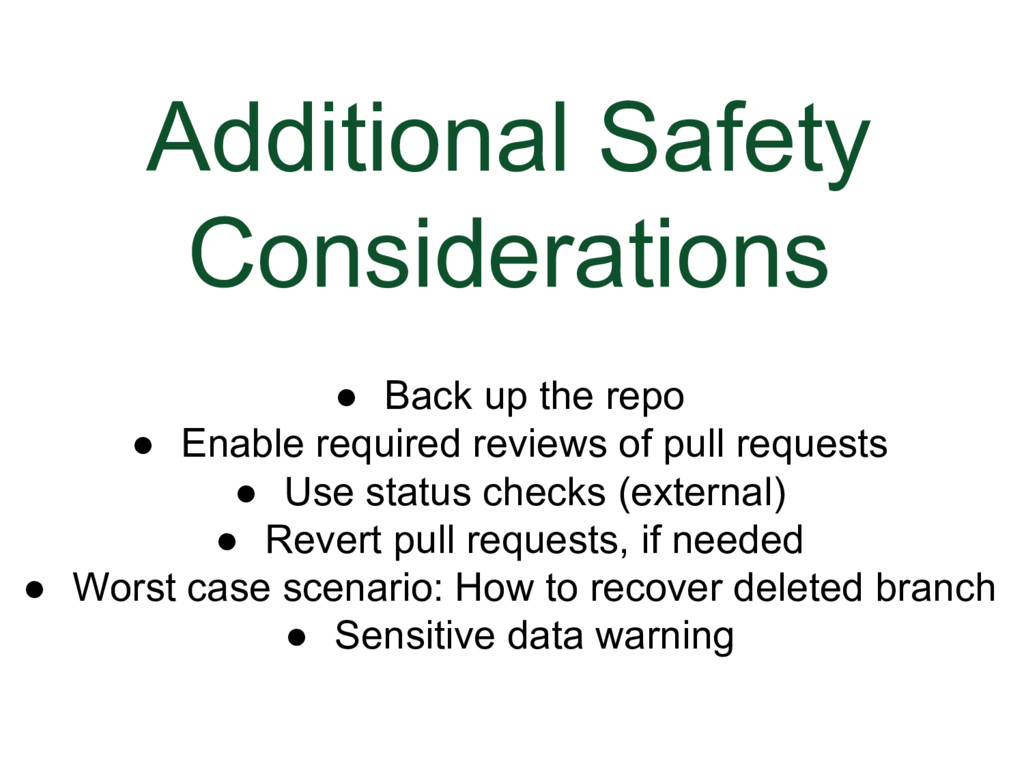
My first recommendation is that if you have the authority, go into a repo’s Settings, click the Branches tab
| |
|
|
Here are a few things you might want to do to keep your code safe
| |
|
|
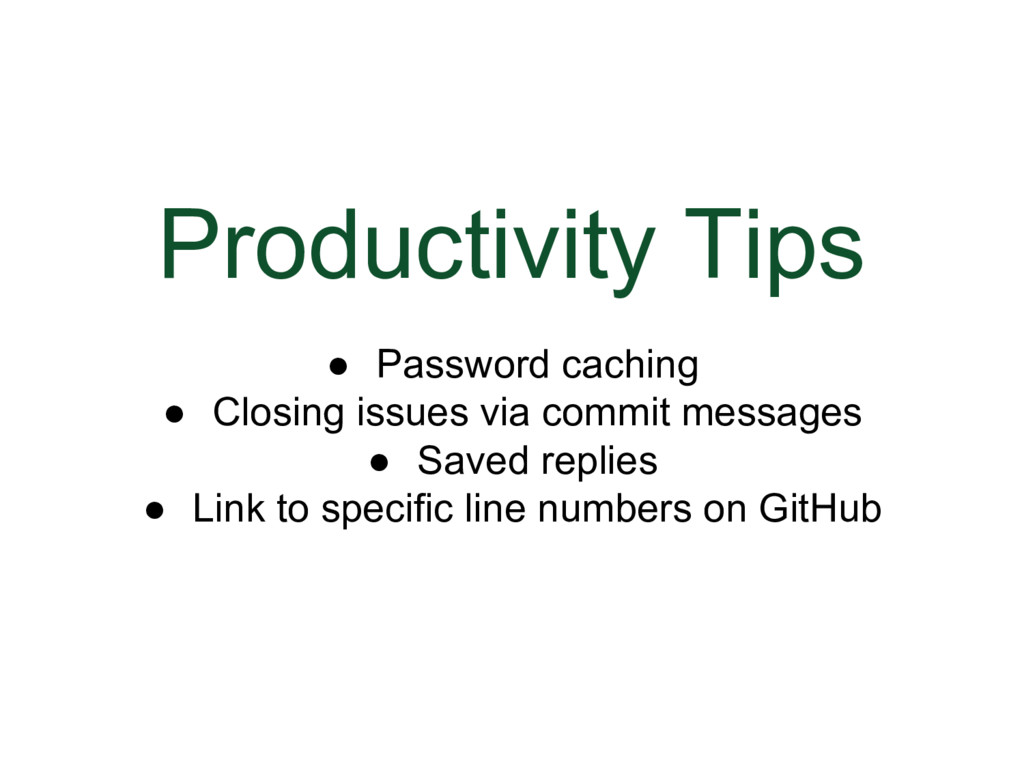
My second recommendation is to use productivity helpers
| |
|
|
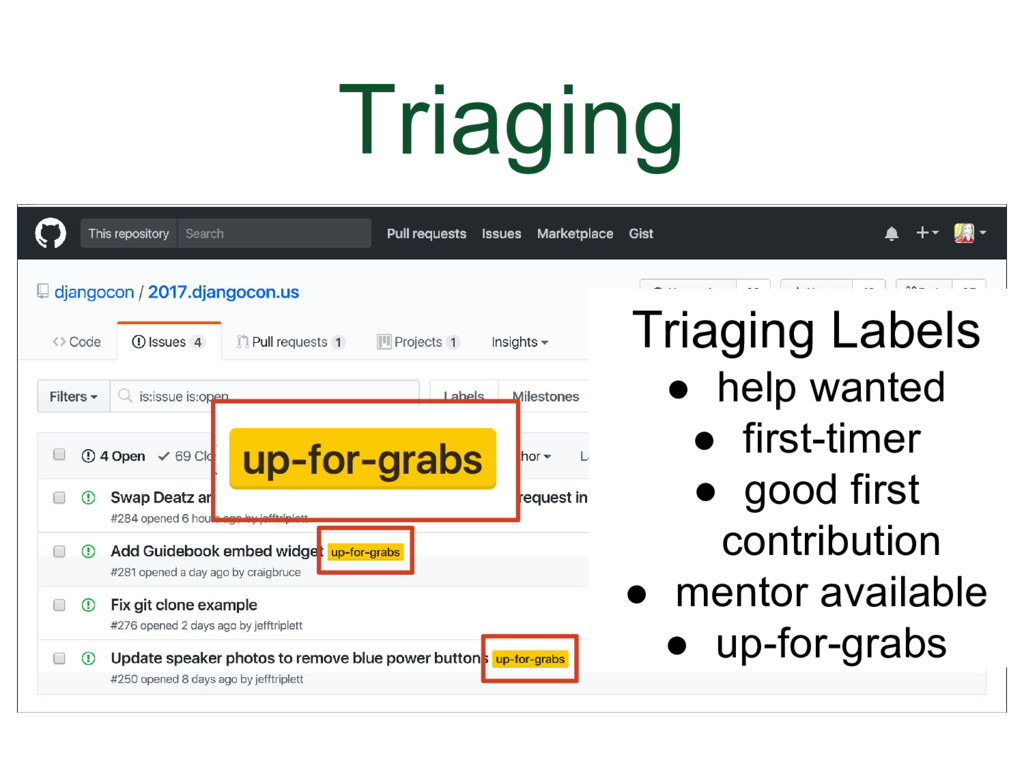
Tips for getting started In the Useful Resources section there is an excellent checklist for evaluating a project and I recommend that you take a look at it. In general... My third recommendation is that when you are looking for a project to contribute to
| |
|
|
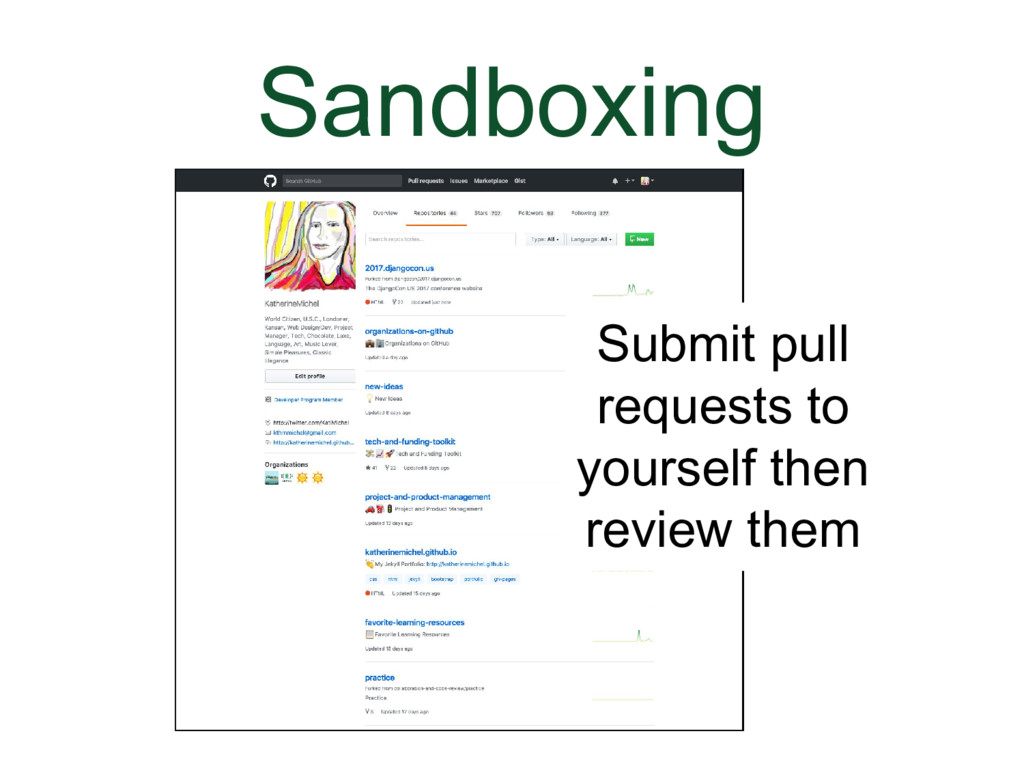
Tips for getting started My fourth recommendation is that you
| |
|
|
I recommend that you be good to yourself.
| |
|
|
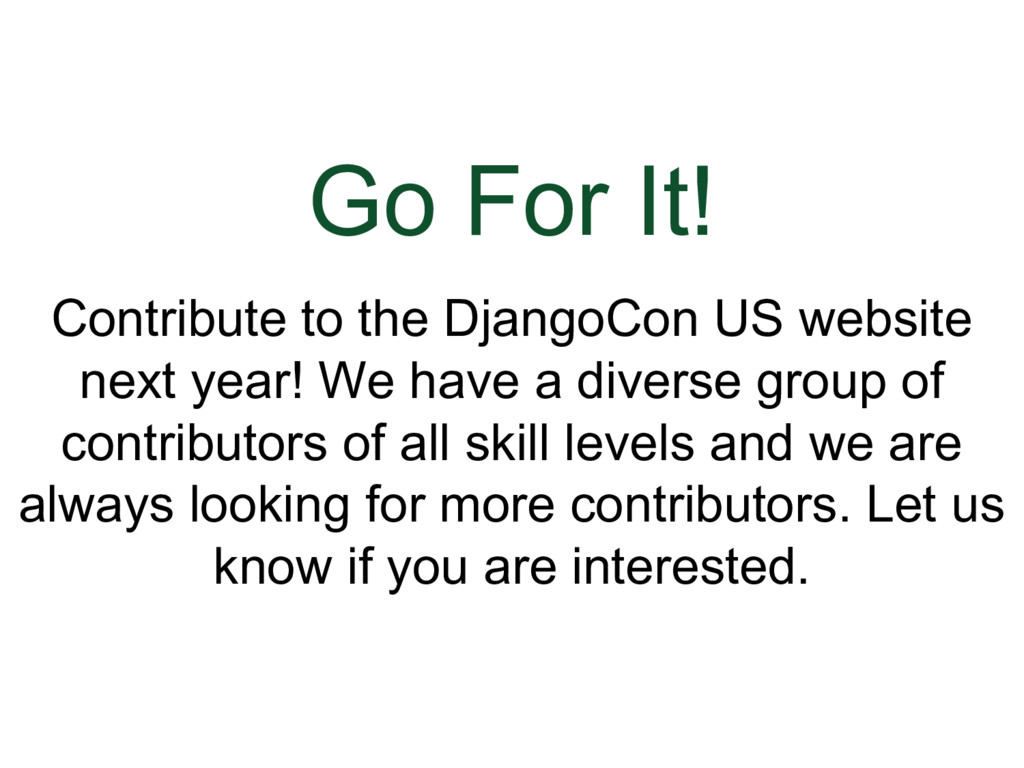
My last but not least recommendation is that you become a contributor to the DjangoCon US website next year
| |
|
|
| |
|
|
Explanation | |
|
|
| |
|
|
$ git help <verb>
$ git <verb> --help
$ man git-<verb>
$ git help clone
$ git clone --help
$ man git-clone | |
|
|
Feel free to contact me. If you make progress based on my talk, I'd love to know. Send me a note if you get the chance. Useful Resources: https://git.io/v5kpy
|


GitHub
Getting Set Up
Git Official
Glossaries and Cheatsheets
GitHub Help and Training
GitHub Try
GitHub Learning Resources
GitHub Open Source Guides
Collaborative Development Models and Permission Levels
- About Collaborative Development Models
- Types of Collaborative Development Models
- Permission Levels for an Organization
- Repository Permission Levels for an Organization
- Permission Levels for a User Account Repository
Pull Request Branches Created from a Fork
- Allowing Changes to a Pull Request Branch Created from a Fork
- Committing Changes to a Pull Request Branch Created from a Fork
Advanced Collaborative Development Workflow Examples
- Git Flow
- A Successful Git Branching Model (more advanced)
- A Successful Git Branching Model Considered Harmful
- SemVer (subtopic)
10x Results
Documentation
- DjangoCon US Website README.md
- DjangoCon US Website LICENSE
- DjangoCon US Website CODE_OF_CONDUCT.md
- DjangoCon US Website CONTRIBUTING.md
GitHub Documentation Resources
- About READMEs
- Licensing a Repository
- Adding a License to a Repository
- Adding a Code of Conduct to Your Project
- GitHub Pages Basics
- Customizing GitHub Pages
- Wikis
- Gists
Writing and Formatting
Setting Up and Maintaining Teams
Recover a Branch
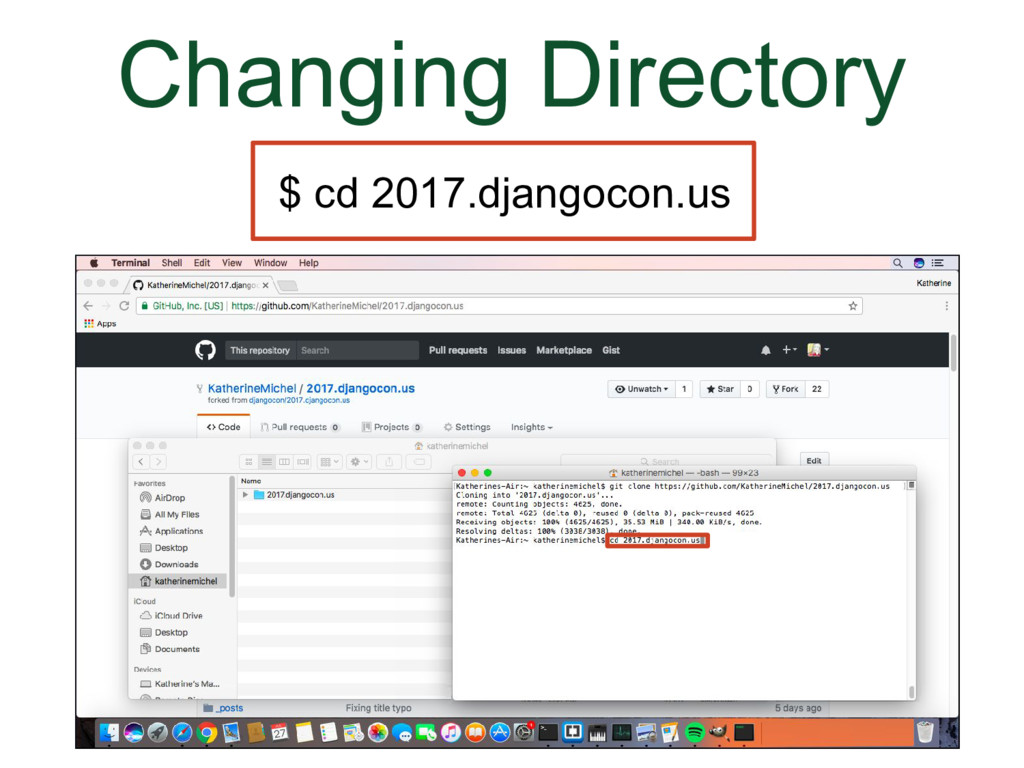
Go to the home directory
$ cdChange directory
$ cd <folder-name>Move back a directory
$ cd ..List the folders and files in a directory
$ lsNormal cloning
$ git clone <repo-url>Avoid a local path conflict by giving a clone a different name (for instance if you are cloning both a shared repo and a fork for practice!)
$ git clone <repo-url> <different-local-directory-name>$ git clone <repo-url>
$ cd <repo-name>
$ git branch
$ git checkout -b <branch-name>
$ git add .
$ git commit -m "Your note"
$ git push origin <branch-name>$ git fetch origin
$ git checkout -b <branch-name> origin/<branch-name>
$ git merge masterIf we make a change, we can push additional commits to the shared repo feature branch or pull request branch
$ git add .
$ git commit -m "Your note"
$ git push origin <branch-name> $ git checkout -b <branch-name> master
$ git pull https://github.com/<user-name>/<repo-name> <branch-name>If we make a change, we can push additional commits to the forked repo pull request branch (pull request author needs to have given permission, and local branch name and remote branch name need to match)
$ git add .
$ git commit -m "Your note"
$ git push https://github.com/<user-name>/<repo-name> <branch-name>
If we make a change, we can push additional commits to the forked repo pull request branch, even if the local branch name is different than the remote branch name. In the pull request instructions for a fork, GitHub often adds pull request author username to the beginning of the suggested local branch name, causing the local branch name and remote branch name to be different (perhaps to avoid path conflicts?). (pull request author needs to have given permission)
$ git add .
$ git commit -m "Your note"
$ git push https://github.com/<user-name>/<repo-name> <local-branch-name>:<remote-branch-name>$ git checkout master
$ git merge --no-ff <branch-name>
$ git push origin masterThis will only work for pull request branches, not feature branches.
Fetch the individual pull request, checkout the branch, add and commit changes, push changes to the branch
$ git fetch origin pull/<pull-request-number>/head:<branch-name>
$ git checkout <branch-name>
$ git add .
$ git commit -m "Your note"
$ git push <remote-name> <branch-name>
Example
$ git fetch origin pull/1/head:patch-1
$ git checkout patch-1
$ git add .
$ git commit -m "Your note"
$ git push origin patch-1Delete local branch
$ git branch -d <branch-name>Force delete local branch
$ git branch -D <branch-name>Delete remote branch (instead of deleting directly through browser)
$ git push <remote-name> :<branch-name>Checkout (switch) to a branch that already exists (-b is not needed, because is used to create branch)
$ git checkout <branch-name>Create and checkout (switch) to a branch (you are in the branch you are branching off of, or there is only one branch, so you do not need to specify which branch you are branching off of)
$ git checkout -b <branch-name>Create and checkout (switch) to a branch (you are not in the branch you are branching off of)
$ git checkout -b <branch-name> <branch-branching-off-of>Anytime you are working on a branch, whether it be a feature branch or a pull request branch and you have made a change, you can use these commands to add and commit your changes to git version control.
After you have checked out (switched) to a branch
$ git add .
$ git commit -m "Your note"
Alternatively, combine the two lines into one line
$ git commit -am "Your note"Pulling and pushing directly from and to a remote repository
$ git pull <remote-name> <branch-name>
$ git push <remote-name> <branch-name>
Common pull and push example
$ git pull origin master
$ git push origin master
Pushing and pulling via URL (handy when dealing with a branch outside our origin, for instance, when working with pull request from a fork)
$ git pull https://github.com/<user-name>/<repo-name> <branch-name>
$ git push https://github.com/<user-name>/<repo-name> <branch-name>There are two ways to fetch feature or pull request branch to your local development environment.
- You can fetch and merge (two separate commands that provide greater control)
- Or you can pull ($ git fetch + $ git merge in one command)
Fetch new branches and commits from the remote repository to local .git folder (add a remote first, if needed), without merging them locally. The branches stored here are called remote-tracking branches.
$ git fetch <remote-name>Checkout the branch you will be merging updates into (presumably the branch already exists)
$ git checkout <branch-name>Merge remote-tracking branch updates with branch you are currently checked out on
$ git merge <remote-name>/<branch-name>When a shared repository is updated, the fork does not automatically update with the change. You could delete and re-fork the fork, but this is not practical, for instance, if you have a pull request pending. So, you can add the shared repository as a remote to your local clone, fetch the updates, and push them to your fork.
Add a remote
$ git remote add <remote-name> <remote-url>Add upstream remote repository (the name upstream is very commonly used in this situation)
$ git remote add upstream https://github.com/upstream-username/original-repositoryVerify new upstream remote (cannot push to upstream unless you have write permission)
$ git remote -v
origin  https://github.com/your-username/your-fork (fetch)
origin  https://github.com/your-username/your-fork (push)
upstream  https://github.com/upstream-username/original-repository (fetch)
upstream https://github.com/upstream-username/original-repository (push)If you are working from the "Shared Repository" Model, you are fetching from the origin. If you are working from the "Fork and Pull" Model, you are fetching from the upstream.
Common origin example
$ git fetch origin
$ git checkout master
$ git merge origin/master
Common upstream example (including pushing changes to corresponding branch in forked repository in GitHub)
$ git fetch upstream
$ git checkout master
$ git merge upstream/master
$ git push origin master
Keep feature branch up-to-date (often merging master into feature branch)
$ git checkout <feature-branch-name>
$ git merge <branch-name>
Example
$ git checkout example-branch
$ git merge masterThe style of this transcript is heavily inspired by:
- Ana Balica's (Twitter, GitHub) transcript of her Humanizing among coders keynote for PyCon CZ 2016.
- Honza Javorek's (Twitter, GitHub) transcript of Anna Ossowski's (Twitter, GitHub) keynote Be(Come) A Mentor! Help Others Succeed! for PyCon CZ 2017.
Thank you!
- email: kthrnmichel@gmail.com
- GitHub: https://github.com/KatherineMichel
- Twitter: https://twitter.com/KatiMichel
© 2017 to Present Katherine Michel. All Rights Reserved.