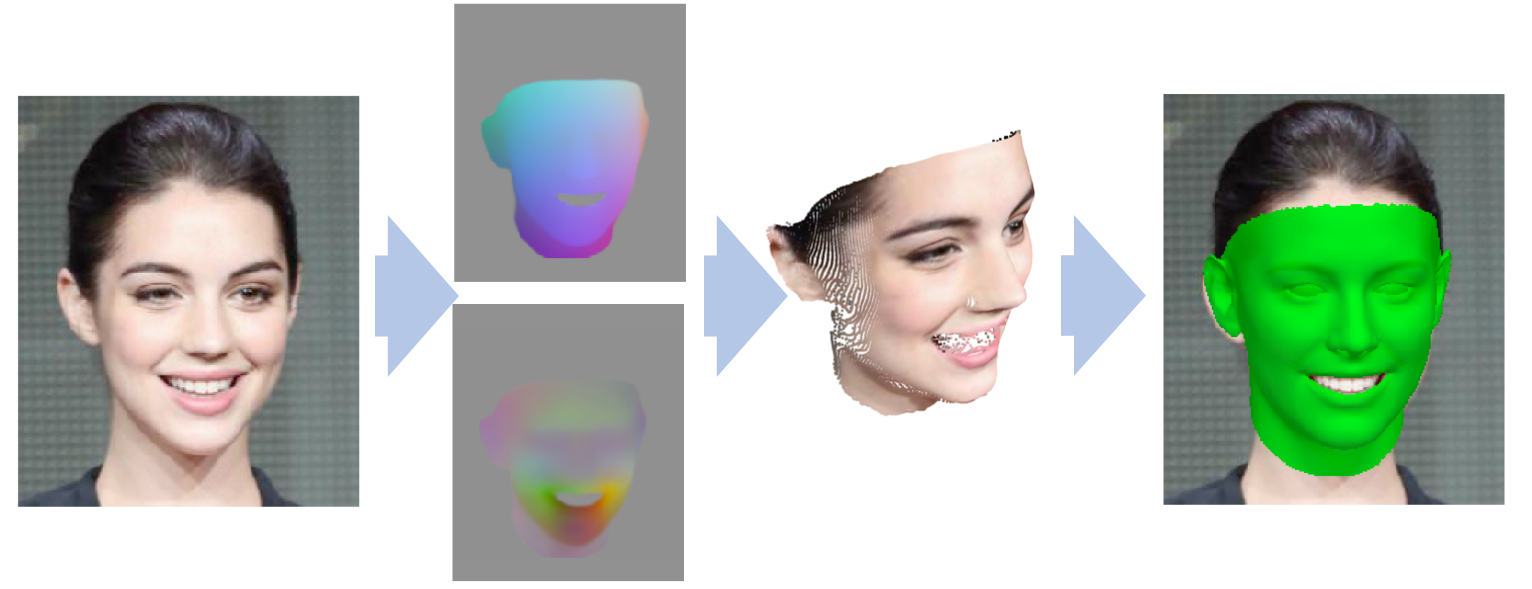
- The pix2face dense face alignment and 3D estimation network (pix2face_net)
- The camera/pose and face coefficient estimation contained in the face3d repository
- Rendering of novel viewpoints and expressions

You have two options for running: within a docker container, or natively on your system. The only requirement for the former is docker itself. The requirements for building and running natively are:
- CMake (version 3.10 or higher)
- Python (version 3.6 has been tested)
- numpy, Pillow, scikit-image
- pytorch (versions 0.4 and 1.0 have been tested), including torchvision
- opencv (opencv-python-headless)
Optional:
- CUDA (for GPU acceleration of pix2face network and coefficient estimation)
For a full list of system packages required, consult the Dockerfile.
See the README.md in the docker directory of this repository.
Clone this repository to $PIX2FACE_SRC_DIR. If you did not clone recursively, you'll need to run:
cd $PIX2FACE_SRC_DIR
git submodule update --init --recursive --progress
Activate your favorite python virtualenv if not using your system's python. This will ensure that the build process will link against the correct python libraries.
Install the python requirements file.
pip install -r $PIX2FACE_SRC_DIR/requirements.txtCreate a build directory and run Cmake:
mkdir $PIX2FACE_BUILD_DIR
cd $PIX2FACE_BUILD_DIR
cmake $PIX2FACE_SRC_DIR
Note: Depending on the location of your graphics libraries, you may have to set CMAKE_PREFIX_PATH. For example:
cmake -DCMAKE_PREFIX_PATH=/usr/lib64/nvidia $PIX2FACE_SRC_DIRBy default, the compiled python modules will be installed in the active python site. If you want to change this, add -DPYTHON_SITE=${INSTALL_DIR} to the cmake command line and add ${INSTALL_DIR} to your PYTHONPATH.
Build the face3d and vxl compiled python modules:
make installConfigure your python path: Source the env script:
cd $PIX2FACE_SRC_DIR
source ./pix2face_env.bsh
Or, manually:
export PYTHONPATH=${PIX2FACE_SRC_DIR}/pix2face_net:${PIX2FACE_SRC_DIR}/pythonDownload the required data files to their correct locations by running the download_data.bsh script. Note that the numpy and eos_py packages are needed for the script to work correctly but they should already be in your python evironment if the requirements.txt file was used to create a python environment.
cd ${PIX2FACE_SRC_DIR}
./download_data.bshTo exercise the full pipeline, you can run the demo script:
python scripts/pix2face_demo.pyThis will estimate face geometry from a test image and render images with new pose and expression. Rendered images will be saved directly to the scripts directory.
The scripts directory also contains several examples of pose and coefficient estimation. For example, to generate a CSV file $POSE_CSV_FNAME with yaw, pitch, and roll (in degrees) of every face image listed (one per line) in the text file $IMAGE_PATHS_FILE:
python scripts/estimate_pose_batch.py $IMAGE_PATHS_FILE $POSE_CSV_FNAMENote that the examples in the scripts directory generally set a variable cuda_device, which is defaulted to None. The value of None will cause the pix2face network to run on the CPU. Set cuda_device to an integer value to run on the corresponding GPU device for increased processing speed.
If you find this software useful, please consider referencing:
@INPROCEEDINGS{pix2face2017,
author = {Daniel Crispell and Maxim Bazik},
booktitle = {2017 IEEE International Conference on Computer Vision Workshop (ICCVW)},
title = {Pix2Face: Direct 3D Face Model Estimation},
year = {2017},
pages = {2512-2518},
ISSN = {2473-9944},
month={Oct.}
}Daniel Crispell dan@visionsystemsinc.com