
-
Clone this repo (with
--recurse-submodules)git clone --recurse-submodules git@github.com:<>.git -
Ensure lufa was cloned (
makewill fail otherwise)# from project root git clone https://github.com/abcminiuser/lufa.git -
Install Arduino IDE https://www.arduino.cc/en/Main/Software
-
Obtain hardware
- Arduino Micro
- Micro USB to USB C cable (to connect Arduino to Nintendo Switch)
- Breadboard Kit
- 10kΩ resistor (included in kit)
- Wires (included in kit)
- Push button (included in kit)
-
Attach the push button to the Arduino Micro according to the following diagram:

- Get AVR tool chain
brew tap osx-cross/avr
brew install avr-gcc- Build and flash (tap the button twice to put it into flash mode)
# from project root
make && ./flash.shYou can modify which programs are installed onto the Arduino Micro by opening the scripts/runner.c file and adjusting the InitializeGameScripts function.
Plug in the Arduino to the Switch by using the micro USB to USB C cable. It will automatically be detected and no setup is needed and the blue light on the Arduino should turn on to indicate it has power.
Use the button (the one that's separately attached, the one directly on the Arduino is a reset button) to select which program to run. 1 button press will run the first program, 2 button presses will run the second program, etc. The delay in between button presses needs to be just right, about 1 second, you can't press too fast or too slow! Then, wait a couple of seconds and the orange light on the Arduino will turn on, which indicates a program is running. When the orange light is on, you can press the reset button to stop running the program, and the light will turn off. Note that after a program "ends" (if it's not an infinitely looping program), the orange light will still be on, so if you want to start another program, you need to reset before picking a new program.
- ShakeTreeAndCollect: Start by standing to the tree's right side and face left. Your character may drift slightly over time, so you should place some objects to block yourself in, like:
B XXOYB XXX XXX O = tree, X = shaken items, Y = you, B = blockage - WishStars: This will automatically keep looking up, so it keeps working when people are entering or leaving the island. To prevent villagers from talking to you accidentally, block yourself in (i.e. with holes).
- HitRock: Start from the bottom left corner of the rock.
Starting position: R OX O R = rock X = you (facing any direction) O = hole/obstruction - Clone1x1Items / Sell40ItemsNTimes / CloneAndSell80Items: see the comments in
scripts/AnimalCrossing/glitch.cfile for instructions - BuyBulk: Have your cursor on the item you want to buy. This will buy that item in bulk until your backpack is full (60 times).
- SelectBulk: When your inventory is open and you can multi-select items, this will select every item. Useful for selling entire inventory to Nook Shop.
- MysteryIsland: Stand in front of the dodo, don't talk to him yet, and then start the program. Make sure you have a nook miles ticket in your bag.
- OpenGate: Will stop at the option to choose dodo code or all your friends. Stand in front of the dodo, don't talk to him yet, and then start the program. Make sure you don't have a nook miles ticket in your bag.
- Travel: Will stop at the option to choose dodo code or check friends. Stand in front of the dodo, don't talk to him yet, and then start the program.
A second Arduino can be used as an ICSP programmer. This accelerates iterative development by enabling the program to be updated without disconnecting from a Nintendo Switch. This post describes the capability in general, but these instructions focus on using an Arduino Uno with the ICSP header to flash an Arduino Micro.
First, prepare the Uno to act as an ISP. Note, this sketch can drive debug LEDs on digital output pins 7 (data), 8 (error), 9 (heartbeat). It is not necessary to use this, but it can help with debugging in case something doesn't work.(https://www.arduino.cc/en/Tutorial/ArduinoISP).
- Open the example sketch named ArduinoISP (File -> Examples -> ArduinoISP).
- Select the Uno as target board (Tools -> Board -> "Aruino Uno")
- Select the correct port (Tools -> Port -> ...).
- Upload the sketch.
Optional Debug Wiring Instructions
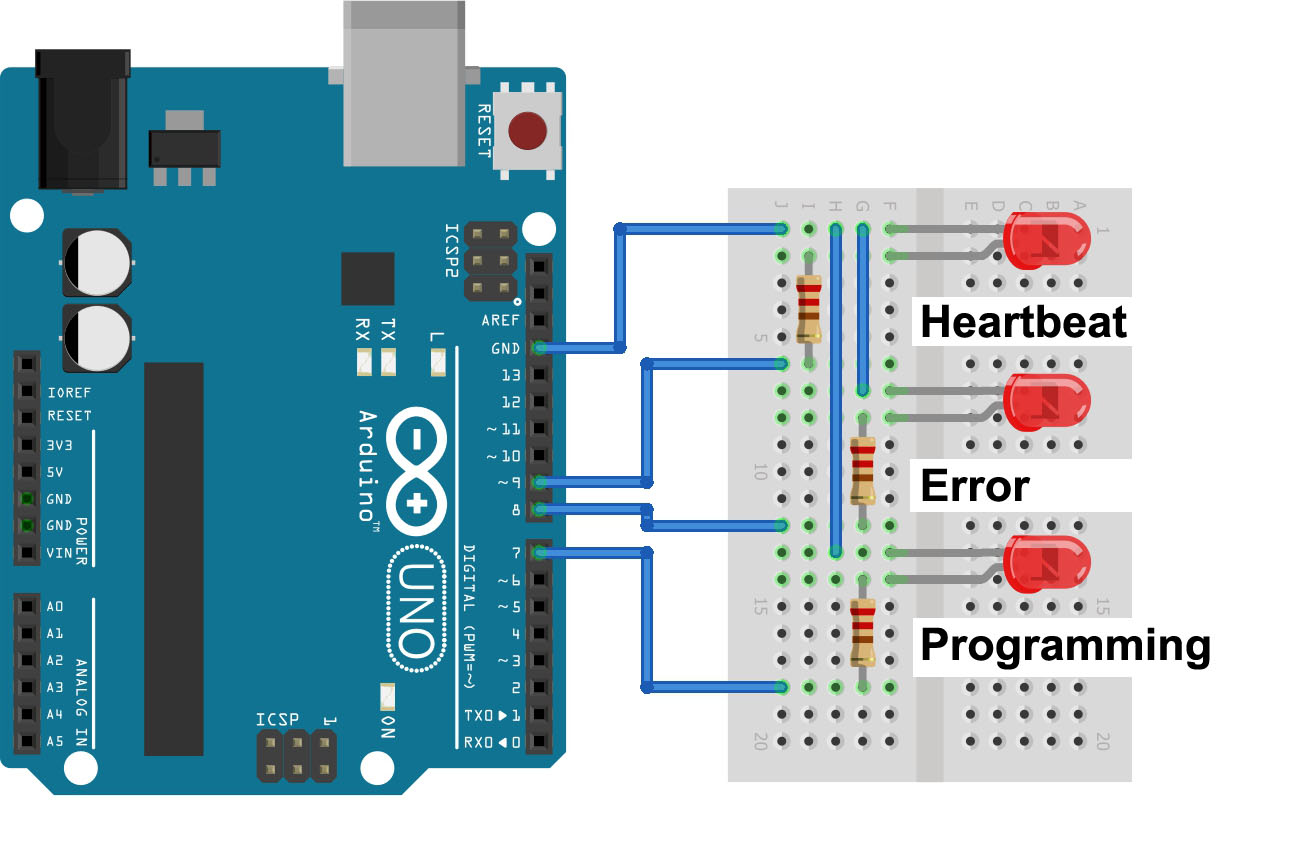
- Connect 220Ω resistor to pin 7 (this LED will flash during programming)
- Connect this resistor to the LED's anode (long leg)
- Conne the LED's short leg to ground plane
- Connect 220Ω resistor to pin 8 (this LED will flash if an error occurs)
- Connect this resistor to the LED's anode (long leg)
- Conne the LED's short leg to ground plane
- Connect 220Ω resistor to pin 9 (this LED will flash to indicate a heartbeat)
- Connect this resistor to the LED's anode (long leg)
- Conne the LED's short leg to ground plane
Full instructions available at https://www.arduino.cc/en/Tutorial/ArduinoISP
Second, wire the Uno to an Arduino Micro using the ICSP connector. Most pins map 1:1 between boards, so once you orient the ICSP header connect pin 1 to pin 1, etc. Two pins require special treatment.
- The reset pin needs to be connected to pin 10 of the Uno to avoid a reset loop while programming.
- The power pin can be disconnedted if the Micro is connected to a Switch. If this is left connected, nothing bad happens, but the USB-C connector will need to be unplugged and reconnected each time a new program is flashed to the Micro.

Make the following connections:
- Programmer ICSP MISO -> Target ICSP MISO
- Programmer ICSP SCK -> Target ICSP SCK
- Programmer D10 -> Target ICSP RESET (special case 1)
- Programmer ICSP GND -> Target ICSP GND
- Programmer ICSP MOSI -> Target ICSP MOSI
- Programmer ICSP 5V -> Target ICSP 5V (special case 2)
Uno full pinout

Micro full pinout

Remember to disconnect ICSP power when connected to a switch or it will stop recognizing the Micro each time a new program is flashed.
This prepares the bootloader in the Arduino Micro to receive programs through the ICSP connector. At this point the following connections should be made:
PC/Mac <-(USB)- Arduino Uno <-(ICSP)-> Arduino Micro
- While leaving the Uno connected, select Micro as the target board (Tools -> Board -> "Aruino Micro")
- Use the same port that was used previously
- Select the Aduino as ISP programmer (Tools -> Programmer -> "Arduino as ISP").
- Flash the bootloader (Tools -> Burn Bootloader). This should take about 30s.
Flash the blink program to the board (enable verbose output for uploads to see the AVR commands used, in case flash_isp.sh needs updated paths).
- Open the blink example sketch (File -> Examples -> 01. Basics -> Blink). Other scripts can be closed.
- Using the same configuration (Tools -> Board -> "Arudino Micro", same port)
- Upload the sketch to the micro (Sketch -> Upload Using Programmer)
If the blink program loaded correctly, connect the Nintendo Switch to the Arduino Micro and disconnect 5v from ICSP:
PC/Mac <-(USB)- Arduino Uno <-(ICSP)-> Arduino Micro -(USB-C)-> Nintendo Switch
- From a terminal install prerequisites:
brew tap osx-cross/avrandbrew install avr-gcc - Compiles
make - Write Joystick.hex to the Micro
./flash_isp.sh
In theory this could be built for any ATMega board that has enough memory and a USB port. Instructions for compliation to Teensy 2.0++, Arduino Micro, and Arduino UNO R3 have been tested.
Go to the Teensy website and download/install the Teensy Loader application. For Linux, follow their instructions for installing the GCC Compiler and Tools. For Windows, you will need the latest AVR toolchain from the Atmel site. See this issue and this thread on GBAtemp for more information. (Note for Mac users - the AVR MacPack is now called AVR CrossPack. If that does not work, you can try installing avr-gcc with brew.)
LUFA has been included as a git submodule, so cloning the repo like this:
git clone --recursive git@github.com:bertrandom/snowball-thrower.git
will put LUFA in the right directory.
You will also need to edit makefile before issuing make. Change MCU = atmega32u4 on line 15 to MCU = at90usb1286.
Now you should be ready to rock. Open a terminal window in the SwitchAutomator directory, type make, and hit enter to compile. If all goes well, the printout in the terminal will let you know it finished the build! Follow the directions on flashing Joystick.hex onto your Teensy, which can be found page where you downloaded the Teensy Loader application.
You will need to set your Arduino in DFU mode, and flash its USB controller. (Note for Mac users - try brew to install the dfu-programmer with brew install dfu-programmer.) Setting an Arduino UNO R3 in DFU mode is quite easy, all you need is a jumper (the boards come with the needed pins in place). Please note that once the board is flashed, you will need to flash it back with the original firmware to make it work again as a standard Arduino. To compile this project you will need the AVR GCC Compiler and Tools. (Again for Mac users - try brew, adding the osx-cross/avr repository, all you need to do is to type brew tap osx-cross/avr and brew install avr-gcc.) Next, you need to grab the LUFA library: download and install it following the steps described for the Teensy 2.0++.
Finally, open a terminal window in the SwitchAutomator directory, edit the makefile setting MCU = atmega16u2, and compile by typing make. Follow the DFU mode directions to flash Joystick.hex onto your Arduino UNO R3 and you are done.
The Arduino Micro is more like the Teensy in that it has a single microcontroller that communicates directly over USB. Most of the steps are the same as those for the Teensy, except do not download Teensy Loader program. You will also need to edit makefile before issuing make. Change MCU = at90usb1286 on line 15 to MCU = atmega32u4.
Once finished building, start up Arduino IDE. Under File -> Preferences, check Show verbose output during: upload and pick OK. With the Arduino plugged in and properly selected under Tools, upload any sketch. Find the line with avrdude and copy the entire avrdude command and all options into a terminal, replacing the .hex file and path to the location of the Joystick.hex created in the previous step. Also make sure the -P/dev/?? port is the same as what Arduino IDE is currently reporting. Now double tap the reset button on the Arduino and quickly press Enter in the terminal. This may take several tries. You may need to press Enter first and then the reset button or try various timings. Eventually, avrdude should report success. Store the avrdude command in a text file or somewhere safe since you will need it every time you want to print a new image.
Sometimes, the Arduino will show up under a different port, so you may need to run Arduino IDE again to see the current port of your Micro.
If you ever need to use your Arduino Micro with Arduino IDE again, the process is somewhat similar. Upload your sketch in the usual way and double tap reset button on the Arduino. It may take several tries and various timings, but should eventually be successful.
The Arduino Leonardo is theoretically compatible, but has not been tested. It also has the ATmega32u4, and is layed out somewhat similar to the Micro.
-
Install GnuWin's Make http://gnuwin32.sourceforge.net/packages/make.htm
-
Add a few things to your SYSTEM PATH
- Search for "Environment Variables", open the one in Control Panel
- Click on "Environment Variables..." button on bottom right
- In "System variables" select "Path" then click "Edit..."
- Add
C:\Program Files (x86)\GnuWin32\bin - Add
C:\Program Files (x86)\Arduino\hardware\tools\avr\bin
- Add
A suitable 5V buzzer may be attached to any of the available pins on PORTB or PORTD. When compiled with make with-alert, it will begin sounding once printing has finished. See above warning about PORTB and PORTD. Reference section 31 of the AT90USB1286 datasheet for maximum current specs.
Pin 6 on the Teensy is already used for the LED and it draws around 3mA when fully lit. It is recommended to connect the buzzer to another pin. Do not bridge pins for more current.
For the Arduino UNO, the easiest place to connect the buzzer is to any pin of JP2, or pins 1, 3, or 4 of ICSP1, next to JP2. Refer to section 29 of the ATmega16u2 datasheet for maximum current specs. Do not bridge pins for more current.
On the Arduino Micro, D0-D3 may be used, or pins 1, 3, or 4 (PORTB) on the ICSP header. Power specs are the same as for the AT90USB1286 used on the Teensy. The TX and RX LEDs are on PORTD and PORTB respectively and draw around 3mA apiece. Do not bridge pins for more current.
Thanks to Shiny Quagsire for his Splatoon post printer and progmem for his original discovery.
Thanks to exsilium for improving the command structure, optimizing the waiting times, and handling the failure scenarios. It can now run indefinitely!
Thanks to Nick Gammon for his post on using Arduino as an Atmega bootloader programmer.