
The plan is to create a camera calibration program with some nice GUI (using Qt library). This is the small part of my master's dissertation that I will show here. The other part, which uses calibration parameters to undistort the camera and recognize pose of elements on the picture will not be shown nor avalable.
The base alghoritm is based on YouTube manual, see comments in the code.
Here I will also put some interesting links with useful information needed to do camera calibration correctly. Hope this will be helpful for anyone.
- open Terminal, go to folder terminal_beta,
- make the program using make,
- call program in terminal mode using ./calibration -terminal
- open QT Creator,
- open the project in gui-beta/calib-gui,
- compile it and run,
- if you want to run it from Terminal, go to gui-beta/build-calib-gui-Desktop-Debug, run Terminal there and type ./calib-gui.
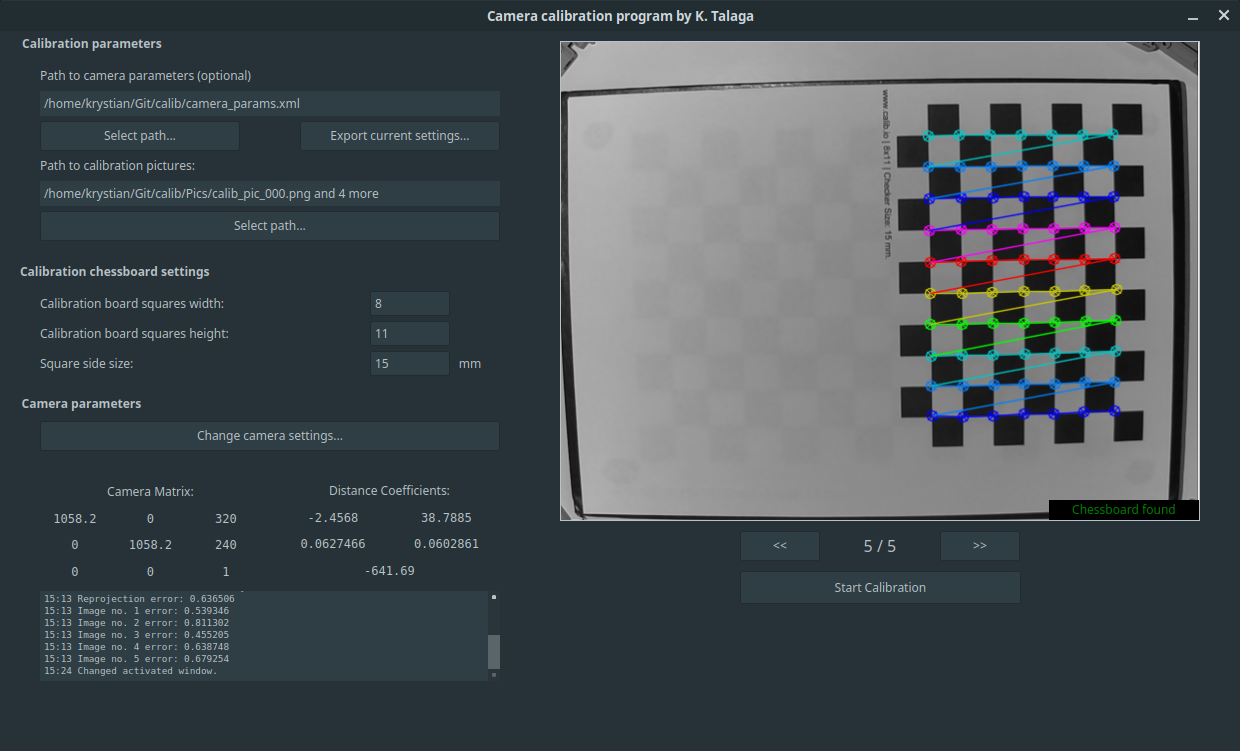
- If you have a camera parameters file, please load it here using "Select path..." button. You can use attached camera_params.xml file with parameters for Raspberry Pi Camera 2.0 B and chessboard with 8x11 squares, 15x15mm each. You can load your own file if you saved your filled parameters (point 4).
If you don't have a camera parameters, you will have to fill all the boxes for camera parameters and calibration chessboard parameters. - If you loaded the file, skip to point 5.
If not, please fill calibration chessboard settings table. The width and height of calibration chessboard is a sum of white and black squares in a row and column. Order does not matter - you can type e.g. 8x11 or 11x8. For squre side size please type its size in milimeters.
Note: If you use even numbers for both calibration chessboard width and height, program may crash. If at least one of them is an odd number, everything should be fine. - Fill the camera parameters available under the "Change camera settings" button. For now "Select camera" list is useless - sorry. Please fill are boxes with correct values, all of them should be greater than zero.
- (Optional) You can export filled parameters into a file using "Export current settings" button. You will be asked for a file name and camera name. After that you will be able to make a calibration with loading a single config file instead of typing all parameters manually (you will be able to skip points 2-4). Remember to add file extensios (.xml or .yml) at the end of the file!
- Load calibration files using "Select path" button. Here you should load multiple files. After loading them you can check whether calibration chessboard was found or not.
- If everything is ok, press "Start Calibration" to calibrate. Calibration result files are generated to the same location as executable file for calibration program, and they are named camera_calibration.xml and camera_calibration_pic_data.xml. In the future it will be improved.
- OpenCV 3.4.4
- Qt Creator 3.5.1 based on Qt 5.5.1 or newer (Qt Creator 4.5.2 based on Qt 5.9.5 was also OK)
- Linux (here Linux Mint 18.3 and 19.1), after a few changes it can be converted to run under Windows
Please note that this program was made for personal use (it was element of thesis) so it may contain some bugs (e. g. not all of the exceptions are handled). I am not taking responsibility for any of them. If you find some please let me know. I am not super active, but when time comes, I am going to fix all bugs. ;)
Chessboard generator
Part1 Part2 Part3 Part4 - Youtube tutorial, on which this program was based
OpenCV camera calibration tutorial
Link1 Link2 - Good practices when preparing a camera calibration