- Open STM32CubeIDE
- File -> New -> STM32 Project
- Board Selector -> STM32H747I-DISCO -> Next
- Fill below
Project Name: Anything you want
Targeted Language: C++
- Finish
- Initilize all peripherals with their default Mode -> No
- Open .ioc
- Pinout & Configuration
- Pinout -> Clear Pinouts -> Tes
- USART Configuration
- PA9 -> USART1_TX
- PA10 -> USART1_RX
- Connectivity -> USART1(M7) check -> Mode(Asynchronous)
- Uncheck unused configurations
- Analog -> Uncheck ADC1(M4)
- Timers -> Uncheck TIM3(M4)
- Multimedia -> Unchcek DCMI(M4)
- SDMMC Configuration
- Connectivity -> SDMMC1(M7) check -> Mode(SD 4 bits Wide bus)
- NVIC Settings -> SDMMC1 global interrupt Enable
- GPIO Settings -> Configure all the GPIO pins to Pull-up mode. (Do not modify other settings in GPIO Settings tap)
- Middleware and Software Packs -> FATFS_M7 -> SD Card check
- Platform Settings -> Found Solutions -> PI8
- Set Defines -> USE_LFN, FS_EXFAT check.
- Advanced Settings -> Use dma template -> Disabled
- X-CUBE-AI Configuration
- Application -> ApplicationTemplate -> OK
- Add model.onnx
- Click gear icon
- In Options tap, check Input/Output data are channel last
- In External Ram tap, check Use external RAM and Use activation buffer
- In External Flash tap, check Use external flash, and select Split weights between internal and external flash using a linker script rather than Generate a separated bin file for weights -> Click Propose placement. -> OK (This automatically analyze the given model.)
- Click Validate on decktop
- Clock Configuration
- Make below clock to 400 MHz
Fig 1. SYSCLK configuration. This makes the core faster.
- Configure the DIVQ1 to / 80 (This makes the clock for SDMMC1 10 MHz)
Fig 2. DIVQ1 configuration. This let the SDMMC work without DMA configuration.
Make sure that SYSCLK:400 MHz and SDMMC1 50 Mhz (below is OK but doooooo not exceed them)


- Project Manager
- Code Generator configuration:
Fig 3. Code Generator. Check Generate peripheral intialization as a pair of '.c/.h' files per peripheral, and uncheck Delete prebiously generated files when not re-generated.

- Save and generate code.
- CM4
- Open ~~~_CM4 -> Core -> Src -> main.c
- Click Run -> Run
- Click Debugger tap -> Check ST-LINK S/N -> Click Scan button -> Apply and OK
- CM7
- Open ~~~_CM7 -> Core -> Src -> main.c
- Click Run -> Run
- Click Debugger tap -> Check ST-Link S/N -> Click Scan button.
- In External loaders section, click Add... button -> Look for MT25TL01G_STM32H747I-DISCO.stldr -> Check Initialize.
Fig 4. External Loader configuration
- Apply and OK

- Add below includes in USER CODE BEGIN Includes section.
#include <stdio.h>- Add below _write function in USER CODE BEGIN 0 section.
int _write(int fd, char *ptr, int len)
{
	HAL_UART_Transmit(&huart1, (unsigned char*)ptr, len, HAL_MAX_DELAY);
	return len;
}- Add below check_fatfs_error prototype in USER CODE BEGIN PFP section
FRESULT check_fatfs_error(char *op, FRESULT res);- Add below printf and check_fatfs_error functions in USER CODE BEGIN 2 section.
printf("[%s]: system initialization success.\r\n", __func__);
check_fatfs_error("f_mount", f_mount(&SDFatFS, SDPath, 0));
check_fatfs_error("f_open", f_open(&SDFile, "X_train.txt", FA_READ));- Add below check_fat_fs_error function definition in USER CODE BEGIN 4 section.
FRESULT check_fatfs_error(char *op, FRESULT res) {
	switch (res) {
	case FR_OK:
		printf("[%s] success\r\n", op);
		break;
	case FR_DISK_ERR:
		printf("[%s] error: FR_DISK_ERR\r\n", op);
		break;
	case FR_INT_ERR:
		printf("[%s] error: FR_INT_ERR\r\n", op);
		break;
	case FR_NOT_READY:
		printf("[%s] error: FR_NOT_READY\r\n", op);
		break;
	case FR_NO_FILE:
		printf("[%s] error: FR_NO_FILE\r\n", op);
		break;
	case FR_NO_PATH:
		printf("[%s] error: FR_NO_PATH\r\n", op);
		break;
	case FR_INVALID_NAME:
		printf("[%s] error: FR_INVALID_NAME\r\n", op);
		break;
	case FR_DENIED:
		printf("[%s] error: FR_DENIED\r\n", op);
		break;
	case FR_EXIST:
		printf("[%s] error: FR_EXIST\r\n", op);
		break;
	case FR_INVALID_OBJECT:
		printf("[%s] error: FR_INVALID_OBJECT\r\n", op);
		break;
	case FR_WRITE_PROTECTED:
		printf("[%s] error: FR_WRITE_PROTECTED\r\n", op);
		break;
	case FR_INVALID_DRIVE:
		printf("[%s] error: FR_INVALID_DRIVE\r\n", op);
		break;
	case FR_NOT_ENABLED:
		printf("[%s] error: FR_NOT_ENABLED\r\n", op);
		break;
	case FR_NO_FILESYSTEM:
		printf("[%s] error: FR_NO_FILESYSTEM\r\n", op);
		break;
	case FR_MKFS_ABORTED:
		printf("[%s] error: FR_MKFS_ABORTED\r\n", op);
		break;
	case FR_TIMEOUT:
		printf("[%s] error: FR_TIMEOUT\r\n", op);
		break;
	case FR_LOCKED:
		printf("[%s] error: FR_LOCKED\r\n", op);
		break;
	case FR_NOT_ENOUGH_CORE:
		printf("[%s] error: FR_NOT_ENOUGH_CORE\r\n", op);
		break;
	case FR_TOO_MANY_OPEN_FILES:
		printf("[%s] error: FR_TOO_MANY_OPEN_FILES\r\n", op);
		break;
	case FR_INVALID_PARAMETER:
		printf("[%s] error: FR_INVALID_PARAMETER\r\n", op);
		break;
	default:
		printf("[%s] Unknown error\r\n", op);
		break;
	}
	return res;
}- Upload CM7 code (see 03. How to upload CM4 code and CM7 code.), and check serial monitor.
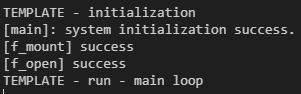 Fig 5. Serial Terminal
