Record the EDA tool operation.
记录方式还是先在README中记录,然后在整理分档;
查看发行版本:https://blog.csdn.net/szr4630/article/details/79613267
lsb_release -acentos 7.8;
gedit 显示行号:https://www.cnblogs.com/wq242424/p/6151461.html
快捷键:
Super+R :打开终端;
Super+J:打开计算器;
Verdi:
https://blog.csdn.net/kevindas/article/details/79008106
需要指定 -P
vcs	-full64 *.v \
	-debug_all \
	-R \
	-timescale=1ns/1ps \
	-P	/home/eda/synopsys/verdi/Verdi_O-2018.09-SP2/share/PLI/VCS/linux64/novas.tab \
		/home/eda/synopsys/verdi/Verdi_O-2018.09-SP2/share/PLI/VCS/linux64/pli.a
	-l compile.log
这个VCS使用写的很详细:
https://zhuanlan.zhihu.com/p/127335447
PrimeTime
https://wenku.baidu.com/view/676a1337d5bbfd0a785673a4.html
https://www.jianshu.com/p/30769ce8925a
在文档中找到一个文件:PrimeTime_PX_Tutorials
PT使用中文教程:https://wenku.baidu.com/view/b33455d4360cba1aa811da43.html
所以,需要整理一个Project,做完Sim,DC,和primetime;
linux sed 命令 https://www.runoob.com/linux/linux-comm-sed.html
Linux sed 命令是利用脚本来处理文本文件。
sed 可依照脚本的指令来处理、编辑文本文件。
Sed 主要用来自动编辑一个或多个文件、简化对文件的反复操作、编写转换程序等。
VCS命令行中的-f,-F以及-file参数区别 https://blog.csdn.net/immeatea_aun/article/details/89155349
命令行使用 vcs -full64 -h获得manual可知,三者区别不大,详情如下:
-f
指定包含源文件和编译时选项的路径名列表的文件。 -F
与-f选项相同,但允许您指定文件的路径,文件中列出的源文件不必是绝对路径名。 -file filename
此选项适用于使用-f或-F选项指定的文件中的条目可能遇到的问题。 此文件可以包含更多编译时选项和不同类型的文件。 它可以包含用于控制编译和PLI选项和目标文件的选项。 您还可以在此文件中使用转义字符和元字符,例如$,`和! 等
VCS 常用命令 https://blog.csdn.net/immeatea_aun/article/details/79789838
需要严格指定file_list中的文件路径以及文件名称,*.v在verdi命令行操作时候,会无法加载source文件;
2、tar 命令 tar可以用来打包文件,还可以把特定目录下的全部文件打包成一个总的文件,打包的同时还可以同时使用gzip的功能进行压缩。如果只执行tar命令则压缩后
的文件后缀名是.tar,如果执行gzip命令则压缩后的文件名后缀名是.gz。如果同时执行两个命令则压缩后的文件名是.tar.gz或者简写为.tgz。
比如:tar -zcvf boot.tgz /boot #将/boot目录整合压缩成boot.tgz
参数说明:-z:使用gzip压缩;-c 创建压缩文件;-v 是显式当前被压缩的文件,-f 指使用文件名即boot.tgz。
解压命令:tar -zxvf boot.tgz
参数说明:-x 是解压的意思
如果解压的同时指定解压目录可以执行以下命令:
tar -zxvf boot.tgz -C /home/dir #需要使用-C参数,后面跟上文件路径。
Linux cp 命令 Linux 命令大全 Linux 命令大全
Linux cp(英文全拼:copy file)命令主要用于复制文件或目录。
语法 cp [options] source dest 或
cp [options] source... directory 参数说明:
-a:此选项通常在复制目录时使用,它保留链接、文件属性,并复制目录下的所有内容。其作用等于dpR参数组合。 -d:复制时保留链接。这里所说的链接相当于Windows系统中的快捷方式。 -f:覆盖已经存在的目标文件而不给出提示。 -i:与-f选项相反,在覆盖目标文件之前给出提示,要求用户确认是否覆盖,回答"y"时目标文件将被覆盖。 -p:除复制文件的内容外,还把修改时间和访问权限也复制到新文件中。 -r:若给出的源文件是一个目录文件,此时将复制该目录下所有的子目录和文件。 -l:不复制文件,只是生成链接文件。 实例 使用指令 cp 将当前目录 test/ 下的所有文件复制到新目录 newtest 下,输入如下命令:
$ cp –r test/ newtest
注意:用户使用该指令复制目录时,必须使用参数 -r 或者 -R 。
DC的gatecount = total area / the area of NAND2;
把2个PMOS和2个NMOS看成一个面积单元,也就是一个2输入与非门为一个单元,所以DC report_area,并找到对应元件库中的2输入与非门的面积大小(我找不到); https://blog.csdn.net/chevroletss/article/details/6082960
1.zip命令 zip -r myfile.zip ./* 将当前目录下的所有文件和文件夹全部压缩成myfile.zip文件,-r表示递归压缩子目录下所有文件.
2.unzip命令 unzip -o -d /home/sunny myfile.zip 把myfile.zip文件解压到 /home/sunny/ -o:不提示的情况下覆盖文件; -d:-d /home/sunny 指明将文件解压缩到/home/sunny目录下;
3.其他 zip -d myfile.zip smart.txt 删除压缩文件中smart.txt文件 zip -m myfile.zip ./rpm_info.txt
要使用 zip 来压缩文件,在 shell 提示下键入下面的命令:
zip -r filename.zip filesdir 在这个例子里,filename.zip 代表你创建的文件,filesdir 代表你想放置新 zip 文件的目录。-r 选项指定你想递归地(recursively)包括所有包括在 filesdir 目录中的文件。 要抽取 zip 文件的内容,键入以下命令: unzip filename.zip 你可以使用 zip 命令同时处理多个文件和目录,方法是将它们逐一列出,并用空格间隔:
zip -r filename.zip file1 file2 file3 /usr/work/school 上面的命令把 file1、file2、 file3、以及 /usr/work/school 目录的内容(假设这个目录存在)压缩起来,然后放入 filename.zip 文件中。
dc 2015.06版之后,自身就不再支持library compiler,需要自行安装library compiler。
$ lc_shell lc_shell> read_lib S011HDSP_X32Y8D32_BW_SS_1.08_125.lib lc_shell> write_lib -format db S011HDSP_X32Y8D32_BW_SS_1.08_125 -output S011HDSP_X32Y8D32_BW_SS_1.08_125.db lc_shell> quit ———————————————— 版权声明:本文为CSDN博主「uvm_ydd」的原创文章,遵循CC 4.0 BY-SA版权协议,转载请附上原文出处链接及本声明。 原文链接:https://blog.csdn.net/uvm_ydd/article/details/89709990
https://www.cnblogs.com/IClearner/p/11008940.html
dc_shell | tee run.log

report_area -hierarchy 可以显示每个模块的使用面积信息
脚本内容
# set search path
set_app_var search_path [list * /home/user/junkai_liu/Desktop/SRS5025/decoder/test1_00]

# set dc library
set_app_var link_library [list  ss_1v62_125c.db]

set_app_var target_library [list ss_1v62_125c.db]

set_app_var symbol_library [list ss_1v62_125c.db]

sh rm -rf mapped
sh mkdir mapped

set_svf ./mapped/rld_top.svf

set compile_seqmap_propagate_constants false

# read verilog file
analyze -format verilog [list data_adj.v \
                                rld_core.v \
                                rld_top.v]

elaborate rld_top
# set current design
# current_design rld_top

link
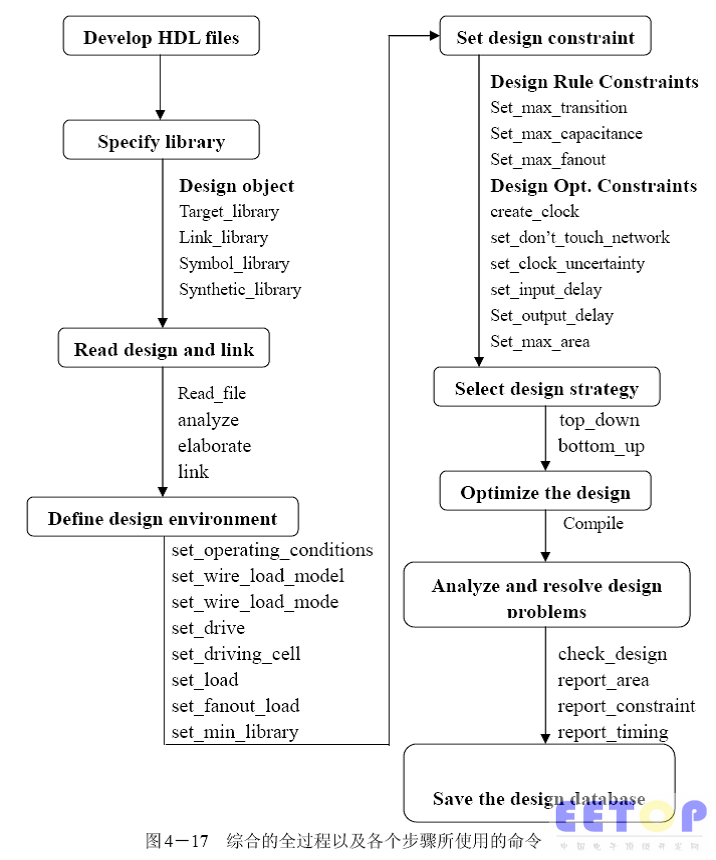
link 之后的结果为1,说明环境设置的是正确的,如果link之后的结果为0,说明环境有问题
含有parameter的实例化,需要使用
analyze -format verilog [list data_adj.v\
							rld_core.v\
							rld_top.v]
elavorate rld_top
进行source文件的读取。
http://blog.eetop.cn/blog-422523-28881.html
analyzer是分析HDL的源程序并将分析产生的中间文件存于work(用户可以自己指定)的目录下
elaborate则在产生的中间文件中生成verilog的模块或者VHD的实体;
缺省情况下,elaborate读取的是work目录中的文件
当前读取完所要综合的模块后,需要使用link命令将读到DC存储区中的模块或实体连接起来
注意:如果在使用link命令后,出现unresolved design reference的警告信息,需要重新读取该模块,或者在.synopsys_dc.setup文件中添加link_library,告诉DC到库中去找这些模块,同时还要注意search_path中的路径是否指向该模块或单元电路所在的目录
link命令执行后,DC就将模块按照RTL级或门级的描述将电路连接起来,之后的各种限制条件就可以对该电路的顶层模块施加;
https://www.cnblogs.com/wtjqs/p/10416654.html
在eetop上下载到了Design Compiler User Guide,看一看综合的详细文件;
Synthesis = Translation + Logic Optimization + Gate Mapping
23、Design Compiler 的Topographical Mode相比Wire Load Models有什么优势? 线负载模型(WLM)是基于工艺厂的数据统计,而不是特定于自己的设计。在深亚微米(UDSM)设计中,互连寄生参数对路径延迟有很大的影响 ,WLM是不够准确的。 Topographical Mode使用placement算法来估计线延时,提供和实际物理布局更好的时序相关性。 Topographical Mode 除了逻辑库之外,还需要物理库(Milkyway)
版权声明:本文为CSDN博主「数字芯片实验室」的原创文章,遵循CC 4.0 BY-SA版权协议,转载请附上原文出处链接及本声明。 原文链接:https://blog.csdn.net/iNostory/article/details/86751200
5、Design Compiler 综合过程中 “link” 命令完成了什么功能? link 是 Design Compiler ”resolve”设计中例化模块的过程。Design Compiler 通过变量 “link_library” 指定例化模块库的位置,和 target_library 一样,默认为 your_library.db。建议显式地使用 link 命令,否则工具可能带着 “unresolved references” 进行综合,产生没有意义的结果,同时浪费时间。
report constraint
report constraint -all_violators
report timing
report timing -significant_digits 6 查看数据小数点后面6位
时序分析之slack:https://www.cnblogs.com/chenwu128/archive/2011/12/12/2285423.html
fpga时序分析和slack(SOC) (Quartus II)
https://blog.csdn.net/gtkknd/article/details/52824855
https://blog.csdn.net/sinat_29862967/article/details/111225986
报告开始显示了路径的起点,路径终点,路径组名和路径检测的类型。此例中,路径检测类型为max,意味着最大的延时或者setup check,若是min则是最小的延时或者hold check
下面一个大表显示了从起点到终点之间的一个个点的延时值。纵列有三个标识, Point, Incr和 Path,分别表示了路径中的各个点,此点所需要的延时和从起点一直累积到此点的延时值。(一般是6列:point、fanout扇出值、trans传输延时、incr器件延时、path、attributes延时类型)
星号(*)表示了使用了SDF文件中的延时值,r和f表示 上升或者下降沿。
标准延迟文件SDF:主要包含了网表中所有器件的延迟信息,用于时序仿真;通常情况下,在仿真过程中会使用由PT报出的sdf,因为PT会结合后端工具,生成延迟更为精确的sdf文件。
时序约束对电路的要求:
- 综合工具现在不能很好的支持一步电路,甚至不支持异步电路;
- single clock,single cycle,单个时钟,单沿触发,不要一会儿posedge,一会儿negedge;
可以用下面命令对除时钟以外的所有输入端口设置约束: set_input_delay -max 3.5 -clock CLK [romove_from_collection [all_inputs] [get_ports CLK]];#表示从所有输入端口中除掉时钟CLK
create_clock -period 10 [get_ports CLK]
set_input_delay -max 6 -clock CLK [all_inputs]
remove_input_delay [get ports CLK] ;#时钟不需要输入延迟的约束
set_output_delay -max 4 -clock CLK [all_outputs]
set_clock_uncertainty:对时钟的偏移与抖动进行建模,也就是对时钟的偏差进行建模。
set_ clock_ uncertainty -rise 0.2 -fall 0.5 [get_clocks CLK]
可以设置为ideal network的端口有,时钟,复位,使能端口,因为这些端口会连接到很多个cell中,所以就是要一个端口驱动很多个cell,这样的延迟是很大的。所以在综合的时候就要做 ideal network或者dont_touch处理。 这些高负载的网络,时钟要做时钟树综合,即CTS。 其他的做buffer tree. 比如你的Design理由有CLK,nRESET, ENABLE, SCANMODE。这么多个高负载端口。 你就可以这么的设置 set_ideal_network -no_pro [list CLK nRESET ENABLE SCANMODE]
Figure 2-2 shows how to run checking and reporting commands in parallel to improve runtime in the Design Compiler design flow.
Figure 2-2 Parallel Command Execution in the Design Compiler Design Flow
RTL design
Link and constrain the design
Run checking commands in parallel (
set_host_options -max_cores 8
parallel_execute \
[list check_design check_timing …])
compile_ultra
Run reporting commands in parallel (
set_host_options -max_cores 8
update_timing
parallel_execute \
[list report_timing report_qor …])
可以一次并行输出多个报告;
https://blog.csdn.net/ciscomonkey/article/details/108908386
启动DC,link之后
list_libs,查看当前内存中所有使用的库;
list_designs,查看当前的设计有几个module;带 * 为current_design;
由于在list_design中,我们仅仅只能看到最原始的design,不能看到例化后的instance。使用list_instance可以list当前current_instance下面的instance。
set maxpaths 15
check_design > "${log_path}${rpt_file}" report_area >> "${log_path}${rpt_file}" report_design >> "${log_path}${rpt_file}" report_cell >> "${log_path}${rpt_file}" report_reference >> "${log_path}${rpt_file}" report_port -verbose >> "${log_path}${rpt_file}" report_net >> "${log_path}${rpt_file}" report_compile_options >> "${log_path}${rpt_file}" report_constraint -all_violators -verbose \
>> "${log_path}${rpt_file}"
report_timing -path end >> "${log_path}${rpt_file}"
report_timing -max_path $maxpaths
>>"${log_path}${rpt_file}"
.tgz格式的解压 tar zxvf filename

.gz格式的解压 gunzip filename
