Click Here and View CN Introduction
- This program is currently not suitable for windows system and it is only tested on ubuntu16.04, 18.04 and 20.04.
- Only support labels of Pascal-VOC format(.xml file).
Since YOLOv5 is now widely used, a simple and easy-to-use training tool is needed. before using this tool please make sure the following toolkits or packages installed correctly.
- CUDA>=10.1
- CUDNN
- torch>=1.7.1
- torchvision
- pyqt5
- pyqt5-tools
You should note that if you use this program in a conda enviroment, please install pyqt5 by using "conda install pyqt==5.X.X" rather than "pip3 install pyqt5", or it may failed to run this program.
For more details, please read READ_ME.txt
git clone https://github.com/LSH9832/yolov5_training_tool.git
cd yolov5_training_tool
chmod +x ./setup.sh
./setup.sh
You can try to replace "github.com" with "hub.fastgit.org" if download speed is slow.
wget -O packages/yolov5/models/pt/yolov5s.pt https://github.com/ultralytics/yolov5/releases/download/v5.0/yolov5s.pt
wget -O packages/yolov5/models/pt/yolov5m.pt https://github.com/ultralytics/yolov5/releases/download/v5.0/yolov5m.pt
wget -O packages/yolov5/models/pt/yolov5l.pt https://github.com/ultralytics/yolov5/releases/download/v5.0/yolov5l.pt
wget -O packages/yolov5/models/pt/yolov5x.pt https://github.com/ultralytics/yolov5/releases/download/v5.0/yolov5x.pt
You can try to replace "github.com" with "hub.fastgit.org" if download speed is slow.
After running "./setup.sh", this program icon will appear amount the desktop applications, click and open it.
DesktopFile location:
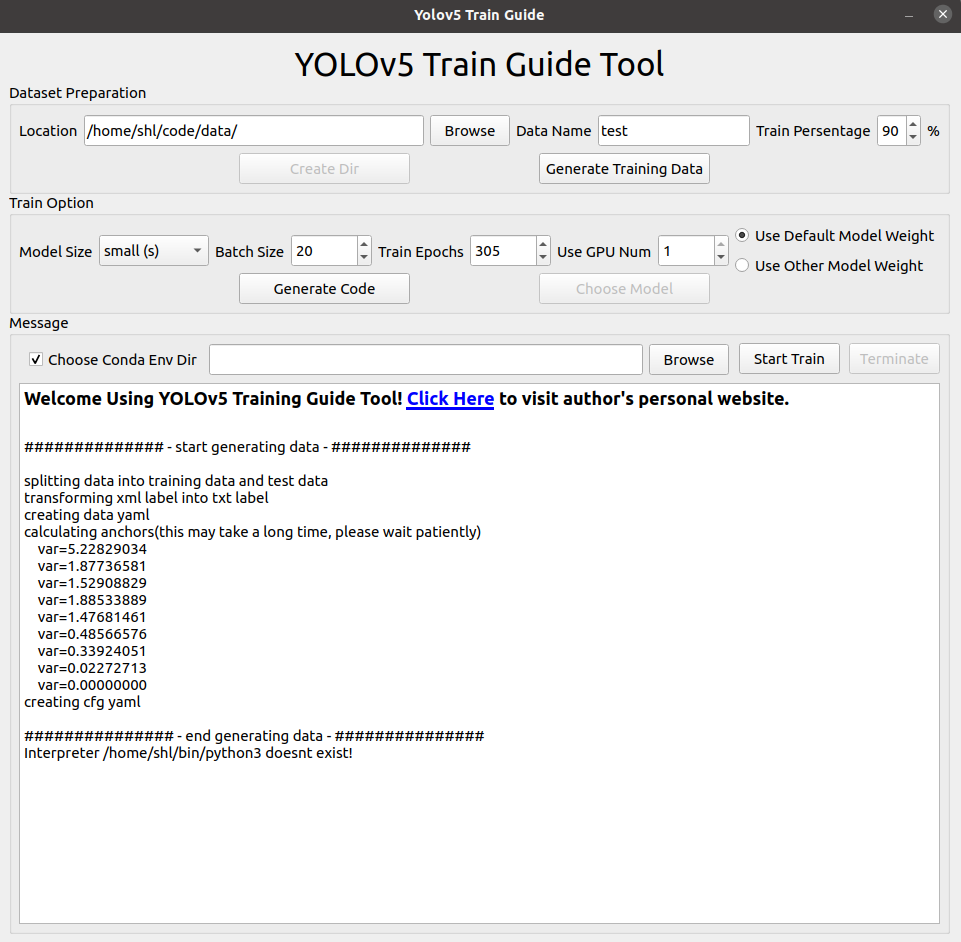
/home/$USER/.local/share/applications/yolov5_training_tool.desktop- After opening this program, firstly choose a location(example:/home/$USER/datasets) to restore dataset, then give a name(example:mydata) of it and click button "Create Dir", then a new dir(example:mydata) is created in choosed location.(example:/home/$USER/datasets)
- There are 4 dirs inside your data dir(example:mydata), put all label file(.xml file) into dir "Annotations" and all image files(it seemsly only recognize jpg files, you can modify relative code if you are going to use images with other formats) into dir "images".
- Create file "label.txt" in this dir(example:mydata/label.txt) and write every class name you want to train in this dataset for each line, make sure no empty line in this txt file.
- Select train persentage of these images and click the button "Generate Training Data", images will be devide into traindata and valdata automatically and anchors is calculate which may take a long time if number of images is too large.
- Choose model size, input batch size, epochs and how many GPU you want to use; you can also choose other weight file by clicking button "Choose Model", but you should make sure the model size of the weight file is as large as you choose in this program, or it will raise error if you start training. Click button "Generate Code" and "start_train.py" is generate in your data dir. Start training
python3 start_train.py    # use single GPU
python3 -m torch.distributed.launch --master_port 12345 --nproc_per_node ${GPUNUMBER} start_train.py # use multi GPU of number ${GPUNUMBER},of course you can change another master_port not being used.- You can also click button "Start Train" and train your data in this program directly. If you are going to run this program in a conda enviroment, choose your enviroment dir before you start training in this program.
