- OAuth and OpenID Connect
- Table of Content
- Understanding the Differences Between OAuth and OpenID Connect
- Understanding OAuth Roles and Authorization Flow
- Overview of OAuth Client Types
- OAuth and User Consent
- Front Channel vs. Back Channel in OAuth
- Introduction to Front Channel vs. Back Channel
- Back Channel: Secure Data Transfer
- Front Channel: Less Secure Data Transfer
- OAuth and Data Delivery
- Why the Front Channel is Necessary in OAuth
- OAuth Flow Design
- Problems with Front Channel Token Delivery (Implicit Flow)
- Back Channel Token Delivery and Modern Browsers
- Clarifying the Back Channel for JavaScript Apps
- Application Identity in OAuth
- Authorization Code Flow Overview
- Mobile Apps
- Single-Page Apps (SPAs)
- OpenID Connect
- OAuth for APIs
OAuth and OpenID Connect are distinct protocols with different purposes and security considerations. OAuth is designed primarily for applications to gain access to APIs without needing to know the user's identity. An analogy is provided comparing OAuth to checking into a hotel: the front desk (OAuth authorization server) verifies identity but gives a key card (access token) that allows access to various facilities without revealing who the guest is.
In contrast, OpenID Connect builds on OAuth by adding user identity information. It introduces ID tokens, which communicate user data back to applications, allowing them to identify users and display their information. In summary, OAuth focuses on API access, while OpenID Connect emphasizes user identification, with the key takeaway being to think of OAuth as related to accessing APIs and OpenID Connect as related to identifying users.
In a typical scenario where a user accesses data from an API, there are four primary roles:
- User: The individual with the account.
- Device: The user's mobile phone or web browser.
- Application: The software running on the device, which interacts with the API.
- API: The resource that contains the data the application requests.
The OAuth specification uses more precise terms:
- Resource Owner: Instead of "user."
- User Agent: Instead of "device."
- OAuth Client: Instead of "application."
- Resource Server: Instead of "API."
While these terms are technically accurate, they can be interchangeable in casual conversation.
The term "application" can be ambiguous, as it may refer to both mobile apps and APIs. In the context of OAuth, it specifically denotes the OAuth Client that accesses data from the API.
Earlier methods, like cookie-based authentication, involve the user typing their password into the device, which then communicates directly with the web application to obtain a session cookie. Although this is an improvement over storing passwords, there is still room for better security.
OAuth was originally designed to allow third-party applications to access user data without sharing passwords. The introduction of the authorization server helps achieve this by:
- Allowing users to log in directly at the authorization server.
- Generating an access token to grant the application access to the API.
This process ensures that the application never sees the user's password.
Once the application receives the access token, it can make requests to the API, which must validate the token. This approach is more secure than allowing APIs to validate passwords directly.
In OAuth, roles are not necessarily distinct components. For instance:
- A small system may have an API with a built-in OAuth server, meaning it serves both as the authorization and resource server.
- In more complex systems, you might have a separate authorization server and multiple microservices acting as resource servers.
In OAuth, the type of application plays a crucial role in determining various security properties associated with it. OAuth 2.0 classifies applications into two primary types: Confidential Clients and Public Clients. This classification is based on whether an application can securely store credentials, such as a client secret, during the OAuth exchange.
Confidential clients can be securely deployed with a client secret, which remains hidden from users. These are typically server-side applications, developed using languages like Java, .NET, or PHP. Developers often store API keys in configuration files or environment variables to maintain their secrecy.
Conversely, public clients, such as mobile apps or single-page applications (SPAs), cannot securely store secrets. Users can access the source code of SPAs through the browser, revealing any embedded secrets. Similarly, mobile apps can be reverse-engineered to extract sensitive information. Consequently, secrets should never be included in applications running on user-controlled devices.
In OAuth, client authentication is critical as it ensures that only legitimate applications can communicate with the authorization server. When credentials are included in requests, the server can verify the application's identity, preventing impersonation. Authorization servers may enforce different policies based on the client type, influencing aspects like consent screens, refresh token issuance, and token lifetimes.
OAuth 2.1 introduces a middle ground termed Credentialed Clients. These clients possess credentials but have not undergone identity verification by the authorization server. For instance, a mobile app may utilize dynamic client registration to obtain a client secret on its first launch without any initial authentication, allowing potential impersonation at that stage. However, subsequent requests can use the obtained client secret to authenticate the app.
OAuth aims to protect user data and ensure it is shared only with desired parties. The consent screen prompts users for permission before sharing their information during the authorization process.
The consent screen is crucial for the authorization server to confirm that it is protecting the user effectively. Without it, users may unwittingly share their information with unauthorized apps.
The password grant flow involves users providing their credentials directly to an application, which then sends them to the authorization server for an access token. This process is simplistic and lacks user verification.
There are significant risks associated with the password grant. Users may unknowingly hand over their credentials to third-party applications, creating security vulnerabilities. Even first-party apps may misuse this flow, as the authorization server cannot confirm if the user is actively logging in.
By redirecting users to the authorization server for authentication, users only enter their passwords on the server, ensuring they are actively using the application and agree to the access requested.
The password grant flow is not conducive to integrating multifactor authentication (MFA). Redirecting users to the authorization server allows for easy implementation of MFA, enhancing overall security without altering application code.
For first-party confidential clients, user consent may be bypassed because the risk of app impersonation is minimized. However, the redirect remains essential for maintaining security benefits, including MFA.
- The front channel and back channel describe different methods of data transfer between systems.
- The back channel is a secure, client-to-server connection, typically over HTTPS, ensuring data integrity and authenticity.
- The front channel uses the browser's address bar to transfer data between systems.
- In the back channel, the connection is encrypted, ensuring data cannot be tampered with.
- The back channel can be compared to hand-delivering a package, where both the sender and recipient are verified.
- The front channel involves using a third-party, like a delivery service, to transfer data.
- This introduces issues of trust and verification, as you cannot guarantee the data's integrity during transit.
- Similarly, the recipient cannot be certain of the sender’s authenticity or whether the data was compromised.
- In OAuth, the goal is for the application to securely obtain an access token.
- The back channel is ideal for secure delivery, but the front channel is used to ensure user consent.
- The front channel allows the user to be involved in the authorization process.
- It's also useful for incorporating multi-factor authentication, where the authorization server handles this aspect.
- The application first sends a non-sensitive request to the authorization server via the front channel.
- After the user logs in and consents, the authorization server can send the user back to the application.
- Sending access tokens via the front channel is insecure and is no longer recommended.
- This method, known as the Implicit flow, is discouraged due to the lack of security.
- Modern browsers support Cross-Origin Resource Sharing (CORS), enabling secure back channel communication.
- JavaScript apps can now use the back channel by making POST requests to the OAuth server, ensuring secure token delivery.
- The back channel refers to any client-to-server connection, including JavaScript making AJAX or Fetch requests.
Applications, known as clients in OAuth, act as independent entities. They use a client ID to identify themselves in the OAuth flow, especially during the authorization process.
The client ID identifies an app, while the client secret is like an app's password. Public apps without a client secret can't guarantee their identity, which can create security risks if an attacker intercepts tokens.
The flow begins with the app redirecting the user's browser to the authorization server, providing parameters like the scope and redirect URI. The server responds with an authorization code, which the app exchanges for an access token.
For apps without a client secret (e.g., mobile apps), PKCE is used. It allows the app to generate a unique secret for each request, ensuring that only the app that started the flow can redeem the authorization code.
The redirect URI is crucial for application identity, especially in mobile and single-page apps. Web apps use globally unique URLs, but mobile apps may use custom URL schemes, which are less reliable for identifying apps.
For security, HTTPS redirect URIs are more trusted because they require the app developer to prove domain ownership. This makes them a key part of app identity verification.
We will walk through the complete authorization code flow for web applications, using sample URLs and discussing differences that may arise with OAuth servers. At the end, there will be an opportunity to try the flow with a real OAuth server.
Once an application is registered with an OAuth server and has a client ID and secret, the flow begins. The goal is to deliver an access token from the server to the application, ideally via the back channel, so the token stays out of the browser for enhanced security.
- Login Trigger: The user clicks the login button to begin.
- PKCE Code Verifier: The app generates a random secret (PKCE Code Verifier), hashes it to create a Code Challenge, and stores it. This hash is included in the redirect URL.
- Redirection to OAuth Server: The user is redirected to the OAuth server with the Code Challenge, client ID, redirect URL, and scope.
- Authorization Request via Front Channel: The request is sent via the browser, ensuring only the hash (not the secret) is transmitted for security reasons.
- User Authentication: At the OAuth server, the user logs in, possibly performs multi-factor authentication, and confirms they want to log in to the app.
- Authorization Code Delivery: The OAuth server sends the user back to the application with an authorization code via the browser (front channel).
- Authorization Code Validity: The code is one-time use and must be redeemed quickly.
- Back Channel Request: The application server exchanges the authorization code for an access token by sending a request to the OAuth server (bypassing the browser). The request includes the authorization code, client credentials, and the plaintext PKCE secret.
- Access Token Delivery: The server validates the request, compares the hashes, and delivers the access token to the app for use in API requests.
PKCE (Proof Key for Code Exchange) was initially designed for mobile apps but is now recommended for all types of applications, even those with client secrets, to prevent attacks like the authorization code injection attack.
sequenceDiagram
    participant User
    participant UserAgent
    participant App
    participant AS as AuthorizationServer
    participant API

    User->>UserAgent: I'd like to use this great app
    UserAgent->>App: Request to use app
    App->>UserAgent: Hang on while I generate a new secret and hash it
    Note left of App: Secret is generated <br/>using PKCE!
    App->>UserAgent: Please go to the authorization server to grant me access, take this hash with you
    UserAgent->>AS: I'd like to log in to {app}, here's the hash it gave me
    AS->>UserAgent: Here is a temporary code the app can use
    UserAgent->>App: Here is the temporary code, please use this to get a token
    App->>AS: Here's the code, and the plaintext secret, please give me a token
    AS->>App: Let me verify the hash of that secret... ok here is an access token!
    App->>API: Please let me access this user’s data with this access token!
-
Generate Code Verifier and Challenge: The app generates a random string (code verifier) and hashes it using SHA256 to create the Code Challenge.
-
Build Authorization URL: Add parameters like
response_type=code, client ID, redirect URL, scope, and Code Challenge to the authorization endpoint URL.https://authorization-server.com/auth? response_type=code& client id=CLIENT ID& redirect_uri=REDIRECT_URI & scope=photos& state=XXXXXXX & code_challenge=XXXXXXXXXXXXX& code_challenge_method=S256 -
User Authentication: The user logs in and approves the request. If successful, the OAuth server returns the authorization code.
https://example-app.com/redirect?code=AUTH_CODE_HERE&state=XXXXXXX -
Token Exchange: The app exchanges the authorization code for an access token by making a back channel POST request to the token endpoint. The request includes the client credentials and Code Verifier.
POST https://authorization-server.com/token grant_type=authorization_code& code=AUTH CODE HERE & redirect_uri=REDIRECT_URI & code_verifier-VERIFIER_STRING& client_id=CLIENT_ID& client_secret=CLIENT_SECRET -
Access Token Usage: The app uses the access token to make API requests. If a refresh token is received, it can be used to get a new access token when the current one expires.
- Errors may occur during the token exchange, requiring the flow to restart.
- Refresh tokens may expire or fail due to various reasons (e.g., revoked permissions, deleted users).
PKCE is now part of OAuth 2.1 Security Best Practices and is recommended for all apps to defend against code injection attacks. While some servers may not support PKCE yet, it can still be implemented in your OAuth clients to future-proof the application.
We'll explore how OAuth authorization differs in mobile apps compared to web server apps. While the authorization code flow works similarly in both environments, there are unique challenges specific to mobile apps.
Unlike web apps, it is unsafe to include client secrets in mobile apps. Including a client secret in the source code, compiling it, and distributing it via an App Store makes the secret accessible to everyone. Tools can easily decompile app binaries, exposing the client secret, which defeats its purpose.
To address this, mobile apps simply do not use a client secret. Instead, they rely on other security measures to ensure safe OAuth flows. This is one of several differences in how mobile apps handle OAuth, which will be covered in the following lessons.
One unique aspect of mobile app security in OAuth flows is how platforms like iOS and Android handle redirect URLs, which direct the user back to the app after authorization. This differs from web apps, where the entire interaction occurs securely within a browser.
In web apps, the OAuth flow takes place within a browser, and the browser's security mechanisms (such as DNS checks and HTTPS validation) ensure a relatively secure process. The authorization server sends a redirect back to the application via the same browser tab, making it secure.
In mobile apps, the flow starts in the app, which launches an in-app browser to communicate with the authorization server. When the authorization server sends the redirect back, it can be intercepted by other apps, leading to security concerns. This is because mobile apps lack the same built-in protections as web browsers.
Initially, mobile apps could define custom URL schemes (e.g., todo://), where any app matching that scheme would launch. However, there was no registration process for these schemes, meaning competing apps could claim the same URL and intercept redirects. This opens up the possibility of apps stealing authorization codes.
Modern apps use deep linking, where developers can claim specific URL patterns, including domain names and paths. These claims are more secure since developers must prove ownership of the domain, providing an extra layer of security. However, deep linking still has limitations and can fail under certain conditions.
Given the security risks with redirect URLs in mobile apps, the Proof Key for Code Exchange (PKCE) protocol is critical. PKCE helps protect the OAuth flow by ensuring the authorization code is securely exchanged, even if the redirect is intercepted. Therefore, using app-claimed URL patterns along with PKCE is recommended for mobile apps.
Initially, mobile apps launching a browser for OAuth caused a poor user experience. Users were forced to leave the app and switch to Safari (iOS) or Chrome (Android) to log in, making the flow less seamless and fragile.
Many mobile apps tried to improve user experience by embedding a web view within the app. However, this introduced several security problems:
- Lack of Address Bar: Users couldn’t verify if they were on the real authorization server, making them vulnerable to phishing attacks.
- Cookie Isolation: Web views do not share cookies with the system browser, forcing users to re-enter login details even if already logged in elsewhere.
- App Control Over Web View: Apps could potentially access and extract passwords typed in the web view, defeating the purpose of OAuth’s security model.
To improve both user experience and security, mobile platforms developed special APIs:
- SFSafariViewController (iOS) and Chrome Custom Tabs (Android): These APIs allow browsers to be securely launched within the app, without letting the app access the browser contents.
- Users don’t leave the app but still benefit from system-level security, such as shared cookies.
- This setup ensures users don’t have to re-enter passwords if already logged into the system browser, providing both security and convenience.
We walks through a complete authorization code flow for native and mobile applications. A sample URL is used instead of a real server, but differences with real OAuth servers are discussed. At the end, you can try it out with a real OAuth server.
When building a native app, you cannot deploy credentials if the app is distributed through an app store. Therefore, OAuth servers don’t provide a client secret for native apps, and you'll perform the flow using only a client ID.
The app running on a mobile device needs an access token to make API requests. The goal is to deliver the token from the OAuth server to the app through a backchannel, while utilizing the browser for user login.
- PKCE Code Verifier and Code Challenge: The app generates a random string called the PKCE Code Verifier and calculates its hash (code challenge), which it includes in the request to the OAuth server.
- Front Channel Request: The app sends the login request to the OAuth server through the browser. The request includes the client ID, redirect URL, and scope.
- User Login: The user logs into the OAuth server, which may share cookies with the system, allowing automatic login.
- Authorization Code Returned: The OAuth server sends the authorization code back to the app via the browser.
- Backchannel Request: The app exchanges the authorization code for an access token by making a backchannel request to the OAuth server, sending the PKCE code verifier.
PKCE is a security extension for protecting the authorization code flow, especially for mobile apps without client secrets. It ensures that the same entity requesting the authorization code is redeeming it.
Before sending the user to the OAuth server, the app generates a code verifier, calculates its hash, and sends the request to the server. This request includes parameters such as the response type, client ID, redirect URL, scope, and code challenge.
Mobile apps use special in-app browsers (SFSafariViewController on iOS and Chrome Custom Tabs on Android) for OAuth requests. These browsers isolate the app from seeing sensitive information.
After the user logs in, the OAuth server either returns an authorization code or an error to the app’s redirect URL. The app checks the state value for validation and exchanges the authorization code for an access token.
The app makes a POST request to the OAuth server’s token endpoint, sending the authorization code, redirect URL, and code verifier. Upon successful exchange, the server responds with an access token, expiration time, and possibly a refresh token.
Refresh tokens are special tokens used to get new access tokens without user involvement. This helps keep the user logged in while allowing access tokens to have shorter lifespans. For example, access tokens could last just an hour, but the app can use refresh tokens in the background to request new access tokens without interrupting the user.
For mobile apps, getting the user to interact with the OAuth server can mean popping up an in-app browser, which interrupts the user. Refresh tokens allow the app to get new access tokens without showing a browser window, improving the user experience.
Different servers may handle refresh tokens differently. Some require the app to explicitly request a refresh token by including the scope offline_access in the authorization request. However, the server ultimately decides whether the app gets a refresh token, and it may have policies determining which apps or users are eligible.
Once the app receives the refresh token (along with the access token), it can use it to request new access tokens when needed. This is done through a simple POST request to the OAuth server’s token endpoint, with the refresh token, the grant type refresh_token, and the app’s client ID. Since native apps don’t have client secrets, protecting the refresh token is critical.
Although the lack of a client secret can make refresh tokens a security risk, mobile platforms provide mechanisms to protect them, such as secure storage APIs. Apps should take advantage of these features to store refresh tokens securely.
- The app initially has no tokens and prompts the user to sign in.
- Upon signing in, the app receives both an access token and a refresh token.
- The refresh token is stored securely on the device using a secure storage API.
- When the access token expires, the app uses the refresh token to get a new access token, sometimes requiring biometric authentication (e.g., FaceID) to unlock the secure storage.
- The user experience remains smooth as the app avoids prompting for a password, relying instead on biometric verification.
Single-page apps (SPAs) run in the browser, which brings unique challenges. Since JavaScript apps are considered public clients, there’s no way to include API keys or client secrets securely. Even if you try to hide them, users can easily access them by viewing the source code. Without a client secret, OAuth flows like PKCE (Proof Key for Code Exchange) are used for secure communication.
Browsers are vulnerable to cross-site scripting (XSS) attacks, where attackers can run malicious code that looks like legitimate app code. If successful, attackers can access sensitive data such as access tokens or user information. One of the best defenses is a strong Content Security Policy (CSP), which controls what JavaScript can be loaded and from which domains. However, this can be tricky to balance with the need for third-party scripts (e.g., for analytics or advertising), which also pose potential security risks.
Users may have installed browser extensions that have access to the app’s page, adding another layer of uncertainty. Even if the app uses a strict CSP and avoids third-party JavaScript, browser extensions can still inject code into the page, potentially compromising the app’s security.
Browsers lack secure storage options, which is another challenge when dealing with access or refresh tokens. Since JavaScript can access cookies, LocalStorage, or SessionStorage, any JavaScript running on the page (including malicious code via XSS) could potentially access these tokens. This limitation makes it difficult to store sensitive information securely in SPAs.
Because of the inherent risks in the browser environment, OAuth servers often have stricter policies for SPAs. For example, refresh tokens might be disabled or limited to one-time use, and access tokens might have shorter lifetimes to reduce the impact of token leaks.
The most secure OAuth flow for SPAs is the authorization code flow with PKCE, which ensures that only the app initiating the flow can complete it and receive the token. However, once the token is granted, securely storing it in the browser becomes a challenge due to the inherent risks of the browser environment.
Browsers are prone to XSS attacks, where attackers can run malicious code in your app, potentially accessing stored tokens. Any data stored in accessible locations (e.g., LocalStorage, SessionStorage, or cookies) is at risk if an attacker can execute JavaScript on your page.
- LocalStorage: Persists data across sessions and tabs, but is vulnerable to XSS attacks as any script on the page can access it.
- SessionStorage: Stores data only for the duration of the window session and does not share data across tabs, but is also susceptible to XSS.
- Cookies: Although commonly used for backend communication, they can be accessed by JavaScript, making them similarly vulnerable.
Even if your app does not directly have a cross-site scripting vulnerability, external scripts or libraries you load (e.g., analytics or ads) can access your storage, further increasing security risks.
- In-Memory Storage: Storing tokens in memory avoids the risks associated with LocalStorage and SessionStorage, but tokens are lost when the page is refreshed or a new tab is opened.
- Service Worker: Service workers can store tokens in an isolated context, protecting them from XSS attacks. However, this method is more complex to implement, does not work in IE11, and requires all API requests to go through the service worker, which acts as an OAuth client.
The WebCrypto API allows JavaScript to generate and use private keys without exposing them, enabling encrypted token storage. However, this API is not supported in IE or Safari, and while it improves security, attackers could still use the private key to decrypt the storage.
Storing tokens in JavaScript makes them vulnerable to cross-site scripting (XSS) attacks. To avoid this risk, a more secure approach is to move the OAuth flow and token storage to a dynamic backend server, ensuring that tokens are not accessible to JavaScript.

In this model, the OAuth flow is handled by a backend server rather than the frontend JavaScript. This setup is suitable if your single-page app (SPA) is served from a dynamic backend like .NET or Java, but not if you're using pure static hosting like Amazon S3.
- The browser loads the SPA.
- When the OAuth flow starts, the user is redirected to the authorization server to log in.
- The authorization server redirects the user back to the SPA with an authorization code.
- The SPA sends this code to its backend server.
- The backend server exchanges the code for an access token via a secure back channel.
- The backend stores the access token and sets an HTTPOnly session cookie in the browser, ensuring that the token can't be stolen by JavaScript.
When the SPA needs to make an API request, it sends the request to the backend along with the session cookie. The backend uses the stored access token to make the API call, keeping the token entirely out of the browser.
The backend server acts as a confidential client, which means it can use a client secret for additional security. This method is recommended in the OAuth for Browser-Based App specification and is a much safer option for SPAs with dynamic backend support.
OpenID Connect extends OAuth by adding the ability to share user information with applications. While OAuth focuses on allowing apps to access APIs, OpenID Connect provides a way for applications to learn about users.
The key addition in OpenID Connect is the ID Token, which allows the authorization server to communicate information about the user who logged in. ID Tokens are always JSON Web Tokens (JWT).
A JWT is made up of three parts:
- Header: Contains information about the token, such as the algorithm used.
- Payload: Contains user data, such as identifiers and profile information.
- Signature: Used to validate the token.
All three parts are base64 encoded, with the header and payload being encoded JSON data.
Common properties in the payload include:
- sub: The user's identifier.
- iss: The server that issued the token.
- aud: The intended audience, usually the client ID.
- iat: The issuance time.
- exp: The expiration time.
The exact contents of the payload can vary depending on the OAuth server.
The sub property contains the user’s unique identifier, which can be in various formats (e.g., a string of letters and numbers, a username, or an email). This identifier is stable and unique for each user, allowing the application to use it for user management.
Access tokens and ID tokens serve different purposes, even though they may share the same format (JSON Web Token). Access tokens are used by the application to make API requests, while ID tokens are used to learn information about the user.
Access tokens allow an application to access an API. The application cannot and should not interpret the token, treating it as an opaque string. This is a design principle of OAuth, similar to a hotel key card that simply works without the user knowing its internal details.
ID tokens, on the other hand, are designed to be read by the application. They contain user information, such as claims, and are meant to be unpacked and validated by the application, like checking a passport.
The audience for an access token is the API or resource server, while the audience for an ID token is the application. These tokens have different roles, and their audience property in the JWT will reflect this.
Not all OAuth servers use JSON Web Tokens for access tokens. Access tokens can have different formats, and applications should not make assumptions about this. However, ID tokens are always JSON Web Tokens and need to be validated by the application.
Applications often need both access tokens (for API requests) and ID tokens (to identify the user). The easiest way to get an ID token, if already using the authorization code flow, is to add the "openid" scope to the request. This will return both an access token and an ID token.
To request an ID token, you add the "openid" scope to a normal authorization request with response_type=code. When the authorization server responds, it returns an access token and an ID token in the same response. This method simplifies ID token handling since the signature doesn’t need validation when received over a trusted back channel.
https://authorization-server.com/auth?
        response_type=code&
        scope=photos+openid&
        client_id=CLIENT_ID&
        redirect uri=REDIRECT URI &
        state=xyz1234&
        nonce=1029385476&
        code_challenge=CODE_CHALLENGE&
        code_challenge_method=S256
Alternatively, you can use response_type=id_token if you only want an ID token without an access token. This method returns the ID token directly in the redirect, similar to the Implicit flow. However, it's crucial to validate the token when using this method to ensure its authenticity.
{
"token_type": "Bearer",
"access_token":"RsT5Ojbz0zqLgV3Ia",
"expires_in":3600,
"id_token":"eyJraWQiOiJiRmxZzL2..."
}
By default, an ID token obtained with just the "openid" scope contains minimal information. If you need more user details like their name or email, you must request additional scopes like "profile" or "email". However, not all servers include this information in the ID token. In some cases, you may need to request user information from a userinfo endpoint using an access token.
Using response_type=id_token in the front channel introduces risks. Even though ID tokens are signed and can be validated, the authorization server doesn’t confirm if the token was successfully received by the application. Sensitive information like email addresses should not be sent in this way, as the front channel is less secure. The back channel via the authorization code flow is a safer option.
When receiving an ID token from the OAuth server, especially over the front channel using implicit or hybrid flows, it is crucial to validate the token. Without validation, a malicious actor could inject a bogus ID token, compromising your application's security.
The first step is to validate the signature of the JSON Web Token (JWT) to ensure that its contents haven't been tampered with. Use a JWT library to check the signature using the correct key, which may be included in the token's header. Verify the signing algorithm and validate the signature using the library.
In addition to the signature, you must validate several key claims:
- Issuer: Confirm the token comes from your OpenID Connect server.
- Audience: Ensure the token is intended for your application by checking the client ID.
- Timestamps: Validate the
issued_atandexpires_attimestamps. - Nonce: Match the nonce value in the token with the one you set in the request to prevent injection attacks.
Once validated, you can trust claims such as the user's ID (subject), email, or name. Additional claims like amr (Authentication Method Reference) may indicate how the user logged in (e.g., with a password or second factor). You can also check when the user last authenticated.
If you obtain the ID token through the authorization code flow over the back channel, many of these validation steps (issuer, audience, timestamps, signature) are unnecessary, as the secure HTTPS connection already ensures the token's integrity.
If you store the ID token (e.g., in a client-side cookie or pass it to another part of your app), you must revalidate it whenever it is used, as it is no longer coming from a trusted source. Validate the signature and claims again to ensure its integrity.
For simpler use cases like retrieving the user's email or name, you can use the authorization code flow to safely get the ID token from the trusted back channel, avoiding the need for complex validation steps.
After covering OAuth from the perspective of applications, it's time to switch gears and focus on APIs. While the first part of the course concentrated on OAuth for applications, this section will address what is important for APIs that use OAuth for protection.
One key difference between applications and APIs is that applications don't care about the format of an access token. However, from the API's perspective, the token format is critical as the API must understand, access, and validate the token (similar to a hotel door knowing how to read a key card).
This section will cover important aspects for API protection using OAuth, including:
- Access token formats
- Token lifetime trade-offs
- Defining scopes for your API
Let's dive into these topics!
When building an API, you have two main types of access tokens to choose from:
- Reference Tokens: These are random strings that act as pointers to data stored elsewhere.
- Self-encoded Tokens: These contain data within the token itself, often in a structured format like a JSON Web Token (JWT).

Reference tokens can be implemented using:
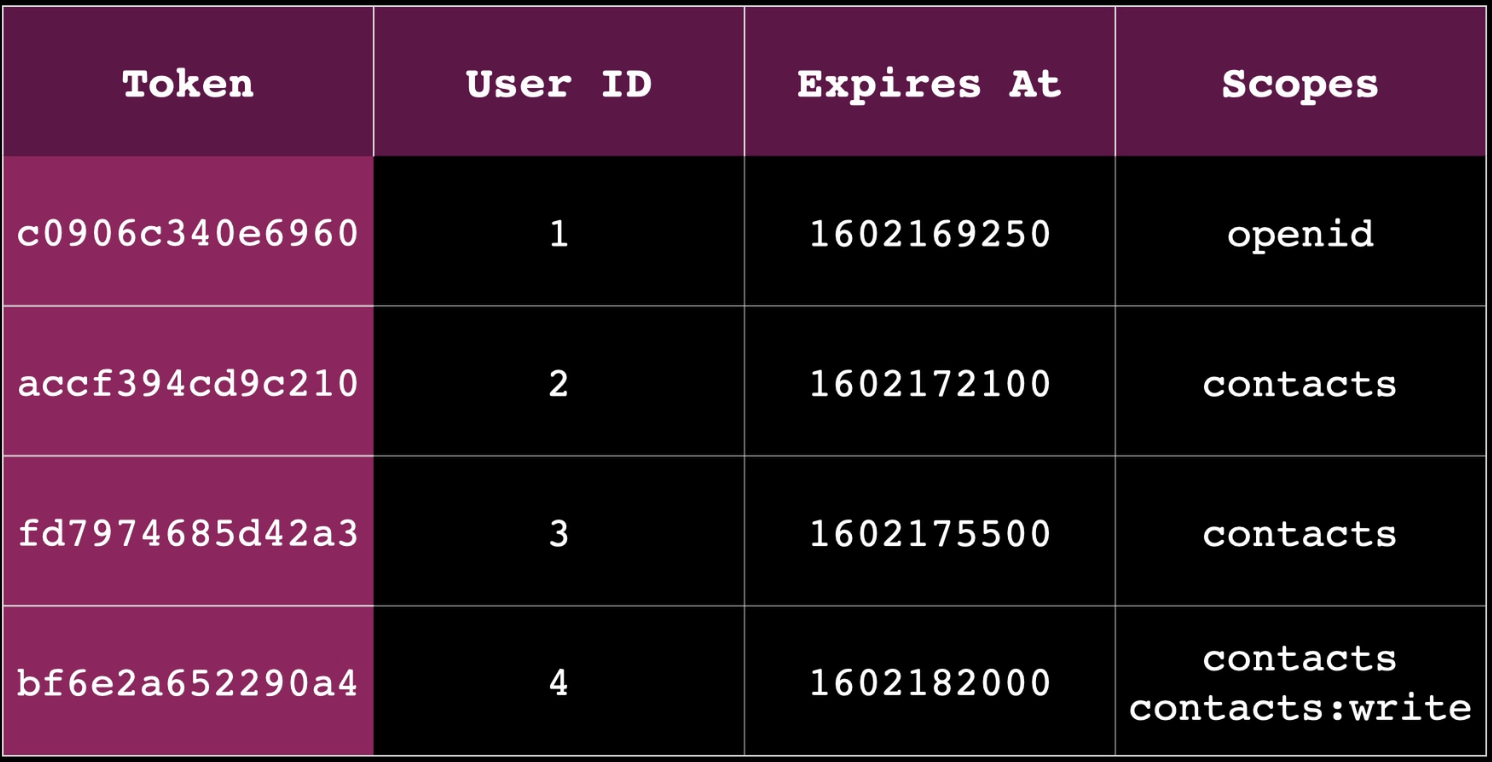
- Relational databases: Store the token string alongside details like user ID, token lifetime, and scopes.
- Caching systems (e.g., Memcache, Redis): The random string becomes the cache key, with associated data stored in the cache.
The key idea is that the token itself doesn’t hold any data; it's a reference to data stored elsewhere.
Self-encoded tokens pack data within the token string. Common data includes:
- User ID
- Application issued to
- Token expiration and creation time
- Scopes granted
- Additional data like the authorization server or last login time
A widely used implementation of self-encoded tokens is JSON Web Tokens (JWT), which standardizes what to include in such tokens.
Applications interacting with OAuth treat access tokens as opaque strings, meaning they don't need to know what’s inside the token. The focus for apps is that the token works, much like a hotel key card.
APIs, on the other hand, need to understand the format and content of access tokens. They care about the distinction between reference tokens and self-encoded tokens to validate and use the token properly.
Reference tokens are random strings that serve as pointers to data stored elsewhere, typically in a database. The token string itself holds no inherent meaning.
- Simplicity: Easy to implement and understand. The creation and management of tokens (e.g., revoking tokens) are straightforward.
- Data Security: Sensitive data can be stored separately in a database, protecting it from being exposed to users, applications, or APIs. This ensures that only the authorization server can access the associated data.
- Easy Revocation: Tokens can be easily revoked by deleting records in the database when necessary, such as when a user or application is deleted.
- Storage Requirement: Reference tokens must be stored, which could become overwhelming depending on the number of users, applications, and token lifetimes.
- API Lookup Overhead: APIs must query the database to validate tokens. This can be manageable in small-scale systems where the OAuth server and API share a database, but it becomes a challenge in larger, distributed systems.
For larger systems:
- Central Database Dependency: Scaling to multiple APIs or data centers introduces the burden of querying a central database, which may hinder performance.
- HTTP Token Validation: Token Introspection is an extension that allows APIs to validate tokens over HTTP, but it adds complexity and may not be optimal for highly distributed systems.
Reference tokens are ideal for small-scale systems or APIs with built-in OAuth servers. However, they might not be the best choice for large-scale or distributed systems due to the storage and validation limitations.
Self-encoded tokens contain meaningful, self-contained data, often implemented as JSON Web Tokens (JWT). These tokens can validate themselves without needing external data.
- No Storage Needed: Since the token contains all necessary validation data, there’s no need to store it in a database.
- Scalability: APIs and resource servers can validate tokens independently without shared storage, making them ideal for distributed systems.
- Independent Operation: If using a separate OAuth server (like Okta), APIs can validate tokens directly without needing to query the OAuth server for token validity.
- Data Visibility: Data within the JWT is not encrypted; it can be decoded and accessed by anyone with the token, including users and developers.
- Revocation Challenges: Tokens cannot be revoked before they expire. If a token is issued for 24 hours, it remains valid until it naturally expires, even if a user or application is deleted.
- State Maintenance: Services like Okta maintain token state (revoked or active) independently of the JWT, allowing for proper revocation through network queries.
- Token Introspection: APIs can use token introspection to check token validity, but they must communicate with the authorization server for the most accurate status.
Self-encoded tokens, especially JSON Web Tokens, are well-suited for larger-scale APIs and systems that utilize a separate OAuth server. The benefits often outweigh the drawbacks, making them a popular choice in many authorization scenarios. Future lessons will address strategies for managing token revocation and related challenges.
Access tokens are essential in OAuth implementations, with self-encoded tokens being one of the two main types. JSON Web Tokens (JWT) are the most common form of self-encoded tokens.
eyJraWQiOiJvQlJjR3RxVDhRV2tJR0MyVXpmcEZUczVqSkdnM00zSTNOMHgtZDJhSFNNIiwiYWxnIj oiUlMyNTYifQ.eyJ2ZXIiOjEsImp0aSI6IkFULKp3eVRTCTlqNDU0bDNTNmRTM1VTV1hMVVpwekdKd WNSd1ZEbFZCNWNIC3cuVVM1V1NGYVFiQllUMC9GM2tjMG8vK1ZUY3VZZzdwVnZqZXZTT3hkUHhCMD0 iLCJpc3MiOiJodHRwczovL2Rldi0zOTYzNDMub2t0YXByZXZpZXcuY29tL29hdXRoMi9kZWZhdWx0I iwiYXVkIjoiYXBpOi8vZGVmYXVsdCIsImlhdCI6MTU0MzgwMzAyNSwiZXhwIjoxNTQzODA2NjI1LCJ jaWQiOiIwb2FoenBwM3RjcEZyZmNXSTBONyIsInVpZCI6IjAwdWkwZmpraWV5TDQ2bWEWMGg3Iiwic 2NwIjpbIm9mZmxpbmVfYWNjZXNzIiwicGhvdG8iXSwic3ViIjoiaW5xdWlzaXRpdmUtYWxiYXRyb3N zQGV4YW1wbGUuY29tIn0.ncVkzcc6qrFJSXE3-5UsRukHvbwIMKYL3PFaMwReYTquPACOQ8t93xF0 bxbS8wrP0udCDvk6eYq4VbjoFdD59Yy6ltz0OKQ13g8uFg2RwqTBMOKR0mYtQH0RCr9ORhSsmKolaD Dt4TcRX78ZOAyhZ_Qg_UcEoHM4uZikpzBJYPYKbCCfbx-6FzYyHuvevSFzURISYpSHv3nbzirkEzKb Ov7eZlglcCYBdUoGuVBskyHxfMxFpoKQU3mwIFd1QJR8LZ8hA_5ZdYjjMeSXfjnhlP2rppJiHylNre GXXCUSUA74V2t_keY44deTrnPgoFOSe9IchWqcj6sDMDutC4ag
A JWT consists of three base64-encoded parts separated by dots:
- Header: Contains metadata, such as the signing algorithm.
- Payload: Holds the claims or data relevant to the token.
- Signature: Ensures the token's integrity but does not encrypt the data.
The JWT specification allows for various claims, but OAuth servers often use a combination of standard and custom claims. The claims defined in the JSON Web Token Profile for OAuth 2.0 Access Tokens include:
- iss (Issuer): Identifies the token issuer, usually the OAuth server's base URL.
- exp (Expiration): Specifies when the token expires; it cannot be unlimited.
- iat (Issued At): The timestamp when the token was issued.
- aud (Audience): Identifies the intended recipient of the token.
- sub (Subject): Represents the user or entity associated with the token.
- client_id: The identifier of the application that received the token.
- jti (JWT ID): A unique identifier for the token, useful for tracking usage.
Optional claims may include:
- scope: Details the scope under which the token was issued.
- auth_time: Indicates the last time the user authenticated, allowing APIs to enforce re-authentication based on time.
- acr (Authentication Context Class Reference): Indicates the authentication method used.
- amr (Authentication Methods Reference): Lists the methods used for user authentication.
OAuth servers can include additional custom claims based on their policies, such as user groups or additional user information.