A tool designed to help public waste management services monitor and empty public trash cans.
This project is project is being developed for the INFOM453 class (Laboratoire en Informatique Ambiante et Mobile) at UNamur (BE).
IAM uses the concept of agent to monitor trash cans. An agent is a device whose purpose is to monitor a single trash can state and to notify the server when changes occur. Insofar as this implementation goes, you may either go for the Raspberry route or the Arduino route. Both paths are now detailed.
Prerequisites:
- Get a Raspberry Pi, any version should be sufficent;
- Get a 2Y0A21 F42 distance sensor;
- Get a 2Y0A21 F08 distance sensor.
When the prerequisites are satisfied, proceed to the phidget python library installation on the raspberry:
mkdir -p libphidget22
wget -q https://www.phidgets.com/downloads/phidget22/libraries/linux/libphidget22.tar.gz -O - | gunzip -c - | tar xf - -C "${PWD}/libphidget22" --strip-components 1
cd libphidget22
./configure && make
sudo make install
sudo ldconfig
sudo cp "${PWD}/libphidget22/plat/linux/udev/99-libphidget22.rules" /etc/udev/rules.d/
After which you may have to reboot the raspberry. Once this is done you may proceed to the python dependencies installation:
cd ${PROJECT_ROOT}/raspberry
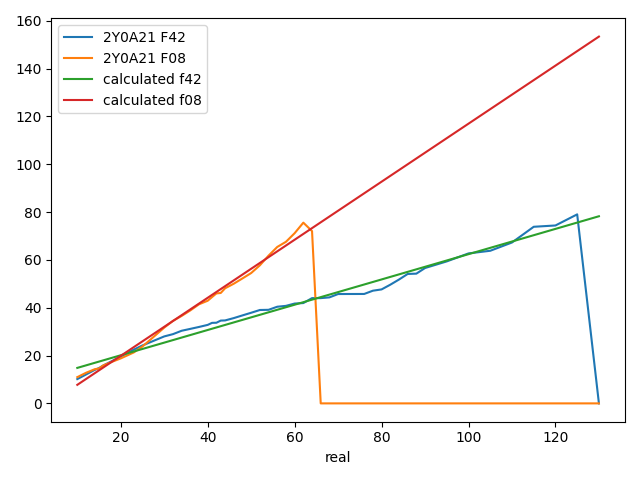
pip install -r requirements.txtSensors do not provide accurate results out of the box. If f details the function that outputs the accurate results and g represents the sensor raw data, c is the callibration function such that c ∘ g = f. This callibration function is (roughly) defined as follow:
- Get the sensor raw data (an example of this is available in the
raspberry/data/raw_calibration_measurement.csvfile); - Find the function that best fit the sensor data (find
g); - Find the transform from
gtof(i.e.c). Given that our function is linear, this is equivalent to finding the slope factor and y-intercept that separatesgandf. - Apply
ctogat runtime, i.e. for every sensor measurementx, apply the slope factormand y-interpectcsuch thaty = mx + c. - Send
yto the server.
The raspberry/calibration.py (and its output raspberry/parameters.json) detail steps 2 and 3. Step 4 is realised in the get_corrected_value function in raspberry/phidgets.py by loading the raspberry/parameters.json file.
The transformation for our captors looks as follow:
Prerequisites:
- Get an Arduino mkr WIFI 1010
- Get 2 distance sensors HC-SR04
- Get a movement sensor PIR HC-SR501
- Install the following arduino libraries
Configure wifi connection for the arduino:
- Go into /arduino/main/ folder
- Open the arduino_secrets.h file
- Enter your SSID and password
Prerequisites:
- Have docker installed;
- Have docker-compose installed.
When the prerequisites are satisfied, run:
docker-compose up -dYou're done! Drink a cup of coffee while backend and frontend sources are compiled and then head to localhost:8000!
The migrations, backend and frontend logs can be respectively found in migrations.log, backend.log and frontend.log.
Prerequisites:
- Have a Java Runtime Environment version 8 or superior;
- Have SBT installed;
- Have NodeJS and NPM installed;
- Have a MySQL or MariaDB server available.
When the prerequisites are satisfied, you may run the migrations with the following command:
cd ${PROJECT_ROOT}/backend
sbt "run migrate \
    --database-host $DB_HOST \
    --database-port $DB_PORT \
    --database-schema $DB_SCHEMA \
    --database-user $DB_USER \
    --database-password $DB_PASSWORD
"
Where variables are replaced with the chosen installation details.
cd ${PROJECT_ROOT}/backend
sbt run
If everything was setup properly, you should now be able to reach the website at localhost:8000
Executing the following
cd ${PROJECT_ROOT}/frontend
npm ci
npm run build
will compile frontend assets and output the result to the public/build directory. If you wish to recompile on every change, you may replace npm run build by npm run dev. When the assets have been prepared, we need to add the resulting files to the backend resources folder for server delivery:
mkdir backend/target/scala-2.12/assets
cp -R frontend/public/. backend/target/scala-2.12/assets
If you wish to automate the process you may either use a watcher such as inotify or simply link the two folders.
