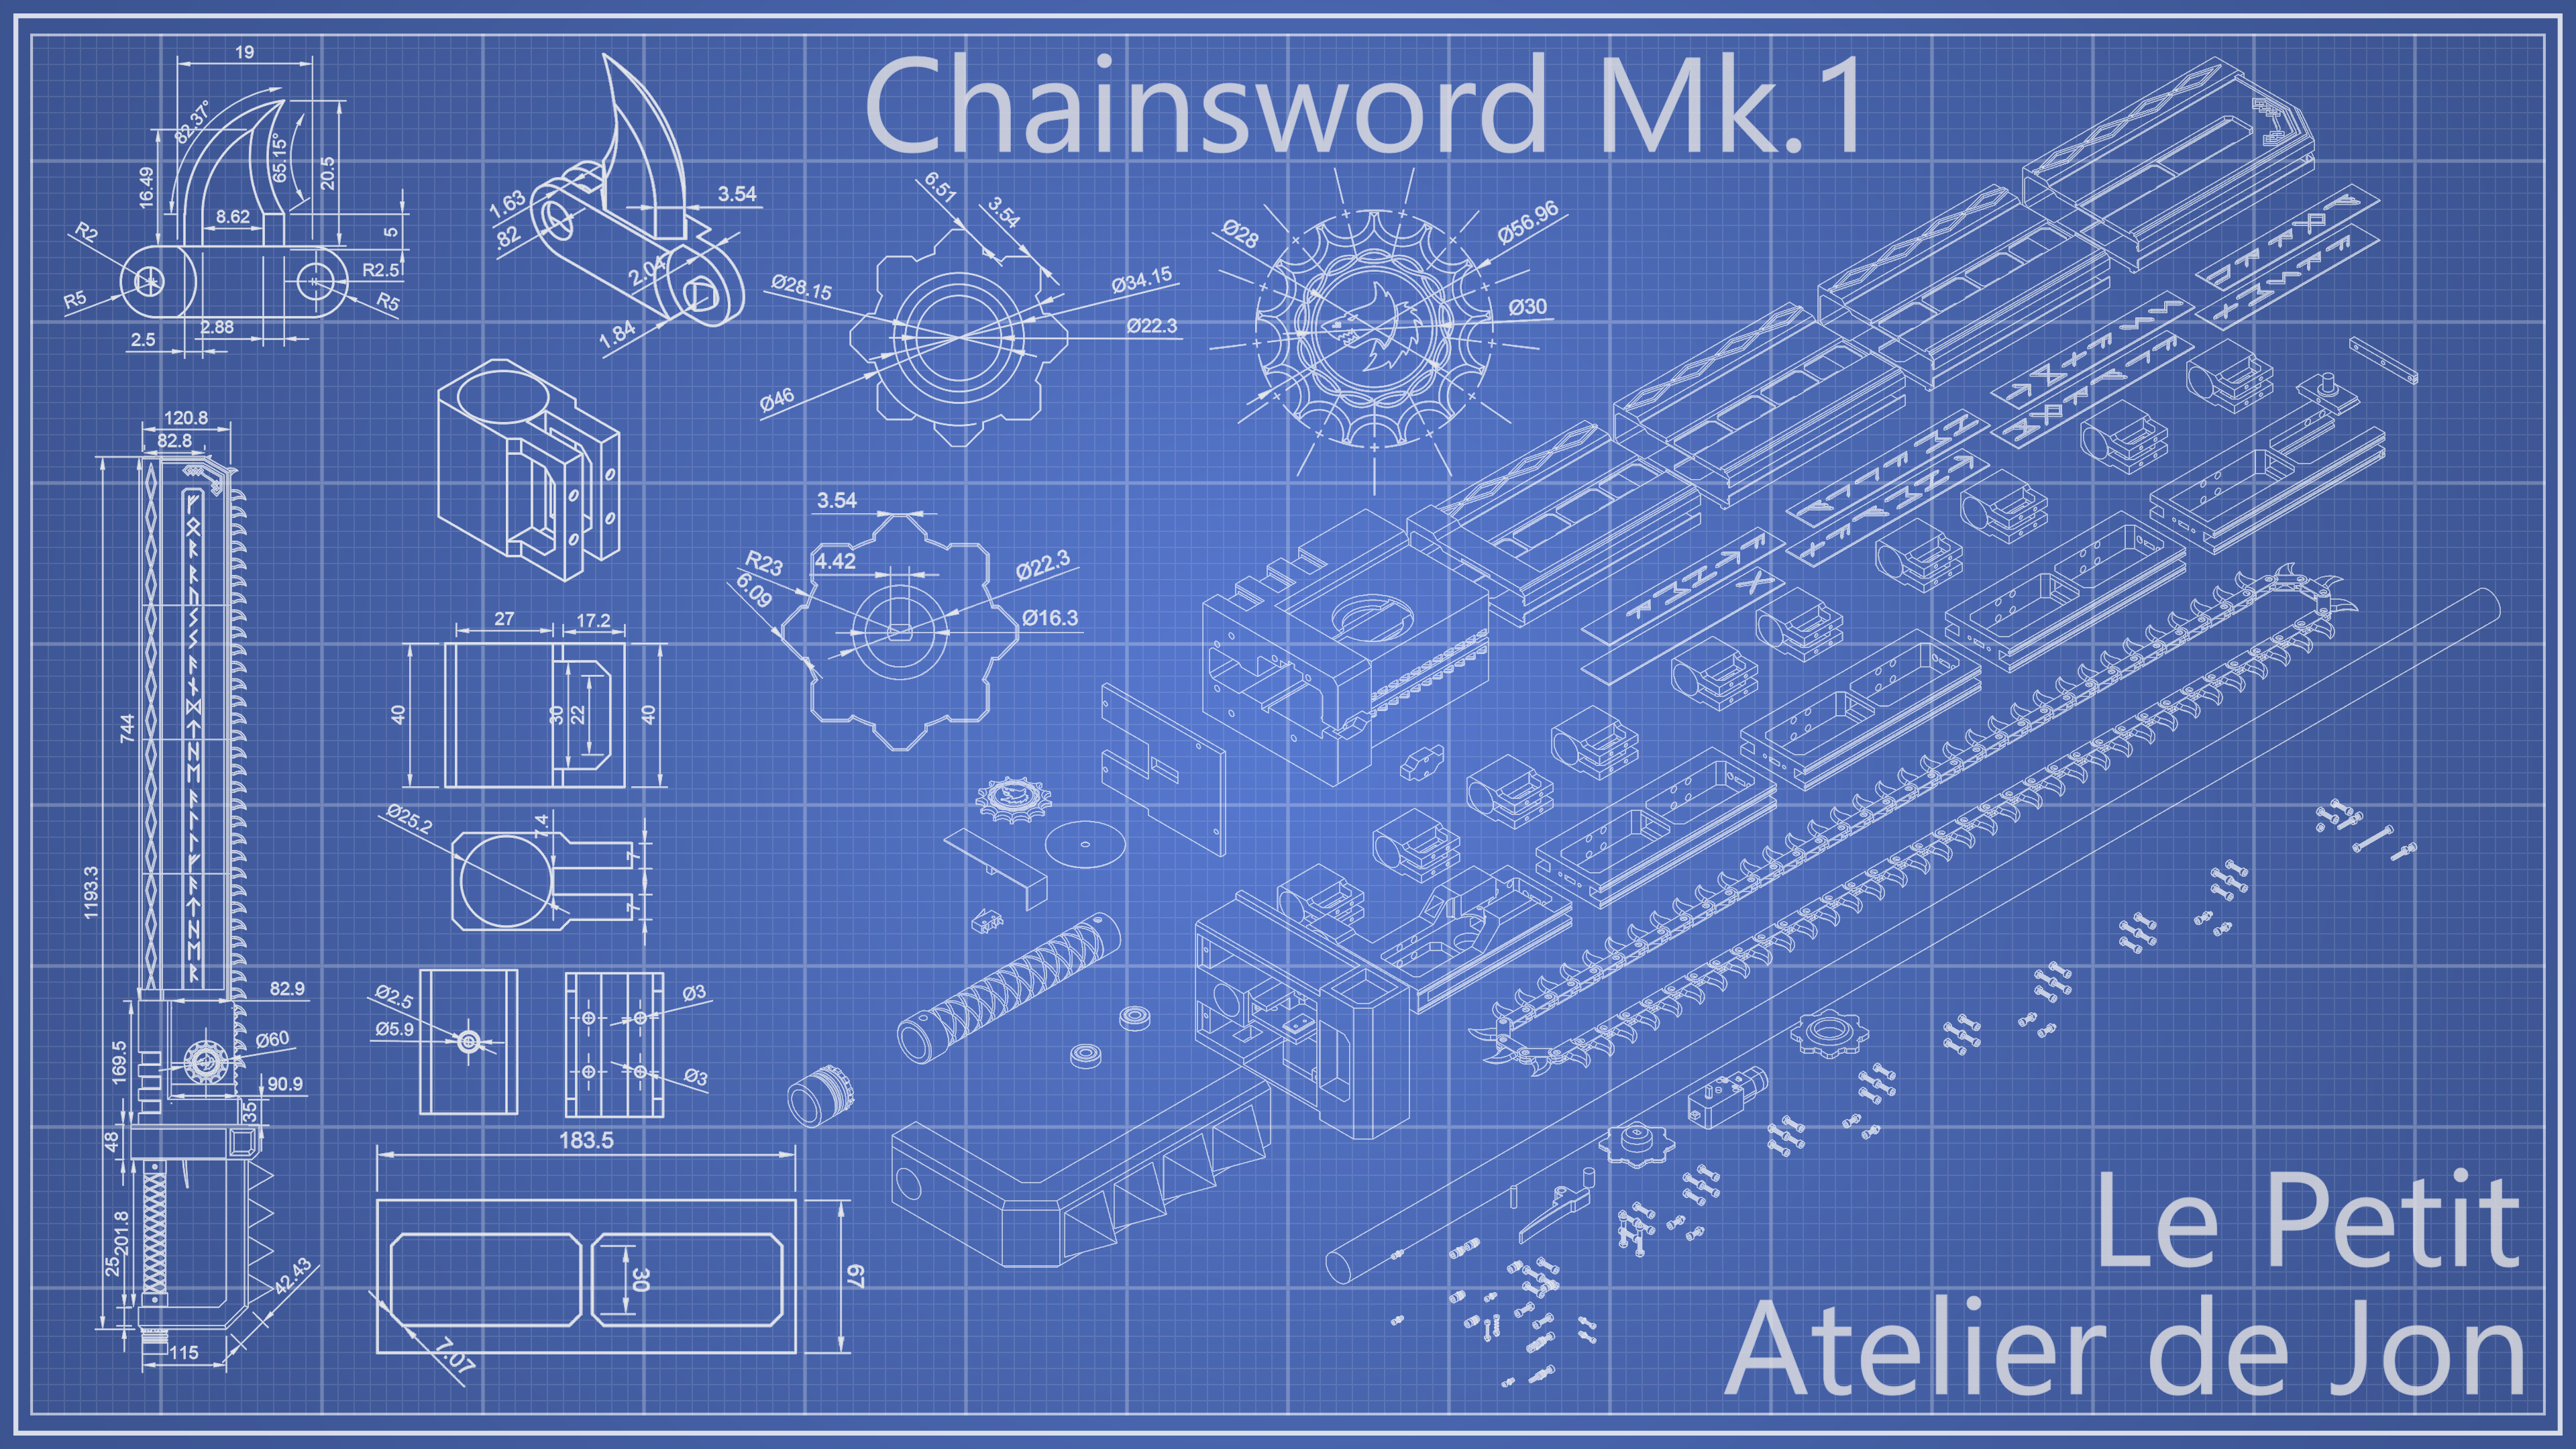
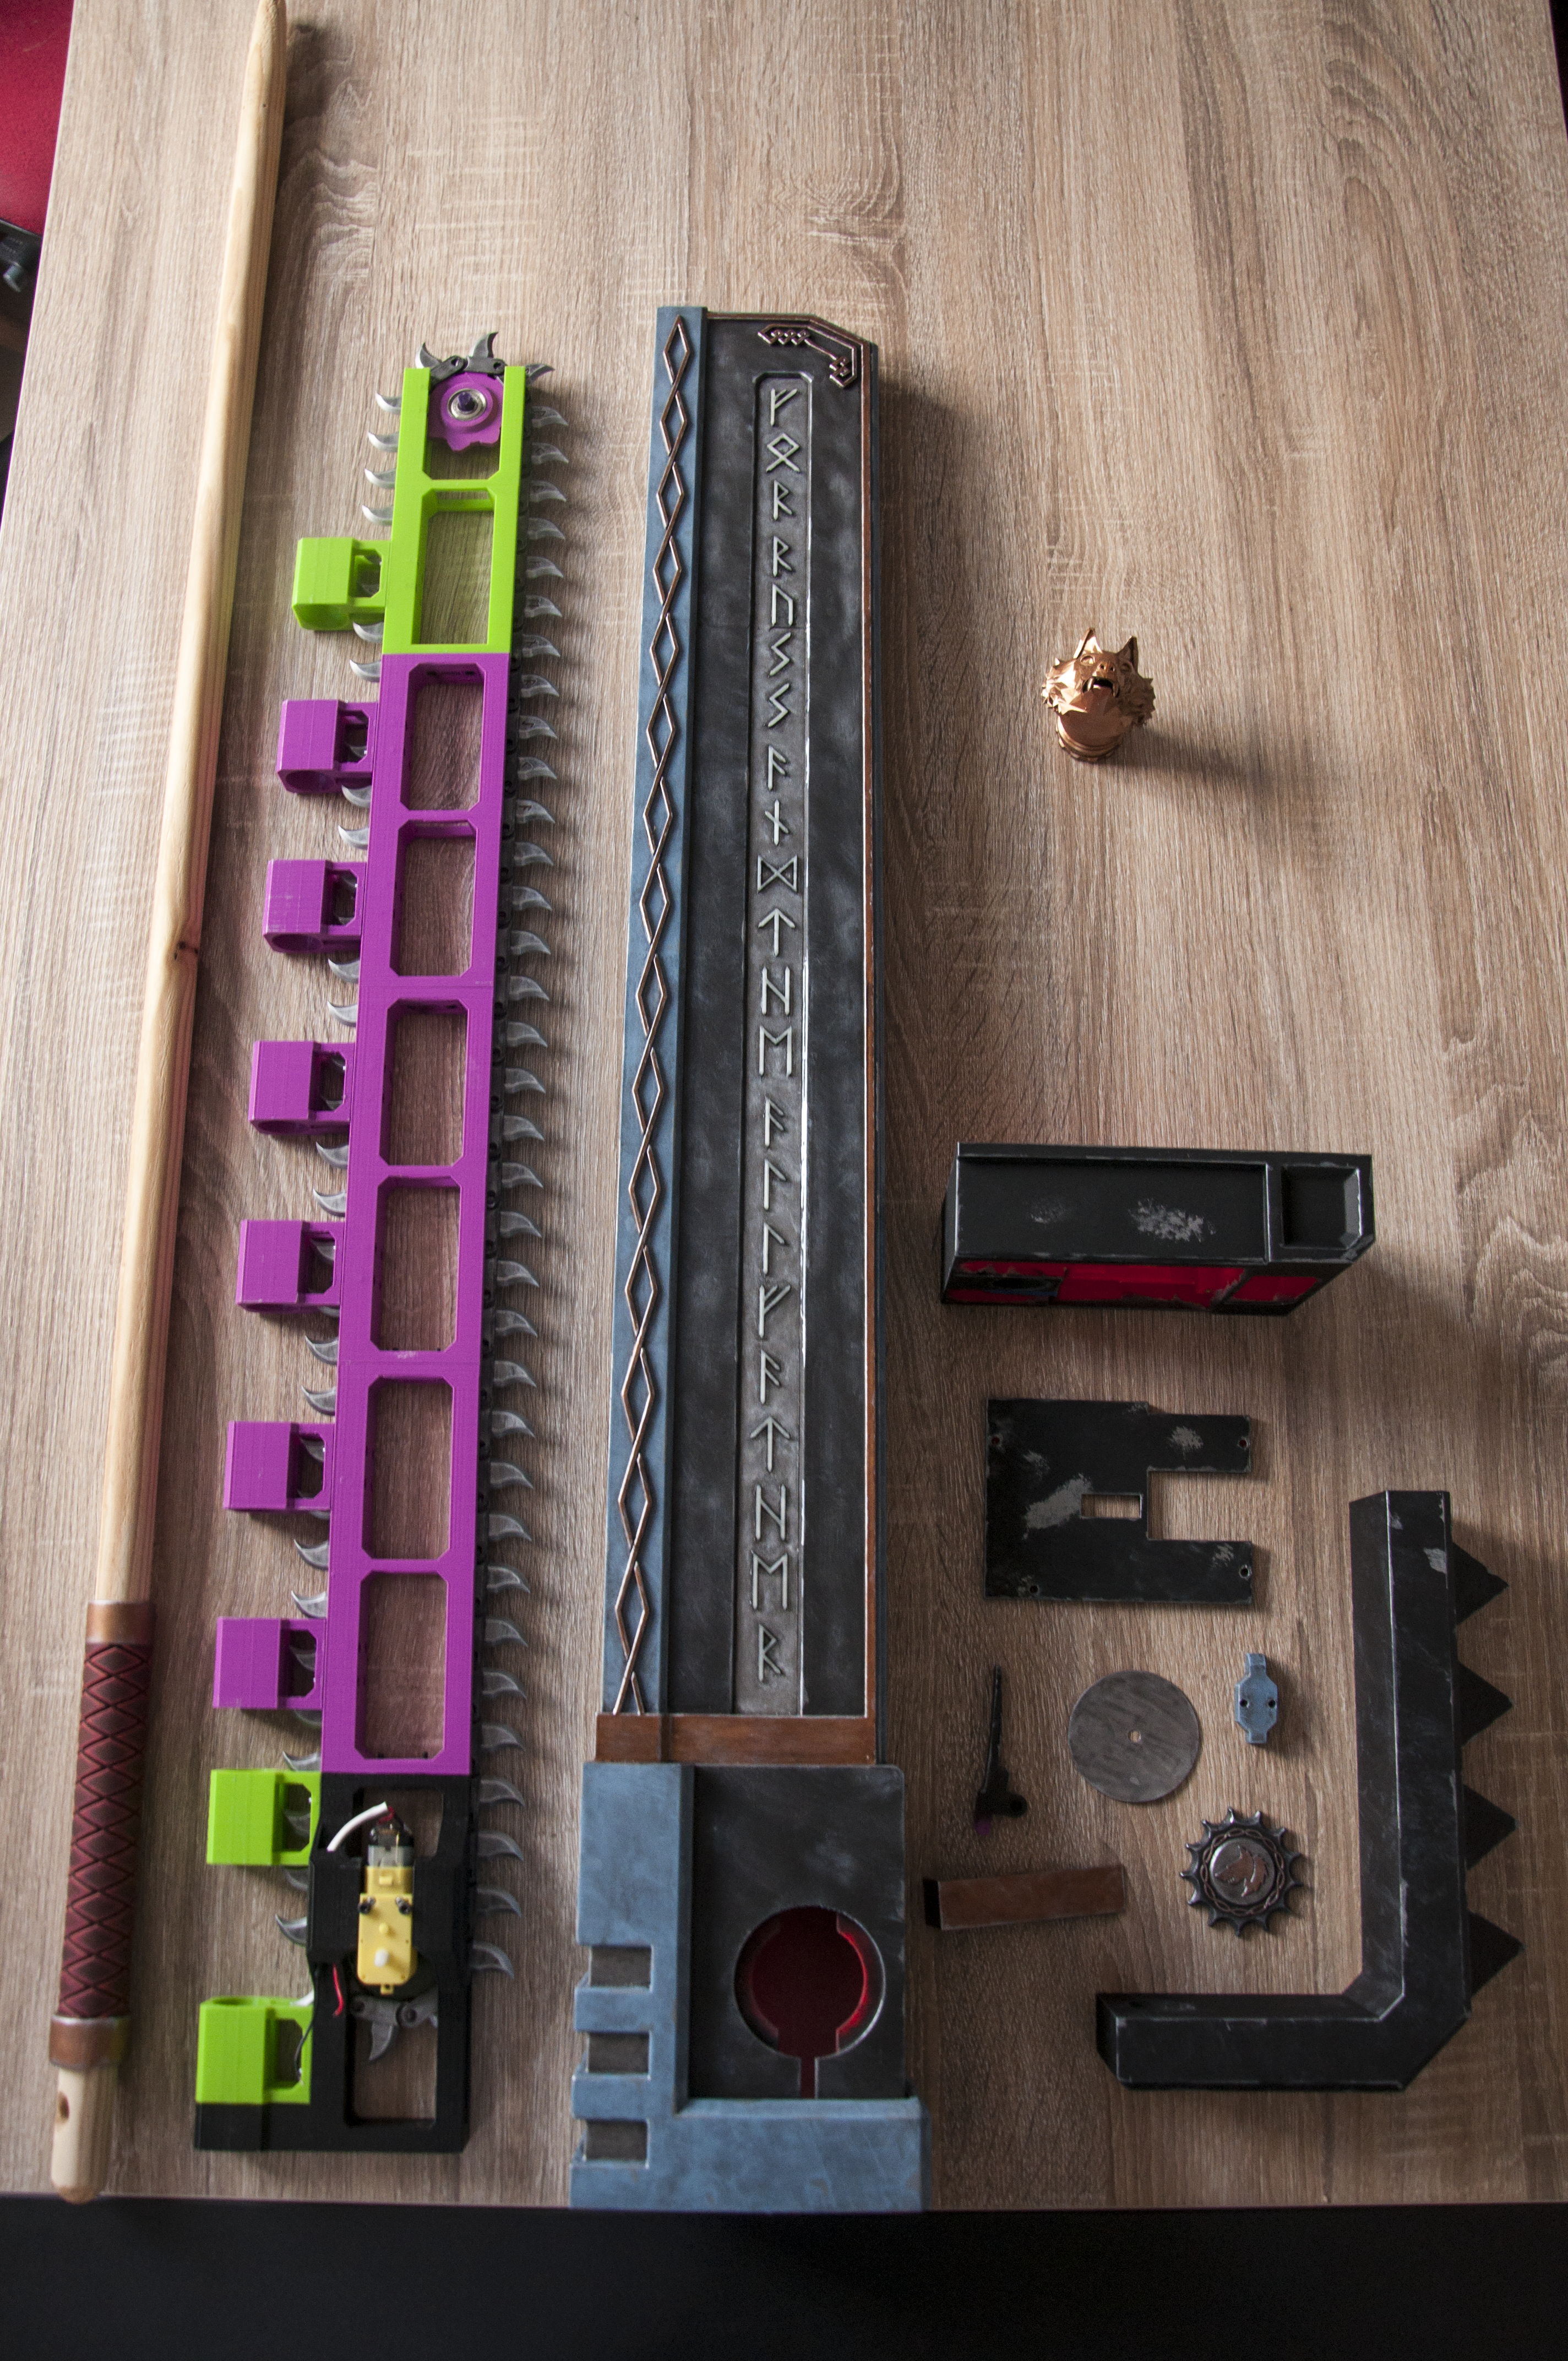
This page contains the source code and assembly instructions for a functional 3D printed chainsword. The 3d models for the chainsword can be found here.
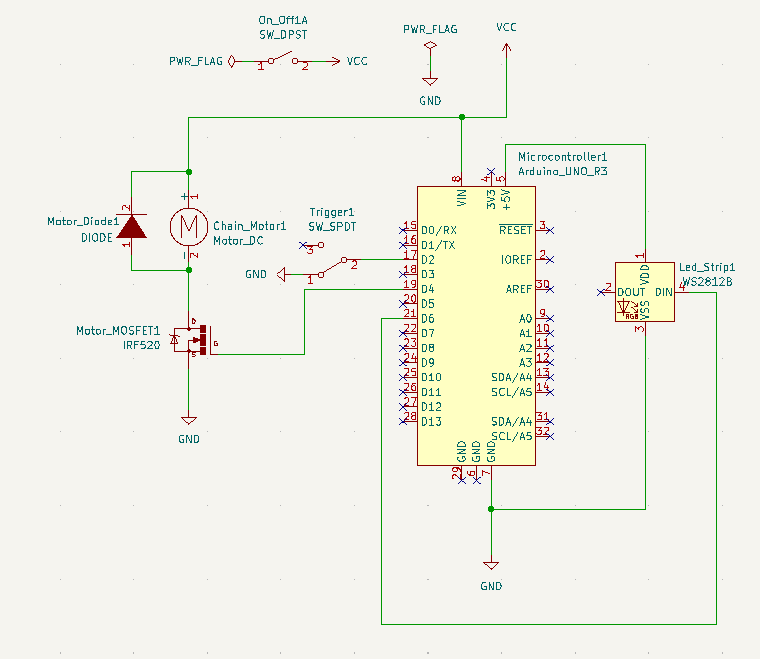
The chainsword is powered by a microcontroller driving a DC motor and a WS2812B led strip.
The source code is a PlatformIO project, to build it you should open it in an IDE supporting PlatformIO, it will handle for you the needed dependencies. In case you don't, or you can't use PlatformIO you will need the following dependencies :
The project is configured to use a A-Star 32U4 Micro microcontroller, but you can use any Arduino compatible microcontroller as long as it fits inside the cross guard.
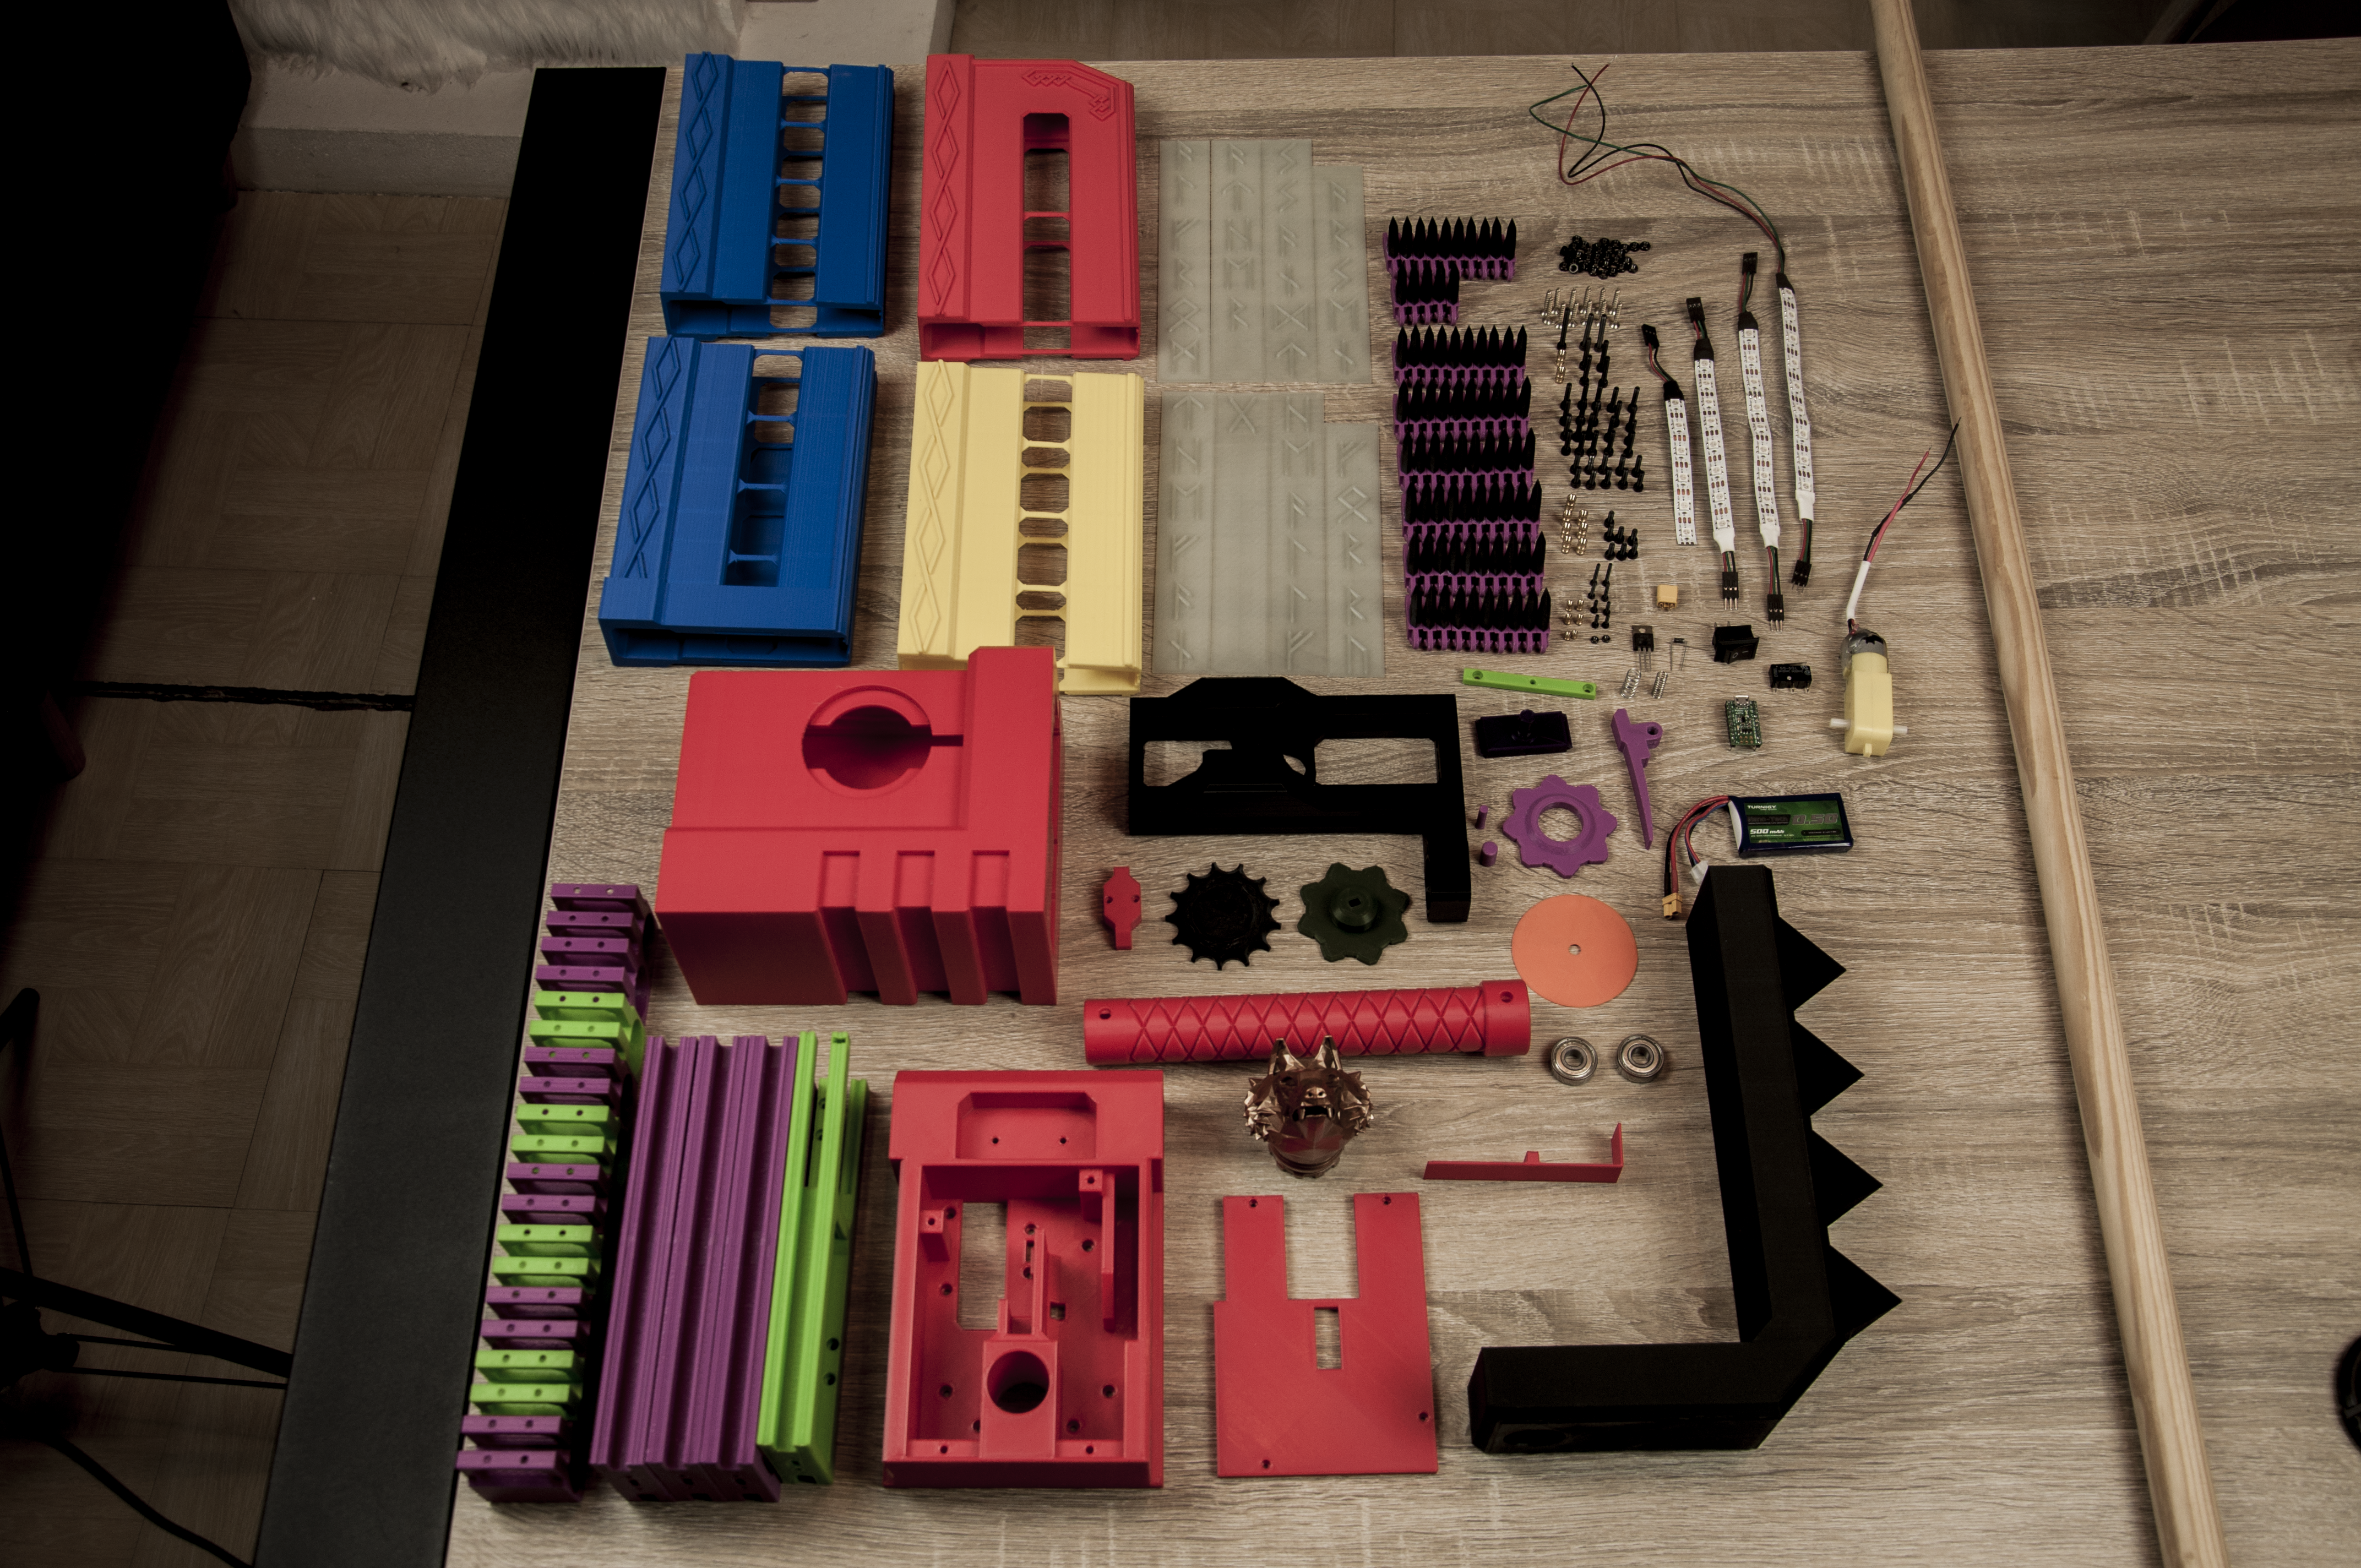
Let's build the chainsword! Let's start by taking a look at everything we're going to need before the assembly.
The chainsword is mainly made of 3D printed parts. Here is the list, sorted by printing parameters I used:
- PLA 0.2mm
- Intermediate_Structure.stl x3
- Bottom_Structure.stl x1
- Top_Structure x1
- Broom_Holder.stl x10
- Cross_Guard.stl x1
- Cross_Guard_Hatch.stl x1
- Guard.stl x1
- Handle.stl x1
- Base_Blade_Cover.stl x1
- Blade_Cover_First_Section.stl x1
- Blade_Cover_Second_Section.stl x1
- Blade_Cover_Third_Section.stl x1
- Blade_Cover_Head.stl x1
- Tooth_Base.stl x75
- PLA 0.1mm
- Top_Structure_Gear_Rail.stl x1
- Top_Structure_End.stl x1
- Top_Gear_Wheel.stl x1
- Motorized_Gear_Wheel.stl x1
- Motorized_Gear_Wheel_Axis.stl x1
- Trigger.stl x1
- Trigger_Axis.stl x1
- Display_Gear_Wheel_Cover.stl x1
- Motor_Axis_Opening_Cover.stl x1
- Base_Blade_Cover_Teeth_Opening_Cover.stl x1
- Phosphorescent PLA 0.1mm
- Blade_Cover_Head_Rune_Front.stl x1
- Blade_Cover_Head_Rune_Back.stl x1
- Blade_Cover_Third_Section_Front.stl x1
- Blade_Cover_Third_Section_Back.stl x1
- Blade_Cover_Second_Section_Front.stl x1
- Blade_Cover_Second_Section_Back.stl x1
- Blade_Cover_First_Section_Front.stl x1
- Blade_Cover_First_Section_Back.stl x1
- Resin 0.05mm
- Display_Gear_Wheel.stl x1
- Tooth_Basic_Top.stl x64
- Tooth_V_Top.stl x1
- Tooth_L_Top.stl x1
- Tooth_K_Top.stl x2
- Tooth_A_Top.stl x2
- Tooth_F_Top.stl x1
- Tooth_E_Top.stl x1
- Tooth_N_Top.stl x1
- Tooth_R_Top.stl x1
- Tooth_Y_Top.stl x1
- Pommel x1
Although the 3D parts make up most of the sword, we'll also need some hardware to assemble the sword:
- Screws
- M2x8 x4
- M2x12 x2
- M2x16 Screw x2
- M3x8 x7
- M3x12 x10
- M3x16 x40
- M3x20 x4
- M3x25 x2
- M3x40 x1
- 3x20 wood screw x12
- Nuts
- M2 x2
- M3 x55
- Threaded Insert for plastic
- M3x10x5 x9
- M2x4x3.5 x6
For the chainsword to work, we'll need electronic parts:
- GearMotor DG01D x1
- microswitch SS-5GL x1
- Pololu A-Star 32U4 Micro microcontroller x1
- WS2812B Led Strip x1 (at least 18 Leds)
- On/Off Switch x1
- Type N Mosfet (i.e. IRF520) x1
- Diode x1
- Battery 7.4v 500mah x1
Other parts are needed:
- Broom stick, around 120 cm, 25 mm diameter x1
- 608-zz ABEC bearing x2
- ~6x40mm spring x1
- ~7-20mm spring x1
Finally, we'll need tools to assemble the chainsword:
- M3 Hex Screwdriver
- M2 Hex Screwdriver
- Phillips Screwdriver
- Soldering Iron
- Solder wire
- Cyanoacrylate Glue
- Plastic Glue
- Filler Primer
- Acrylic paint (I used Citadel paint)
- Sand paper
- Hot Glue Gun
- Lubricant / Grease
- Masking Tape
- Electrical wire
Let's start the assembly of the chainsword. Each step will present the needed parts first then the sub-steps.
For the paint, let your imagination do the work.
- Tooth_Base.stl x75
- Tooth_Basic_Top.stl x64
- Tooth_V_Top.stl x1
- Tooth_L_Top.stl x1
- Tooth_K_Top.stl x2
- Tooth_A_Top.stl x2
- Tooth_F_Top.stl x1
- Tooth_E_Top.stl x1
- Tooth_N_Top.stl x1
- Tooth_R_Top.stl x1
- Tooth_Y_Top.stl x1
- Glue each Top on each Tooth_Base with Cyanoacrylate Glue.
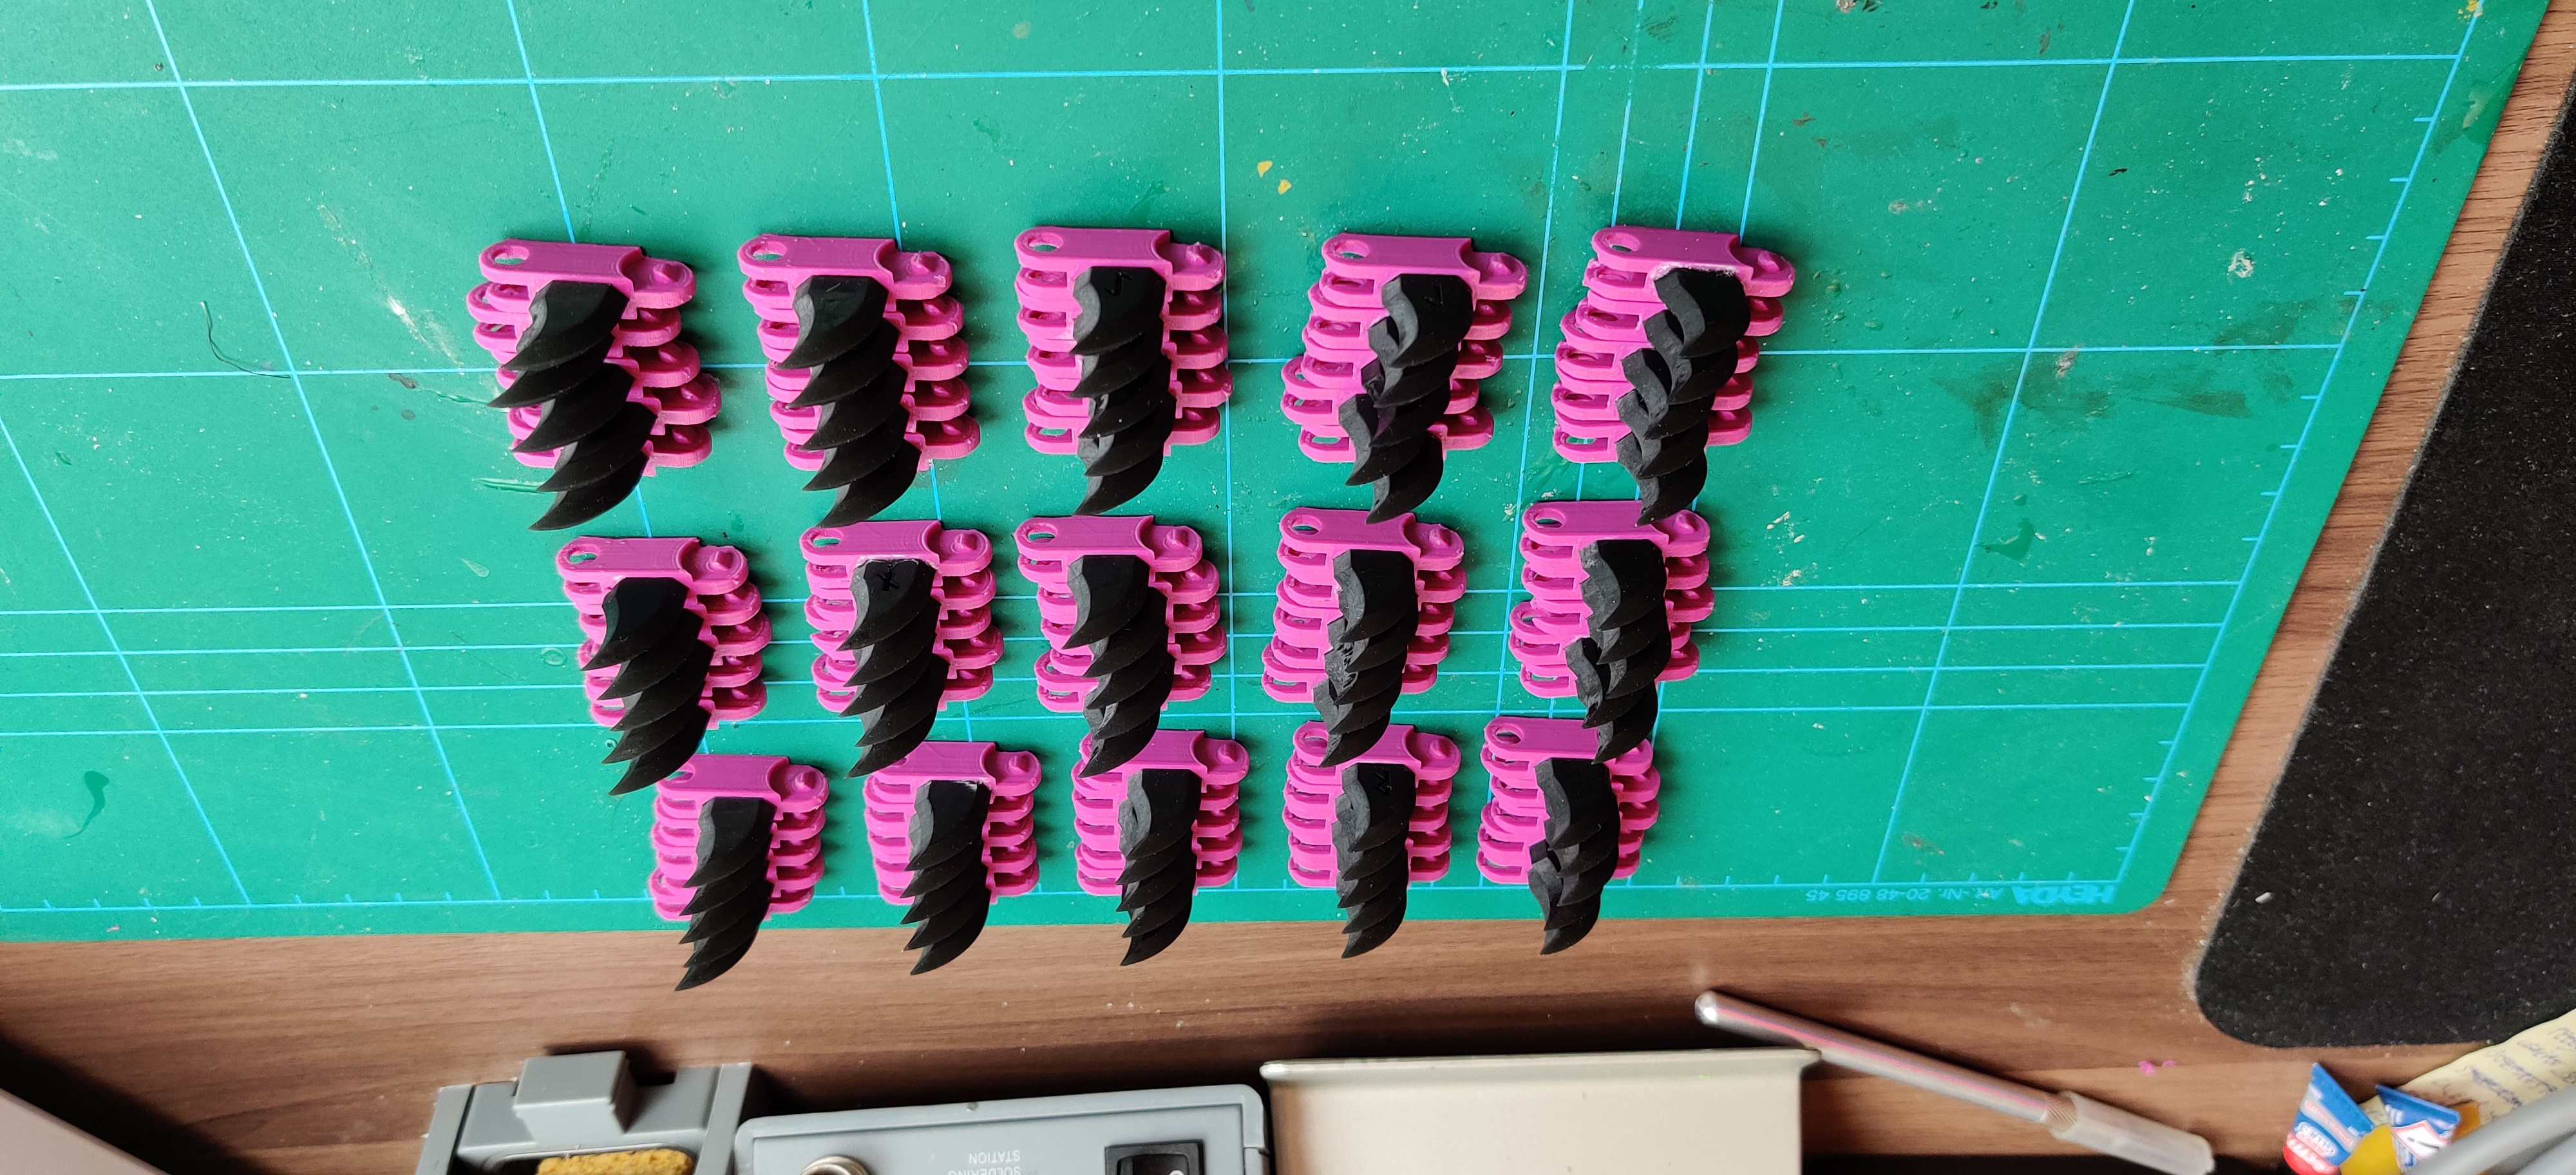
- Paint the teeth, there's no need to use filler primer here as the top is made of resin and the base is not very visible.
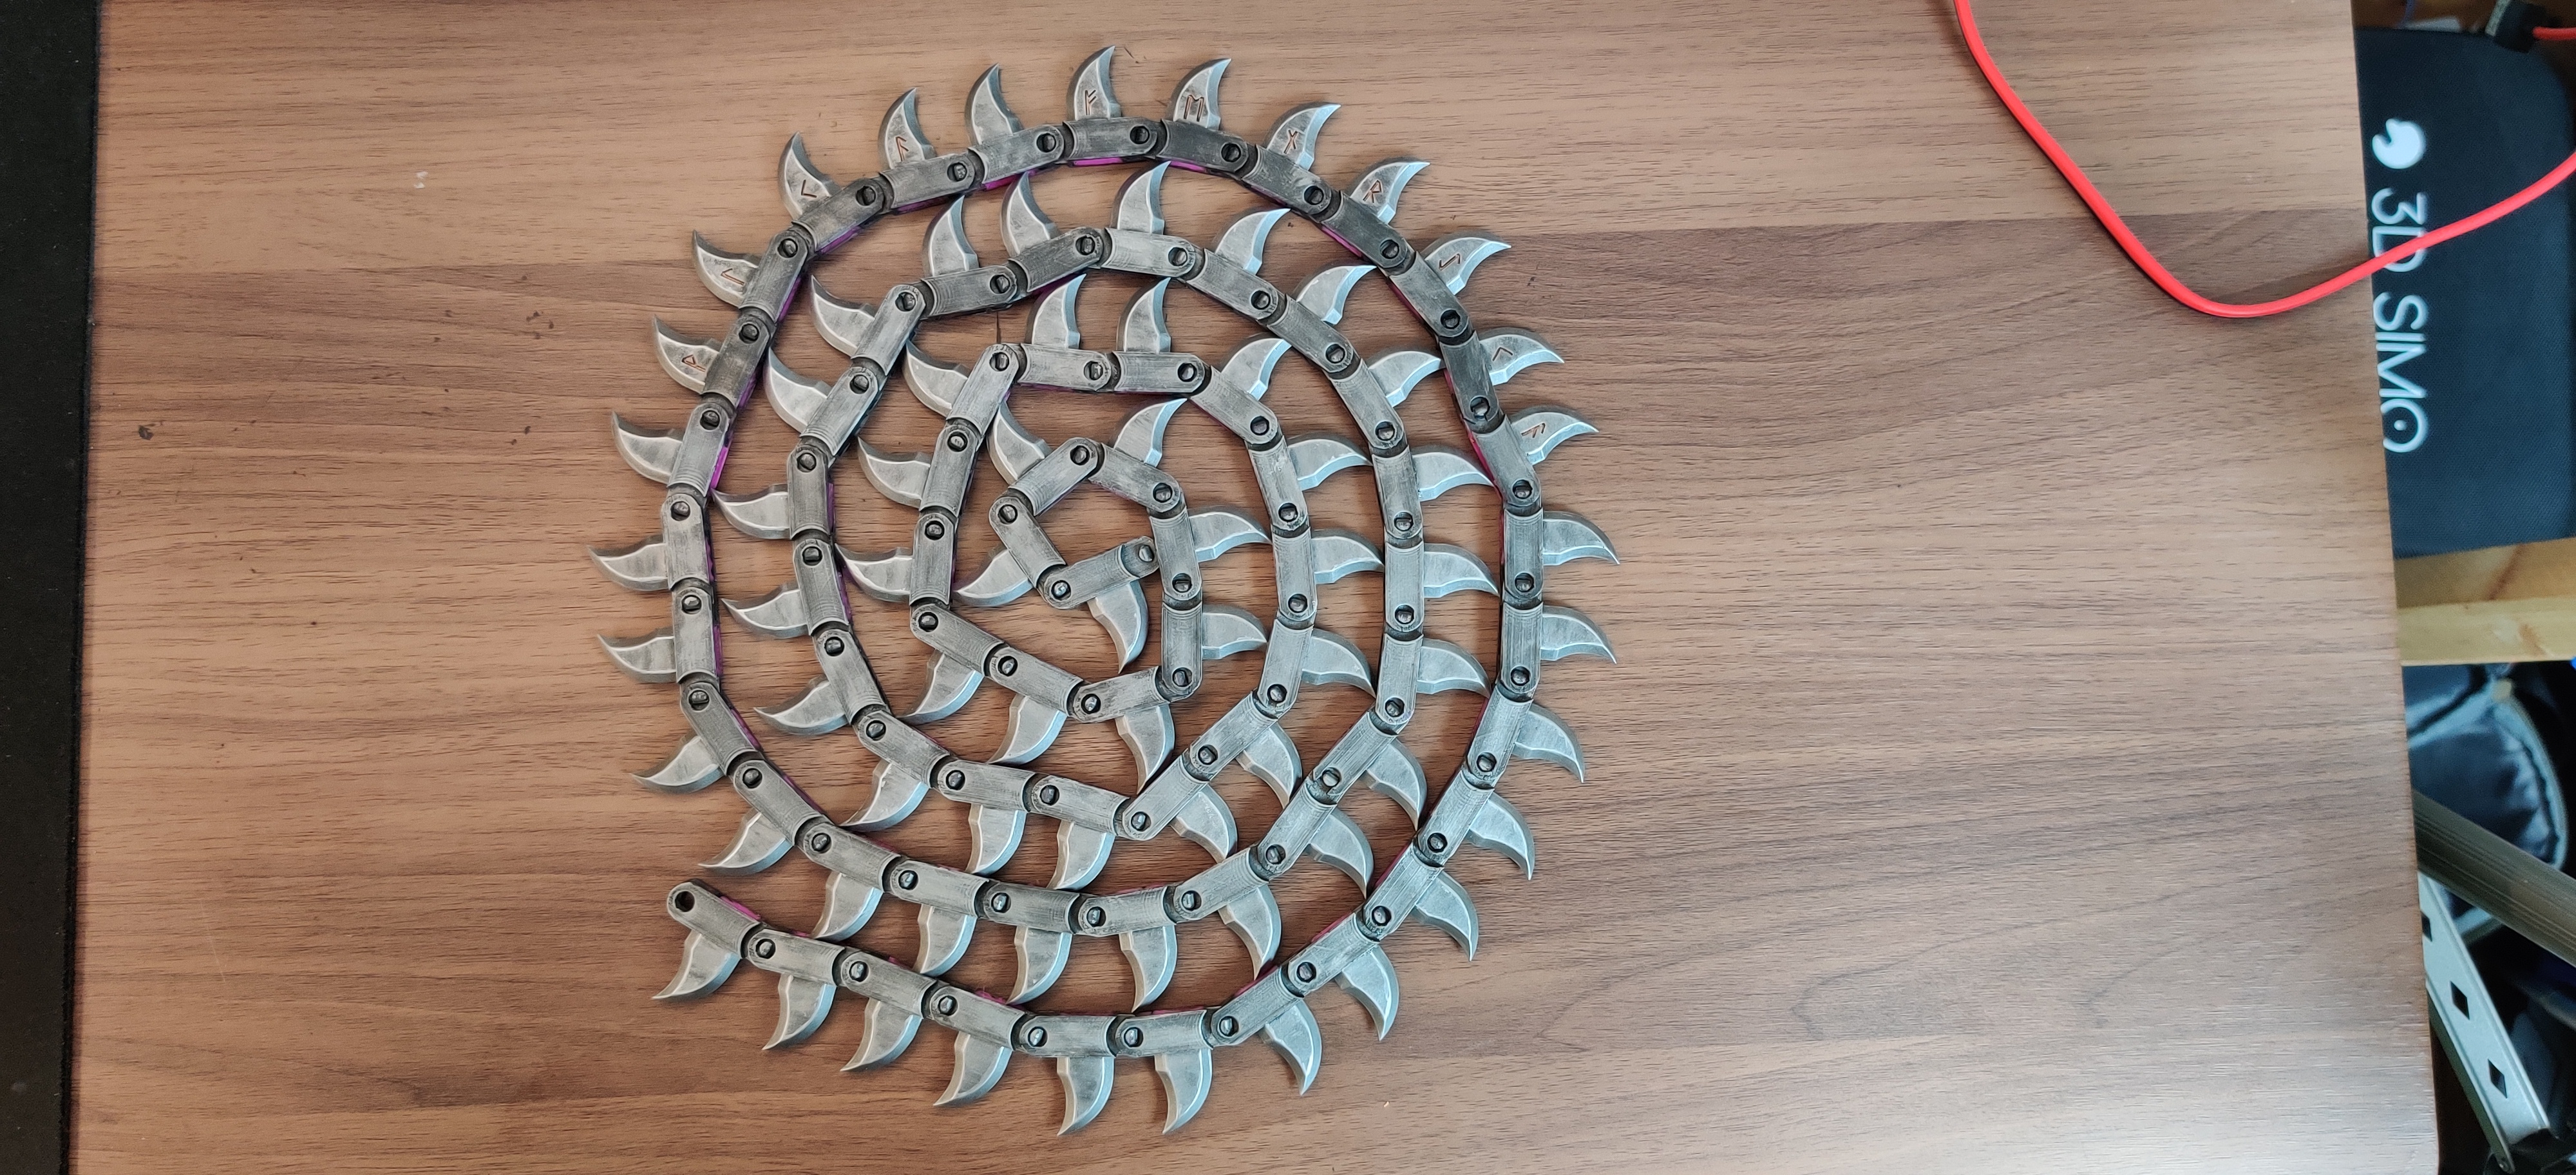
- Snap the teeth with letters to form the text VLKA FENRYKA separated by one normal tooth, as seen in the following picture.

- Snap the already formed chain with all the remaining teeth to form the final chain. Don't close it yet, keep one link open.
- Cross_Guard.stl x1
- Trigger.stl x1
- Trigger_Axis.stl x1
- microswitch SS-5GL x1
- On/Off Switch x1
- M2x4x3.5 Threaded Insert x4
- M2x16 Screw x2
- M2 Nut x2
- ~7-20mm spring x1
- Solder electrical wire to the microswitch and to the On/Off Switch.
- Use filler primer on the Cross_Guard and Trigger parts, sand them and finally paint them.
- Use a soldering iron to put the inserts on the corresponding holes on the Cross_Guard part.
- Screw the microswitch to the Cross_Guard with the M2x16 Screws and the M2 Nuts.
- Fix the Trigger to the Cross_Guard with the Trigger_Axis.
- Insert the Spring between the Trigger and the Cross_Guard.
- Insert the On/Off Switch in the remaining location inside the Cross_Guard hatch.
- Intermediate_Structure.stl x3
- Bottom_Structure.stl x1
- Top_Structure x1
- Cross_Guard.stl x1
- Broom_Holder.stl x10
- Broom stick, around 120 cm, 25 mm diameter x1
- GearMotor DG01D x1
- 608-zz ABEC bearing x2
- ~6x40mm spring x1
- Top_Structure_Gear_Rail.stl x1
- Top_Structure_End.stl x1
- Top_Gear_Wheel.stl x1
- Motorized_Gear_Wheel.stl x1
- Motorized_Gear_Wheel_Axis.stl x1
- M3x16 x40
- M3x12 x10
- M3x20 x2
- M3x25 x2
- M3x40 x1
- M3 Nuts x55
- 3x20 wood screw x10
- Chain x1
- Screw 2 Broom_Holder on each section of the structure using 4 M3x16 screws and 4 M3 nuts per holder (40 M3x16 and 40 M3 Nuts in total). N.B: 2 screws per holder should be enough.
- Insert 1 608-zz ABEC bearing into the Top_Gear_Wheel part, then put the wheel on the axis of Top_Structure_Gear_Rail. Slide the rail into the grooves on top of the Top_Structure part, then isert 1 M3 nut into the hole inside the rail.
- Insert 2 M3 Nuts into the holes on the side of the Top_Structure part then screw the Top_Structure_End with 2 M3x20 screws. Insert the M3x40 screw into the hole on the middle of Top_Structure_End then slide the Spring on it before screwing it to the Top_Structure_Gear_Rail. This part will be used to adjust the tension of the chain.
- Insert the Gear Motor on the location provided on the Bottom_Structure part and secure it with 2 M3x25 screws and 2 M3 nuts. Optional : you can solder the diode in parallel with the motor now, it will prevent any back-voltage generated by the motor from going back into the circuit. Or you can do it later with the other electronics.
- Fix the Motorized_Gear_Wheel to the Gear Motor, then glue the Motorized_Gear_Wheel_Axis to the Motorized_Gear_Wheel and insert the last 608-zz ABEC bearing on the location provided on the Bottom_Structure in such a way that the Motorized_Gear_Wheel_Axis is inside the bearing.
- Screw together the Bottom_Structure, the 3 Intermediate_Structure and the Top_Structure using 2 M3x12 Screws and 2 M3 Nuts for each section (8 M3x12 and 8 M3 Nuts in total).
- Screw together the structure and the Cross_Guard.stl part with 2 M3x12 screws and 2 M3 Nuts.
- Insert the Broom Stick into the holes along the structure and secure it with 10 3x20 wood screws.
- Put lubricant or grease on the chain and the slots along the structure then slide the chain on the structure and close it by snapping the last link. Adjust the chain tension by tightening or loosening the screw fixed on the Top_Structure_Gear_Rail. You can test if the chain rotate correctly by hand or by powering the motor to check the tension.
- Structure
- Guard.stl x1
- Handle.stl x1
- M3x20 x2
- M3x10x5 x2
- 3x20 wood screw x2
- Use filler primer on the Handle and Guard parts, sand them and finally paint them.
- Use a soldering iron to put the inserts on the appropriate holes on the Guard part.
- Put the Handle on the broom stick which exceeds from the structure, then screw it with 2 3x20 wood screws.
- Put the Guard on the broom stick and into the hole of the Cross_Guard and screw it using 2 M3x20 screws.
- Base_Blade_Cover.stl x1
- Blade_Cover_First_Section.stl x1
- Blade_Cover_Second_Section.stl x1
- Blade_Cover_Third_Section.stl x1
- Blade_Cover_Head.stl x1
- Blade_Cover_Head_Rune_Front.stl x1
- Blade_Cover_Head_Rune_Back.stl x1
- Blade_Cover_Third_Section_Front.stl x1
- Blade_Cover_Third_Section_Back.stl x1
- Blade_Cover_Second_Section_Front.stl x1
- Blade_Cover_Second_Section_Back.stl x1
- Blade_Cover_First_Section_Front.stl x1
- Blade_Cover_First_Section_Back.stl x1
- M2x4x3.5 insert x2
- M3x10x5 insert x7
- For each section, insert the corresponding runes part, all front on the same side, and all back on the other side :
- Blade_Cover_First_Section : Blade_Cover_First_Section_Front & Blade_Cover_First_Section_Back.
- Blade_Cover_Second_Section : Blade_Cover_Second_Section_Front & Blade_Cover_Second_Section_Back.
- Blade_Cover_Third_Section : Blade_Cover_Third_Section_Front & Blade_Cover_Third_Section_Back.
- Blade_Cover_Head : Blade_Cover_Head_Rune_Front & Blade_Cover_Head_Rune_Back.
- Use a soldering iron to put the M3x10x5 Inserts and the M2x4x3.5 on the appropriate holes on the Base_Blade_Cover part.
- The blade cover assembly is a bit tricky : first slide the Blade_Cover_Third_Section.stl then the Blade_Cover_Head.stl over the structure. Glue the together with plastic glue or cyanoacrylate. Once the glue is dry, remove the cover from the structure. Do the same by sliding Blade_Cover_Second_Section.stl then previous assembly. Keep going with Blade_Cover_Third_Section.stl and Base_Blade_Cover.stl. Take the oppotunity to glue the runes.
- Once the glue is dry, remove the blade cover from the structure.
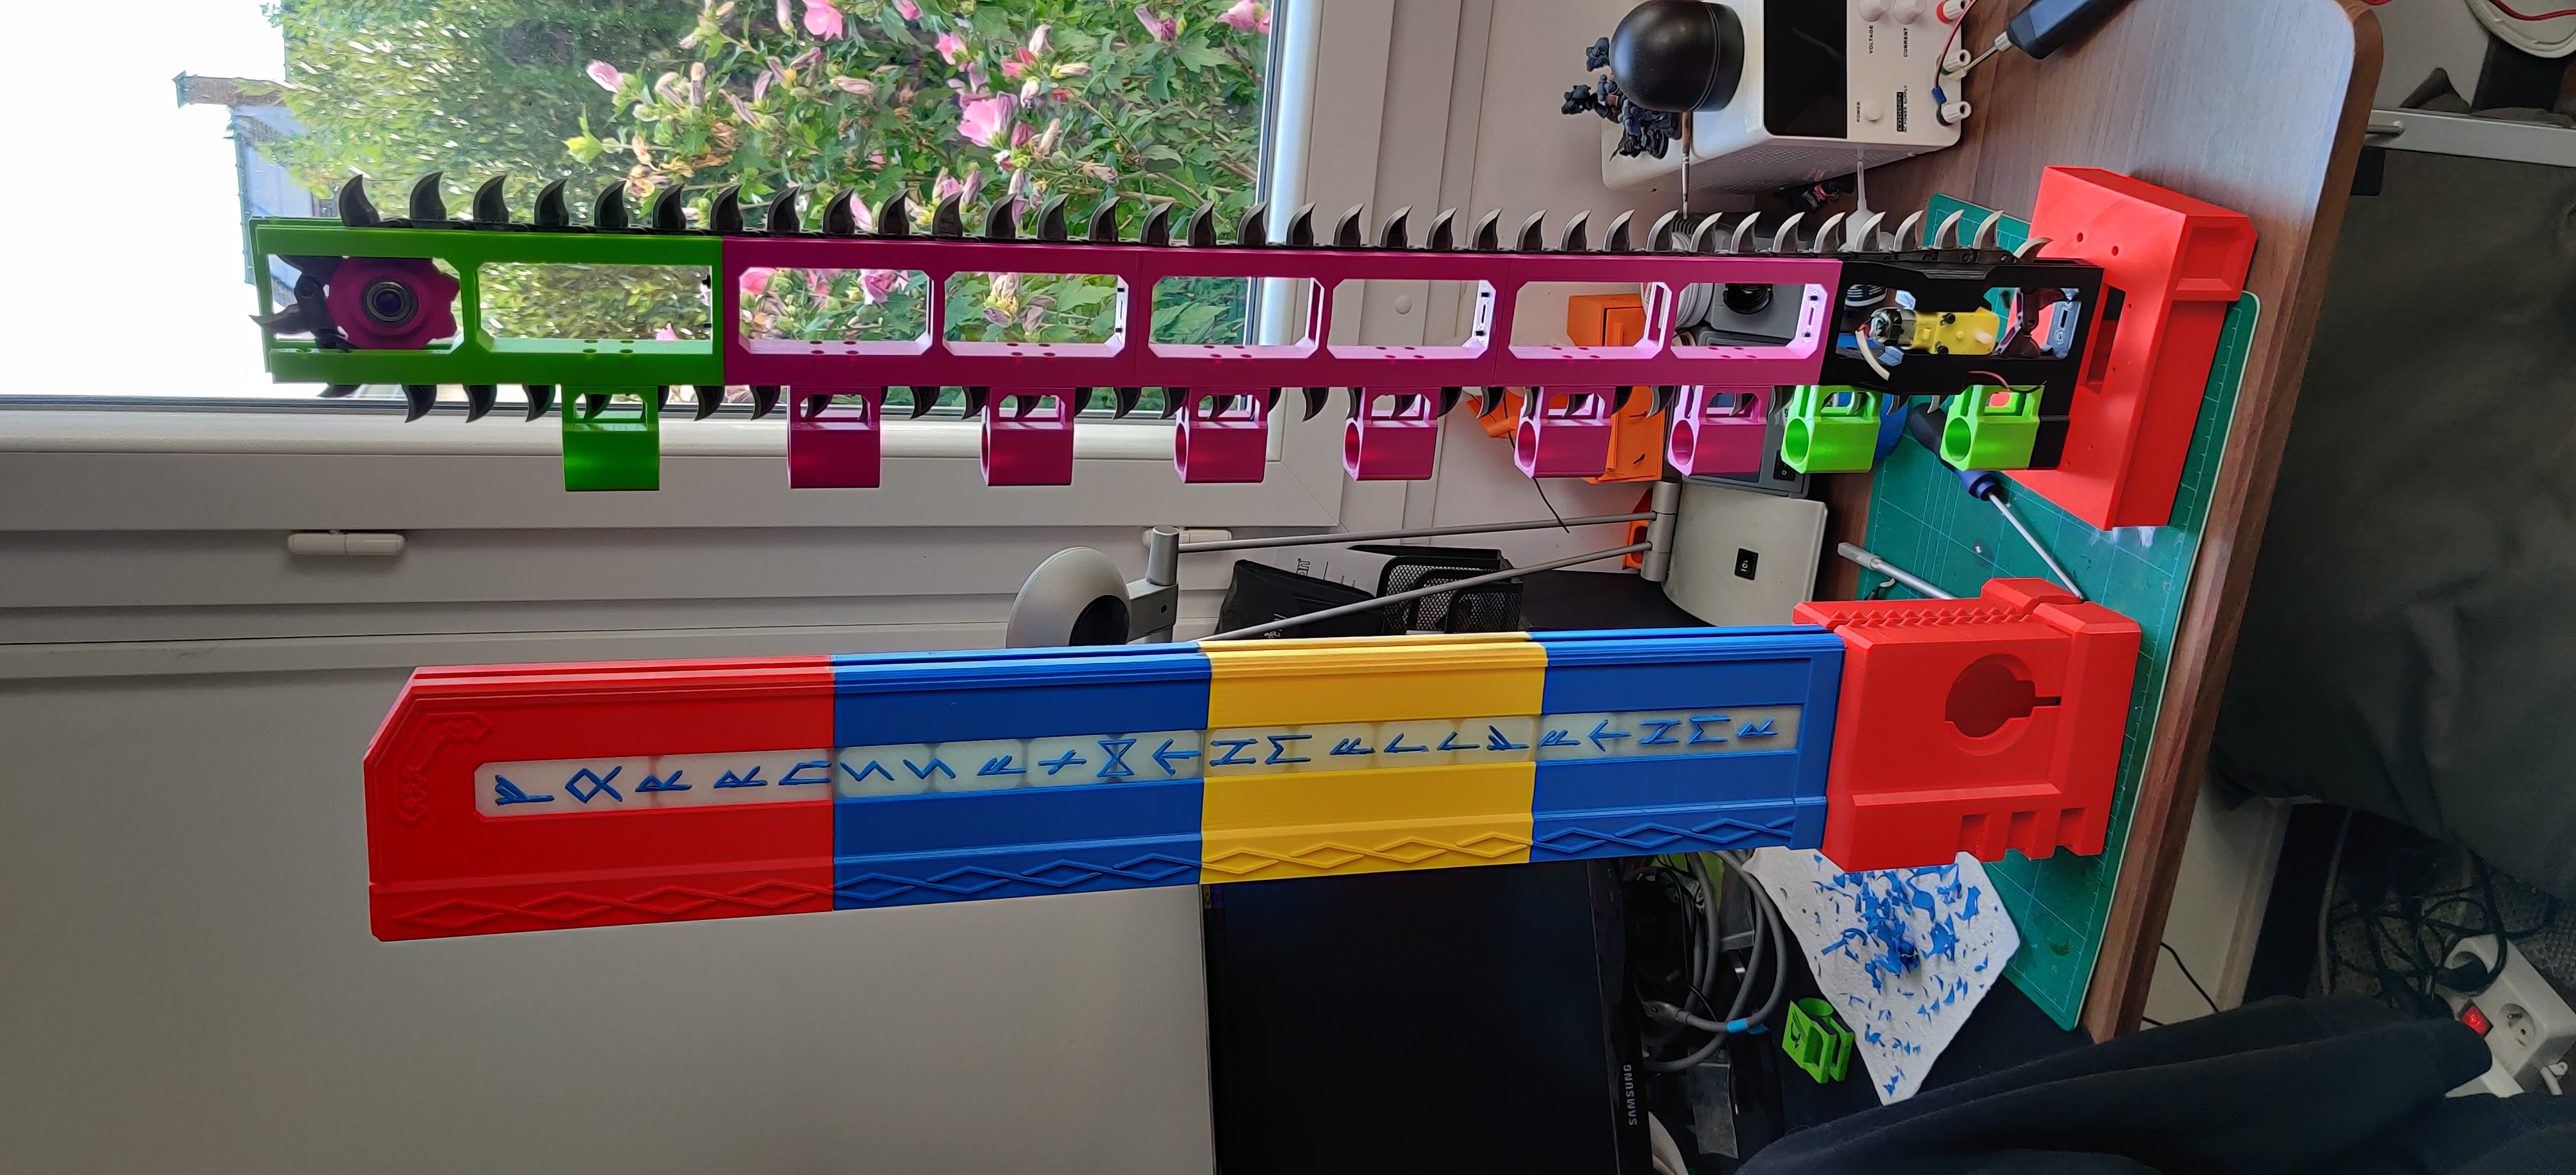
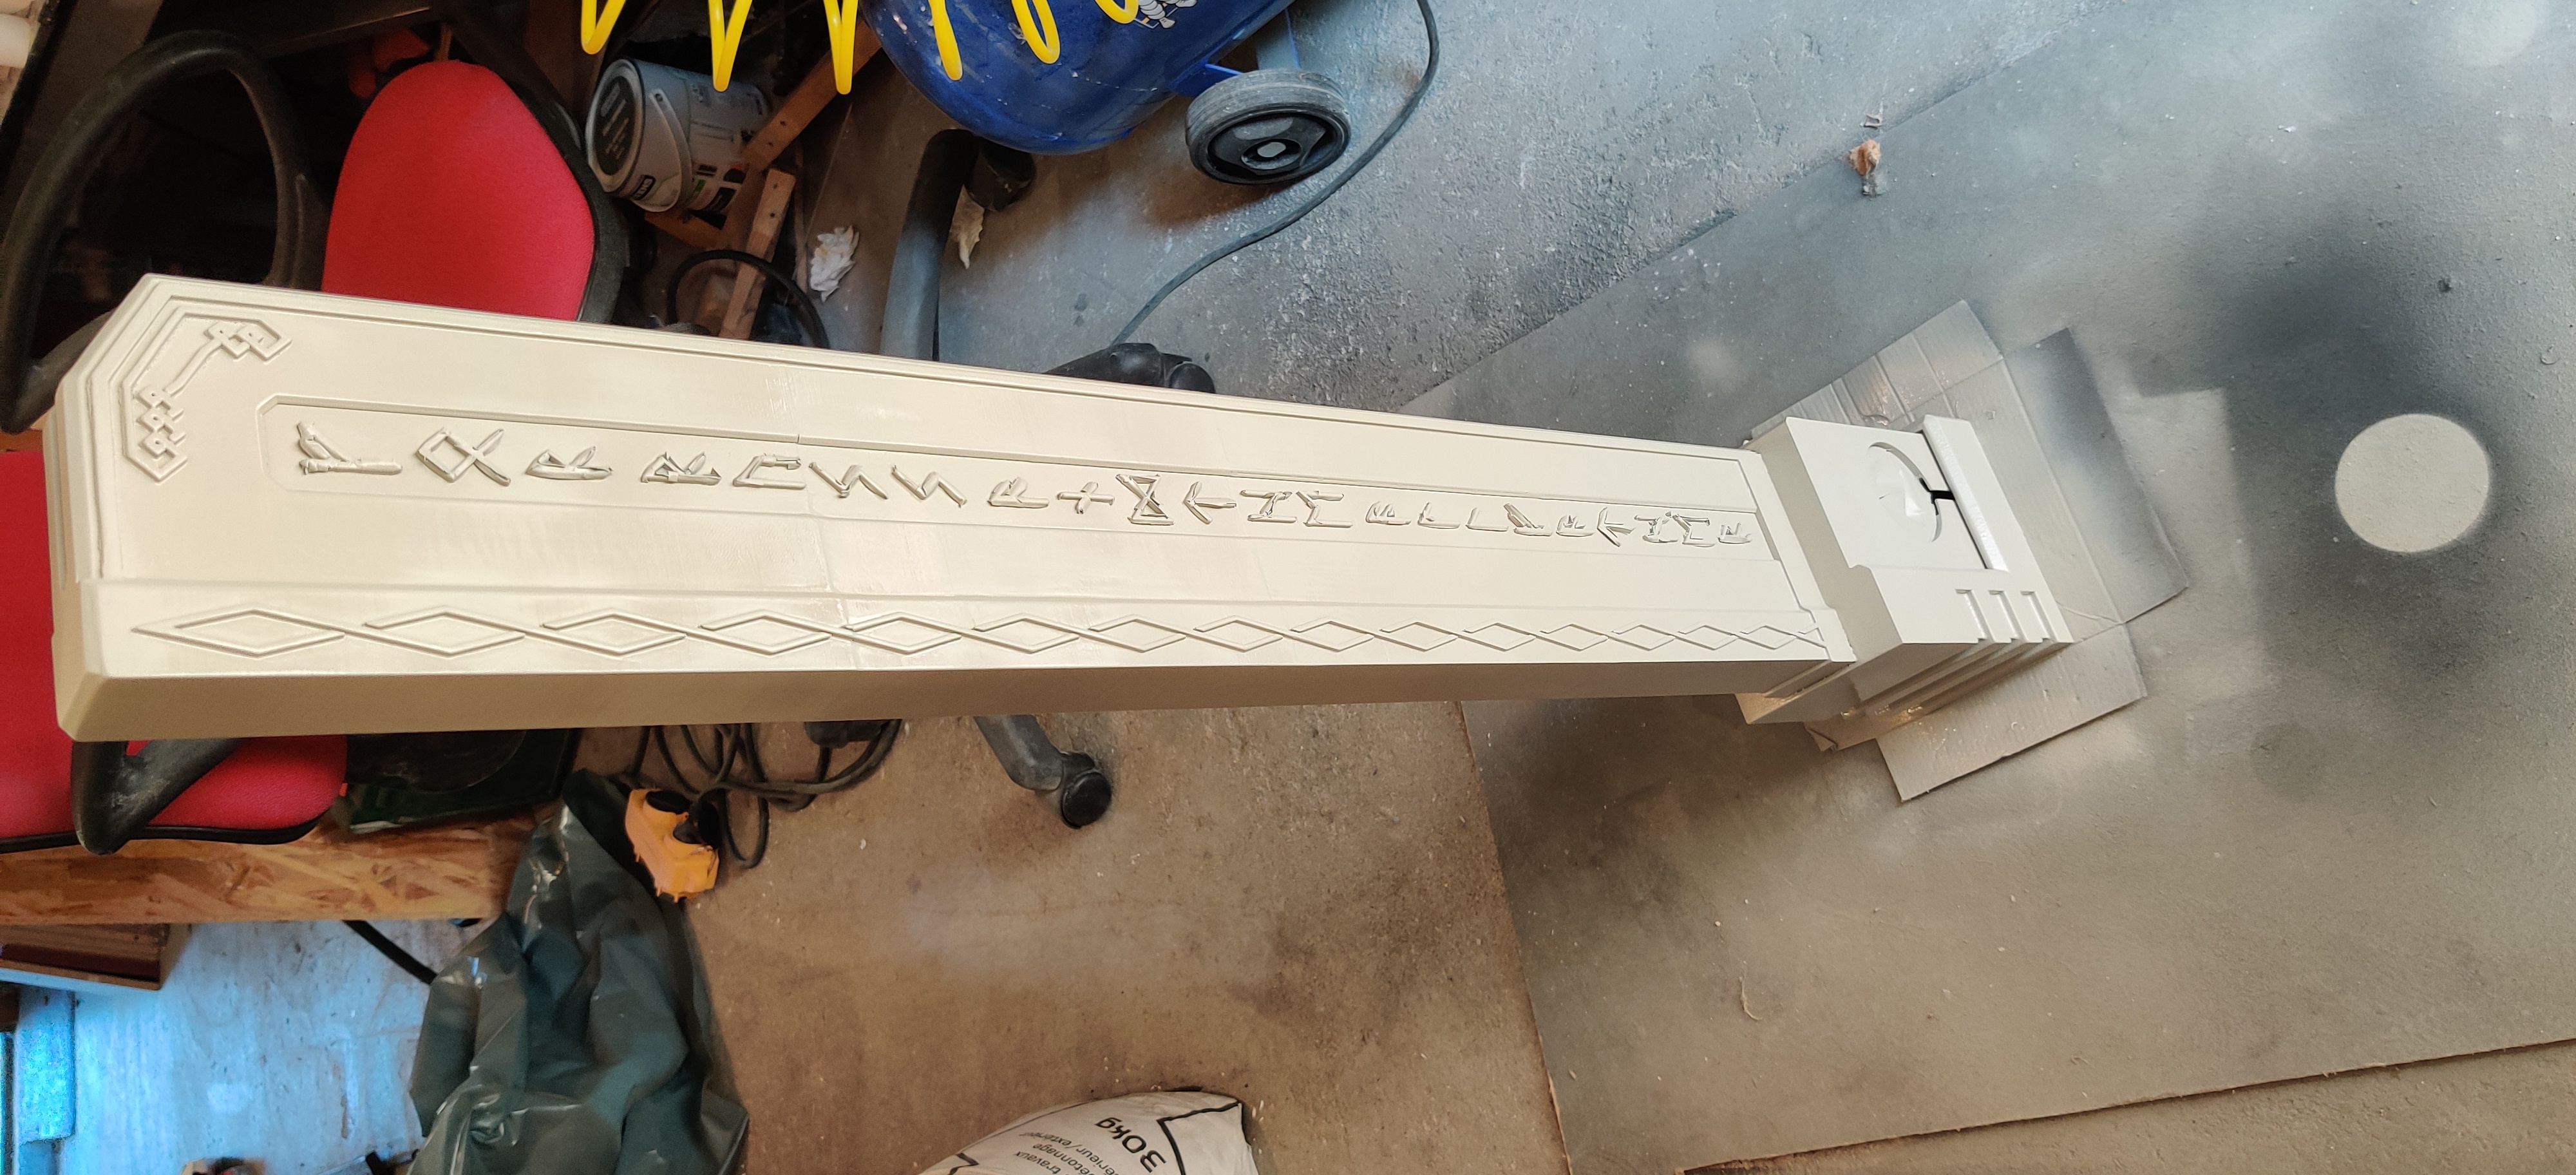
- Put masking tape over the runes then prime and paint the blade cover. Once the paint is dry, remove the masking tape.
- GearMotor DG01D x1
- microswitch SS-5GL x1
- Pololu A-Star 32U4 Micro microcontroller x1
- On/Off Switch x1
- Type N Mosfet (i.e. IRF520) x1
- diode x1
- Battery 7.4v 500mah x1
- WS2812B Led Strip x1 (at least 18 Leds)
- Use the following circuit diagram to make the electronics for the project.
- Flash the source code on the microcontroller.
- Glue the Led Strip along the structure. You can split the strip in 4 parts in order to fit the size of each section.
- Cross_Guard_Hatch.stl x1
- Display_Gear_Wheel.stl x1
- Display_Gear_Wheel_Cover.stl x1
- Motor_Axis_Opening_Cover.stl x1
- Base_Blade_Cover_Teeth_Opening_Cover.stl x1
- Blade Cover
- Blade Structure
- Pommel x1
- M2x8 x4
- M2x12 x2
- M3x8 x7
- Prime and paint the remaining parts (Cross_Guard_Hatch.stl, Display_Gear_Wheel.stl, Display_Gear_Wheel_Cover.stl, Motor_Axis_Opening_Cover.stl and Base_Blade_Cover_Teeth_Opening_Cover.stl).
- Put the blade cover over the blade structure and screw it with 7 M3x8 screws.
- Put the Display_Gear_Wheel_Cover.stl over the motor opening then put the the Display_Gear_Wheel.stl on the motor axis and insert the Motor_Axis_Opening_Cover.stl into the Base_Blade_Cover.stl location.
- Screw the Base_Blade_Cover_Teeth_Opening_Cover.stl with the 2 M2x12 screws.
- Put in place the Cross_Guard_Hatch.stl then secure it with 4 M2x8 screws.
- Finally, glue the Pommel with the hot glue gun.
You now have a working chainsword.
Enjoy.
