RU: Это инструкция для создание статической линковки(сборки) для QT 5.9 - 5.15, с помощью данной инструкции вы сможете делать portable версии своих проектов.
EN: This is an instruction for creating a static link (assembly) for QT 5.9 - 5.15, using this instruction you can make portable versions of your projects.
- Online installer(https://www.qt.io/download-qt-installer?hsCtaTracking=99d9dd4f-5681-48d2-b096-470725510d34%7C074ddad0-fdef-4e53-8aa8-5e8a876d6ab4)
- Visual Studio 2017 или 2019(https://visualstudio.microsoft.com/ru/downloads/)
- Исходники Qt
- Active Perl последней версии
- Python 2.7+
- Скачиваем QT Online Installer(https://www.qt.io/download-qt-installer?hsCtaTracking=99d9dd4f-5681-48d2-b096-470725510d34%7C074ddad0-fdef-4e53-8aa8-5e8a876d6ab4):
- Запускаем и путём нажатия "Далее" попадаем на это окно(изображение ниже)(смотрим на установленные галочки)(Версия qt 5.9-5.15):
-
Устанавливаем с стандартными настройками Perl и Python
-
Открываем x64 Native Tools Command Prompt for VS 2019
-
Переходим в директорию с установленным QT (в моём случае это D:\QT\5.12.2\
Если на диске C:
cd C:\QT\5.12.2\
Если на диске D:
cd /d D:\QT\5.12.2\
5.1 Создаем папку для сборки
mkdir build
cd build-
Запускаем конфигурационный скрипт
<Путь до исходников Qt>\configure.bat -debug-and-release -static -static-runtime -opensource -confirm-license -platform win32-msvc -qt-zlib -qt-libpng -qt-libjpeg -nomake examples -nomake tests -no-opengl -skip qtscript -prefix "<Путь куда будет собираться статическая версия>"
<Путь до исходников Qt>- как правило находится в папке с установленным QT, в моём случае: D:\QT\5.12.2\Src<Путь куда будет собираться статическая версия>- в моём случае это папка с установленным Qt D:\QT\5.12.2\MSCV-Static
D:\QT\5.12.2\Src\configure.bat -debug-and-release -static -static-runtime -opensource -confirm-license -platform win32-msvc -qt-zlib -qt-libpng -qt-libjpeg -nomake examples -nomake tests -no-opengl -skip qtscript -prefix "D:\QT\5.12.2\MSCV-Static"
Ключи:
skip <module>- исключает из процесса сборки отдельный подмодульnomake examples- исключает из процесса сборки примеры программnomake tests- исключает из процесса сборки тестыplatform <platform>- определяет платформу, для которой будет собран Qt, в данном случае Windows с MSVCno-opengl- не использовать OpenGL для отрисовки интерфейсаqt-zlib,qt-libpng,qt-libjpeg- использовать библиотекиzlib,libpng,libjpegпоставляемые вместе с Qtopensource- использовать open source вариант Qtconfirm-license- автоматически принять лицензию Qtdebug-and-release,release,debug- варианты сборокstatic,static-runtime- включить статическую компоновку Qt и runtimeprefix <prefix>- путь до папки, в которую будут скопированы откомпилированные файлы Qt
-
Запускаем сборку Qt (займет достаточно много времени)
nmake
-
Устанавливаем Qt
nmake install
-
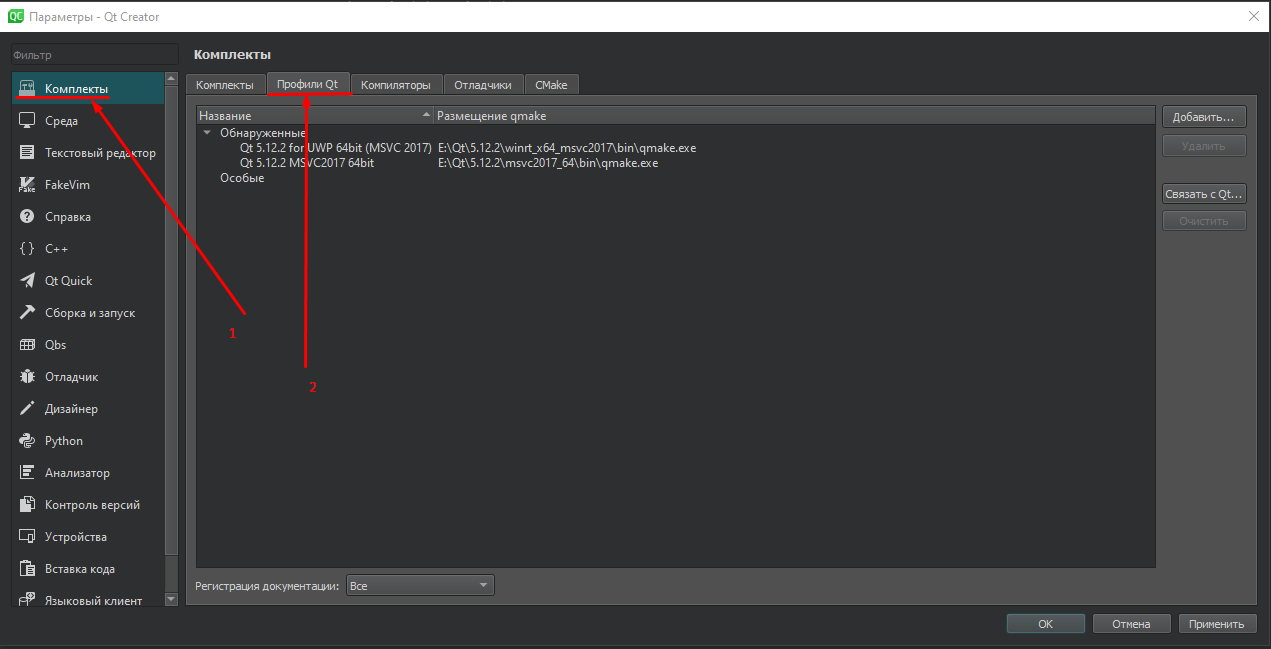
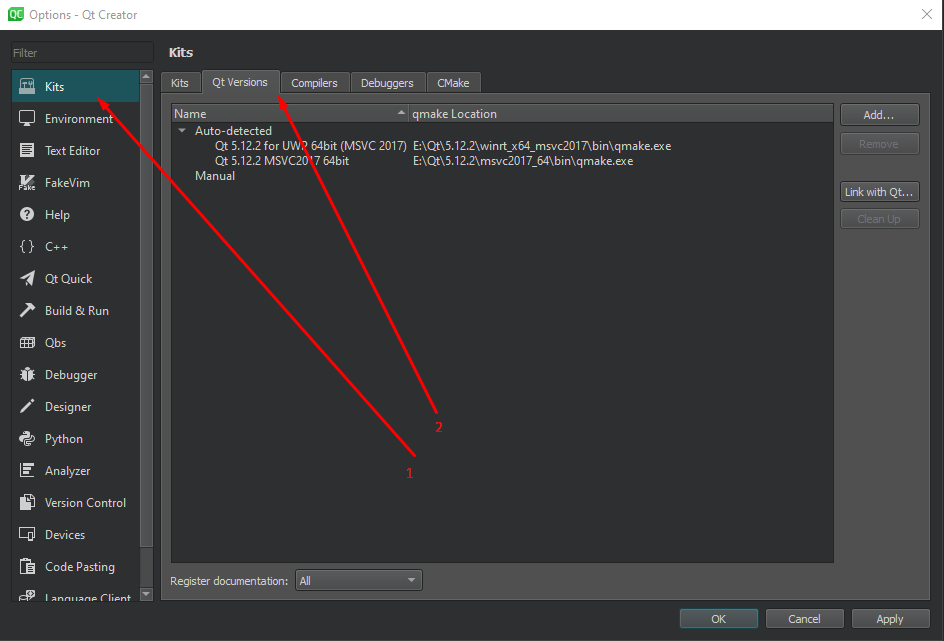
Открываем «Параметры», выбираем «Комплекты» и переходим на вкладку «Профили Qt»
-
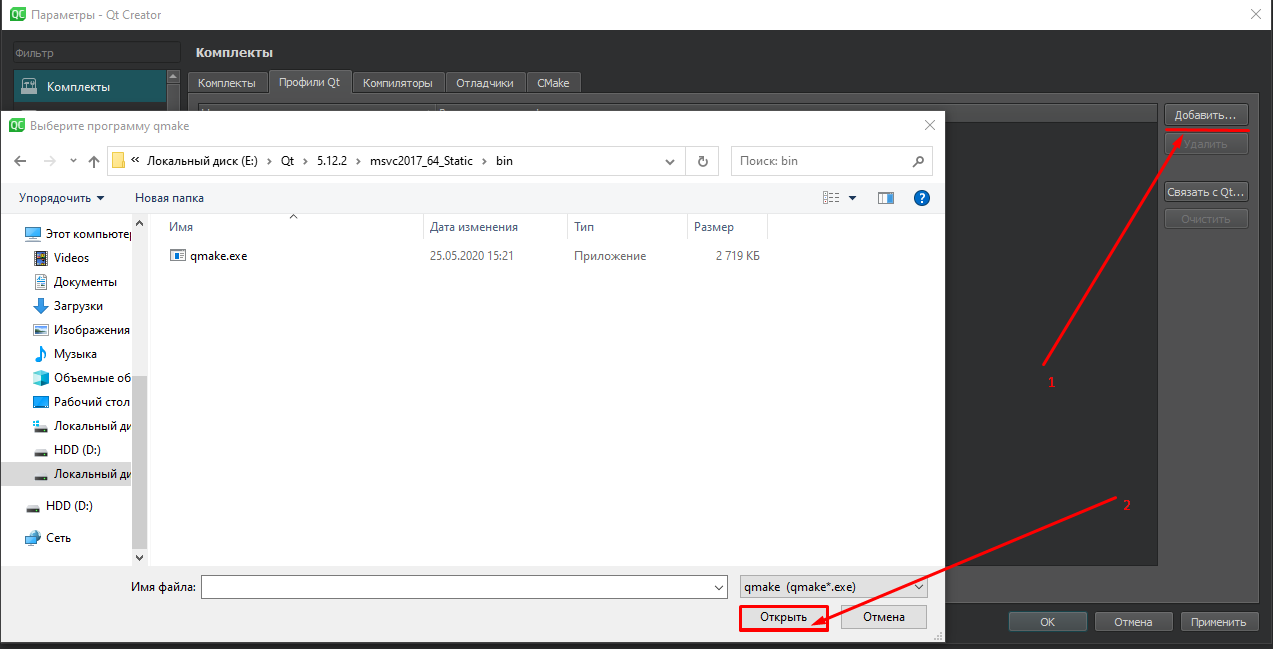
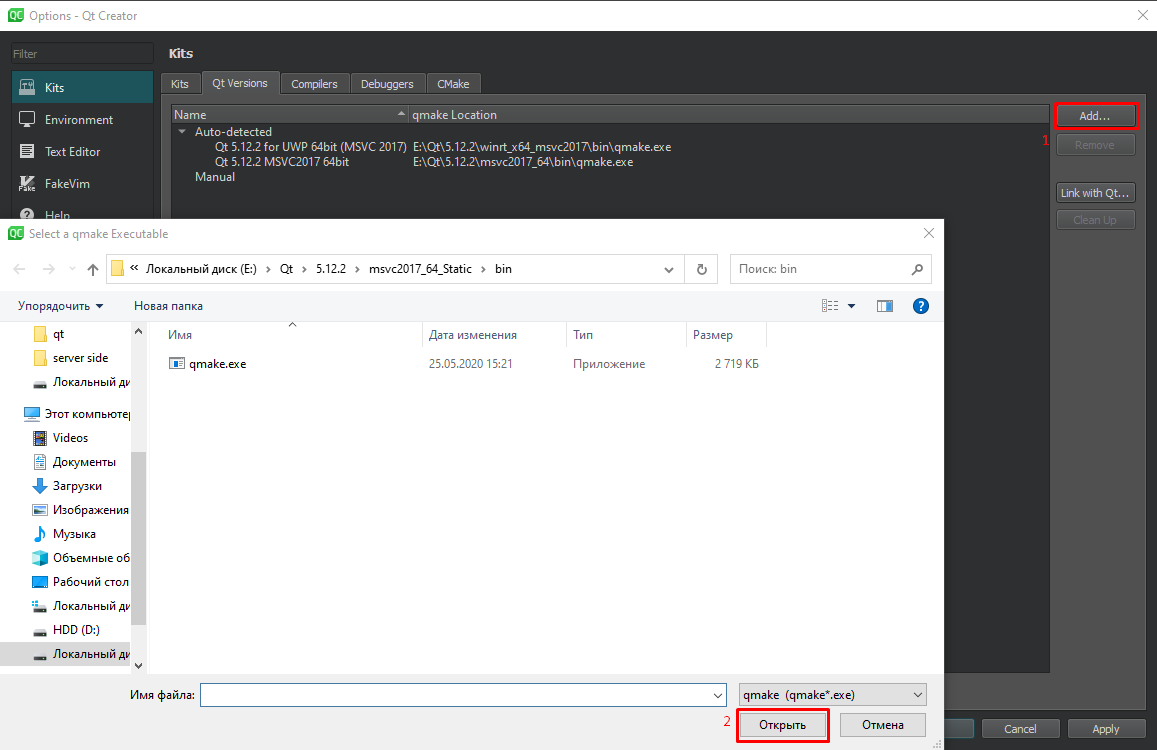
Нажимаем кнопку «Добавить…» и указываем путь до
qmake.exe -
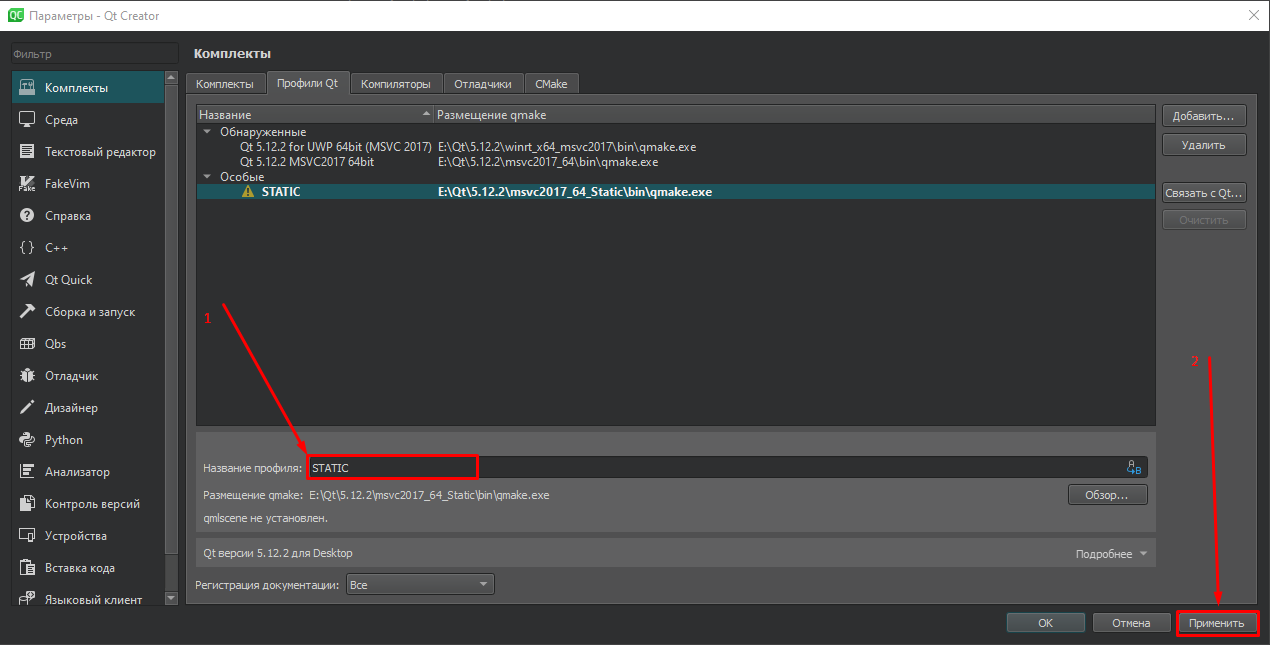
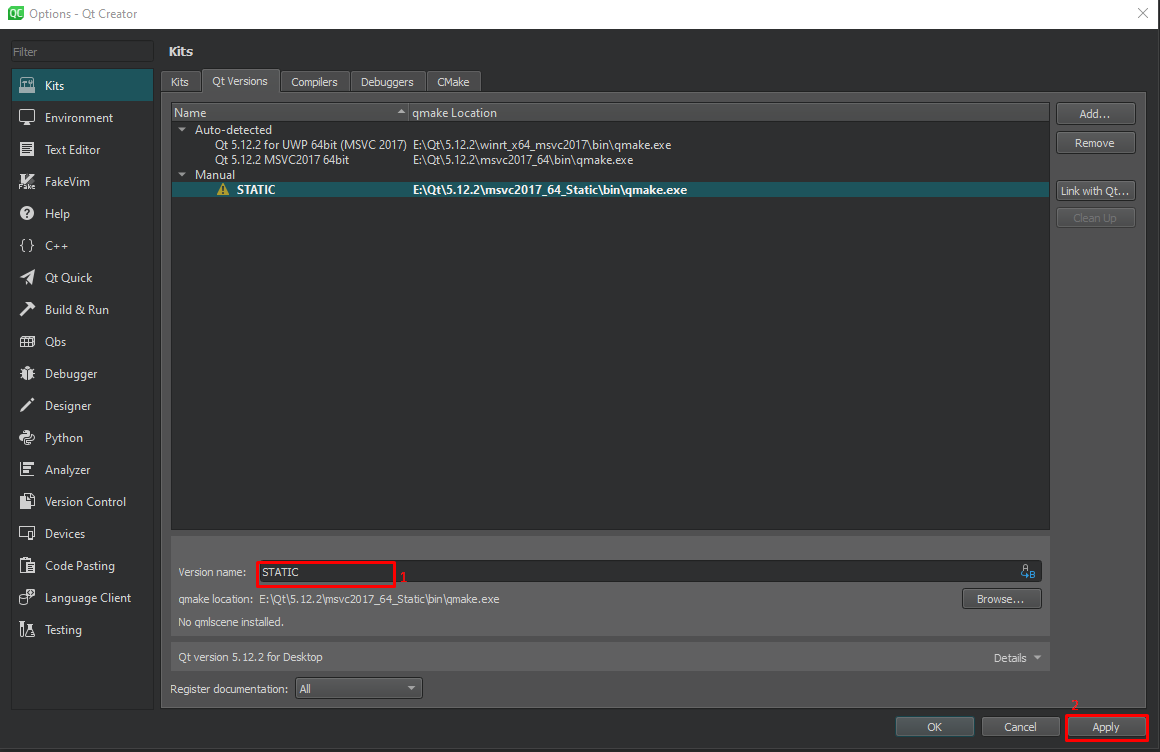
Вводим название для нового профиля и нажимаем кнопку «Применить»
-
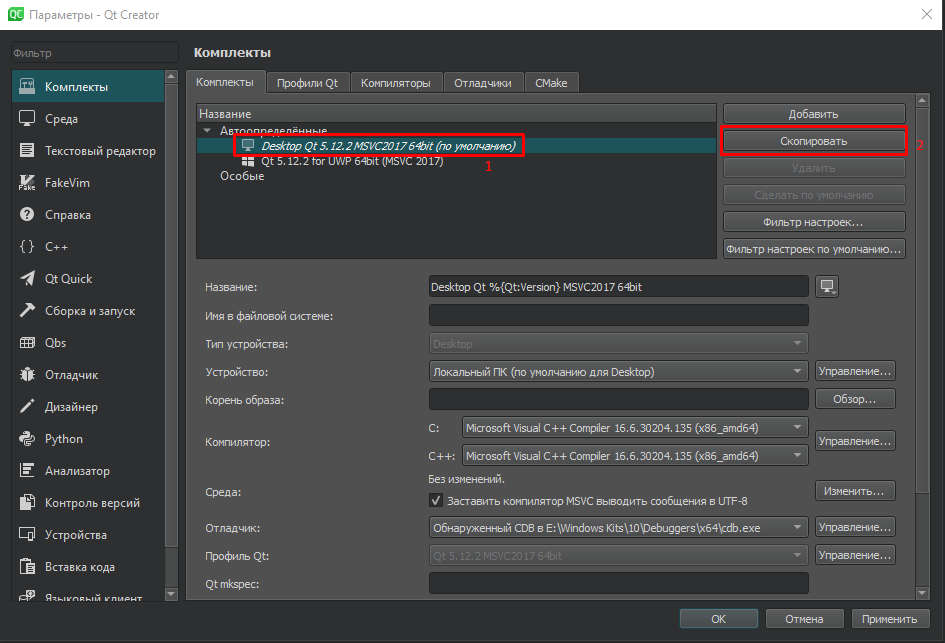
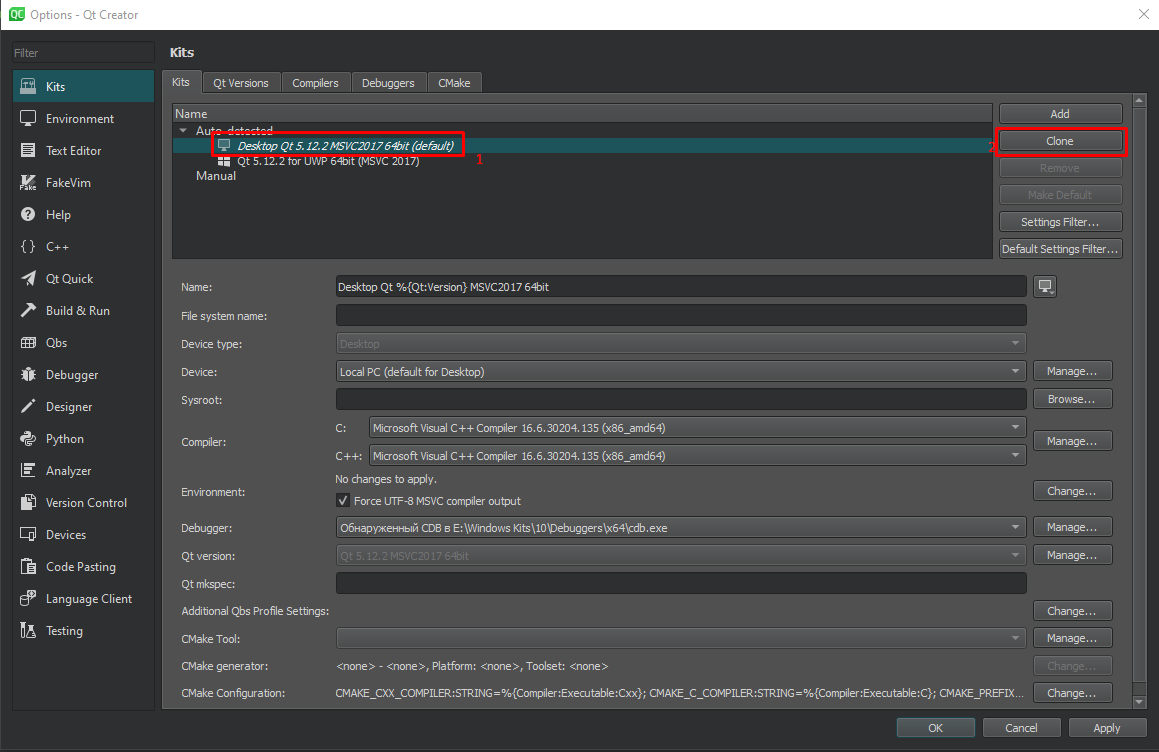
Переходим на вкладку «Комплекты». Копируем комплект с соответствующим компилятором (в данном случае MSVC)
-
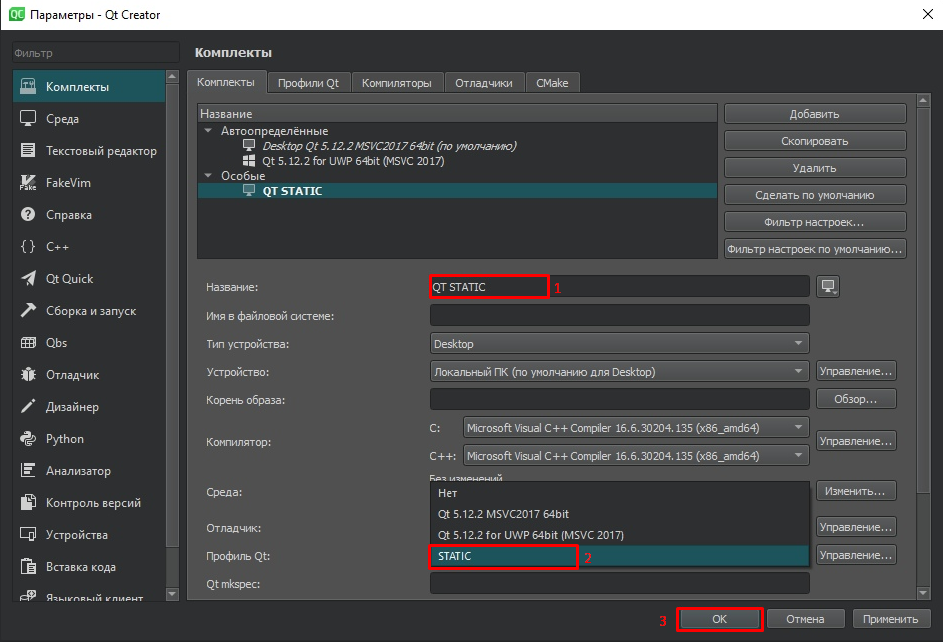
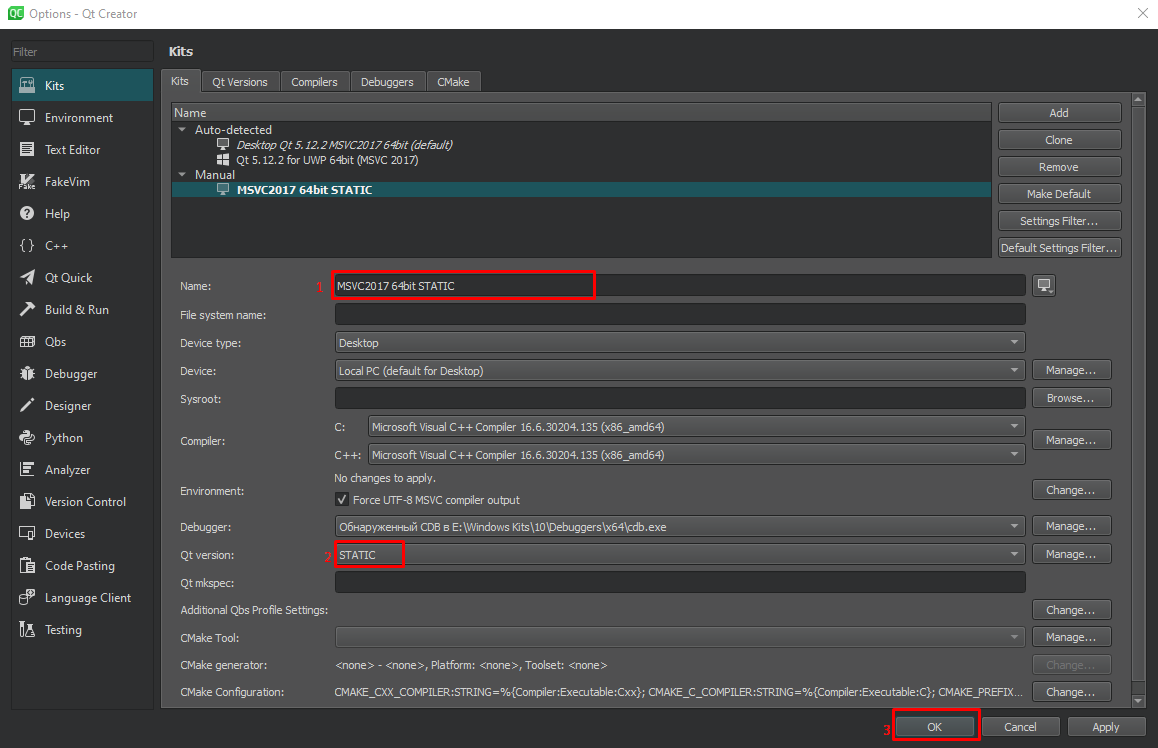
В свойствах нового комплекта выбираем новое название, а также выбираем только что добавленный нами профиль Qt. Нажимаем «ОК»
-
Открываем проект в QtCreator. Переключаемся в режим «Проекты»
-
В списке профилей выбираем новый профиль Qt
-
Для сборки с нужным комплектом слева внизу выбираем наш профиль Qt и запускаем сборку
- Online installer(https://www.qt.io/download-qt-installer?hsCtaTracking=99d9dd4f-5681-48d2-b096-470725510d34%7C074ddad0-fdef-4e53-8aa8-5e8a876d6ab4)
- Visual Studio 2017 or 2019(https://visualstudio.microsoft.com/ru/downloads/)
- Source code Qt
- Active Perl latest version
- Python 2.7+
- Download QT Online Installer(https://www.qt.io/download-qt-installer?hsCtaTracking=99d9dd4f-5681-48d2-b096-470725510d34%7C074ddad0-fdef-4e53-8aa8-5e8a876d6ab4):
- We start and by clicking "Next" we get to this window (image below) (we look at the installed checkmarks) (Version qt 5.9-5.15):
-
Install with default settings Active Perl and Python
-
Open x64 Native Tools Command Prompt for VS 2019
-
Go to the directory with QT installed (in my case, this is D:\QT\5.12.2\
If on drive C:
cd C:\QT\5.12.2\
If on drive D:
cd /d D:\QT\5.12.2\
5.1 Create a folder for the assembly
mkdir build
cd build-
Run the configuration script
<Path to Qt source>\configure.bat -debug-and-release -static -static-runtime -opensource -confirm-license -platform win32-msvc -qt-zlib -qt-libpng -qt-libjpeg -nomake examples -nomake tests -no-opengl -skip qtscript -prefix "<The path where the static version will be collected>"
<Path to Qt source>- usually located in a folder with QT installed, in my case: D:\QT\5.12.2\Src<The path where the static version will be collected>- in my case, this is the folder with Qt installed D:\QT\5.12.2\MSCV-Static
D:\QT\5.12.2\Src\configure.bat -debug-and-release -static -static-runtime -opensource -confirm-license -platform win32-msvc -qt-zlib -qt-libpng -qt-libjpeg -nomake examples -nomake tests -no-opengl -skip qtscript -prefix "D:\QT\5.12.2\MSCV-Static"
Keys:
skip <module>- excludes a separate submodule from the assembly processnomake examples- excludes sample programs from the build processnomake tests- excludes tests from the assembly processplatform <platform>- defines the platform for which Qt will be built, in this case Windows with MSVCno-opengl- do not use OpenGL to render the interfaceqt-zlib,qt-libpng,qt-libjpeg- use the librarieszlib,libpng,libjpegsupplied with Qtopensource- use open source Qt optionconfirm-license- automatically accept Qt licensedebug-and-release,release,debug- assembly optionsstatic,static-runtime- enable static layout of Qt and runtimeprefix <prefix>- path to the folder to which the compiled Qt files will be copied
-
We start the assembly of Qt (it will take a lot of time)
nmake
-
Install Qt
nmake install
-
Open “Options”, select “Kits” and go to the “Qt Profiles” tab
-
Click the "Add ..." button and specify the path to
qmake.exe -
Enter a name for the new profile and click the "Apply" button
-
Go to the “Kits” tab. Copy the kit with the appropriate compiler (in this case, MSVC)
-
In the properties of the new kit, select a new name, and also select the Qt profile we just added. Click OK


