![]()


Deploy a Kubernetes cluster for free, using K3s and Oracle always free resources.
- OCI K3s cluster
- Table of Contents
Note choose a region with enough ARM capacity
- This is repo shows only how to use terraform with the Oracle Cloud infrastructure and use only the always free resources. This examples are not for a production environment.
- At the end of your trial period (30 days). All the paid resources deployed will be stopped/terminated
- At the end of your trial period (30 days), if you have a running compute instance it will be stopped/hibernated
To use this repo you will need:
- an Oracle Cloud account. You can register here
Once you get the account, follow the Before you begin and 1. Prepare step in this document.
This module was tested with:
- Ubuntu 20.04, 22.04 (ubuntu remote user)
- Ubuntu 20.04, 22.04 Minimal (ubuntu remote user)
- Oracle Linux 8, 9 (opc remote user)
Is always recommended to create a separate user and group in your preferred domain to use with Terraform. This user must have less privileges possible (Zero trust policy). Below is an example policy that you can create allow terraform-group to manage all the resources needed by this module:
Allow group terraform-group to manage virtual-network-family  in compartment id <compartment_ocid>
Allow group terraform-group to manage instance-family  in compartment id <compartment_ocid>
Allow group terraform-group to manage compute-management-family  in compartment id <compartment_ocid>
Allow group terraform-group to manage volume-family  in compartment id <compartment_ocid>
Allow group terraform-group to manage load-balancers  in compartment id <compartment_ocid>
Allow group terraform-group to manage network-load-balancers  in compartment id <compartment_ocid>
Allow group terraform-group to manage dynamic-groups in compartment id <compartment_ocid>
Allow group terraform-group to manage policies in compartment id <compartment_ocid>
Allow group terraform-group to read network-load-balancers  in compartment id <compartment_ocid>
Allow group terraform-group to manage dynamic-groups in tenancy
See how to find the compartment ocid. The user and the group have to be manually created before using this module. To create the user go to Identity & Security -> Users, then create the group in Identity & Security -> Groups and associate the newly created user to the group. The last step is to create the policy in Identity & Security -> Policies.
To use terraform with the Oracle Cloud infrastructure you need to generate an RSA key. Generate the rsa key with:
openssl genrsa -out ~/.oci/<your_name>-oracle-cloud.pem 4096
chmod 600 ~/.oci/<your_name>-oracle-cloud.pem
openssl rsa -pubout -in ~/.oci/<your_name>-oracle-cloud.pem -out ~/.oci/<your_name>-oracle-cloud_public.pem
replace <your_name> with your name or a string you prefer.
NOTE: ~/.oci/<your_name>-oracle-cloud_public.pem will be used in terraform.tfvars by the Oracle provider plugin, so please take note of this string.
Clone this repo and go in the example/ directory:
git clone https://github.com/garutilorenzo/k3s-oci-cluster.git
cd k3s-oci-cluster/example/
Now you have to edit the main.tf file and you have to create the terraform.tfvars file. For more detail see Oracle provider setup and Pre flight checklist.
Or if you prefer you can create an new empty directory in your workspace and create this three files:
terraform.tfvars- More details in Oracle provider setupmain.tfprovider.tf
The terragrunt.hcl file will look like:
terraform { source = "./modules//k3s-cluster" }// Error : 409 - Conflict fix retry_max_attempts = 2 retry_sleep_interval_sec = 10 retryable_errors = [ "(?m).409-Conflict", ]
// Indicate the input values to use for the variables of the module. inputs = { # Addons install_certmanager = false install_longhorn = false install_argocd_image_updater = false install_argocd = true install_kubevela = true install_crossplane = true
# Options expose_kubeapi = true // expose only for my_public_ip expose_argocd_nodeport = true load_cluster_kubeconfig = true k3s_extra_worker_node = true // creates the 3rd worker node unique_tag_value = basename(get_terragrunt_dir()) # Set the values below - by editing or setting env vars.. tenancy_ocid = get_env("OCI_TENANCY_OCID") compartment_ocid = get_env("OCI_COMPARTMENT_OCID") region = get_env("OCI_REGION") os_image_id = get_env("OCI_OS_IMAGE_ID") availability_domain = get_env("OCI_AVAILABILITY_DOMAIN") user_ocid = get_env("OCI_USER_OCID") private_key_path = get_env("OCI_PRIVATE_KEY_PATH") public_key_path = get_env("OCI_PUBLIC_KEY_PATH") fingerprint = get_env("OCI_FINGERPRINT", "")
}
For all the possible variables see Pre flight checklist
The provider.tf will look like:
provider "oci" {
  tenancy_ocid     = var.tenancy_ocid
  user_ocid        = var.user_ocid
  private_key_path = var.private_key_path
  fingerprint      = var.fingerprint
  region           = var.region
}
Now we can init terraform with:
terraform initterraform init Initializing modules... Downloading git::https://github.com/garutilorenzo/k3s-oci-cluster.git for k3s_cluster...
- k3s_cluster in .terraform/modules/k3s_cluster
Initializing the backend...
Initializing provider plugins...
- Reusing previous version of hashicorp/oci from the dependency lock file
- Reusing previous version of hashicorp/template from the dependency lock file
- Using previously-installed hashicorp/template v2.2.0
- Using previously-installed hashicorp/oci v4.64.0
Terraform has been successfully initialized!
You may now begin working with Terraform. Try running "terraform plan" to see any changes that are required for your infrastructure. All Terraform commands should now work.
If you ever set or change modules or backend configuration for Terraform, rerun this command to reinitialize your working directory. If you forget, other commands will detect it and remind you to do so if necessary.
In the example/ directory of this repo you need to create a terraform.tfvars file, the file will look like:
fingerprint      = "<rsa_key_fingerprint>"
private_key_path = "~/.oci/<your_name>-oracle-cloud.pem"
user_ocid        = "<user_ocid>"
tenancy_ocid     = "<tenency_ocid>"
compartment_ocid = "<compartment_ocid>"
To find your tenency_ocid in the Ocacle Cloud console go to: Governance and Administration > Tenency details, then copy the OCID.
To find you user_ocid in the Ocacle Cloud console go to User setting (click on the icon in the top right corner, then click on User settings), click your username and then copy the OCID.
The compartment_ocid is the same as tenency_ocid.
The fingerprint is the fingerprint of your RSA key, you can find this vale under User setting > API Keys.
Once you have created the terraform.tfvars file edit the main.tf file (always in the example/ directory) and set the following variables:
| Name | Version |
|---|---|
| cloudinit | 2.3.2 |
| helm | 2.9.0 |
| http | 3.2.1 |
| local | 2.4.0 |
| oci | 4.110.0 |
| random | 3.4.3 |
| ssh | 2.6.0 |
| Name | Version |
|---|---|
| cloudinit | 2.3.2 |
| helm | 2.9.0 |
| http | 3.2.1 |
| local | 2.4.0 |
| oci | 4.110.0 |
| random | 3.4.3 |
| ssh | 2.6.0 |
No modules.
| Name | Description | Type | Default | Required |
|---|---|---|---|---|
| argocd_image_updater_release | Argo CD release Image Updater | string |
"v0.12.0" |
no |
| argocd_release | Argo CD release | string |
"v2.6.3" |
no |
| availability_domain | Availability domain | string |
n/a | yes |
| certmanager_email_address | Email address used for signing https certificates | string |
"changeme@example.com" |
no |
| certmanager_release | Cert manager release | string |
"v1.11.0" |
no |
| cluster_name | Name of your K3s cluster | string |
"k3s-cluster" |
no |
| compartment_ocid | Compartment ocid | string |
n/a | yes |
| compute_shape | Compute shape to use. NOTE Is mandatory to use this compute shape for provision 4 always free VMs | string |
"VM.Standard.A1.Flex" |
no |
| crossplane_release | Crossplane release | string |
"1.11.2" |
no |
| default_security_list_tcp | all the ports for security list - for tcp rules | list |
[ |
no |
| default_security_list_tcp_with_argo | all the ports for security list + argocd - for tcp rules | list |
[ |
no |
| disable_ingress | Disable all ingress controllers | bool |
false |
no |
| environment | Current work environment (Example: staging/dev/prod). This value is used for tag all the deployed resources | string |
"staging" |
no |
| expose_argocd_nodeport | Expose or not the ArgoCD server to my_public_ip_cidr | bool |
false |
no |
| expose_kubeapi | Expose or not the kubeapi server to the internet. Access is granted only from _my_public_ip_cidr* for security reasons | bool |
false |
no |
| fault_domains | n/a | list(any) |
[ |
no |
| fingerprint | (Optional) The fingerprint for the user's RSA key. This can be found in user settings in the Oracle Cloud Infrastructure console. Required if auth is set to 'ApiKey', ignored otherwise.) | string |
n/a | yes |
| http_lb_port | HTTP port used by the public LB | number |
80 |
no |
| https_lb_port | HTTPS port used by the public LB | number |
443 |
no |
| ingress_controller | Define the ingress controller to use | string |
"default" |
no |
| ingress_controller_http_nodeport | NodePort where nginx ingress will listen for http traffic | number |
30080 |
no |
| ingress_controller_https_nodeport | NodePort where nginx ingress will listen for https traffic | number |
30443 |
no |
| install_argocd | install Argo CD: A declarative, GitOps continuous delivery tool for Kubernetes | bool |
false |
no |
| install_argocd_image_updater | Install Argo CD Image Updater: A tool to automatically update the container images of Kubernetes workloads that are managed by Argo CD | bool |
false |
no |
| install_certmanager | Install cert manager 'Cloud native certificate management' | bool |
false |
no |
| install_crossplane | Install Crossplane: Build control planes without needing to write code. Crossplane has a highly extensible backend that enables you to orchestrate applications and infrastructure no matter where they run, and a highly configurable frontend that lets you define the declarative API it offers | bool |
false |
no |
| install_kubevela | Install KubeVela: Make shipping applications more enjoyable | bool |
false |
no |
| install_longhorn | install longhorn 'Cloud native distributed block storage for Kubernetes'. To use longhorn set the k3s_version < v1.25.x Ref | bool |
false |
no |
| istio_release | n/a | string |
"1.16.1" |
no |
| k3s_extra_worker_node | Deploy the third worker nodes. The node will be deployed outside the worker instance pools. Using OCI always free account you can't create instance pools with more than two servers. This workaround solve this problem. | bool |
true |
no |
| k3s_load_balancer_name | Internal LB name | string |
"k3s internal load balancer" |
no |
| k3s_server_pool_size | Number of k3s servers deployed | number |
1 |
no |
| k3s_subnet | Subnet where K3s will be exposed. Rquired if the subnet is different from the default gw subnet (Eg. 192.168.1.0/24) | string |
"default_route_table" |
no |
| k3s_version | n/a | string |
"latest" |
no |
| k3s_worker_pool_size | Number of k3s workers deployed | number |
2 |
no |
| kube_api_port | Kube-API default port | number |
6443 |
no |
| kubeconfig_location | Kubeconfig default location | string |
"~/.kube/config" |
no |
| kubevela_release | Kubevela release | string |
"1.7.5" |
no |
| load_cluster_kubeconfig | Enable to access cluster locally - overwriting var.kubeconfig_location content!!!! | bool |
false |
no |
| longhorn_release | Longhorn release | string |
"v1.4.0" |
no |
| my_public_ip_cidr | Your public ip in CIDR format: (Example: xxx.xxx.xxx.xxx/32) | string |
"" |
no |
| nginx_ingress_release | NGINX ingress release | string |
"v1.5.1" |
no |
| oci_core_subnet_cidr10 | First subnet CIDR | string |
"10.0.0.0/24" |
no |
| oci_core_subnet_cidr11 | Second subnet CIDR | string |
"10.0.1.0/24" |
no |
| oci_core_subnet_dns_label10 | First subnet DNS label | string |
"defaultsubnet10" |
no |
| oci_core_subnet_dns_label11 | Second subnet DNS label | string |
"defaultsubnet11" |
no |
| oci_core_vcn_cidr | VCN CIDR | string |
"10.0.0.0/16" |
no |
| oci_core_vcn_dns_label | VCN DNS label | string |
"defaultvcn" |
no |
| oci_identity_dynamic_group_name | Dynamic group name. This dynamic group will contains all the instances of this specific compartment | string |
"Compute_Dynamic_Group" |
no |
| oci_identity_policy_name | Policy name. This policy will allow dynamic group 'oci_identity_dynamic_group_name' to read OCI api without auth | string |
"Compute_To_Oci_Api_Policy" |
no |
| os_image_id | Image id to use | string |
n/a | yes |
| private_key_path | Path to your private OCI RSA key | string |
n/a | yes |
| public_key_path | Path to your public workstation SSH key | string |
n/a | yes |
| public_lb_shape | LB shape for the public LB. NOTE is mandatory to use this kind of shape to provision two always free LB (public and private) | string |
"flexible" |
no |
| public_load_balancer_name | Public LB name | string |
"K3s public LB" |
no |
| region | OCI region based on your needs | string |
n/a | yes |
| tenancy_ocid | n/a | string |
n/a | yes |
| unique_tag_key | Unique tag name used for tagging all the deployed resources | string |
"k3s-provisioner" |
no |
| unique_tag_value | Unique value used with unique*tag_key | string |
"" |
no |
| user_ocid | n/a | string |
n/a | yes |
| Name | Description |
|---|---|
| argo_instructions | n/a |
| k3s_servers_ips | n/a |
| k3s_workers_ips | n/a |
| public_lb_ip | n/a |
| ssh_instructions | n/a |
To find the list of the availability domains run this command on che Cloud Shell:
oci iam availability-domain list
{
  "data": [
    {
      "compartment-id": "<compartment_ocid>",
      "id": "ocid1.availabilitydomain.oc1..xxxxxxxxxxxxxxxxxxxxxxxxxxxxxxxxxxxxxx",
      "name": "iAdc:EU-ZURICH-1-AD-1"
    }
  ]
}
To filter the OS images by shape and OS run this command on che Cloud Shell. You can filter by OS: Canonical Ubuntu or Oracle Linux:
oci compute image list --compartment-id <compartment_ocid> --operating-system "Canonical Ubuntu" --shape "VM.Standard.A1.Flex"
{
  "data": [
    {
      "agent-features": null,
      "base-image-id": null,
      "billable-size-in-gbs": 2,
      "compartment-id": null,
      "create-image-allowed": true,
      "defined-tags": {},
      "display-name": "Canonical-Ubuntu-20.04-aarch64-2022.01.18-0",
      "freeform-tags": {},
      "id": "ocid1.image.oc1.eu-zurich-1.aaaaaaaag2uyozo7266bmg26j5ixvi42jhaujso2pddpsigtib6vfnqy5f6q",
      "launch-mode": "NATIVE",
      "launch-options": {
        "boot-volume-type": "PARAVIRTUALIZED",
        "firmware": "UEFI_64",
        "is-consistent-volume-naming-enabled": true,
        "is-pv-encryption-in-transit-enabled": true,
        "network-type": "PARAVIRTUALIZED",
        "remote-data-volume-type": "PARAVIRTUALIZED"
      },
      "lifecycle-state": "AVAILABLE",
      "listing-type": null,
      "operating-system": "Canonical Ubuntu",
      "operating-system-version": "20.04",
      "size-in-mbs": 47694,
      "time-created": "2022-01-27T22:53:34.270000+00:00"
    },
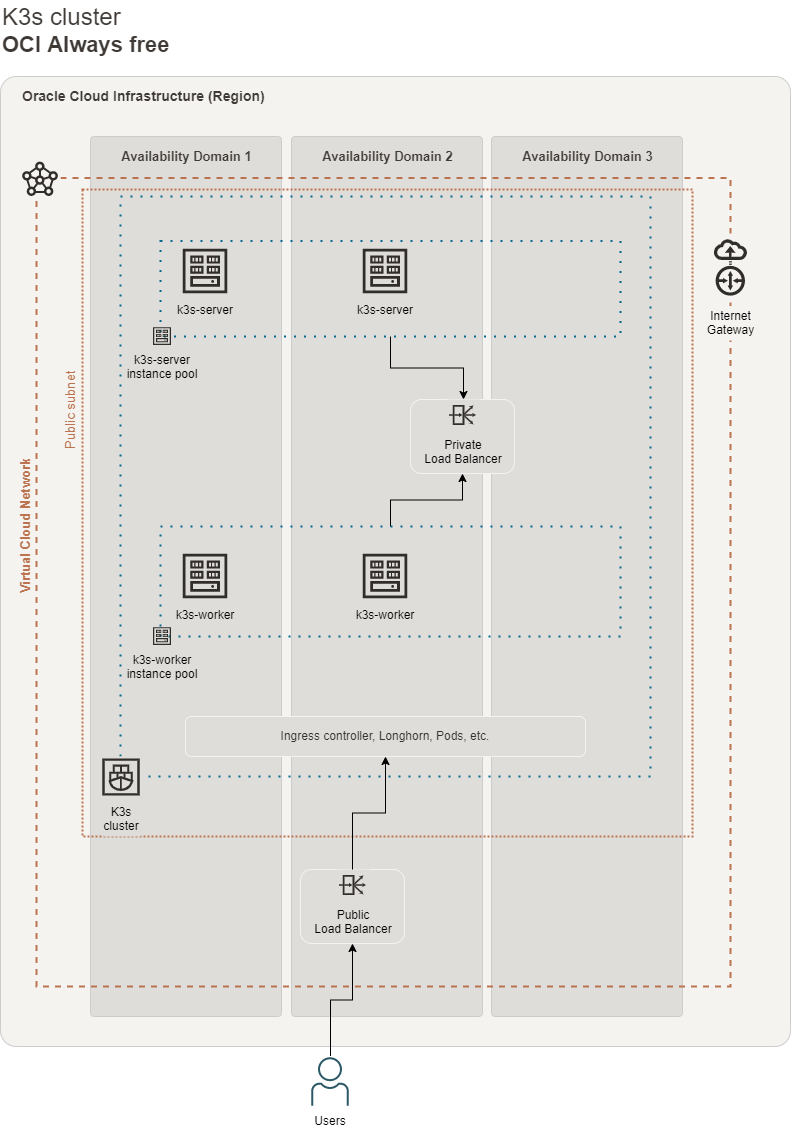
In order to get the maximum resources available within the oracle always free tier, the max amount of the k3s servers and k3s workers must be 2. So the max value for k3s_server_pool_size and k3s_worker_pool_size is 2.
In this setup we use two LB, one internal LB and one public LB (Layer 7). In order to use two LB using the always free resources, one lb must be a network load balancer an the other must be a load balancer. The public LB must use the flexible shape (public_lb_shape variable).
In this environment the High Availability of the K3s cluster is provided using the Embedded DB. More details here
The default installation of K3s install Traefik as ingress the controller. In this environment Traefik is replaced by Nginx ingress controller. To install Traefik as the ingress controller set the variable ingress_controller to default. For more details on Nginx ingress controller see the Nginx ingress controller section.
The final infrastructure will be made by:
- two instance pool:
- one instance pool for the server nodes named
k3s-servers - one instance pool for the worker nodes named
k3s-workers
- one instance pool for the server nodes named
- one internal load balancer that will route traffic to K3s servers
- one external load balancer that will route traffic to K3s workers
The other resources created by terraform are:
- two instance configurations (one for the servers and one for the workers) used by the instance pools
- one vcn
- two public subnets
- two security list
- one dynamic group
- one identity policy
This setup will automatically install longhorn. Longhorn is a Cloud native distributed block storage for Kubernetes. To disable the longhorn deployment set install_longhorn variable to false.
NOTE to use longhorn set the k3s_version < v1.25.x Ref.
In this environment Nginx ingress controller is used instead of the standard Traefik ingress controller.
The installation is the bare metal installation, the ingress controller then is exposed via a NodePort Service.
---
apiVersion: v1
kind: Service
metadata:
  name: ingress-nginx-controller-loadbalancer
  namespace: ingress-nginx
spec:
  selector:
    app.kubernetes.io/component: controller
    app.kubernetes.io/instance: ingress-nginx
    app.kubernetes.io/name: ingress-nginx
  ports:
    - name: http
      port: 80
      protocol: TCP
      targetPort: 80
      nodePort: ${ingress_controller_http_nodeport} # default to 30080
    - name: https
      port: 443
      protocol: TCP
      targetPort: 443
      nodePort: ${ingress_controller_https_nodeport} # default to 30443
  type: NodePort
To get the real ip address of the clients using a public L4 load balancer we need to use the proxy protocol feature of nginx ingress controller:
---
apiVersion: v1
data:
  allow-snippet-annotations: "true"
  enable-real-ip: "true"
  proxy-real-ip-cidr: "0.0.0.0/0"
  proxy-body-size: "20m"
  use-proxy-protocol: "true"
kind: ConfigMap
metadata:
  labels:
    app.kubernetes.io/component: controller
    app.kubernetes.io/instance: ingress-nginx
    app.kubernetes.io/managed-by: Helm
    app.kubernetes.io/name: ingress-nginx
    app.kubernetes.io/part-of: ingress-nginx
    app.kubernetes.io/version: 1.1.1
    helm.sh/chart: ingress-nginx-4.0.16
  name: ingress-nginx-controller
  namespace: ingress-nginx
NOTE to use nginx ingress controller with the proxy protocol enabled, an external nginx instance is used as proxy (since OCI LB doesn't support proxy protocol at the moment). Nginx will be installed on each worker node and the configuation of nginx will:
- listen in proxy protocol mode
- forward the traffic from port
80toingress_controller_http_nodeport(default to30080) on any server of the cluster - forward the traffic from port
443toingress_controller_https_nodeport(default to30443) on any server of the cluster
This is the final result:
Client -> Public L4 LB -> nginx proxy (with proxy protocol enabled) -> nginx ingress (with proxy protocol enabled) -> k3s service -> pod(s)
cert-manager is used to issue certificates from a variety of supported source. To use cert-manager take a look at nginx-ingress-cert-manager.yml and nginx-configmap-cert-manager.yml example. To use cert-manager and get the certificate you need set on your DNS configuration the public ip address of the load balancer.
We are now ready to deploy our infrastructure. First we ask terraform to plan the execution with:
terraform plan... ... + id = (known after apply) + ip_addresses = (known after apply) + is_preserve_source_destination = false + is_private = true + lifecycle_details = (known after apply) + nlb_ip_version = (known after apply) + state = (known after apply) + subnet_id = (known after apply) + system_tags = (known after apply) + time_created = (known after apply) + time_updated = (known after apply) + reserved_ips { + id = (known after apply) } }
Plan: 27 to add, 0 to change, 0 to destroy.
Changes to Outputs:
- k3s_servers_ips = [
- (known after apply),
- (known after apply), ]
- k3s_workers_ips = [
- (known after apply),
- (known after apply), ]
- public_lb_ip = (known after apply)
──────────────────────────────────────────────────────────────────────────────────────────────────────────────────────────────────────────────────────────────────────────────
Note: You didn't use the -out option to save this plan, so Terraform can't guarantee to take exactly these actions if you run "terraform apply" now.
now we can deploy our resources with:
terraform apply... ... + is_preserve_source_destination = false + is_private = true + lifecycle_details = (known after apply) + nlb_ip_version = (known after apply) + state = (known after apply) + subnet_id = (known after apply) + system_tags = (known after apply) + time_created = (known after apply) + time_updated = (known after apply) + reserved_ips { + id = (known after apply) } }
Plan: 27 to add, 0 to change, 0 to destroy.
Changes to Outputs:
- k3s_servers_ips = [
- (known after apply),
- (known after apply), ]
- k3s_workers_ips = [
- (known after apply),
- (known after apply), ]
- public_lb_ip = (known after apply)
Do you want to perform these actions? Terraform will perform the actions described above. Only 'yes' will be accepted to approve. Enter a value: yes
... ...
module.k3s_cluster.oci_network_load_balancer_backend.k3s_kube_api_backend[0]: Still creating... [50s elapsed] module.k3s_cluster.oci_network_load_balancer_backend.k3s_kube_api_backend[0]: Still creating... [1m0s elapsed] module.k3s_cluster.oci_network_load_balancer_backend.k3s_kube_api_backend[0]: Creation complete after 1m1s [...]
Apply complete! Resources: 27 added, 0 changed, 0 destroyed.
Outputs:
k3s_servers_ips = [ "X.X.X.X", "X.X.X.X", ] k3s_workers_ips = [ "X.X.X.X", "X.X.X.X", ] public_lb_ip = tolist([ "X.X.X.X", ])
Now on one master node you can check the status of the cluster with:
ssh X.X.X.X -lubuntuubuntu@inst-iwlqz-k3s-servers:
$ sudo su - root@inst-iwlqz-k3s-servers:# kubectl get nodes
NAME STATUS ROLES AGE VERSION inst-axdzf-k3s-workers Ready <none> 4m34s v1.22.6+k3s1 inst-hmgnl-k3s-servers Ready control-plane,etcd,master 4m14s v1.22.6+k3s1 inst-iwlqz-k3s-servers Ready control-plane,etcd,master 6m4s v1.22.6+k3s1 inst-lkvem-k3s-workers Ready <none> 5m35s v1.22.6+k3s1
We can now test the public load balancer, nginx ingress controller and the security list ingress rules. On your local PC run:
curl -v http://<PUBLIC_LB_IP>
- Trying PUBLIC_LB_IP:80...
- TCP_NODELAY set
- Connected to PUBLIC_LB_IP (PUBLIC_LB_IP) port 80 (#0) > GET / HTTP/1.1 > Host: PUBLIC_LB_IP > User-Agent: curl/7.68.0 > Accept: / >
- Mark bundle as not supporting multiuse < HTTP/1.1 404 Not Found < Date: Fri, 25 Feb 2022 14:03:09 GMT < Content-Type: text/html < Content-Length: 146 < Connection: keep-alive < <html> <head><title>404 Not Found</title></head> <body> <center><h1>404 Not Found</h1></center> <hr><center>nginx</center> </body> </html>
Connection #0 to host PUBLIC_LB_IP left intact
404 is a correct response since the cluster is empty. We can test also the https listener/backends:
curl -k -v https://<PUBLIC_LB_IP>
- Trying PUBLIC_LB_IP:443...
- TCP_NODELAY set
- Connected to PUBLIC_LB_IP (PUBLIC_LB_IP) port 443 (#0)
- ALPN, offering h2
- ALPN, offering http/1.1
- successfully set certificate verify locations:
- CAfile: /etc/ssl/certs/ca-certificates.crt CApath: /etc/ssl/certs
- TLSv1.3 (OUT), TLS handshake, Client hello (1):
- TLSv1.3 (IN), TLS handshake, Server hello (2):
- TLSv1.2 (IN), TLS handshake, Certificate (11):
- TLSv1.2 (IN), TLS handshake, Server key exchange (12):
- TLSv1.2 (IN), TLS handshake, Server finished (14):
- TLSv1.2 (OUT), TLS handshake, Client key exchange (16):
- TLSv1.2 (OUT), TLS change cipher, Change cipher spec (1):
- TLSv1.2 (OUT), TLS handshake, Finished (20):
- TLSv1.2 (IN), TLS handshake, Finished (20):
- SSL connection using TLSv1.2 / ECDHE-RSA-AES256-GCM-SHA384
- ALPN, server accepted to use http/1.1
- Server certificate:
- subject: C=IT; ST=Italy; L=Brescia; O=GL Ltd; OU=IT; CN=testlb.domainexample.com; emailAddress=email@you.com
- start date: Feb 25 10:28:29 2022 GMT
- expire date: Feb 25 10:28:29 2023 GMT
- issuer: C=IT; ST=Italy; L=Brescia; O=GL Ltd; OU=IT; CN=testlb.domainexample.com; emailAddress=email@you.com
- SSL certificate verify result: self signed certificate (18), continuing anyway. > GET / HTTP/1.1 > Host: PUBLIC_LB_IP > User-Agent: curl/7.68.0 > Accept: / >
- Mark bundle as not supporting multiuse < HTTP/1.1 404 Not Found < Date: Fri, 25 Feb 2022 13:48:19 GMT < Content-Type: text/html < Content-Length: 146 < Connection: keep-alive < <html> <head><title>404 Not Found</title></head> <body> <center><h1>404 Not Found</h1></center> <hr><center>nginx</center> </body> </html>
Connection #0 to host PUBLIC_LB_IP left intact
To check if longhorn was successfully installed run on one master nodes:
kubectl get ns
NAME              STATUS   AGE
default           Active   9m40s
kube-node-lease   Active   9m39s
kube-public       Active   9m39s
kube-system       Active   9m40s
longhorn-system   Active   8m52s # longhorn namespace
root@inst-hmgnl-k3s-servers:~# kubectl get pods -n longhorn-system
NAME                                        READY   STATUS    RESTARTS        AGE
csi-attacher-5f46994f7-8w9sg                1/1     Running   0               7m52s
csi-attacher-5f46994f7-qz7d4                1/1     Running   0               7m52s
csi-attacher-5f46994f7-rjqlx                1/1     Running   0               7m52s
csi-provisioner-6ccbfbf86f-fw7q4            1/1     Running   0               7m52s
csi-provisioner-6ccbfbf86f-gwmrg            1/1     Running   0               7m52s
csi-provisioner-6ccbfbf86f-nsf84            1/1     Running   0               7m52s
csi-resizer-6dd8bd4c97-7l67f                1/1     Running   0               7m51s
csi-resizer-6dd8bd4c97-g66wj                1/1     Running   0               7m51s
csi-resizer-6dd8bd4c97-nksmd                1/1     Running   0               7m51s
csi-snapshotter-86f65d8bc-2gcwt             1/1     Running   0               7m50s
csi-snapshotter-86f65d8bc-kczrw             1/1     Running   0               7m50s
csi-snapshotter-86f65d8bc-sjmnv             1/1     Running   0               7m50s
engine-image-ei-fa2dfbf0-6rpz2              1/1     Running   0               8m30s
engine-image-ei-fa2dfbf0-7l5k8              1/1     Running   0               8m30s
engine-image-ei-fa2dfbf0-7nph9              1/1     Running   0               8m30s
engine-image-ei-fa2dfbf0-ndkck              1/1     Running   0               8m30s
instance-manager-e-31a0b3f5                 1/1     Running   0               8m26s
instance-manager-e-37aa4663                 1/1     Running   0               8m27s
instance-manager-e-9cc7cc9d                 1/1     Running   0               8m20s
instance-manager-e-f39d9f2c                 1/1     Running   0               8m29s
instance-manager-r-1364d994                 1/1     Running   0               8m26s
instance-manager-r-c1670269                 1/1     Running   0               8m20s
instance-manager-r-c20ebeb3                 1/1     Running   0               8m28s
instance-manager-r-c54bf9a5                 1/1     Running   0               8m27s
longhorn-csi-plugin-2qj94                   2/2     Running   0               7m50s
longhorn-csi-plugin-4t8jm                   2/2     Running   0               7m50s
longhorn-csi-plugin-ws82l                   2/2     Running   0               7m50s
longhorn-csi-plugin-zmc9q                   2/2     Running   0               7m50s
longhorn-driver-deployer-784546d78d-s6cd2   1/1     Running   0               8m58s
longhorn-manager-l8sd8                      1/1     Running   0               9m1s
longhorn-manager-r2q5c                      1/1     Running   1 (8m30s ago)   9m1s
longhorn-manager-s6wql                      1/1     Running   0               9m1s
longhorn-manager-zrrf2                      1/1     Running   0               9m
longhorn-ui-9fdb94f9-6shsr                  1/1     Running   0               8m59s
You can verify that all pods are running:
root@inst-hmgnl-k3s-servers:~# kubectl get pods -n argocd
NAME                                                READY   STATUS    RESTARTS   AGE
argocd-application-controller-0                     1/1     Running   0          8m51s
argocd-applicationset-controller-7b74965f8c-mjl97   1/1     Running   0          8m53s
argocd-dex-server-7f75d56bc6-j62hb                  1/1     Running   0          8m53s
argocd-notifications-controller-54dd686846-lggrz    1/1     Running   0          8m53s
argocd-redis-5dff748d9c-s5q2l                       1/1     Running   0          8m52s
argocd-repo-server-5576f8d84b-sgbbt                 1/1     Running   0          8m52s
argocd-server-76cf7d4c7b-jq9qx                      1/1     Running   0          8m52s
To fetch the initial admin password, to be able to do this you need to expose your kubeapi-server (set expose_kubeapi variable to ture) and fetch the kubeconfig from one of the server nodes, it will be in (/var/lib/rancher/k3s/server/cred/admin.kubeconfig):
kubectl -n argocd get secret argocd-initial-admin-secret -o jsonpath="{.data.password}" | base64 -d
To connect to the UI (make sure to copy the kubeconfig to your local machine first):
kubectl -n argocd port-forward service/argocd-server -n argocd 8080:443
After that you should be able to visit the ArgoCD UI: https://localhost:8080
Finally to test all the components of the cluster we can deploy a sample stack. The stack is composed by the following components:
- MariaDB
- Nginx
- Wordpress
Each component is made by: one deployment and one service. Wordpress and nginx share the same persistent volume (ReadWriteMany with longhorn storage class). The nginx configuration is stored in four ConfigMaps and the nginx service is exposed by the nginx ingress controller.
Deploy the resources with:
kubectl apply -f https://raw.githubusercontent.com/garutilorenzo/k3s-oci-cluster/master/deployments/mariadb/all-resources.yml
kubectl apply -f https://raw.githubusercontent.com/garutilorenzo/k3s-oci-cluster/master/deployments/wordpress/all-resources.yml
NOTE The Wordpress installation is secured. To allow external traffic to /wp-admin, /xmlrpc.php and wp-login.php you have to edit the deployments/nginx/all-resources.yml and change this line:
- name: SECURE_SUBNET
  value: 8.8.8.8/32 # change-me
with your public ip address CIDR.
curl -o nginx-all-resources.yml https://raw.githubusercontent.com/garutilorenzo/k3s-oci-cluster/master/deployments/nginx/all-resources.ymlvi nginx-all-resources.yml
change SECURE_SUBNET and save the file
kubectl apply -f nginx-all-resources.yml
now check the status:
kubectl get deployments
NAME        READY   UP-TO-DATE   AVAILABLE   AGE
mariadb       1/1     1            1           92m
nginx         1/1     1            1           79m
wordpress     1/1     1            1           91m
kubectl get svc
NAME            TYPE        CLUSTER-IP      EXTERNAL-IP   PORT(S)    AGE
kubernetes        ClusterIP   10.43.0.1       <none>        443/TCP    5h8m
mariadb-svc       ClusterIP   10.43.184.188   <none>        3306/TCP   92m
nginx-svc         ClusterIP   10.43.9.202     <none>        80/TCP     80m
wordpress-svc     ClusterIP   10.43.242.26    <none>        9000/TCP   91m
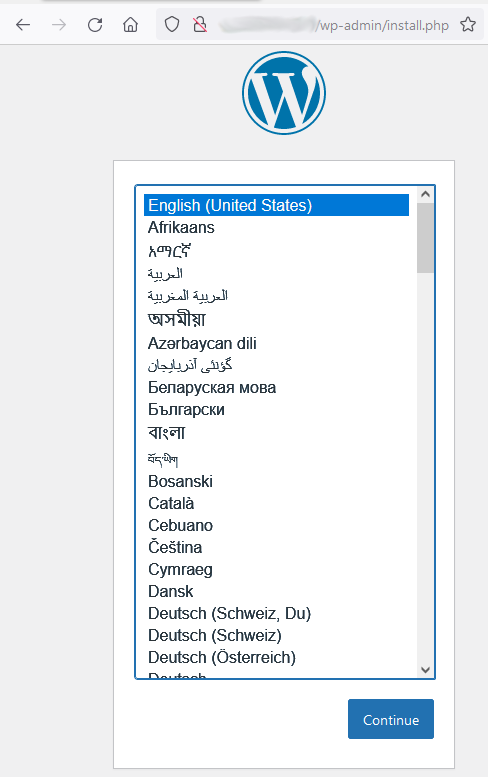
Now you are ready to setup WP, open the LB public ip and follow the wizard. NOTE nginx and the Kubernetes Ingress rule are configured without virthual host/server name.
To clean the deployed resources:
kubectl delete -f https://raw.githubusercontent.com/garutilorenzo/k3s-oci-cluster/master/deployments/mariadb/all-resources.yml
kubectl delete -f https://raw.githubusercontent.com/garutilorenzo/k3s-oci-cluster/master/deployments/nginx/all-resources.yml
kubectl delete -f https://raw.githubusercontent.com/garutilorenzo/k3s-oci-cluster/master/deployments/wordpress/all-resources.yml
load_cluster_kubeconfig = true
terragrunt destroy
If you see this error during the infrastructure destruction:
Error: 409-Conflict, Invalid State Transition of NLB lifeCycle state from Updating to Updating
│ Suggestion: The resource is in a conflicted state. Please retry again or contact support for help with service: Network Load Balancer Listener
│ Documentation: https://registry.terraform.io/providers/oracle/oci/latest/docs/resources/network_load_balancer_listener
│ API Reference: https://docs.oracle.com/iaas/api/#/en/networkloadbalancer/20200501/Listener/DeleteListener
re-run terraform destroy
The runc version in k3s containerd version 1.6.6 contains a regression that prevents anyone from executing a command and attaching to the container's TTY (exec -it) whenever someone runs systemctl daemon-reload. Alternatively, the user may run into this issue on SELinux-enforced systems. Ref.
kubectl exec -it -n kube-system cilium-6lqp9 -- cilium status
Defaulted container "cilium-agent" out of: cilium-agent, mount-cgroup (init), apply-sysctl-overwrites (init), mount-bpf-fs (init), wait-for-node-init (init), clean-cilium-state (init)
error: Internal error occurred: error executing command in container: failed to exec in container: failed to start exec "b67e6e00172071996430dac5c97352e4d0c9fa3b3888e8daece5197c4649b4d1": OCI runtime exec failed: exec failed: unable to start container process: open /dev/pts/0: operation not permitted: unknown
To solve this issue downgrade to k3s v1.23