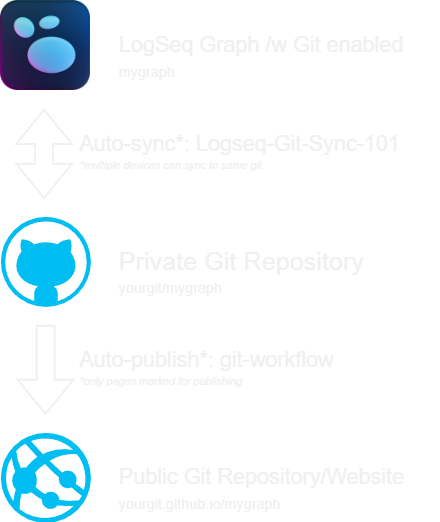
This repository provides comprehensive instructions for setting up and publishing your private LogSeq Graph as a shared site on your <owner>.github.io location using GitHub Actions.
Example:
If the <owner> is
BestOwnerand you have a private repository namedLogBookcontaining a graph, this action will publish it underbestowner.github.io/LogBook.
When you push information into the private repository containing the LogSeq graph, an action will be triggered. This action will convert all public pages into your public website under a designated subfolder.
To set up your LogSeq Graph in GitHub, you need to use the Logseq-Git-Sync-101 repository.
Detailed instructions on how to accomplish this can be found in the Good and Geeky video tutorial.
This repository will host all your graphs as websites on <owner>.github.io.
-
Follow the instructions to create your own .github.io website if you don't already have one.
-
The LogSeq Graph Repositories require an access token to publish to your site. It is recommended to use the new Fine-grained Tokens, but the classic tokens will also work since you will only be supplying them to a private repository.
-
Since each graph has its own subfolder, there is no basic index file for the site. Browsing directly into a subfolder will result in a 404 error. However, accessing
<owner>.github.io/LogSeqwill work.To provide easy navigation, I have included an
index.htmlfile that can be placed in the root of your <owner>.github.io site. This file dynamically lists all the subfolders as buttons for accessing the graphs.Simply copy the
github.io/index.htmlfile into the root of your new<owner>.github.iosite.This is a very simple index file that can be easily replaced with something better or customized for your personal use.
The Graph repositories use the logseq/publish-spa solution to convert the Graph into a website using a modified action.
-
Before you can publish your LogSeq Graph in a remote repository, you need to provide the GitHub Action with an API secret called GH_TOKEN.
- To create the GH_TOKEN, go to
Settings>Secrets and variables>Action>Secrets(/settings/secrets/actions). - Name the secret GH_TOKEN and add the API access token created in Webiste step.
- To create the GH_TOKEN, go to
-
Copy the file
workflows/logseq-publisher.yamlto your new LogSeq repository under the folder.github/workflows/in your graph's GitHub repository. -
You can manually change the destination by adding the following variables under
Settings>Secrets and variables>Action>Variables(/settings/variables/actions).FOLDERGITHUB_IO
Example:
FOLDER=LogGraph, GITHUB_IO=NextBestOwner, results in: 'nextbestowner.github.io/LogGraph'
