This is a template for writing laboratory reports in LaTeX. It has a predominantly chemical footprint but can be adapted to any need. An example of this template is available here.
This guide, however, is not intended to be a tutorial on how to write in LaTeX, so it assumes that you know how to write a LaTeX file.
- First, you need a LaTeX compiler. You can work offline or online:
- online:
- you can use [TeXShop][texshop] or a similar native client to typeset the LaTeX file or an online editor such Overleaf;
- offline:
- instructions for obtaining it can be found here: http://latex-project.org/ftp.html;
- online:
- Download this package through the release section or alternatively
Code -> Download zipand unzip: - Compile the document through the
main.texfile, the heart of the template contained within the downloaded folder.
The template is structured in such a way that you can comfortably write a report by dividing each section into a different file located in the section folder.
However, there are some files of greater importance that are listed below and addressed in a separate section one by one.
main.texconfig/settings.texconfig/package.texbibliography.bibimg/section/
In this file, the beating heart of the template, you will find in the first few lines:
\documentclass[a4paper]{article} %file structure
\usepackage[utf8]{inputenc}

\input{config/package} %packages used
\input{config/settings} %file with settings
\input{config/package} indicates where all the packages used to build the output file are located. It should only be modified if you know what you are doing because removing packages may compromise the correct composition of main.tex.
\input{config/settings} is the part that styles the final file. This is where the settings, commands and settings of the packages used are contained. It will be analysed in detail in a separate section.
Continuing to scroll through the file, you come across:
%Name and Surname
\def \nome {Name}
\def \cognome {Surname}

%title and data
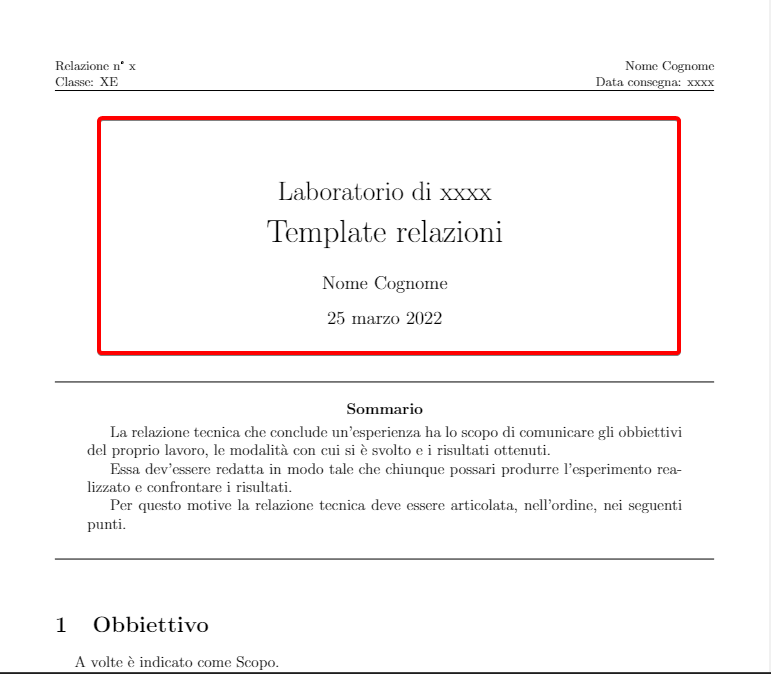
\title{Laboratory of xxxx \\ \huge{Report Template}}
\author{\nome \ \cognome}
\date{\today}
In \def \nome {Nome} e \def \cognome {Surname}, replace Name and Surname in curly braces "{}" with the first and last name of the document's author. This will place the author's first and last name wherever it is needed within the document.
\title{Laboratory of xxxx \\ \huge{Report Template}}} is the command that allows the title to be created. Replace "xxxx" with the name of the subject. If necessary, you can change the whole "Laboratory of xxxx" part. The second piece, however, is the actual title, so you need to replace "Report Template" with your own title.
\date{\today} inserts the compilation date of the file, but it is generally advisable to put the date of the experience you want to report.
This first part in particular goes to form everything that is enclosed in the red rectangle in the image below:
Immediately afterwards comes an important part that defines the header and footer.
%page style
\pagestyle{fancy}
\fancypagestyle{plain}{}
\fancyhf{}
\rhead{\nome \ \cognome \\ Delivery date: xxxx}
\lhead{Report No. x \\ Class: XE}
\rfoot{Page \thepage \hspace{1pt} of \pageref{LastPage}}
\lfoot{\includegraphics[scale=0.1]{img/GitHub/qrcode_github.com.png} LaTeX Template by M.Griot}
\setlength{\headheight}{22.54448pt}
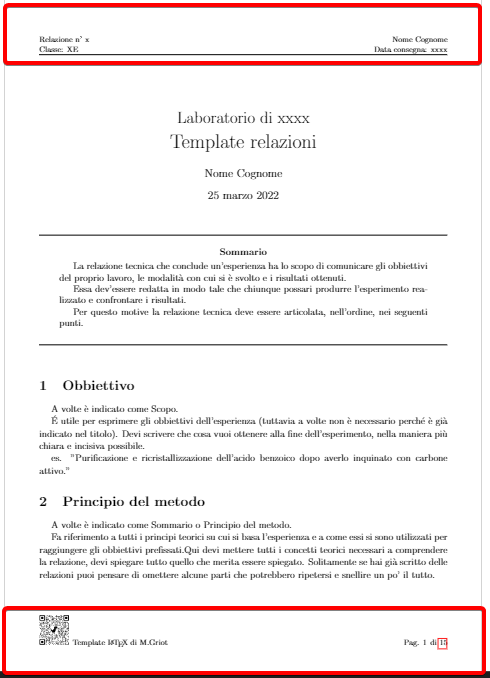
\rhead{\nome \ \cognome \\ Data consegna: xxxx}takes care of putting the author's name and surname, this part automatically, and the delivery date in the header of each page of the document. For the date you need to put the delivery date of the report instead of "xxxx". This is to keep better track of laboratory activities.- The line
\lhead{Report No. x \\ Class: XE}allows you to write the report number. If you were to write more reports over time, you would need to replace "x" with the correct number. There is also the possibility to insert the class or course by changing "Class: XE" to yours. \rfoot{Page. \thepage \hspace{1pt} of \pageref{LastPage}}, on the other hand, writes the page number in the right footer by putting the current page number and the total number of pages, useful if you are afraid that some sheets may be lost. It is advisable not to modify it too much.\lfoot{\includegraphics[scale=0.1]{img/GitHub/qrcode_github.com.png} Template \LaTeX \;di M.Griot}is the penultimate line and creates a QRcode at the bottom left with the link to this page and indicates the author of the template. If you do not want this addition, simply delete the entire line. Of course, if you use this template, I would be happy if you would include the address of this page or the name of its author, but the decision is up to you!- The last line,
\setlength{\headheight}{22.54448pt}, adjusts the height of the header and footer and is not recommended to be modified.
This second part goes to form everything that is enclosed in the red rectangles in the image below:
Finally, there is the body text section.
\hypersetup{pdftitle={Template Example}, pdfauthor={\cognome \; \nome}}

\begin{document}

\maketitle
\input{section/0_Sommario}
\input{section/1_Obbiettivo}
\input{section/2_Principio_del_metodo}
\input{section/3_Strumenti}
\input{section/4_Reagenti}
\input{section/5_Procedimento}
\input{section/6_Reazioni}
\input{section/7_Dati_e_Calcoli}
\input{section/8_Conclusioni}
\input{section/9_Bibliografia}
\input{section/10_H_e_P_frasi}

\input{section/link_utili}
\input{section/esempi}
\end{document}
- The first line
\hypersetup{pdftitle={Template Example}, pdfauthor={\cognome \; \nome}}serves to display the file name and author as properties of the generated PDF. \maketitleallows you to build the Title section we discussed earlier. Do not delete it or the document title will disappear.- All lines between
\maketitleand\end{document}are all sections that are imported to compose the document. Those that see a number before the name, e.g.\input{section/1_Obbiettivo}, are to be kept, as needed, while the last two lines can be deleted as they load text that is useful to the Template but useless for the purpose of a report.
This file, which can be reached via the path: config/settings, is the file dedicated to holding the information and preferences for building the document. The lines of code that compose it are few and simple.
%%%%%Colors
\definecolor{red}{RGB}{255,0,0}
\definecolor{orange}{RGB}{255,165,0}
\definecolor{blue}{RGB}{0,0,255}
\definecolor{green}{RGB}{143,206,0}

%%%%%%%%%% ToDo notes
% \usepackage[colorinlistoftodos,prependcaption,textsize=tiny,disable]{todonotes}
\newcommandx{\unsure}[2][1=]{\todo[linecolor=red,backgroundcolor=red!25,bordercolor=red,#1]{#2}}
\newcommandx{\change}[2][1=]{\todo[linecolor=orange,backgroundcolor=orange!25,bordercolor=orange,#1]{#2}}
\newcommandx{\info}[2][1=]{\todo[linecolor=blue,backgroundcolor=blue!25,bordercolor=blue,#1]{#2}}
\newcommandx{\improvement}[2][1=]{\todo[linecolor=green,backgroundcolor=green!25,bordercolor=green,#1]{#2}}
\newcommandx{\thiswillnotshow}[2][1=]{\todo[disable,#1]{#2}}

%per flowchart
\tikzstyle{startstop} = [rectangle, rounded corners, minimum width=3cm, minimum height=1cm,text centered, draw=black, fill=red!30]
\tikzstyle{io} = [trapezium, trapezium left angle=70, trapezium right angle=110, minimum width=3cm, minimum height=1cm, text centered, draw=black, fill=blue!30]
\tikzstyle{process} = [rectangle, minimum width=3cm, minimum height=1cm, text centered, draw=black, fill=orange!30]
\tikzstyle{decision} = [diamond, minimum width=3cm, minimum height=1cm, text centered, draw=black, fill=green!30]
\tikzstyle{arrow} = [thick,->,>=stealth]
\pgfplotsset{compat=1.18}

%for H and P phrases
\input{config/H_P_command}

%adds the bibliography file for citations
\addbibresource{bibliography.bib} %Import the bibliography file
- The lines below
%%%%%Colorsallow you to define colours. You can add other colours manually to further customise your document. - The lines below
ToDo notesallow you to define markers within the text, useful for highlighting missing parts, writing notes or alerts as shown in the figures below. - The lines below
%per flowchartare for defining the settings for building flowcharts, in particular the cells and arrows. You can modify them or add other geometric shapes. - The line
\input{config/H_P_command}allows you to import a file that allows you to write the P and H phrases quickly and automatically within the report by writing only the number of such phrases. - Finally, the line
\addbibresource{bibliography.bib}is responsible for importing the file containing the bibliography details in.bibformat`
This is the file that contains all the packages used for this document. If necessary, other packages can be added.
\usepackage[italian]{babel}%translation of automatically generated parts
\usepackage{geometry}
\geometry{a4paper,top=3cm,bottom=3cm,left=1.5cm,right=1.5cm} %page  dimension
\usepackage[fontsize=13pt]{scrextend} % for change the fontsize, different from article class
\usepackage{fancyhdr}
\usepackage{indentfirst} %indentation in the first sentence of the paragraph
\usepackage{lastpage}
\usepackage{xcolor}
\usepackage{mdframed}
\usepackage[version=4]{mhchem}%for chemical formulas and equations
\usepackage{chemfig} %for 2D chemistry formulas
\usepackage{modiagram} % molecular orbital diagrams
\usepackage{wrapfig}
\usepackage{pgfplots}
\usepackage{floatrow}
\usepackage{tikz}
\usepackage{subcaption}
\usepackage{longtable} %Multi-page tables
\usepackage{graphicx}
\usepackage{amsthm}
\usepackage{amssymb}
\usepackage{tabularx}
\usepackage{array}
\usetikzlibrary{shapes.geometric, arrows, calc, patterns, positioning}%per flowchart
\usepackage{amsmath}
\usepackage{booktabs}
\usepackage{multicol}
\usepackage[font=scriptsize]{caption}%per image captions
\usepackage{xstring} % to create p and h phrase command
\usepackage{csquotes}
\usepackage[colorinlistoftodos,prependcaption,textsize=tiny]{todonotes}%only for notes, useful for taking notes, if you add "disable" they are all removed from the pdf but can remain in the text.
\usepackage{xargs} % Use more than one optional parameter in a new commands
\usepackage[autocite=superscript,style=chem-acs,articletitle,doi,url]{biblatex}%bibliography, use the \autocite command to use the American Chemical Society style
\usepackage{hyperref}%hyperlinks
We will not analyse all the installed packages but will only focus on a few.
\geometry{a4paper,top=3cm,bottom=3cm,left=1.5cm,right=1.5cm}allows you to choose the page layout more freely, in this case giving a top and bottom margin of 3 cm and a right and left side margin of 1.5 cm. Of course, by varying these numbers you can change the margins to best suit your needs.\usepackage[fontsize=13pt]{scrextend}allows you to have more freedom in changing the font size without having to comply with LaTeX's strict rules. In this case, size 13 was chosen, but it can be changed as needed.\usepackage{indentfirst}allows you to indent even the first lines after section headings, its use depends on personal taste.\usepackage[autocite=superscript,style=chem-acs,articletitle,doi,url]{biblatex}sets a citation style with biblatex in line with the America Chemical Society, to use this style you need to use the\autocitecommand in the text.
This file stores all the data required for citations. See the biblatex documentation for more information.
For the images, a folder is used where they are collected in order to make the working folder more tidy and clean. It is recommended that you place the images in this folder, with a proper subdivision, in order to make the work more orderly.
It is the beating heart of the report, this folder contains the files that make up the report. It contains several files:
- 0_Sommario (Summary)
- 1_Obbiettivo (Objective)
- 2_Principio del metodo (Principle of the method)
- 3_Strumenti (Instruments)
- 4_Reagenti (Reagents)
- 5_Procedimento (Procedure)
- 6_Reazioni (Reactions)
- 7_Dati e Calcoli (Data and Calculations)
- 8_Conclusioni (Conclusions)
- 9_bibliografia (Bibliography)
- 10_H e P frasi (H and P phrases)
- esempi (Examples)
- link utili (Useful Links)
The explanation of the files 1_Obbiettivo to 9_bibliografia are reported in the files themselves and in the sample pdf that you can retrieve above.
The files esempi and link utili are for user assistance and should never be incorporated into the final report.
This is an example of how to improve the README.md file by translating it into English and adding more explanations. Remember to keep your README file clear, concise, and easy to understand for users who are new to your project.


