FF ⇒ Fast Forward, mpeg ⇒ Moving Picture Experts Group
💡 MPEG stands for "Moving Picture Experts Group," and it refers to a set of standards developed by a working group of experts. The MPEG standards are focused on audio and video **compression** and **coding**. They define various methods for compressing audio and video data to enable efficient storage and transmission while maintaining acceptable quality.The MPEG group is the alliance of working groups who are behind setting many of the most important video standards being used today including the MP4 format.
- MPEG-1: This standard was introduced in the early 1990s and is responsible for formats like MPEG-1 Audio Layer III (MP3) for audio compression and Video CD (VCD) for video storage.
- MPEG-2: Introduced in the late 1990s, MPEG-2 is used for digital television broadcasting, DVD videos, and some digital video broadcasting standards.
- MPEG-4: This standard, introduced in the late 1990s as well, is more versatile and supports various multimedia applications, including video streaming, interactive multimedia, and mobile devices. It includes codecs like H.264 (also known as AVC) and AAC (Advanced Audio Codec).
- MPEG-7: This standard focuses on the description of audiovisual content, enabling better searching, indexing, and retrieval of multimedia content.
- MPEG-21: This standard aims to provide a framework for multimedia applications and services, enabling the integration of various multimedia technologies.
- MPEG-DASH: Dynamic Adaptive Streaming over HTTP (DASH) is an adaptive streaming protocol based on MPEG standards, allowing for efficient video streaming over the internet.
- MPEG-H: MPEG-H Audio is an audio codec that supports immersive and 3D audio experiences, making it suitable for technologies like Virtual Reality (VR) and Augmented Reality (AR).
- Open-source project
- Collection of libraries and tools
- For handling multimedia files and streams (audio/video)
- Can use it for free “Free Licence” (GPL/LGPL)
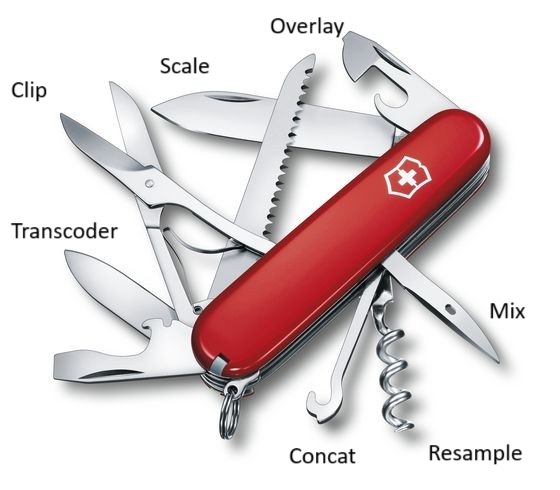
- Swiss army knife of transcoding/streaming
- Versatile (multiple functions)
- Fast
- Simple to run
- Very flexible
- Supports a very wide range of codecs, formats, devices, and protocols
- It is still active and under development
- It has a large community
- Format Conversion: FFmpeg can convert audio and video files between different formats. This is particularly useful when you need to make media content compatible with different devices, software, or platforms.
- Video Compression: FFmpeg includes various codecs and compression algorithms that allow you to reduce the size of video files without compromising too much on quality. This is important for efficient storage and streaming.
- Audio Manipulation: You can use FFmpeg to manipulate audio files by changing their formats, bit rates, sample rates, and channels. It can also apply effects, normalize audio levels, and perform other audio-related tasks.
- Video Editing: While FFmpeg is not a full-fledged video editing software, it can perform basic video editing tasks like cutting, trimming, merging, and concatenating video clips.
- Streaming: FFmpeg supports live streaming and adaptive streaming protocols, making it suitable for broadcasting live events or creating online streaming platforms.
- Transcoding: Transcoding involves converting media content from one codec to another. FFmpeg is often used for this purpose, especially when dealing with video platforms, streaming services, or different hardware devices that require specific codecs.
- Batch Processing: You can automate batch processing tasks with FFmpeg, allowing you to apply the same operation to multiple files.
- Command-Line Interface: FFmpeg provides a command-line interface, which gives you fine-grained control over various settings and options. This is particularly useful for advanced users and developers who want to integrate multimedia processing into scripts and applications.
- Customization: FFmpeg's open-source nature allows developers to modify and extend its functionality to suit specific needs. This makes it adaptable for a wide range of projects.
- Cross-Platform: FFmpeg is available for various operating systems, including Windows, macOS, Linux, and more. This cross-platform compatibility makes it accessible to users on different systems.
- Video Streaming Platforms like YouTube, iTunes…
- Media Players and Editors like VLC
- Media asset management systems
- Transcoders
- Video Conversion Tools
- Broadcasters
- Live Streaming Services
- Video and Audio Processing Libraries
- Digital Signage
- Gaming Industry
- etc
- libavcodec ⇒ contains all the encoders and decoders that FFmpeg support
- libavformat ⇒ has all the muxers and demuxers for dealing with various container formats like MP4, MKV, AVI, and more.
- libavfilter ⇒ consists of a huge number of filters that you can use to modify the audio or video such as scaling, cropping, resizing, and more
- libavdevices ⇒ support several different input and output devices
- libavutil ⇒ contains utility functions that are used by other FFmpeg components. It includes functions for memory management, data structures, mathematics, and more
- libswscale ⇒ is responsible for image scaling and conversion. It's often used to adapt the dimensions and color spaces of video frames
- libswresample ⇒ handles audio resampling and conversion. It's used for adjusting audio sample rates, formats, and channels.
- libpostproc ⇒ provides post-processing functionalities for video frames. It can be used for tasks like deinterlacing, noise reduction, and image enhancement
- libavcformat ⇒ focuses on format conversion and supports a wide range of multimedia formats, making it useful for transcoding and format-related tasks
- ffmpeg⇒ core tool of FFmpeg and provides a comprehensive set of options for transcoding, converting, and manipulating audio and video files. It can be used to change formats, resize videos, adjust codecs, and more
- ffplay ⇒ minimal tool for playing audio and video
- ffprobe ⇒ analyzing multimedia files and extracting information about their formats, codecs, streams, bit rates, and more
- ffserver ⇒ allows you to set up a multimedia streaming server. It can stream audio and video content over networks using various protocols
- ffmpeg-avconv ⇒ is a compatibility tool that provides a similar interface to the now-deprecated avconv command. It's useful for transitioning from avconv to FFmpeg
- ffmpeg-resampler ⇒ is a tool for audio resampling and conversion. It can be used to adjust audio sample rates and formats
- ffmpegthumbnailer ⇒ generates thumbnails from video files. It can be used to create preview images for video content.
- qt-faststart ⇒ rearranges the structure of MP4 or MOV files, making them suitable for streaming over the internet.
- ffmpeg-filters ⇒ provides documentation for FFmpeg's various filters, which can be used to modify and process multimedia content.
- ffmpeg-scaler ⇒ provides documentation for FFmpeg's image scaler, which can be used to resize and convert images.
💡 The FFmpeg project doesn’t offer official builds of FFmpeg for any operating system, so you can build FFmpeg yourself from the source code
- Source Code
- Snapshot https://ffmpeg.org/releases/ffmpeg-snapshot.tar.bz2
- Git git clone https://ffmpeg.org/ffmpeg.git ffmpeg
- Through package manager (APT on Ubuntu, Homebrew on Mac)
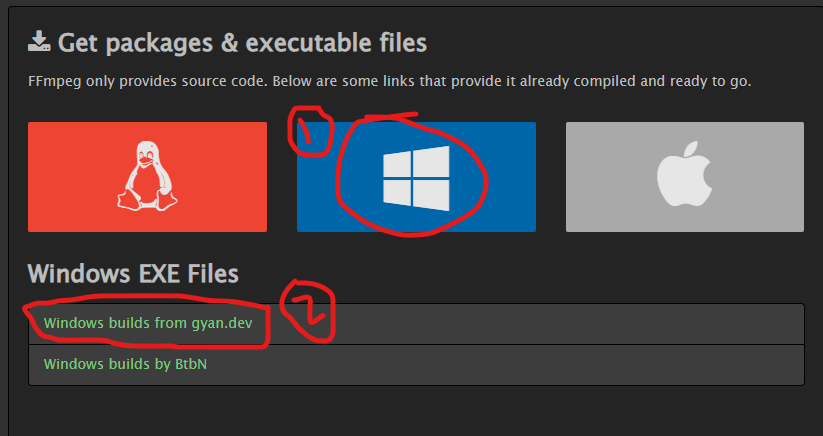
- Through third-party hosted builds: https://ffmpeg.org/download.html for Windows
The easiest way to get FFmpeg installed is by Homebrew package manager
open your terminal and type…
brew  //to install Homebrew package manager
brew install ffmpeg  //to install ffmpeg
ffmpeg //to check version is installedThe easiest way to get FFmpeg installed is by APT package manager open your terminal and type…
sudo apt update   //to get the latest version of apt
sudo apt install ffmpeg  //to install ffmpeg
ffmpeg //to check version is installed-
Get your executable file for Windows
-
Choose the best build for you from
- master builds (full or essential)
- release builds (full or essential) Release Essential is a good choice
-
Extract the downloaded file
-
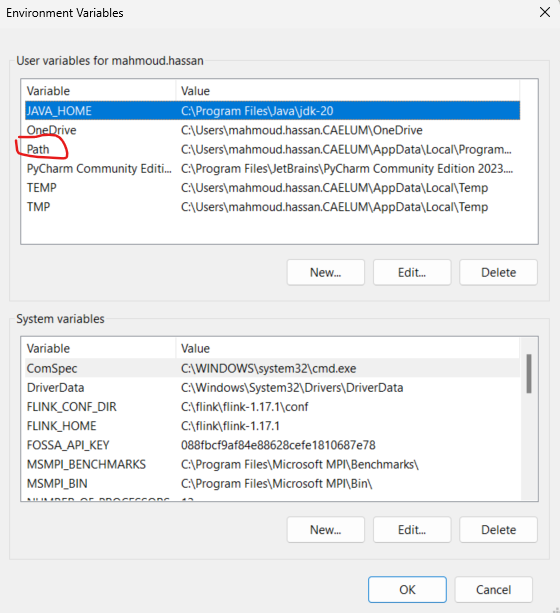
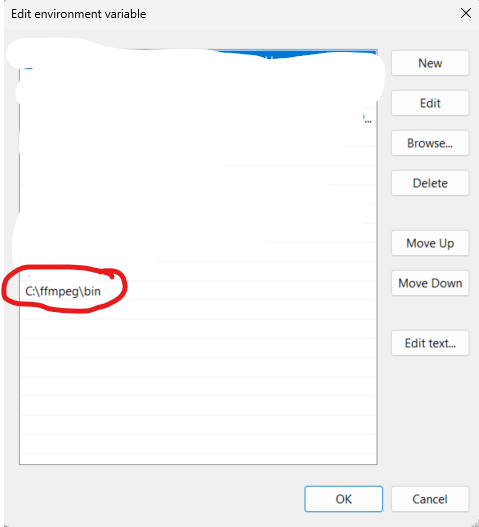
Add bin folder in extracted folder to PATH environment variables
-
Type in your terminal ⇒ ffmpeg to check ffmpeg version
It is a very powerful tool that can be used to extract and show various information about the media for example the resolution of the video, codec information, number of channels in an audio stream, etc.
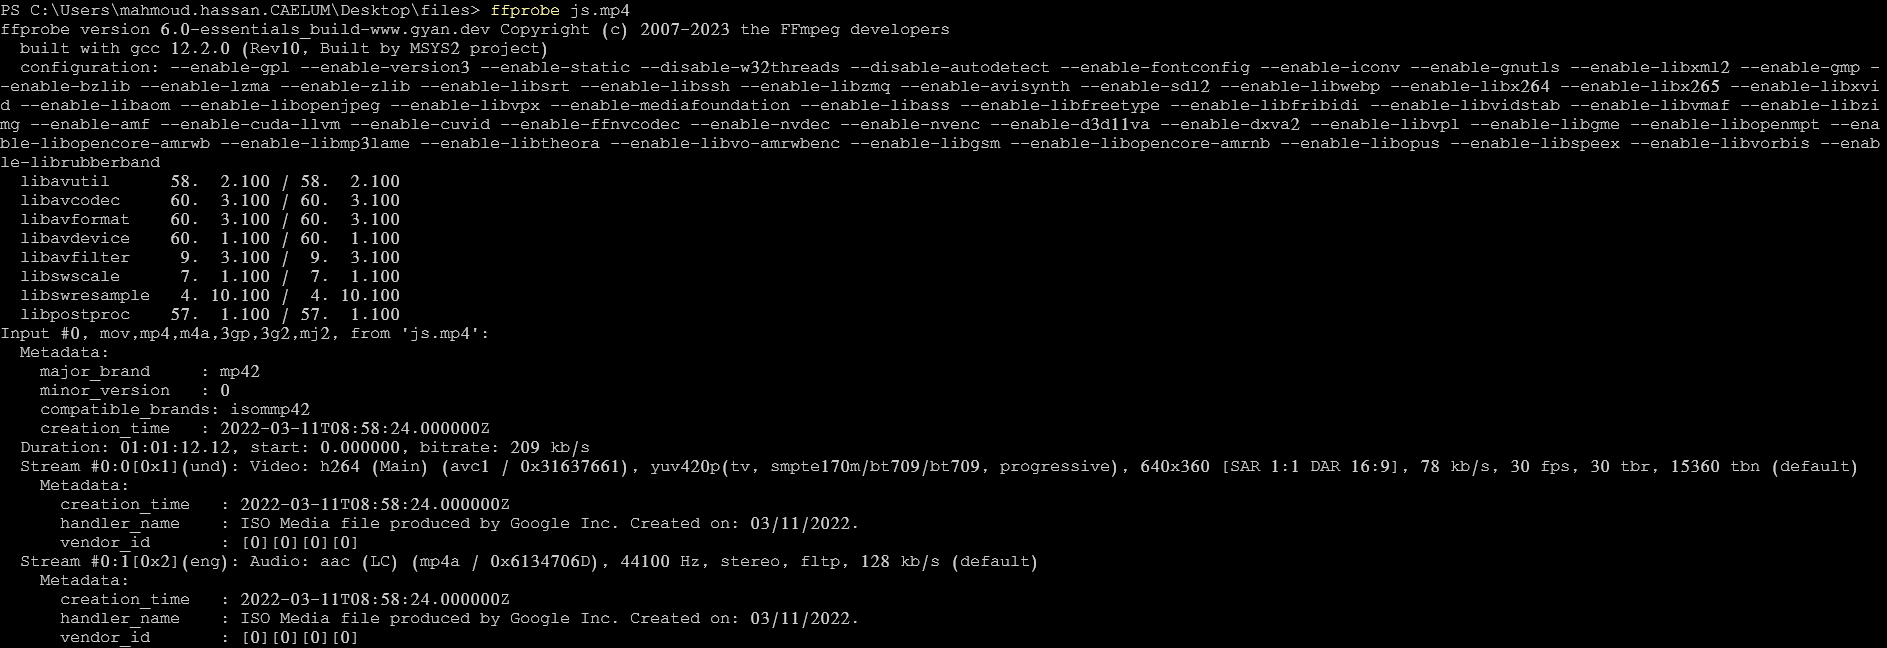
ffprobe [options] [video (name/url)]1- Simple use
ffprobe input.mp4 // [input.mp4] may be local video or video url2- Remove FFprobr banner
ffprobe -hide_banner js.mp43- logs only errors
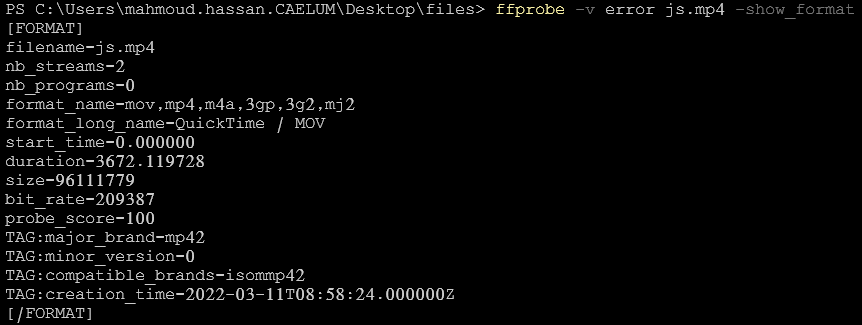
ffprobe -v error js.mp44- show input format
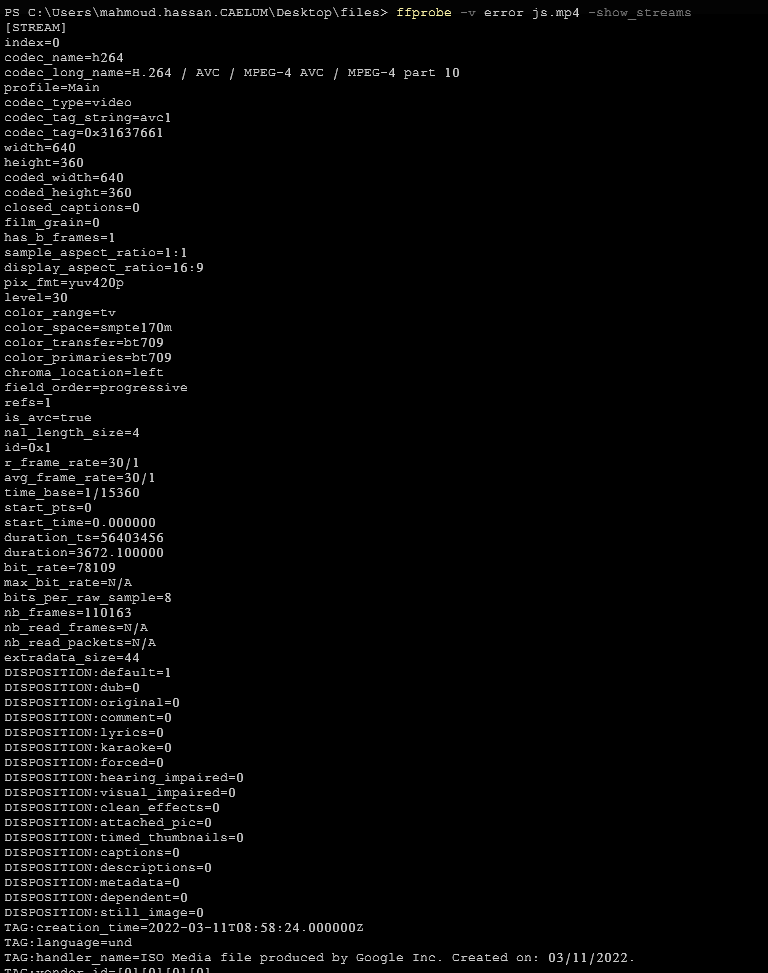
ffprobe -v error js.mp4 -show_format5- show input streams
ffprobe -v error js.mp4 -show_streamsIt will show all information about input video streams (codec name - width - height - codec type - etc.)
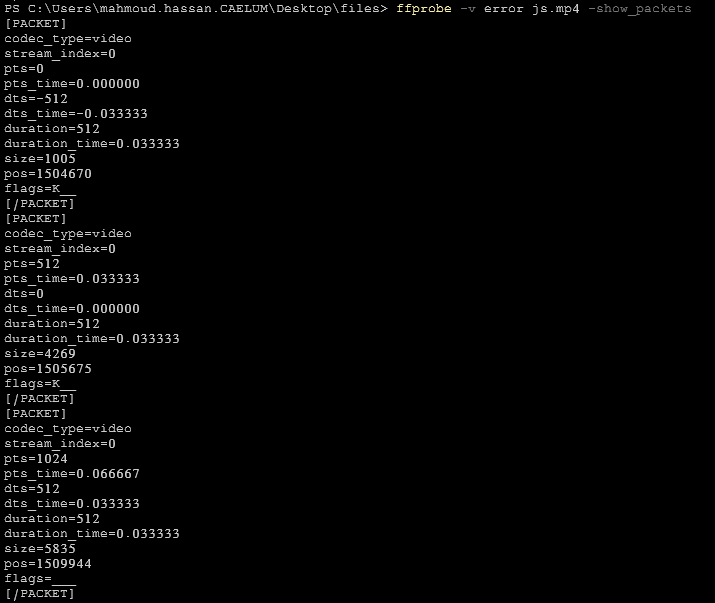
5- show video packets
ffprobe -v error js.mp4 -show_packets6- show video frames
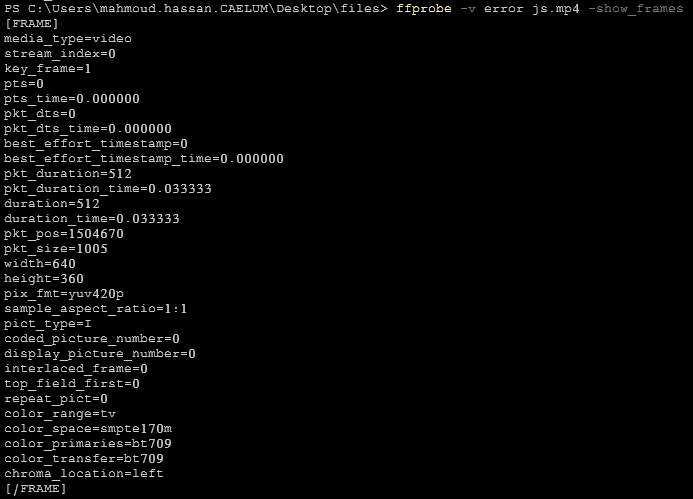
ffprobe -v error js.mp4 -show_frames7- Select video/audio stream
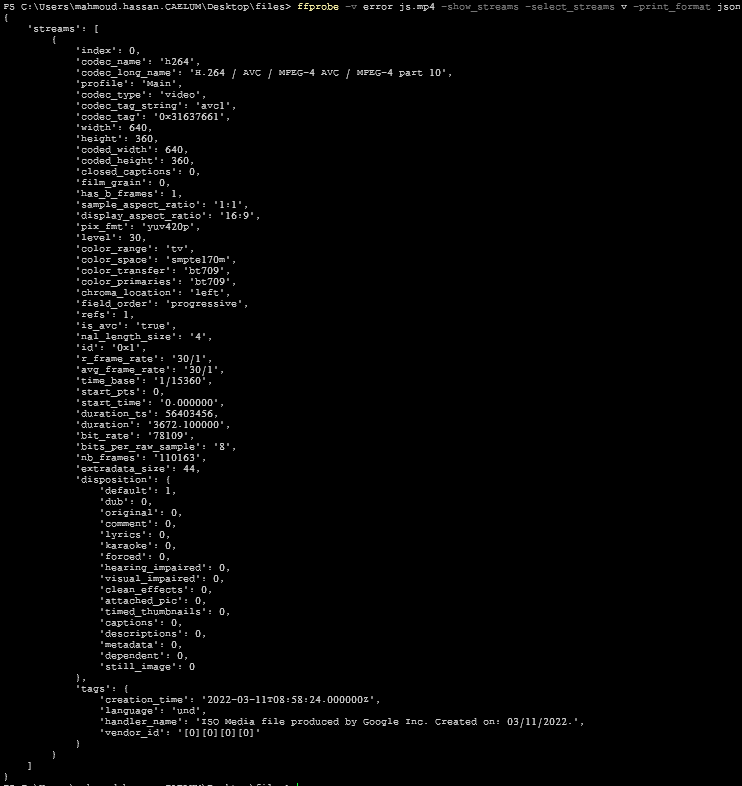
ffprobe -v error js.mp4 -show_streams -select_streams v8- Format output
ffprobe -v error js.mp4 -show_streams -select_streams v -print_format json9- Display a specific property
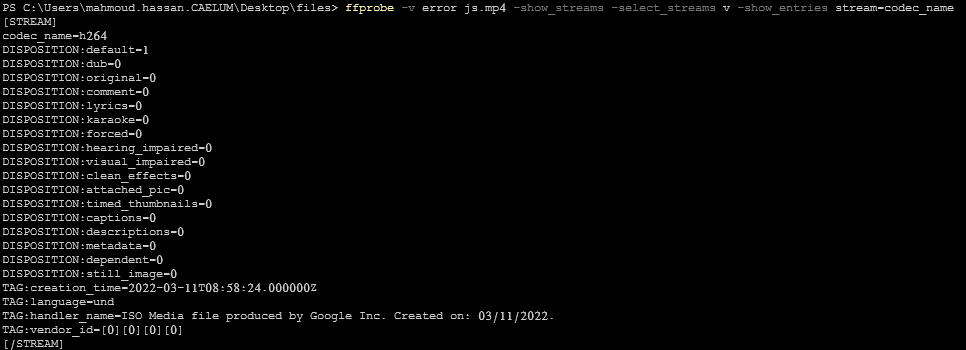
ffprobe -v error js.mp4 -show_streams -select_streams v -show_entries stream=codec_nameffprobe -v error js.mp4 -show_entries format=format_long_name -print_format default** if you want to remove the wrapper **
ffprobe -v error js.mp4 -show_entries format=format_long_name -print_format default=noprint_wrappers=1** if you want to display only value without the key**
ffprobe -v error js.mp4 -show_entries format=format_long_name -print_format default=noprint_wrappers=1:nokey=1It allows you to play various audio and video files directly from the command line without the need for a separate media player application.
ffplay [options] [input file or url]1- Simple use
ffplay source.mp42- Play video without unnecessary logs
ffplay -v error source.mp43- Play video with specific width and height
ffplay -v error source.mp4 -x 1080 -y 9004- Display video with no border
ffplay -v error source.mp4 -x 1080 -y 900 -noborder5- Remove the black area around the video
ffplay -v error source.mp4 -x 10806- Change the window position on the screen
ffplay -v error source.mp4 -top 0 -left 07- display full-screen video
ffplay -v error source.mp4 -fs8- Disable audio playback
ffplay -v error source.mp4 -an9-Disable video playback
ffplay -v error source.mp4 -vn10- Change displayed mode
ffplay -v error source.mp4 -showmode (waves | video | rdft)11- Repeat the played video
ffplay -v error source.mp4 -loop 012- Play a specific section of a video
ffplay -ss 30 -t 10 source.mp413- Disable subtitles
ffplay -v error -sn source.mp4 Shortcuts you can use while a video is playing.
- space => resume/pause
- m => mute/unmute
- f => fullscreen
- double lift click =>  fullscreen
- / or 9 => volume down
- * or 0 => volume up
- w => change mode (audio - video - waves)
- s => frame step
- → => forward 10s
- ← => back 10s
- ↑ => forward 1m
- ↓ => back 1m
- Esc => quit