This repository contains the code and documentation for a supervised emotion classification system using the MuseBox SDK framework and PYNQ. The system uses common USB camera to classify the user's emotional state into one of several predetermined categories.
This repository contains a Jupyter notebook that demonstrates facial emotion classification, powered by MuseBox using a USB camera connected to the SOM KR260 board.
The system is capable of recognizing the following emotions: angry, disgust, fear, happy, sad, surprise, and neutral.
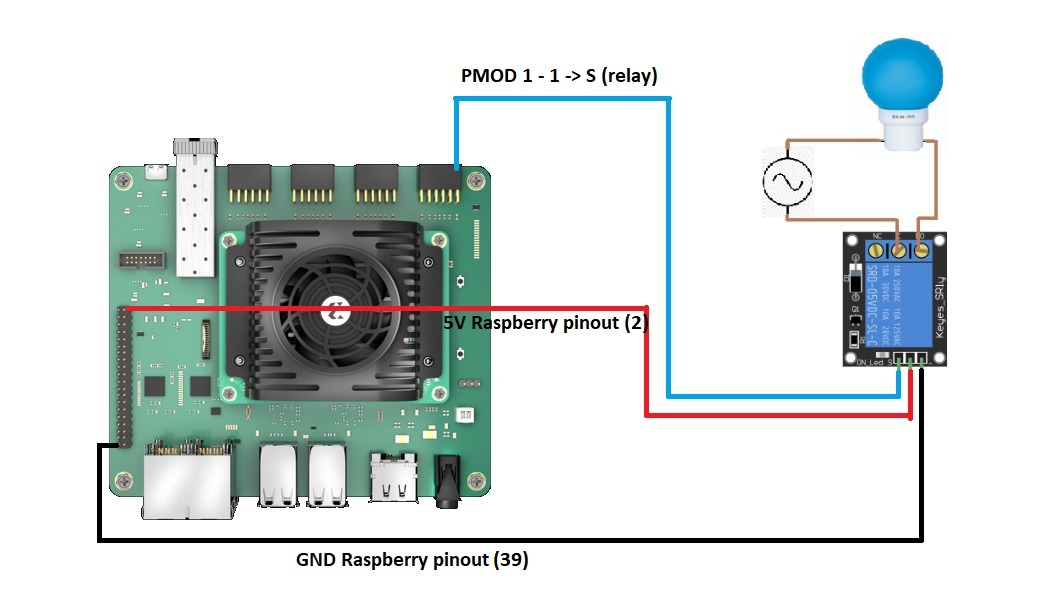
Additionally, it is possible to connect a 5V relay to PMOD 1 of the board, pin 1, in order to control it with the facial expressions. In particular, when the user makes a happy expression, the relay will activate, otherwise it will deactivate. Using a relay, you can control an high voltage component, like a light bulb.
This is the hardware configuration:

The emotion classification system consists of two main components:
-
The MuseBox platform, which is used to infer different AI tasks using the frames from USB camera.
-
The PYNQ platform, which is used to interface to the FPGA (Kria SOM KR260).
To use this system, you will need:
- KR260 FPGA by AMD
- A PYNQ image based on Petalinux for the KR260 (you can get it here)
- The MuseBox library provided in this repo under the "libraries" directory (already installed on the PYNQ image provided before)
To use the system, follow these steps:
-
Turn on the KR260, connect an USB camera (1080p is better) and connect it to the local LAN.
-
(if you want to connect throught ssh for monitoring the board) connect with username "petalinux" and password "root"
-
Open Chrome browser to the board IP at port 9090 (for example, if your board has the IP 192.168.1.9, write on your searchbar http://192.168.1.9:9090). The password for Jupyter Notebook is "xilinx" (as documented in PYNQ)
-
Open the Jupyter Notebook provided in this repo called "Emotion Demo.ipynb" (or if you will use the provided image, is under the directory "The Bring Up")
-
On the Jupyter interface, Kernel -> Restart & Run All
-
Click on "Start button"
-
Enjoy :-)
This project is licensed under the Evaluation License of MuseBox. The brief license is described in the License File
MuseBox License: Evaluation License
PYNQ License : BSD 3-Clause License
This project was created by MakarenaLabs S.R.L.. If you have any questions or comments, please feel free to contact MakarenaLabs.
