These packages are intended to ease the interaction between ABB robots supporting the new Omnicore controller and ROS-based systems, by providing ready-to-run ROS nodes. In particular, we developed the robots' control with ros_control. Furthermore, we integrated moveit! for the supported robots so that you can sends trajectories directly to ros_control and then to the real controller. The supported robots are: Gofa and Yumi Single Arm (together with the SmartGripper).
OS: Ubuntu 20.04 ROS: Noetic
Tested on Ubuntu 20.04 with ROS Noetic. Support on other ROS distro is expected but not tested.
These packages are intended to ease the interaction between ABB OmniCore controllers and ROS-based systems, by providing ready-to-run ROS nodes.
The principal packages are briefly described in the following table:
| Package | Description |
|---|---|
| abb_libegm | (A modified version of https://github.com/ros-industrial/abb_libegm) Provides a ROS node that exposes hardware interface, for direct motion control of ABB robots (via the Externally Guided Motion (EGM) interface). |
| abb_librws | (A modified version of https://github.com/ros-industrial/abb_librws) Provides a ROS node that communicate with the controller using Robot Web Services 2.0 |
| Doc | Provides some documentation about how the RAPID StateMachine running inside the Omnicore Controller |
| moveit_config | Provides the Moveit configurations for the supported robots. |
| omnicore_launcher | Provides all the .launch files to correctly launch the robots in real or simulation. |
| robots_description | Provides ROS nodes for kinematic calculation using the URDF model of the robot (For now only Gofa robot is available). |
| ros_control_ominicore | Provides hardware interface for the robots supporting ABB Omnicore controller. |
| rws_service | Provides some services for the yumi_single_arm SmartGripper. Will be removed in future releases |
Please see each package for more details (e.g. additional requirements, limitations and troubleshooting). Further features of the system are:
- Read robot's joints values (Dha...)
- Read the first 8 Digital Input state of the controller
- Possible to switch through a service FreeDrive control when ROS is running:
service call /set_control_to_free_drive
- Possible to switch to position control (EGM) when ROS is running:
service call /set_control_to_egm
- Move the robot in position control with MoveIt!
- Actuate the Smart Grippers (only available on Yumi Single Arm)
It is assumed that ROS Noetic has been installed on the system in question.
The following instructions assume that a Catkin workspace has been created at $HOME/catkin_ws and that the source space is at $HOME/catkin_ws/src. Update paths appropriately if they are different on the build machine.
The following instructions should setup a ROS workspace where you will clone the current repository.
mkdir -p ~/catkin_ws/src
cd ~/catkin_ws/
catkin buildsudo apt install ros-noetic-ros-control ros-noetic-ros-controllers
sudo apt install ros-noetic-moveitInstall essential dependencies and git, execute the following commands one by one:
sudo apt update
sudo apt upgrade
sudo apt install build-essential gdb cmake git
sudo apt-get install openssl libssl-dev
sudo apt-get install libmysqlclient-dev
Get root access:
sudo -iNavigate to /tmp/ directory (or any other directory to store temporary files).
cd /tmp/Clone the Poco git repo:
git clone -b master https://github.com/pocoproject/poco.gitCompile the libraries:
cd poco
mkdir cmake-build
cd cmake-build
cmake ..
cmake --build . --config ReleaseNote: If you get a library not found error, just install that library via apt.
Install the libraries to include in C++ code:
sudo cmake --build . --target installCopy all the poco file from /usr/local/lib/ to /usr/lib using the root privileges. Afterward you may remove the created /tmp directory.
sudo apt-get install libboost-all-devClone the current repository in the newly created ROS workspace 'catkin_ws' and build it:
cd catkin_ws/src
git clone https://github.com/MerlinLaboratory/abb_wrapper.git
cd ..
catkin build
If there are no errors you are ready to proceed to set up the robot in RobotStudio.
- RobotWare version
7.2or higher (lower versions are incompatible due to changes in the EGM communication protocol). - A license for the RobotWare option Externally Guided Motion (
3124-1). - StateMachine 2.0 RobotWare Add-In (present on the RobotApps of RobotStudio)


After the creation of the system just configure robot to accept external communication both for EGM and Web Services (see next steps).
Open RobotStudio

On the Controller Tab, click Add Controller > One Click Connect..

Click on "Log in as Default User" button

With this configuration, we will set up the IP address of the WAN port where the computer running ROS will be connected.
-
On the Controller tab, in the Configuration group, click Properties and then click
Network settings. The Network settings dialog opens.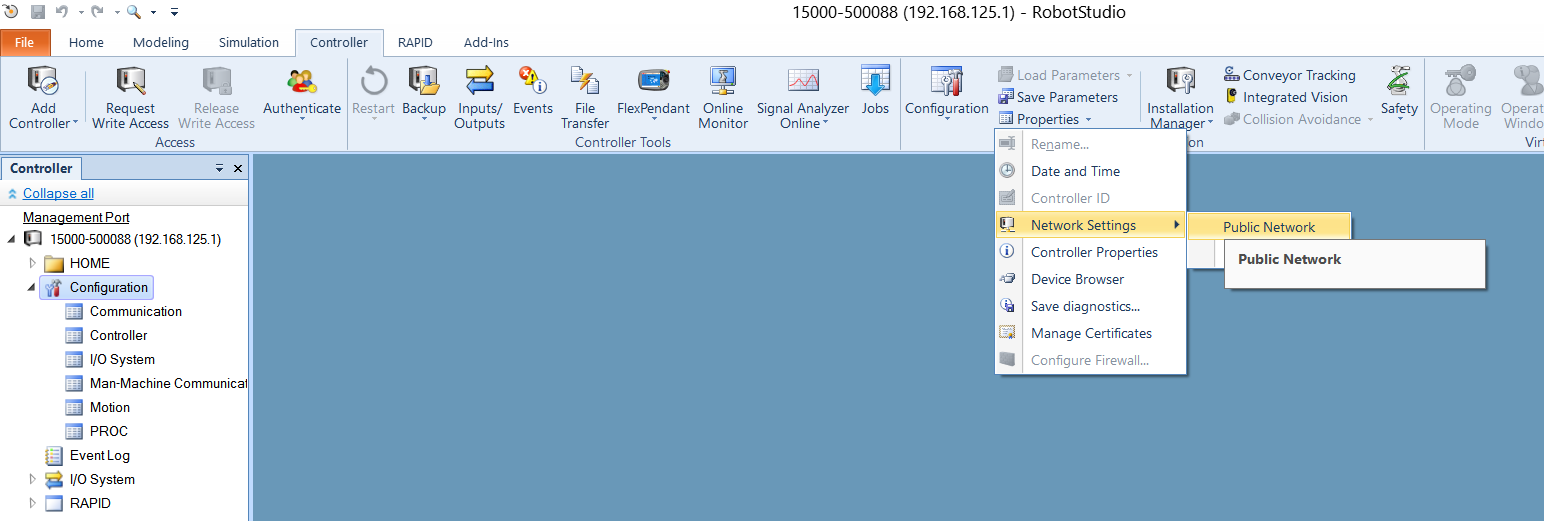
-
Select
Use the following IP addressand then enter the required IP address and Subnet mask boxes to manually set the IP address of the controller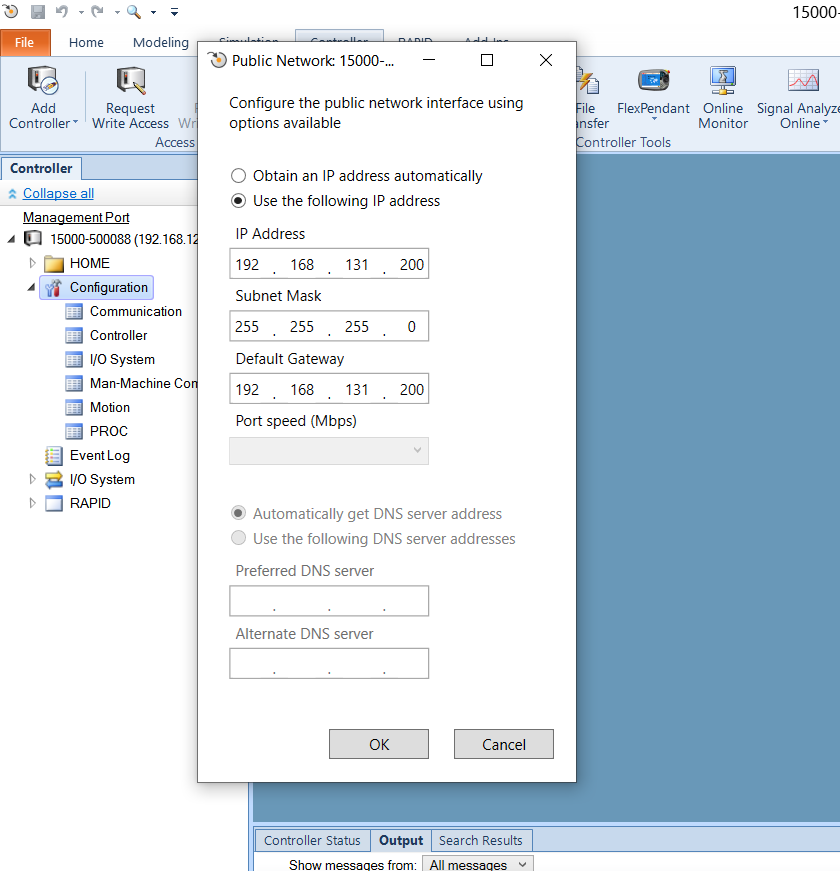


POLIMI SETUP: set WAN IP = 192.168.131.200
This step is optional, also the MGMT port can be used.
The MGMT port have a fixed IP address (192.168.125.1 ) and a DHCP server.
If you are using the MGMT port make sure that the connected computer running ROS is on the same network (192.168.125.xx ) or the DHCP is enabled.
Configure the IP address and the port to use for the UDP protocol. This IP address must be the same of the PC running ROS.
Using RobotStudio, first request the write access.

On the Controller tab, in the Configuration group, click Configuration and then click Communication.

Double click on the UDP Unicast Device item.

POLIMI SETUP:
set ROB 1 IP = 192.168.131.5
set UCDEVICE IP = 192.168.131.5
The ip address 192.168.131.5 is the ip of the Linux machine running ROS. Set the ip address of the Linux machine as static and to the address 192.168.131.5.
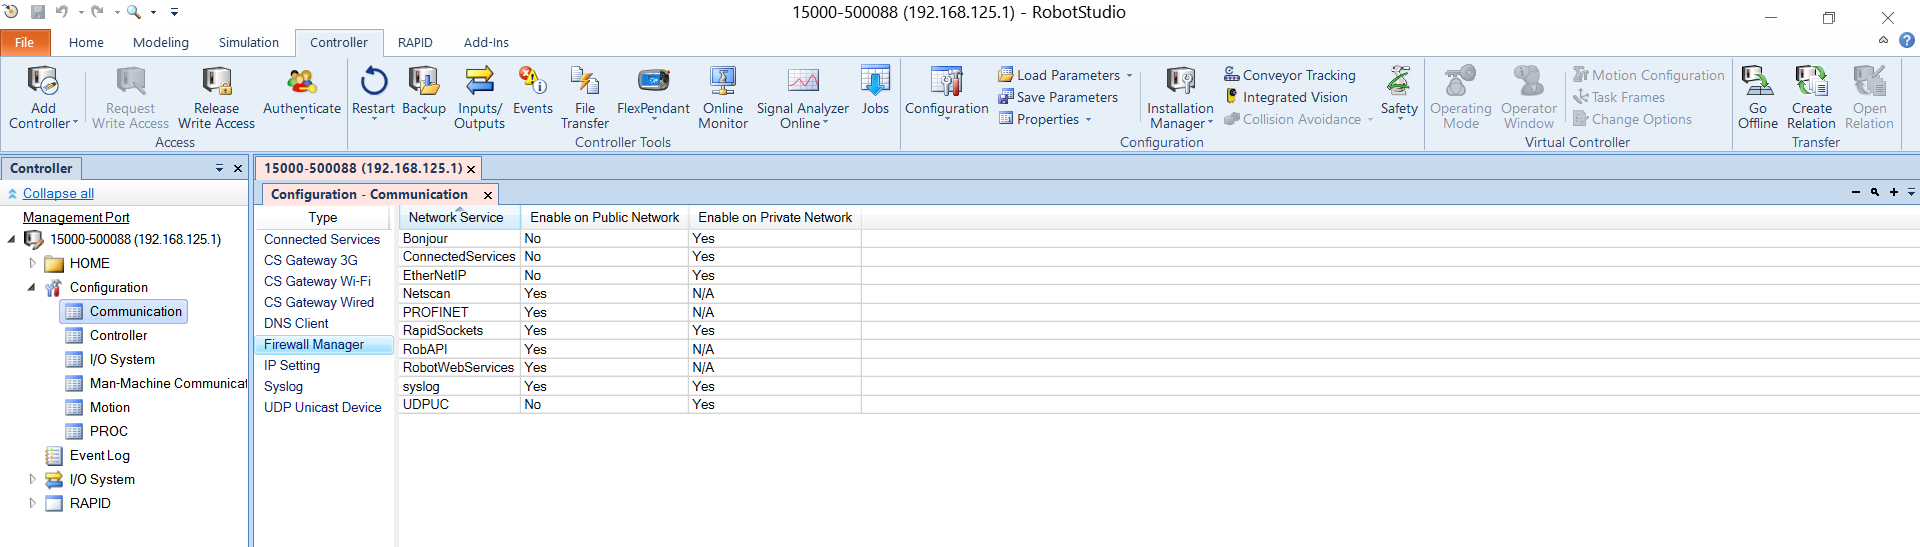
Using the WAN port the firewall on the public network must be configured.
Using RobotStudio, first request the write access.
On the Controller tab, in the Configuration group, click Configuration and then click Communication.
Double click on the Firewall Manager item.
Enable on the public network the following services:
-
RobotWebServices
-
UDPUC (available from RW 7.3.2)

This package use the Robot Web Services 2.0 (RWS) to control the robot. Each RWS session is logged using a user that must to be present on the User Authorization System of the controller (for more details about User Authorization System, see Operating manual - RobotStudio). If not specified, for the RWS communication, the default user is used:
- Username: Default User
- Password: robotics
By default, the Default User does not have the grant Remote Start and Stop in Auto (run rapid routine from the WAN port in Auto mode).
The steps to configure the user account are:
- Using RobotStudio log-in on the controller as Administrator (usually with the user Admin and password robotics).


-
On the Controller tab, in the Access group, click Authenticate and then click
Edit User Account.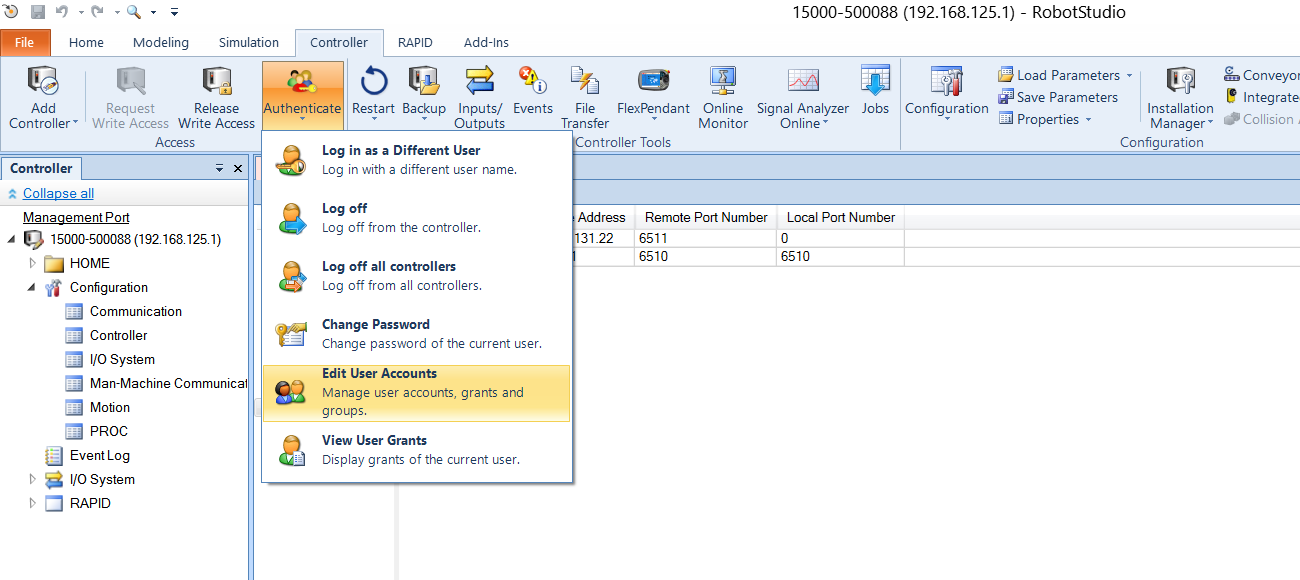
-
On the tab roles check if the grant Remote Start and Stop in Auto is checked for the role of the Default User.
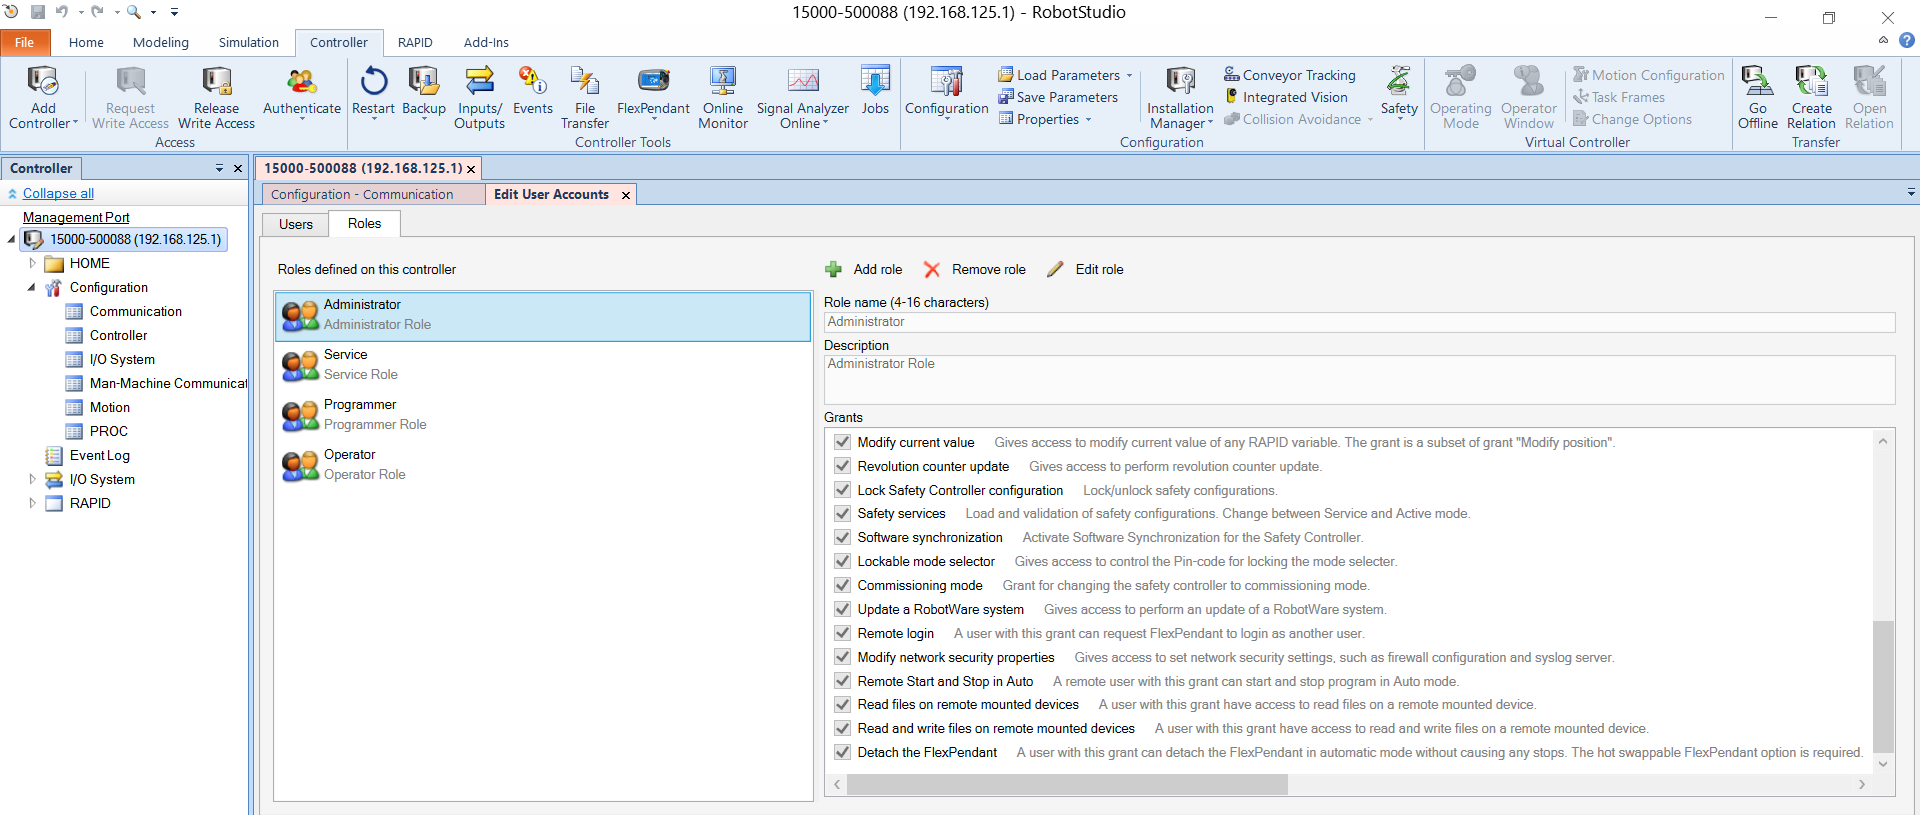
-
Apply.


Any other user can be used by passing the name and the password to rws_interface.
Navigate to ros_control_gofa/config/gofa_cfg.yaml Modify the parameters based on your robot configuration (e.g. ip_robot, name_robot,task_robot, etc.). Note that the IP robot in the yaml has to be the same of the WAN port of the robot controller (POLIMI Setup = 192.168.131.200)
Finally
- Make sure that the application StateMachine 2.0 has loaded in robotstudio in rapid codes from the controller folder "EGM"
- Set robot in Automatic and Motors ON
- Connect an ethernet cable from your Linux machine to the controller WAN port
- Set the Linux machine IP address to 192.168.131.5 (it needs to be the same as the one in "Setup the UDP device")
By default, the repo launches the Gofa robot with a position_controllers/JointTrajectoryController:
  source devel/setup.bash
  roslaunch omnicore_launcher real_robot.launch
If the previous command's output is "EGM IS NOT CONNECTED", Linux's firewall blocks UDP communications with the robot controller. Therefore, you will need to allow the communication in INPUT and OUTPUT to your Linux machine with these two commands:
  sudo iptables -I INPUT -p udp --dport 6511 -j ACCEPT
sudo iptables -A OUTPUT -p udp -m udp --sport 6511 -j ACCEPTBefore you try to use the robot purely in simulation with RobotStudio + ROS, let me save you valuable time: it does not work. Or at least, it works if you want to control the robot with RWS only and not with EGM (note that if you want to move the robot without a RAPID script, you will need EGM pkg).
The fun thing is that it does not work not because of a software problem from ROS or this package but because ABB, at least when you want to virtualise the controller with RobotStudio, does not allow any communication with external computers except the one where RobotStudio is running. RobotStudio can only run on Windows, so it is possible (as far as I know) to have the two running on the same machine. If you solve this issue somehow, email me at niccolo.lucci@polimi.it or make a pull request.