Project that aim to realize a GAN model capable of coherent objects inpainting inside a given image. This project took a lot from these two repositroies:
- Swagan A pytorch implementation of Stylegan2 based on wavelets, without progressive growing.
- Lama A pytorch implementation of a GAN model for inpainting, that exploit the Fourier transform.
- Table of contents
- Model results
- Install the COIGAN module
- Prepare the Severstal steel defect dataset
- Train a COIGAN model
- Evaluate the COIGAN model
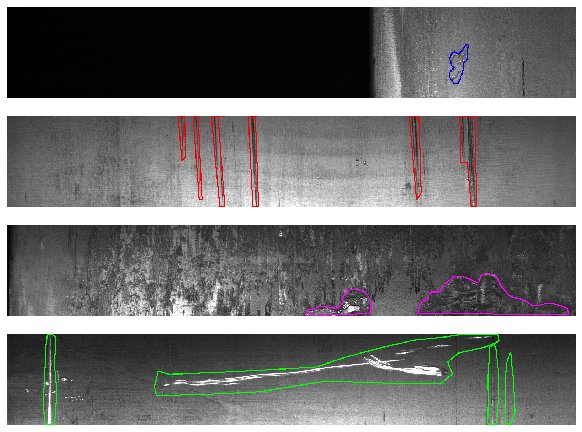
The dataset used for the training is the Severstal steel defect detection dataset, that contains images of steel plates with defects, and the corresponding masks that indicate the location of the defects. This dataset was splited in 2 halves, one for the training and one for the evaluation of the model, and then tilled in 256x256 images, from an initial resolution of 256x1600. Below some images from the original dataset, showing the different defect classes:
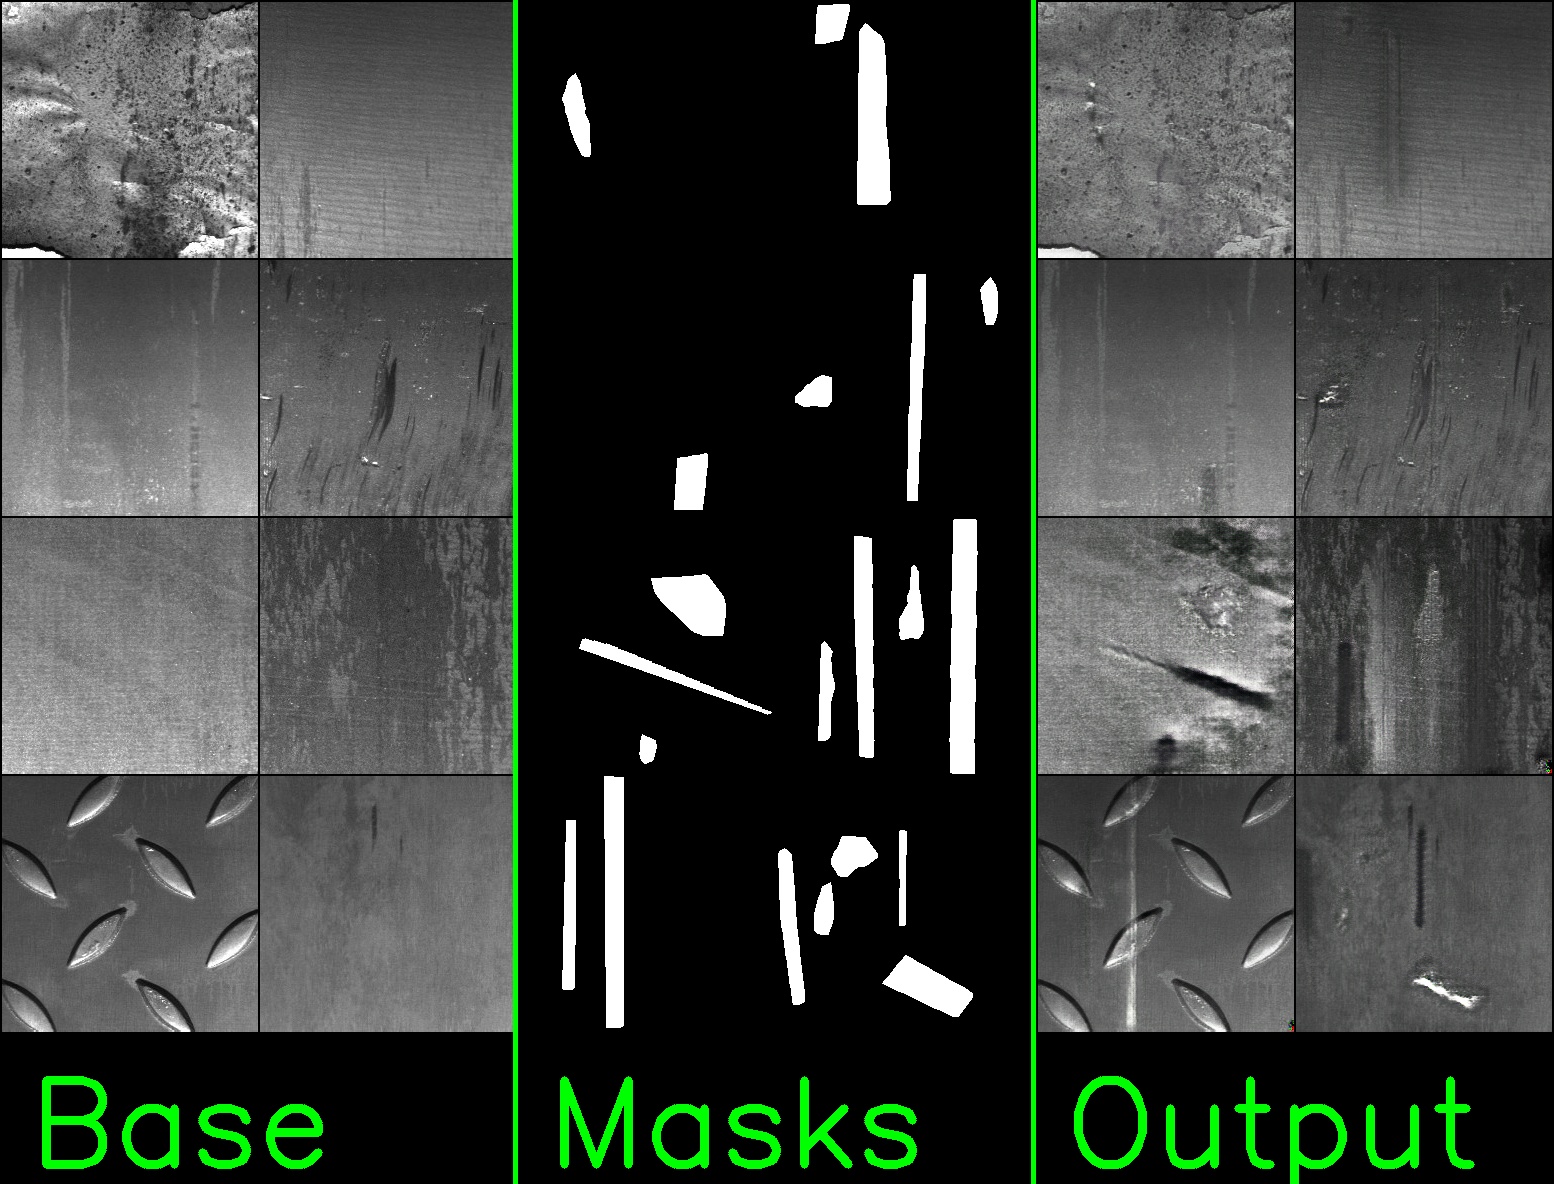
These images are a batch of 8 inputs and 8 outputs of the model, extracted from the step 190000 of the released model.
The image show (left) the base images used for the inpainting process, (center) the masks concatenated to the base images, giving to the model a reference where to apply the defects (note: to simplify the illustration the masks have been collapsed into one, but the masks are splitted in 4 classes/channels in the training), (right) the output of the model (the inpainted images).
The FID score of the released model calculated with the tiled test set (not used for the gan training)
In this section is expleined how to install the COIGAN module in your system, with all his dependencies.
A suggested approch is to create a virtual environment and install the module and his dependencies in it, to avoid conflicts with other projects. To create a virtual environment you can use the following commands:
cd /<project_target_path>/COIGAN-controllable-object-inpainting
python3 -m venv .env
source .env/bin/activate

# here you can install the module and his dependencies...

# to deactivate the virtual environment
deactivateThe project is tested with CUDA 11.5, and with the following version of torch and torchvision:
- torch 1.12.1+cu116
- torchvision 0.13.1+cu116
You can install these versions with the following command, considering a Linux system with CUDA 11.6 or 11.5 installed:
pip install torch==1.12.1+cu116 torchvision==0.13.1+cu116 --extra-index-url https://download.pytorch.org/whl/cu116To install the COIGAN module you need to clone the repo and install it with pip, so follow the commands listed below to install the module in your system:
cd /<project_target_path>/
git clone https://github.com/MassimilianoBiancucci/COIGAN-controllable-object-inpainting.git
cd COIGAN-controllable-object-inpainting
pip install -e COIGAN
Now the module is installed, follow the command bellow if you need to uninstall it:
pip uninstall COIGANThe first thing to do before the dataset preparation is to install and setup the kaggle api credentials, if you already have the kaggle-api installed jump this step.
install the the kaggle api in you system:
pip install kaggleNow you need to retrive the username and the API-KEY and follow one of the following options:
- options 1: You can setup 2 env vars, one for the
export KAGGLE_USERNAME=datadinosaur
export KAGGLE_KEY=xxxxxxxxxxxxxx
- option 2: You can setup a json file in the kaggle api files folder
in the above file you need to add the user name and the API_KEY this way
/home/<username>/.kaggle/kaggle.json{ "username":"xxxxxxxxxxxxxx", "key":"xxxxxxxxxxxxxx" } - option 3: You can download the zip file by yourself at the the challenge page and put it in the folder:
/<your_path>/COIGAN-controllable-object-inpainting/data/severstal-steel-defect-detection
If you have any trouble with the kaggle api setup, refer to this link where the procedure is explained in detail: Kaggle api repo or follow the option 3.
The first thing to do before launch the preparation script is to change the var repo_dir to the path of the repo in your local es:
repo_dir: /home/ubuntu/COIGAN-controllable-object-inpaintingthe var is present inside the config file:
/home/ubuntu/COIGAN-controllable-object-inpainting/configs/data_preparation/severstal_dataset_preparation.yamlIn this section are explained the principal variables of the dataset preparation script, to customize the dataset generated. You can find those variables in the config file:
/your_path/COIGAN-controllable-object-inpainting/configs/data_preparation/severstal_dataset_preparation.yamlHere the more interesting variables:
- dataset_name: name of the dataset, it will be used to create the folder where the generated dataset will be saved. The actual path will be
/<your_path>/COIGAN-controllable-object-inpainting/datasets/severstal-steel-defect-detection/<dataset_name> - repo_dir: path of the repo in your local, specify the main path of the COIGAN repo, es:
/<your_path>/COIGAN-controllable-object-inpainting. - original_tile_size: size of the original tile, for original tile is intended the dimension of the images in the input dtaset, for the severstal dataset is 1600x256, do not change this value.
- tile_size: size of the tile that will be generated, the tile will be cropped from the original tile, so the tile size must be smaller than the original tile size. This can be changed if you want a model with a different output shape.
- binary: This parameter specify if the datasets generated will be in binary json format, if set to True the read(+30%) and write(+150%) operations will be faster, and the dataset will be smaller in size.
- n_workers: number of workers used where the multithreading approach is used. -1 means that all the available cores will be used.
- split_mode: random or fair, specify the method used to split the samples in two sets, if fair is selected, the algorith try to create a train and test set with the same proportion of each class, and defected and non-defected samples. If random is selected, the samples are randomly splitted in two sets.
- train_ratio: Specify how many samples will be placed in the train set from the original dataset, the value must be between 0 and 1.
- test_ratio: Specify how many samples will be placed in the test set from the original dataset, the value must be between 0 and 1.
- black_threshold: From the train dataset will extracted the samples without defects, to create a base dataset used as base for the inpainting process, but in the dataset there are images with big black areas, not suitable for the process, so this parameter specify the threshold used to segment the black area (consider 0 is totally black and 255 is totally white).
- black_area_max_coverage: Specify the maximum allowed extension of the black area on a sample, if greather than this value the sample won't be added to the base dataset.
Before running the coigan training there are a few things to do, other than the dataset preparation. One step is to download the model used for the perceptual loss, and you need to review the training settings, changing the path of the COIGAN repo in the training configs.
For running the COIGAN training script and use the Resnet perceptual loss, you need to download the resnet50 model from the MIT Scene Parsing Benchmark dataset, you can download it running the script download_models_loss.py in the COIGAN-controllable-object-inpainting/scripts folder. NOTE: you should change the var repo_dir in the script to the path of the repo in your local es:
repo_dir= "/<your_path>/COIGAN-controllable-object-inpainting"Then run the download script:
python download_models_loss.pyThis will create a folder in the project root called models_loss/ade20k/ade20k-resnet50dilated-ppm_deepsup with inside the model checkpoint used for the loss.
Before running the training script you need to setup the config files with your specific settings, the file of interest for the triaining can be found under the path:
/<your_path>/COIGAN-controllable-object-inpainting/configs/trainThe most important variable to change is in the file:
/<your_path>/COIGAN-controllable-object-inpainting/configs/train/location/default_locatons.yamlIn this file the var project_home must be changed to the path of the repo in your local path for the COIGAN repo, so all the other paths will be correctly set,
and the scripts will work in this folder.
The other variables that could be interesting to change are:
- conf_name: name of the configuration, it will be used to create the folder where the training logs will be saved.
- checkpoint: path of the checkpoint to load, if you want to continue the training from a previous checkpoint, or if you want to use a pretrained model. In such a case the checkpoint file must have the name with the format: .pt ex: 95000.pt
- max_iter: number of steps of the training.
- batch_size: batch size used for the training, for each thread if distributed data parallel is used.
- num_workers: number of workers used for the dataloader, if distributed data parallel is used, the number of workers will be multiplied by the number of gpus.
- gen_steps: number of consecutive generator steps before pass to the discriminator steps.
- disc_steps: number of consecutive discriminator steps before pass to the generator steps.
- use_g_ema: if True the generator will use the exponential moving average of the generator weights, saving g_ema model in the checkpoints.
- use_ref_disc: if True, in addition to the defects discriminator will be used a second discriminator that will be trained to reduce the distance between the original tile training dataset images, and the generated images. (this reduce the artifacts but introduce some morfological changes in the generated images, respect the base images, even where there are no inpainting masks).
- mask_base_img: if True, the base image will be passed to the generator with the areas to inpaint set to 0, if False the base image will be passed as it is.
- input_mask_noise_mean: mean of the gaussian noise added to the input mask, if 0 no noise will be added.
- input_mask_noise_std: standard deviation of the gaussian noise added to the input mask, if 0 no noise will be added.
- input_mask_noise_smooth: size of the linear filter used to generate a smoothed version of the input mask before adding the noise, if 0 no smoothing will be applied.
- distributed: if True the training will be distributed on multiple gpus with distributed data parallel, if False the training will be run on a single gpu.
- enable_wandb: if True the training will be logged on wandb, if False the training will not be logged on wandb. Note: the wandb settings are in the file:
/<your_path>/COIGAN-controllable-object-inpainting/configs/train/logger/default_logger.yaml- log_img_interval: number of steps between each image logging.
- log_weights_interval: number of steps between each weights and gradients logging.
- checkpoint_interval: number of steps between each checkpoint saving.
- log_shapes_and_defects: if True the shapes and defects used in the training process will be logged to wandb on the imgs log, if False the shapes and defects will not be logged in the training.
Under the field defaults are specified all the subfields that link through the hydra library other files, with specific settings:
- generator: contains the settings for the generator, like the num of input channels or the number of blocks.
- discriminator: contains the settings for the discriminator, like the num of input channels or the input size of the model.
- optimizers: contains the settings for the optimizers, for all the models used in the training (generator, discriminator, ref_discriminator).
- losses: contains the settings for the losses, for all the losses used in the training, mainly the weights for each loss, and some other parameter for some special loss.
as specified in the file:
/<your_path>/COIGAN-controllable-object-inpainting/configs/train/losses/default_losses.yamlThere are all the parameters to tweak the losses used in the training. The wheights disable the corresponding loss if set to 0. The losses supported in the training pipeline are:
- l1: L1 loss, used for the reconstruction of the inpainted image.
- l1_smooth_masked: L1 loss, used for the reconstruction of the inpainted image, applying a smoothed weighted mask to the loss pixel wise, allowing to specify how the weight varies from the center of the mask to the border, and the weights of the base and inpainted objects.
- adversarial: adversarial loss, is the loss that use the discriminator to evaluate the quality of the defects generated by the generator.
- ref_adversarial: adversarial loss, is the loss that use the ref_discriminator to evaluate the general distance fo the entire image generated by the generator, from the original images.
- resnet_perceptual: resnet perceptual loss, is the loss that use the resnet50 model to evaluate the distance of the generated image from the base image passed as input, evaluating the resnet inference features.
- resnet_pl_smooth_masked: resnet perceptual loss, is the loss that use the resnet50 model to evaluate the distance of the generated image from the base image passed as input, evaluating the resnet inference features, applying a smoothed weighted mask to the loss pixel wise, allowing to specify how the weight varies from the center of the mask to the border, and the weights of the base and inpainted objects.
- generator_reg: generator regularization, is the path length regularization loss.
- discriminator_losses:logistic: discriminator logistic loss, is the loss used by the discriminator to evaluate the quality of the defects generated by the generator. discriminator_reg: discriminator regularization, is the path length regularization loss, the R1 regularization loss is used.
- ref_discriminator_losses:logistic: ref discriminator logistic loss, is the loss used by the ref_discriminator. (used only if use_ref_disc is True)
- ref_discriminator_reg: ref discriminator regularization, is the path length regularization loss, the R1 regularization loss is used. (used only if use_ref_disc is True)
To launch the training script and train a COIGAN model you only need to run the script train.py in the COIGAN-controllable-object-inpainting/scripts folder.
To evaluate the COIGAN model you can use the script eval.py or the inference.py scripts in the COIGAN-controllable-object-inpainting/scripts folder.
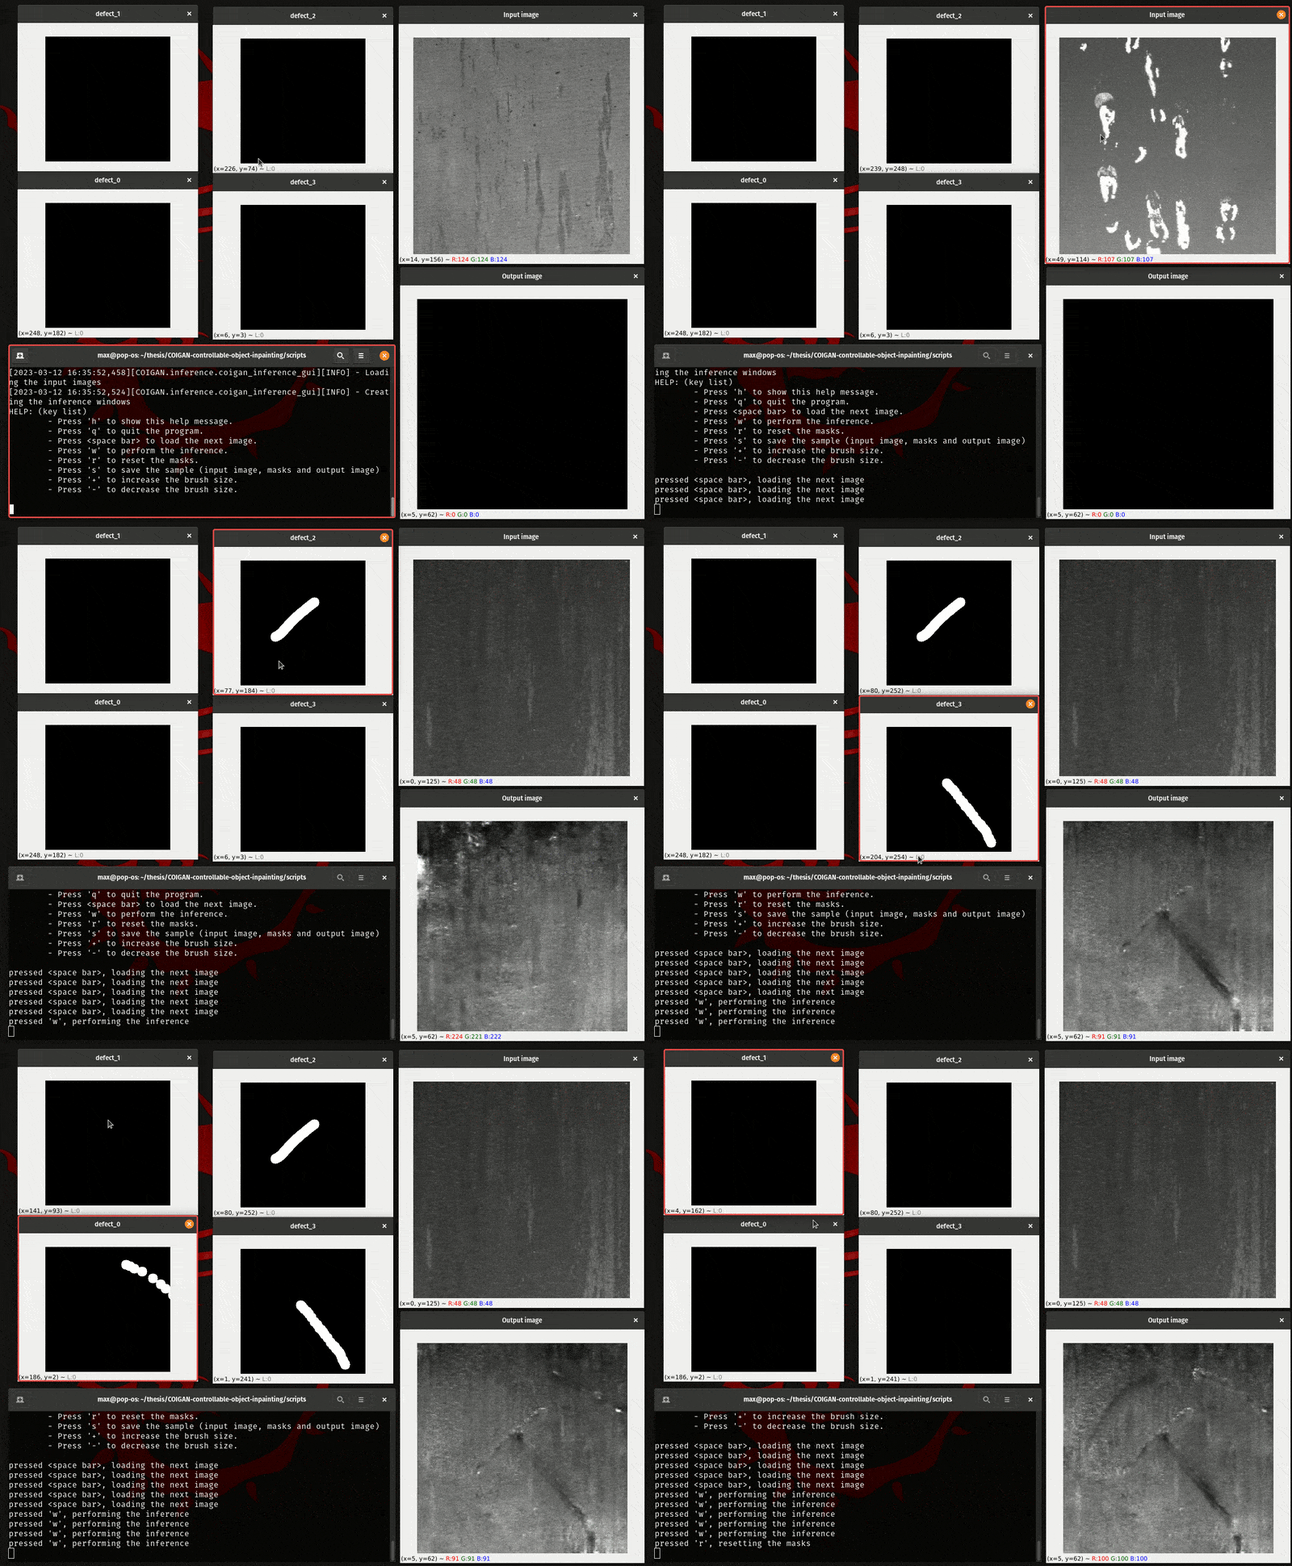
To manually evaluate the COIGAN model you can use the script inference.py, that script load a folder of images and open 2+n cv2 windows, where n is the number of defect classes of the model, and the other 2 windows are for the base image and the inpainted image.
With this method you can manually draw the inpainting mask for each class, and then pass it to the model to inpaint the image, for a direct evaluation.

The manual interface script work with the following keys:
- Hold the right mouse button to draw the inpainting mask.
- Hold the center mouse button to erase the inpainting mask.
- Press 'h' to show the help message.
- Press 'q' to quit the program.
- Press to load the next image.
- Press 'w' to perform the inference.
- Press 'r' to reset the masks.
- Press 's' to save the sample (input image, masks and output image)
- Press '+' to increase the brush size.
- Press '-' to decrease the brush size.
Other settings can be changed in the file:
/<your_path>/COIGAN-controllable-object-inpainting/configs/inference/test_inference_1.yamlThis paragraph explain how to use the script for the automatic inference, this script use a dataloader like in the training script and generate a dataset of inpainted images, and compare it with the test set trough the FID score. Note that all the images in the generated set will have damages while the test contains images without damages too.
The evaluation parameters are specified in the file:
/<your_path>/COIGAN-controllable-object-inpainting/configs/inference/test_eval.yamlIn this file are present the following parameters:
- conf_name: name of the configuration, it will be used to create the folder where the training logs will be saved.
- device: device used for the training, follow the pytorch convention.
- checkpoint: path to the checkpoint to load for the image generation.
- train_imgs_path: path to the folder containing the training images, these images are used to run a fid calculation with the test_imgs, so this FID can be used as reference for the FID between the generated images and the test images.
- test_imgs_path: path to the folder containing the test images, these images are used to run a fid calculation with the generated images.
- generated_imgs_path: path to the folder where the generated images will be saved. do not modify this parameter. n_samples: number of samples to generate, the same number of samples will be used for the fid calculation, for both generated and test images.
- inception_dims: the actual features to use for the fid calculation, the default value is 2048, but you can use 768, 192, 64, for different depth of the inception model.
- batch_size: batch size used for the inference with the COIGAN model.
- inc_batch_size: batch size used for the inference with the inception model.
- num_workers: number of workers used for the dataloader.
- prefetch: number of batches to prefetch for the dataloader.
- mask_base_img: if True the generated images will have the base image as background, if False the generated images will have a black background. keep this parameter as in the training configuration.
- use_g_ema: if True will be used the exponential moving average of the generator, this parameter can be set to True only if this parameter was set to True in the training configuration.
- max_iter: needed for the dataset configuration, set the dataset length, DO NOT TOUCH THIS PARAMETER.
- distributed: needed for the dataset configuration, set to False, DO NOT TOUCH THIS PARAMETER.
To run the evaluation script just run the script eval.py in the COIGAN-controllable-object-inpainting/scripts folder, the results will be saved in the folder:
/<your_path>/COIGAN-controllable-object-inpainting/experiments_eval/<conf_name>Here you can find the generated images, and a json file containing the FID score between the genertaed images and the test images, and the FID score between the train images and the test images. Note that the model is traind using the defects and the bases found inside the train images.


