

Click the search button below to search documentation or error code

ZEGOCLOUD's easy example is a simple wrapper around our RTC product. You can refer to the sample code for quick integration.
- Android Studio Bumblebee or later
- An Android device or Simulator that is running on Android 5.1 or later and supports audio and video. We recommend you use a real device.
- Create a project in ZEGOCLOUD Admin Console. For details, see ZEGO Admin Console - Project management.
- Clone the easy example Github repository.
- Checkout to
call_invitebranch
- Go to Firebase Console and create new project if you don't have one.
- Andd new
Androidapp to your Firebase project. Download thegoogle-service.jsonfile and move it into your Android app module root directory.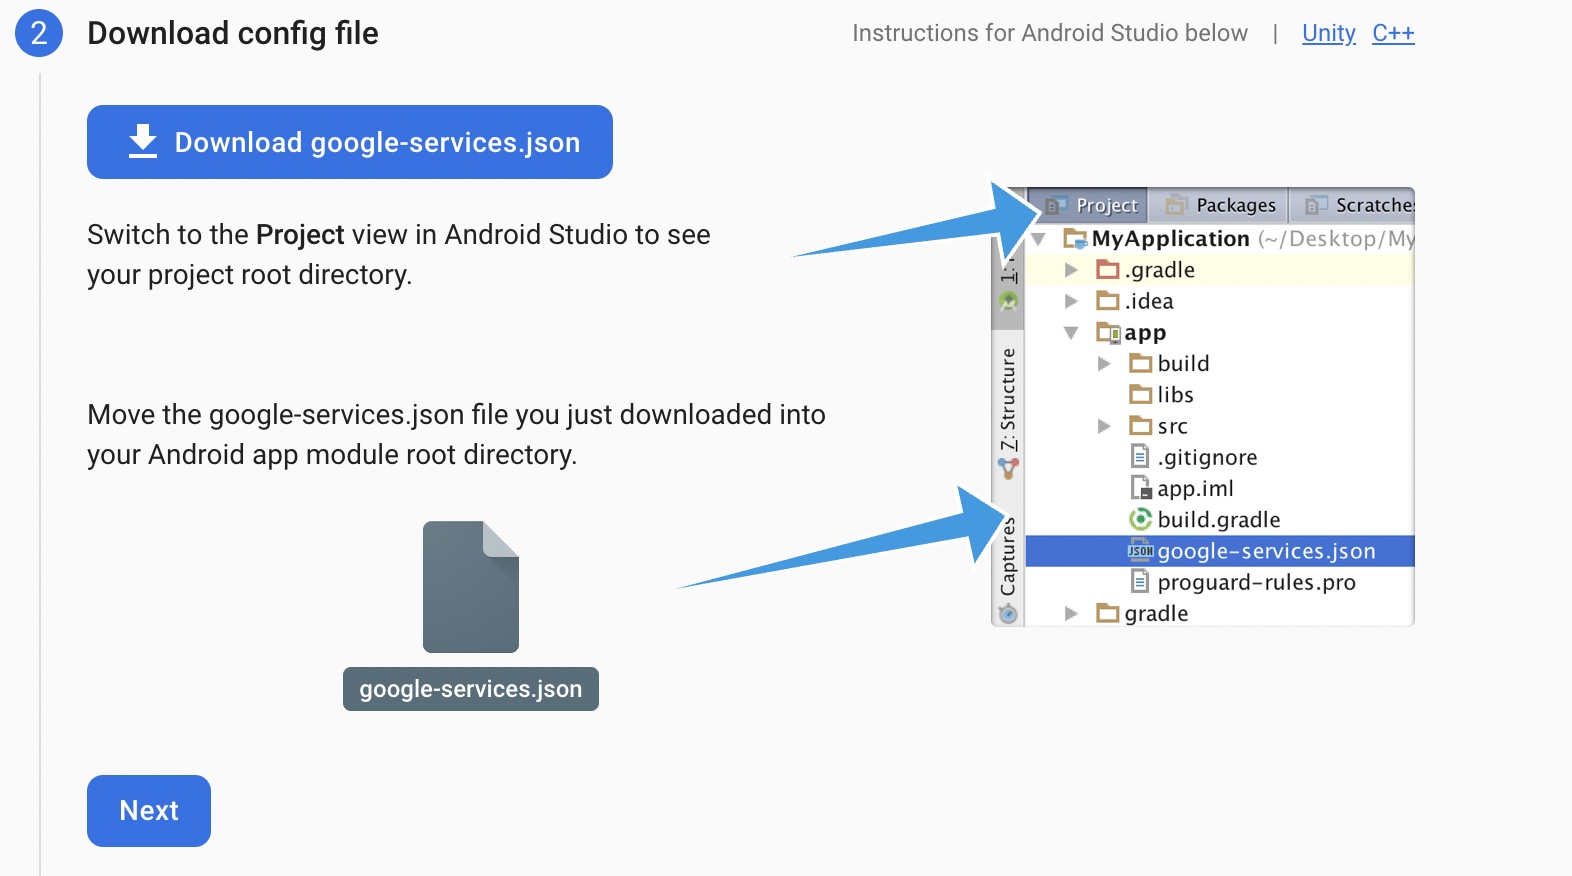
- Add the google-services plugin as a dependency inside of your
/android/build.gradlefile: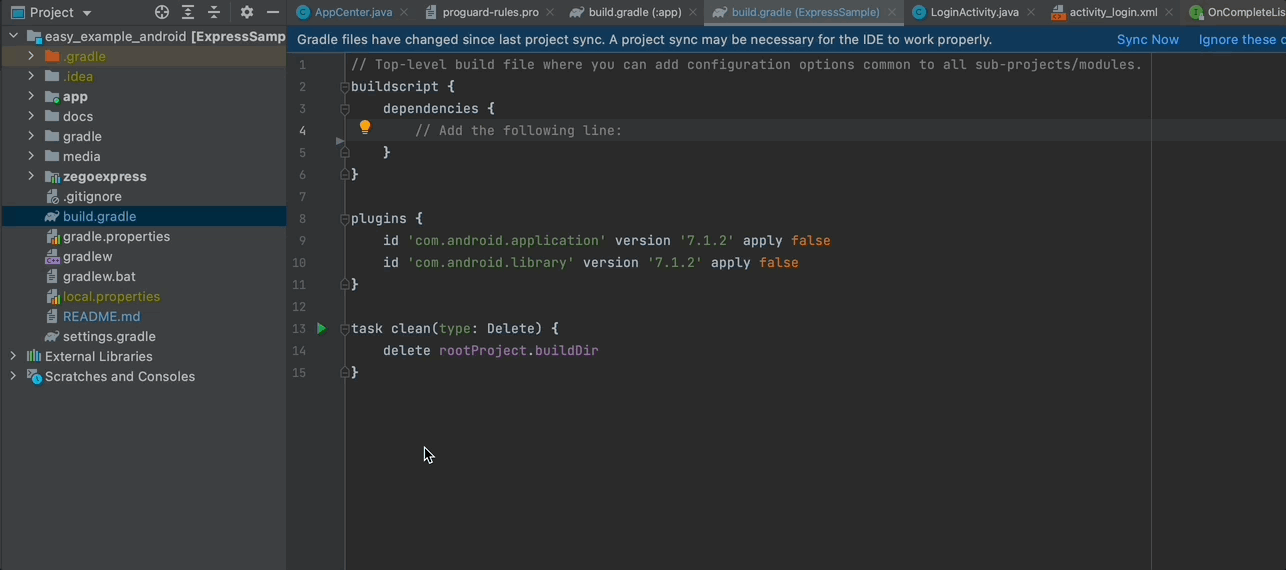


buildscript {
  dependencies {
    // ... other dependencies
    classpath 'com.google.gms:google-services:4.3.10'
    // Add me --- /\
  }
}- Execute the plugin by adding the following to your
/android/app/build.gradlefile: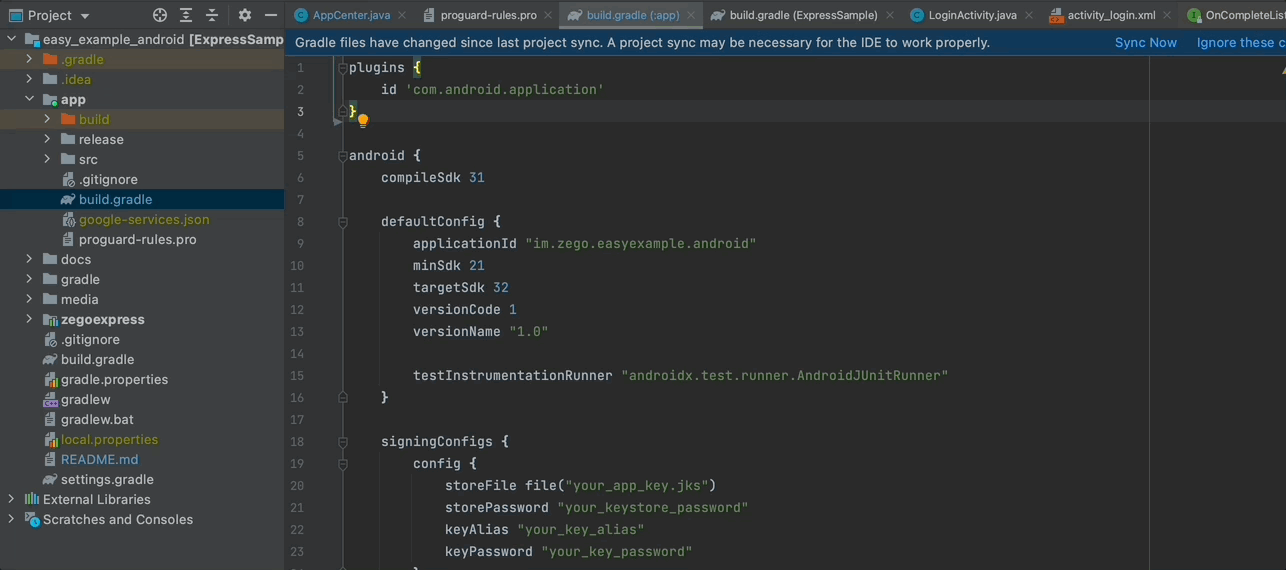

apply plugin: 'com.android.application'
apply plugin: 'com.google.gms.google-services' // <- Add this line
- You need to modify
appIDto your own account, which can be obtained in the ZEGO Admin Console. - You need to set
serverUrlto a valid URL that can be obtained for Zego auth token and post FCM notification request.
-
Connect the Android device to your computer.
-
Open Android Studio, select the Android device you are using,click the Run 'app' in the upper center to run the sample code and experience the Live Audio Room service.
In your setting.gradle file, add the jitpack maven .
pluginManagement {
    repositories {

        maven { url 'https://www.jitpack.io' } // <- Add this line
    }
}
dependencyResolutionManagement {
    repositoriesMode.set(RepositoriesMode.FAIL_ON_PROJECT_REPOS)
    repositories {
        maven { url 'https://www.jitpack.io' } // <- Add this line
    }
}import the :zegoexpress module to your project

Choose the zegoexpress directory.
And add
dependency in your app's build.gradle's dependencies:

dependencies{
   implementation project(':zegoexpress')
}Same as getting started section.
- Generate
Firebase Admin SDK Private Key
 2. Click this deploy button to start deploy your service:
If you are using Firebase Cloud Functions, check this doc for usage and check this example code to make the FCM work with your project.
The calling sequence of the SDK interface is as follows: createEngine --> joinRoom --> setLocalVideoView/setRemoteVideoView --> leaveRoom
Before using the SDK function, you need to create the instance of the SDK(Engine) first. We recommend creating it when the application starts. The sample code is as follows:
ExpressManager.getInstance().createEngine(getApplication(), AppCenter.appID);When you want to communicate with audio and video, you need to call the join room interface first.
If you need to invite other to join the call, you can send the invitation at the same time while you join the room.
binding.callUser.setOnClickListener(new OnClickListener() {
    @Override
    public void onClick(View v) {
        PermissionX.init(LoginActivity.this)
            .permissions(Manifest.permission.CAMERA, Manifest.permission.RECORD_AUDIO)
            .request((allGranted, grantedList, deniedList) -> {
                if (allGranted) {
                    CloudMessage cloudMessage = new CloudMessage();
                    cloudMessage.targetUserID = binding.targetUserId.getText().toString();
                    cloudMessage.roomID = selfID;
                    cloudMessage.callType = "Video";
                    cloudMessage.callerUserID = selfID;
                    cloudMessage.callerUserName = selfName;
                    cloudMessage.callerIconUrl = selfIcon
                    HttpClient.getInstance().callUserByCloudMessage(cloudMessage, new HttpResult() {
                        @Override
                        public void onResult(int errorCode, String result) {
                            if (errorCode == 0) {
                                joinRoom(cloudMessage.roomID, cloudMessage.callerUserID,
                                    cloudMessage.callerUserName);
                            } else {
                                Toast.makeText(getApplication(), "callUserByCloudMessage failed:" + result,
                                    Toast.LENGTH_LONG).show();
                            }
                        }
                    });
                }
            });
    }
});If your project needs to use the video communication function, you need to set the View for displaying the video, call setLocalVideoView for the local video, and call setRemoteVideoView for the remote video.
setLocalVideoView:
ExpressManager.getInstance().setLocalVideoView(binding.localTexture);setLocalVideoView:
@Override
public void onRoomUserUpdate(String roomID, ZegoUpdateType updateType, ArrayList<ZegoUser> userList) {
    if (updateType == ZegoUpdateType.ADD) {
        for (int i = 0; i < userList.size(); i++) {
            ZegoUser user = userList.get(i);
            TextureView remoteTexture = binding.remoteTexture;
            binding.remoteName.setText(user.userName);
            setRemoteViewVisible(true);
            ExpressManager.getInstance().setRemoteVideoView(user.userID, remoteTexture);
        }
    } else {
        setRemoteViewVisible(false);
    }
}When you want to leave the room, you can call the leaveroom interface.
ExpressManager.getInstance().leaveRoom();
-
Device A starts the App to obtain the FCM Token, sends a POST request to https://server/store_fcm_token, and stores the UserID_A and FCM Token on the Server.
-
Device B starts the App to obtain the FCM Token, sends a POST request to https://server/store_fcm_token, and stores the UserID_B and FCM Token on the Server.
-
The App on Device B is killed.
-
Device A sends the call_invitation_data by sending an HTTP request to https://server/send_call_invitation, and calls the loginRoom and startPublishingStream methods of ZegoExpressEngin to start the call.
-
The Server sends a message to Device B via the Firebase messaging.send interface.
-
Device B receives the call_invitation_data via the public void onMessageReceived(@NonNull RemoteMessage remoteMessage) interface and pops up the phone call invitation dialog.
-
After clicking the system notification box, Device B starts the App and uses the call_invitation_data to call the loginRoom and startPublishingStream methods of ZegoExpressEngin to start the call.