Arduino Midi Controller
1. Features
- Cheap to build : use directly a standalone Arduino Teensy microcontroller ;
- Plug-and-play : detected as an actual MIDI device ;
- Easy reprogram through USB : using the USB connection, you can enter a mode to reprogram via Arduino Software ;
- Easily customizable, extandable.
2. Requirements (Software/OS)
- OSX, Windows, Linux
- latest Arduino IDE + Teensy Loader Applicatoin
3. Shopping the Hardware
This are the most important things to consider buying for this controller
- 1x Teensy 3.2
- 5x 74HC4051 (for the 74HCT4051 you need 5V)
- 5x Socket for 74HC4051
- 40x Rotary Potentiometer (5k lin) + Caps for it
- 1x USB Connector
- 5x PCB Connector
- Some colored wires, dont use this cheap jumper wires
- Single/double sided prototyping board
- Optional: Creating own PCB
4. Building process
USB Connection
The first real power within the Teensy 3.2, is the fact that it by default can send MIDI Messages via USB. So we don't need to interface with issues relied to that. You can straight use the default (Mini)USB-Port on the Teensy or Solder your own wire directly on the bottom side (as shown below)
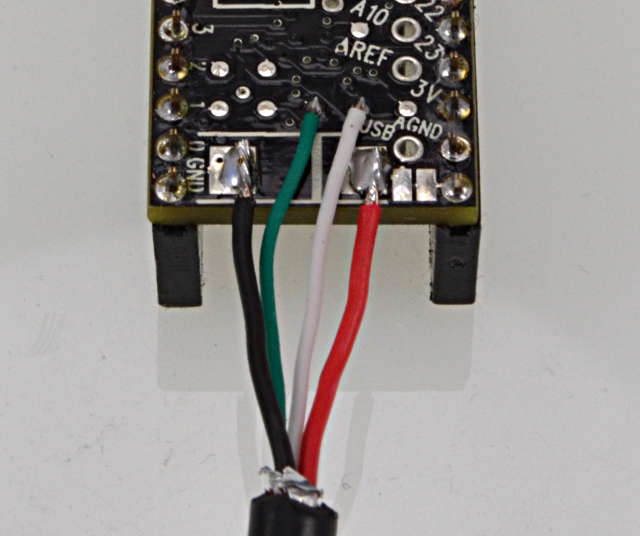
The USB spec actually requires these 4 wire colors, with this assignment to the signals:
- pin 1, +5V, Red
- pin 2, D-, White
- pin 3, D+, Green
- pin 4, GND, Black
The Core
The whole construction uses one part as its main component and thats the Teensy. To get enough analog inputs I will use the 74HC4051 Mux. Per Mux we gain 8 additional analog inputs. There are also some Shiftregisters, 16x Mux, etc. but for this Midicontroller i decided for this ones. At the beginning i was laying out the principial logic for the use of these components on a breadboard. Later on i'll replace it with a proper PCB. For more pictures about the building process feel free to check them out in the documentation folder

4. Credits
- Meaxl for creating customMidiController
- @ajfisher for Analog Mux/Demux library
- @ivanseidel for ArduinoThread