
Course Instructor - Prof. ANURAG SHARMA
1) Ankit 20BEM1018 ankitchawla300@gmail.com ankitchawla071
2) Vansh Aggarwal 20BEM1030 vanshaggarwal2305@gmail.com Vansh2302
3) Vineet Sharda 20BEM1016 vinisharda2003@gmail.com 01Vineet
4) Malavika S 20BEM1026 sureshmalavika724@gmail.com malu12842
5) Yashik Kumar 20BEM1034 yashiksharma5@gmail.com Yashikkumar
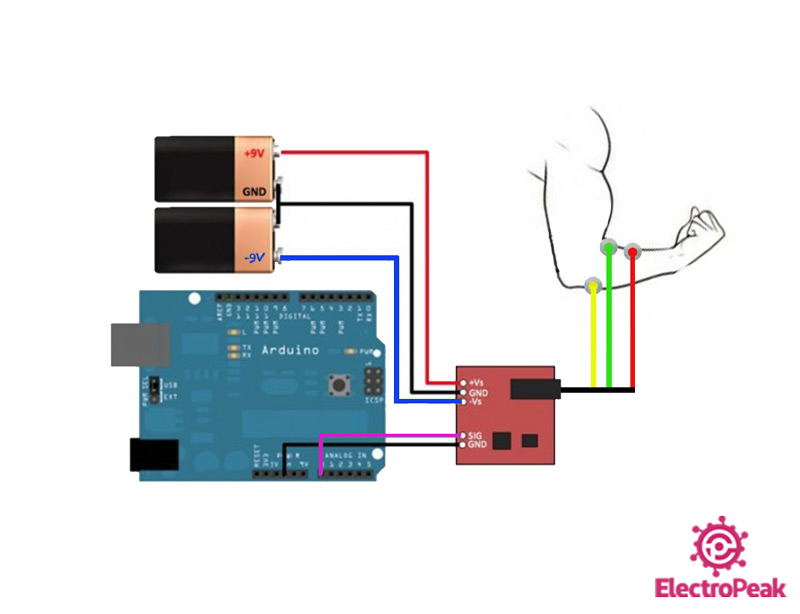
Our project focuses on acquiring raw EMG signals from the targeted muscles and processing it to make it usable to control any device like a bionic arm or gesture based controller. Here we have used RGB led and the concept of colour mixing to display the amount of flexion of our muscle through various colours. We have used an EMG sensor by Advancer Technologies which uses surface electrodes to carry signals from targeted muscle to the sensor. It has 5 pins which includes +Vs, GND of Voltage source, -Vs, sig(signal) and common ground pin for sensor and Arduino Uno. The Signal pin can be connected to any analog pin of the Arduino Uno board. Also this board has an onboard filter circuit to give the processed data and a potentiometer for adjusting the gain.
For acquiring the EMG signal, we basically require five things which includes
2) EMG sensor : It is a circuit consisting of an onboard amplifier and filters to process the raw EMG signal (0-10 mV) taken from muscles through electrodes and converts into a signal which any microcontroller like arduino can read. In our project we are using an EMG sensor from advancer technologies.
close all;
clc;
y=zeros(1,100000);
a = arduino('COM11','Uno'); %connect to the arduino
cm=1;
while cm<=100000
y = readVoltage(a, 'A0'); %read the analog signal from arduino

     if y >= 0.20 &&  y <= 0.49
     writeDigitalPin(a,'D11',0); %Red colour
     writeDigitalPin(a,'D12',1);
     writeDigitalPin(a,'D13',1);

     else if y >= 0.50 &&  y <= 0.79
     writeDigitalPin(a,'D11',1);
     writeDigitalPin(a,'D12',0); %Green colour
     writeDigitalPin(a,'D13',1);

     else if y >= 0.80 &&  y <= 1.19
     writeDigitalPin(a,'D11',1);
     writeDigitalPin(a,'D12',1); %Blue colour
     writeDigitalPin(a,'D13',0);

     else if y >= 1.2 &&  y <= 1.49
     writeDigitalPin(a,'D11',0); %White colour
     writeDigitalPin(a,'D12',0);
     writeDigitalPin(a,'D13',0);

     else if y >= 1.50 &&  y <= 2
     writeDigitalPin(a,'D11',0); %Purple colour
     writeDigitalPin(a,'D12',1);
     writeDigitalPin(a,'D13',0);

      else
        writeDigitalPin(a,'D11',1); %Led off
        writeDigitalPin(a,'D12',1);
        writeDigitalPin(a,'D13',1);
      end
      end
      end
      end
end
cm=cm+1;
End

After completion of this paper, we got to know about how a research paper is formulated and presented.
- From the research we did, we learned about EMG sensors, their applications, and their importance in human life.
- We got to know many areas of interest where we can work in the future, related to EMG.
- The scope of EMG is enormous. We learned how the bionic arms, prosthetic legs, mobility assistance robots, etc work.
- It was really an informative and interesting period of time making this paper.