Important
This repository is referencing the mumbai chain.
Mumbai is deprecated since 08/04/2024, meaning the code in this repository will no longer work out of the box.
You can still use this repository, however you will have to switch any references to mumbai to another chain.
This example project is a simple Play-to-Earn (P2E) game!
The game is a "mining" game, where your character mines for gold gems!
In the beginning, you start out with nothing! In order to play the game, you need to:
- Mint your character NFT (ERC-1155 using the Edition Drop contract)
- Purchase a pickaxe NFT from the "Shop" (Another ERC-1155 using an Edition Drop contract)
- "Equip" (stake) the pickaxe NFT in the Mining contract (built with thirdweb deploy)
- Start earning "Gold Gems"; ERC-20 tokens (using the Token contract)
You can use the GEMs you earn to purchase higher tier pickaxes, which will increase your rewards per block.
( 0 + 1 ) * 10_000_000_000_000 / 100_000_000_000_000_000 gold gems per block.Once you have earned enough GEM tokens, you can use them to purchase higher tier pickaxes.
For example, when you buy the "Stone Hammer" (token ID 1) for 10 GEMs, you will earn:
// 1 (Token ID of stone hammer) + 1 = Rewards Multiplier
// 10_000_000_000_000 / 100_000_000_000_000_000 = The number of GEMs rewarded per block (since the token has 18 decimals)
( 1 + 1 ) * 10_000_000_000_000 / 100_000_000_000_000_000 gold gems per block.
Check out the Demo here: https://play-to-earn.thirdweb-example.com/
You can create your own copy of this project by running the following command:
npx thirdweb create --template play-to-earnInside the contractAddresses file, you can change the contract addresses to your own contracts.
This project uses 4 contracts built with thirdweb:
| Name | Contract Type | Description | Link |
|---|---|---|---|
| Gold Gems | Token (ERC-20) | Gold Gems Rewards Token | View on thirdweb dashboard |
| Pickaxes | Edition Drop (ERC-1155) | Pickaxe NFTs | View on thirdweb dashboard |
| Miners | Edition Drop (ERC-1155) | Character NFTs | View on thirdweb dashboard |
| Mining | Custom (thirdweb deploy) | Staking and rewarding contract | View on thirdweb dashboard |
Learn how to deploy and configure these contracts using the thirdweb portal documentation:
Below, you can find an explanation of the key areas of the project and code snippets explained!
The project is divided into two parts:
-
The application folder contains the code for the front-end of the application.
-
The contracts folder contains our smart contract set up, including our Mining contract. We're using Hardhat so that we can write tests or scripts to interact with the smart contracts locally.
We can deploy the Mining contract using thirdweb deploy!
# Change to the contracts folder
cd contracts

# Deploy the Mining contract
npx thirdweb deployThe way that the game works is by staking a "pickaxe" NFT into the Mining contract.
Then, the contract uses block.timestamp to calculate the player's reward.
The reward logic is calculated as follows:
// blocks passed since last payout * reward multiplier * rewards per blockfunction calculateRewards(address _player)
public
view
returns (uint256 _rewards)
{
// If playerLastUpdate or playerPickaxe is not set, then the player has no rewards.
if (!playerLastUpdate[_player].isData || !playerPickaxe[_player].isData) {
return 0;
}
// Calculate the time difference between now and the last time they staked/withdrew/claimed their rewards
uint256 timeDifference = block.timestamp - (playerLastUpdate[_player].value + 1);
// Calculate the rewards they are owed
uint256 rewards = timeDifference * 10_000_000_000_000 * playerPickaxe[_player].value;
// Return the rewards
return rewards;
}rewards uses the Token ID of the staked pickaxe NFT as the rewards multiplier.
In order to keep track of this information, we have two mappings:
struct MapValue {
    bool isData;
    uint256 value;
}

mapping (address => MapValue) public playerPickaxe;

mapping (address => MapValue) public playerLastUpdate;-
playerPickaxe: This mapping tracks the current pickaxe (token ID of the NFT) that the player has staked. -
playerLastUpdate: This mapping tracks the last time that the player was paid out their rewards.
When the contract is created, we pass in the values of the other contracts we created:
- The Pickaxe Edition Drop contract
- The Gold Gems Token contract
// Store our two other contracts here (Edition Drop and Token)
DropERC1155 public immutable pickaxeNftCollection;
TokenERC20 public immutable rewardsToken;

// Constructor function to set the rewards token and the NFT collection addresses
constructor(DropERC1155 pickaxeContractAddress, TokenERC20 gemsContractAddress) {
    pickaxeNftCollection = pickaxeContractAddress;
    rewardsToken = gemsContractAddress;
}
This allows us to do things like check if the player has a specific NFT, and transfer tokens to and from the contract.
Now, there are three key functions in the contract.
- Stake (send pickaxe to the contract)
- Withdraw (get pickaxe back from the contract)
- Claimed (pay out the player's rewards)
Stake
safeTransferFrom's the pickaxe the player currently has staked back to them.calculateRewardsandtransfer's the player's rewards to them.safeTransferFrom's the pickaxe they are staking from the player to the contract.- Updates the mappings accordingly.
Withdraw
calculateRewardsandtransfer's the player's rewards to them.safeTransferFrom's the pickaxe the player currently has staked back to them.- Updates the mappings accordingly.
Claim
calculateRewardsandtransfer's the player's rewards to them.- Updates the mappings accordingly.
The application interacts with all 4 of the contracts we created by using the thirdweb SDK.
You can learn more about the thirdweb SDK's here:
To allow users to interact with our contracts and make transactions, we need to connect to their wallets. Firstly, we wrap our application in the ThirdwebProvider:
function MyApp({ Component, pageProps }: AppProps) {
  return (
    <ThirdwebProvider activeChain="mumbai">
      <Component {...pageProps} />
    </ThirdwebProvider>
  );
}
Which allows us to use any of the React SDK's hooks in our application!
On the index.tsx page, we use useMetamask and useAddress to connect and read to the user's wallet.
const connectWithMetamask = useMetamask();
const address = useAddress();
The logic on the homepage is:
- Load the user's owned NFTs from the
MinersNFT contract to see if they have a character NFT already.
const {
  data: ownedNfts,
  isLoading,
  isError,
} = useOwnedNFTs(editionDrop, address);-
If they have a character, show them the
Play Gamebutton. -
If they don't have a character, show them the
Claimbutton, allowing them to claim an NFT from our Edition Drop contract:
export default function MintContainer() {
  const editionDrop = useEditionDrop(CHARACTER_EDITION_ADDRESS);
  const { mutate: claim, isLoading } = useClaimNFT(editionDrop);
  const address = useAddress();

  return (
    <div className={styles.collectionContainer}>
      <h1>Edition Drop</h1>
      <button
        onClick={() =>
          claim({
            quantity: 1,
            to: address as string,
            tokenId: 0,
          })
        }
      >
        {isLoading ? "Loading..." : "Claim"}
      </button>
    </div>
  );
}
Once they have claimed their character, they can play the game.
The logic of the game page is on the play page.
The role of this page is to connect to all of the contracts and pass this information down to a set of components.
Firstly, we connect to all of our contracts:
const { contract: miningContract } = useContract(MINING_CONTRACT_ADDRESS);
const characterContract = useEditionDrop(CHARACTER_EDITION_ADDRESS);
const pickaxeContract = useEditionDrop(PICKAXE_EDITION_ADDRESS);
const tokenContract = useToken(GOLD_GEMS_ADDRESS);
There are several components that show different information and pull data from the contracts.
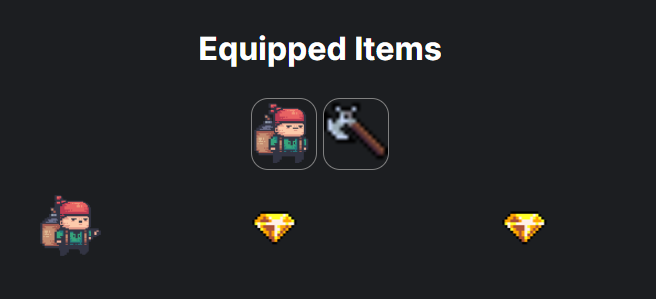
- CurrentGear Component - Shows the owned character NFT and currently staked pickaxe
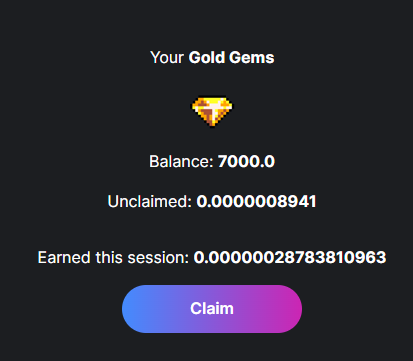
- Rewards Component - Shows the available rewards in the mining contract, the balance of the connected wallet, and a client-side estimation of the rewards they have earnt since they loaded the page in this session.
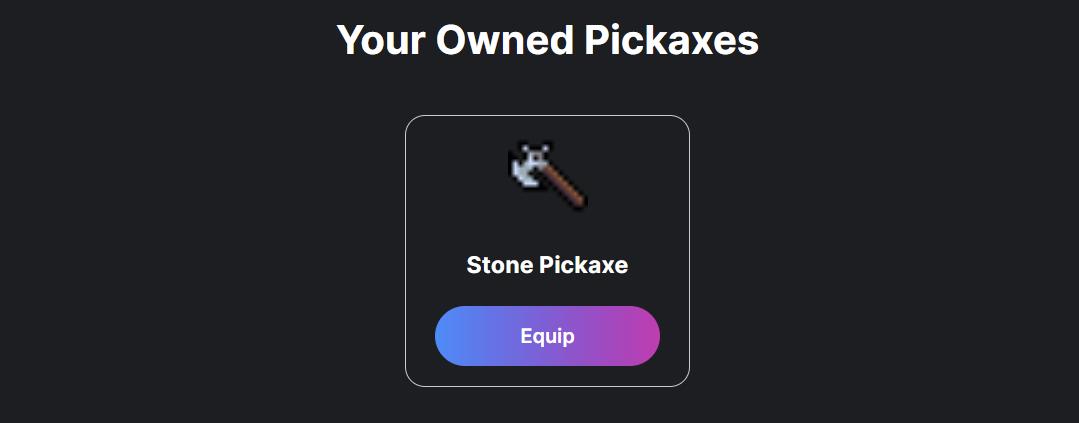
- OwnedGear Component - Shows the owned pickaxes the wallet has and an "Equip" button to stake it.
- Shop Component - Shows all of the pickaxes in the Pickaxe Edition Drop contract, the price for each, and a "Buy" button to claim it.
Contracts Used in this Component:
- Mining Contract - View the currently staked pickaxe
- Character Contract - View the metadata of the character NFT
- Pickaxe Contract - View the metadata of the staked pickaxe token
This component simply shows the user the character NFT they own, the pickaxe they currently have staked, and an animation of the character "mining".
It looks like this:
To get the metadata of the character NFT:
// Since we only have 1 character of token ID 0, it's quite easy to get the metadata.
const { data: playerNft } = useNFT(characterContract, 0);
To get the staked pickaxe:
// playerPickaxe is the name of the mapping we created in the contract.
// It maps walletAddress -> staked token ID.
const p = (await miningContract.call(
  "playerPickaxe",
  address
)) as ContractMappingResponse;
To get the metadata of the staked pickaxe:
// Here, p.value is the token ID.
const pickaxeMetadata = await pickaxeContract.get(p.value);Contracts Used in this Component:
- Mining Contract - View the available rewards of the connected wallet
- Token Contract - View token metadata and balance of connected wallet
This component shows:
- The metadata of the rewards token (name and image)
- The balance of the connected wallet of the token
- The "unclaimed" rewards the user can claim from the connected wallet
- A client-side estimation of the rewards the user has earned since they loaded the page in this session
It looks like this:
To get the metadata of the token:
const { data: tokenMetadata } = useMetadata(tokenContract);To get the balance of the connected wallet:
const address = useAddress();
const { data: currentBalance } = useTokenBalance(tokenContract, address);
To get the "unclaimed" rewards:
const u = await miningContract.call("calculateRewards", address);To claim the rewards from the contract:
await miningContract.call("claim");There is a fun little component within this one caled ApproxRewards that estimates the rewards that have been earnt during this session. _It's probably not that accurate, it just looks pretty cool! It:
- Reads the token ID of the currently staked pickaxe
- Multiplies it by the rewards amount
10_000_000_000_000 - Multiplies this amount by the amount of time that this sessino has been running
Contracts Used in this Component:
- Pickaxe Contract - View all of the owned pickaxes from the Pickaxe Edition Drop contract
- Mining Contract - To stake a selected pickaxe
This component shows the user the NFTs that they own from the pickaxe edition drop contract, and allows them to stake/equip them.
It looks like this:
To view all of their owned pickaxes:
const address = useAddress();
const { data: ownedPickaxes, isLoading } = useOwnedNFTs(
  pickaxeContract,
  address
);
Map / Display each using the ThirdwebNftMedia component to display the metadata:
return (
  <div>
    {ownedPickaxes?.map((p) => (
      <div key={p.metadata.id.toString()}>
        <ThirdwebNftMedia metadata={p.metadata} />
        <h3>{p.metadata.name}</h3>

        <button onClick={() => equip(p.metadata.id)}>Equip</button>
      </div>
    ))}
  </div>
);
To stake/"equip" a pickaxe:
Since our contract attempts to transfer tokens from the wallet to the contract, we need to provide the contract approval to do so, before calling the stake function
async function equip(id: BigNumber) {
  if (!address) return;

  // The contract requires approval to be able to transfer the pickaxe
  const hasApproval = await pickaxeContract.isApproved(
    address,
    MINING_CONTRACT_ADDRESS
  );

  if (!hasApproval) {
    await pickaxeContract.setApprovalForAll(MINING_CONTRACT_ADDRESS, true);
  }

  await miningContract.call("stake", id);
}
At this point, the page reloads and the user's character will start "mining", and earning rewards!
Contracts Used in this Component:
- Pickaxe Contract - View all of the pickaxes available in the Pickaxe Edition Drop contract
The shop is a component that maps over all of the NFTs inside the Pickaxe Edition Drop contract, and displays them, including a "Buy" button for each; allowing the user to claim the NFT for a price (in GEMs).
It looks like this:
The price for each pickaxe NFT is configured with the drop's claim phases.
The claim phases allows us to use our GEMs token as the currency for the NFT.
To display all of the pickaxes in the contract:
export default function Shop({ pickaxeContract }: Props) {
  const { data: availablePickaxes } = useNFTs(pickaxeContract);

  return (
    <>
      <div className={styles.nftBoxGrid}>
        {availablePickaxes?.map((p) => (
          <ShopItem
            pickaxeContract={pickaxeContract}
            item={p}
            key={p.metadata.id.toString()}
          />
        ))}
      </div>
    </>
  );
}
Since the price information is inside the claim phases, we map them out into a ShopItem component, which fetches the claim phase information for each item:
const { data: claimCondition } = useActiveClaimCondition(
  pickaxeContract,
  item.metadata.id
);
To claim a pickaxe NFT:
const { mutate: claimNft } = useClaimNFT(pickaxeContract);async function buy(id: BigNumber) {
if (!address) return;
try {
claimNft({
to: address,
tokenId: id,
quantity: 1,
});
} catch (e) {
console.error(e);
alert("Something went wrong. Are you sure you have enough tokens?");
}
}The art used in this project is used under the CC-0 license.
That said, we want to credit the awesome artists for their work:
- Pirate Bomb by pixelfrog: https://pixelfrog-assets.itch.io/pirate-bomb
- RPG Item Pack by alexs-assets: https://alexs-assets.itch.io/16x16-rpg-item-pack-2
- Gold Gem by Davit Masia - https://kronbits.itch.io/matriax-free-assets
For any questions, suggestions, join our discord at https://discord.gg/thirdweb.


