使用 OpenCv 將影片導入影片,而影片是由很多張照片構成,搭配人臉辨識模組使用就可以在一段影片中找以存放在資料庫的人臉。
主要以此兩篇文章作為學習目標,並做出一定程度的修改。
- Face Recognition 人臉辨識 Python 教學. 人臉辨識在 Computer Vision… | by 李謦伊 | 謦伊的閱讀筆記 | Medium
- 使用深度學習進行人臉辨識: Triplet loss, Large margin loss(ArcFace) | by 張銘 | Taiwan AI Academy | Medium
主要區別:
- 結合兩者,添加相關知識、資料,並做出更詳細的註解(docstring and comment)
- 使用 Tkinter 做 GUI
- 優化檔案結構、模組化
- 除了辨識圖片外,也可以辨識影片中的人臉
Demo: Face Recognition in Python - YouTube
- Face Recognition in Python
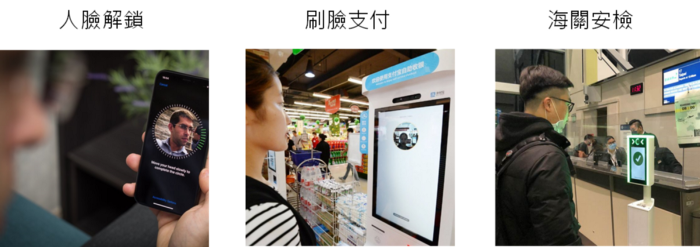
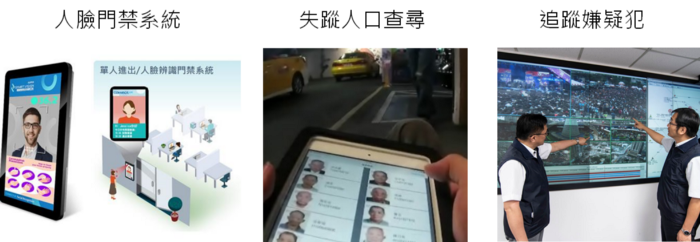
- Face Verification? Face Recognition?
- 五大流程
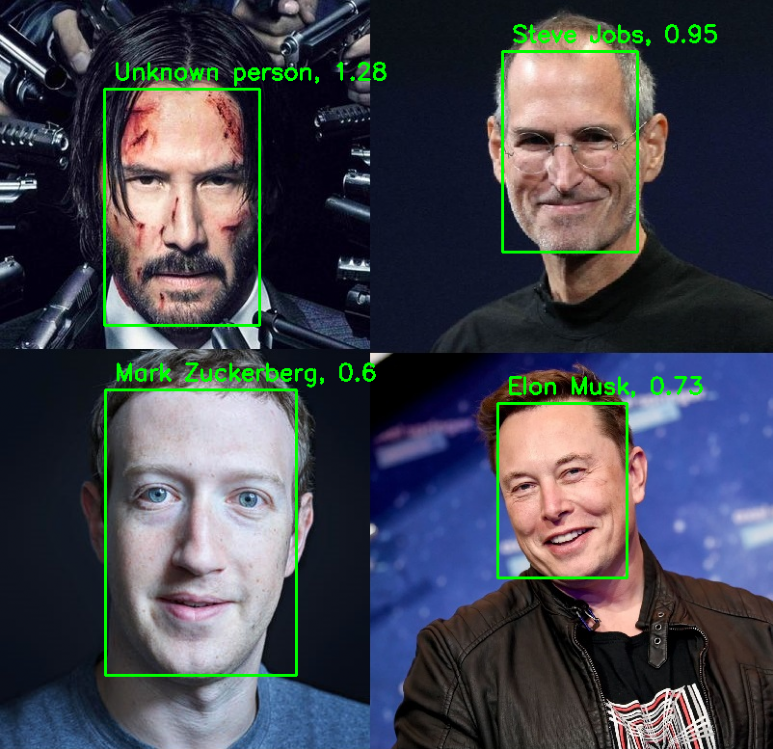
- Face Recognition in Picture - DEMO
- 參考資料、網頁
.
├── Python_Final_109403019_Face_Reconition.pptx # 15頁簡報
├── README.md   # 專案完整README文件
├── assets      # 靜態資源
│   ├── README  # README會用到的圖片
│   ├── images  # 專案運行可選擇使用的圖片
│   └── videos  # 專案運行可選擇使用的影片
├── database    # 資料庫
├── model       # 因檔案過大,若要執行程式碼需下載,請參考下方章節 -> 下載辨識模型
├── requirements.txt   # 環境安裝所需模組
├── src                # 專案程式碼
│   ├── __init__.py
│   ├── database.py
│   ├── face_alignment.py
│   ├── face_comparison.py
│   ├── face_detection.py
│   ├── face_recognition.py
│   ├── feature_extraction.py
│   ├── gui.py
│   ├── main.py        # 主程式
│   └── utils.py
└── tree.txt # 此資料夾內之檔案樹狀結構- Python: 3.9
- IDE: Pycharm
- GUI: Tkinter
- Face detection package: RetinaFace
- Computer Vision Library: OpenCV
- Database: sqlite3
- Package Management: pipenv
由於部分套件的依賴套件較為老舊,所以不是所有平台都支援,可能需要使用 Conda 或 Venv 等虛擬環境。 目前 Windows11 沒問題,不過 M2 Macbook Pro 嘗試起來好像不支援。
$ pip install -r requirements.txt
或使用 pipenv
-
安裝 pipenv
$ pip install pipenv
-
在專案目錄中創建一個新的虛擬環境,並使用 Python 3.9
本機系統中必須有 Python 3.9,pipenv 才能找到並使用
$ pipenv shell --python 3.9
這會創建一個新的虛擬環境,並且將終端機/命令行界面設置到這個虛擬環境中。
-
用 pipenv 安裝 requirements.txt 文件中的所有套件
pipenv install -r requirements.txt
因檔案較大,請自行下載並放入
./model資料夾中~也可以選擇其他模型
Computer Vision 是一門研究機器如何「看」的科學
人臉驗證與人臉辨識的差別又為何呢?
- 確定一張臉是否為某人
1 : 1matching problem- 應用
- 從擁有 k 個人物的 DataBase 確定一張臉的身分
1 : k- 應用
-
人臉偵測 Face Detection
-
人臉對齊 Face Alignment
-
特徵表徵 Feature Representation
- Face Detection
- Face Alignment
- Feature extraction
- Create Database
- Face Recognition
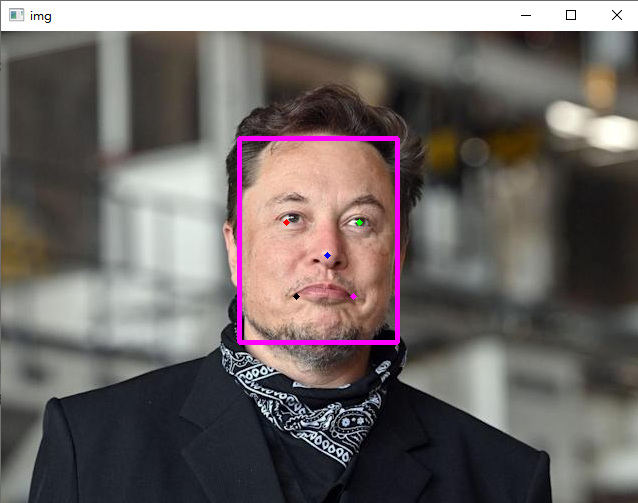
偵測人臉並取得座標值
使用 RetinaFace 進行人臉辨識
也可用 MTCNN,不過 RetinaFace 的辨識表現略為優異。
參考 → RetinaFace: Single-stage Dense Face Localisation in the Wild
CODE
import cv2
from retinaface import RetinaFace

# init with normal accuracy option
detector = RetinaFace(quality='normal')

# 讀取圖檔,因為 opencv 預設是 bgr 因此要轉成 rgb
img_path = 'database/Elon Musk/elon_musk_1.jpg'
img_bgr = cv2.imread(img_path, cv2.IMREAD_COLOR)
img_rgb = cv2.cvtColor(img_bgr, cv2.COLOR_BGR2RGB)

# 取得人臉及特徵的座標值 landmarks
detections = detector.predict(img_rgb)
print(detections)
print(len(detections))

# 將取得的座標值畫上記號及框框
img_result = detector.draw(img_rgb, detections)

# 轉回 cv2 可讀的 gbr
img = cv2.cvtColor(img_result, cv2.COLOR_RGB2BGR)

# show using cv2
cv2.imshow('img', img)
if cv2.waitKey(0) == ord('q'):  # press q to quit
    print('exit')

cv2.destroyWindow('img')
output
[{'x1': 238, 'y1': 107, 'x2': 396, 'y2': 311, 'left_eye': (285, 191), 'right_eye': (358, 191),
  'nose': (326, 224), 'left_lip': (295, 265), 'right_lip': (352, 265)}]
模組化以方便後續調用
# in src/face_detection.py

def face_detect(img_path, detector):
    img_bgr = cv2.imread(img_path, cv2.IMREAD_COLOR)
    img_rgb = cv2.cvtColor(img_bgr, cv2.COLOR_BGR2RGB)
    detections = detector.predict(img_rgb)

    return img_rgb, detections


# 這個是辨識影片為求方便會用到的
def face_detect_bgr(img_bgr, detector):
    img_rgb = cv2.cvtColor(img_bgr, cv2.COLOR_BGR2RGB)
    detections = detector.predict(img_rgb)

    return img_rgb, detections
若出現錯誤可能是因為無法導入 shapely.geometry 模塊,因此需下載 Shapely.package 再執行以下指令導入
pip install <your Shapely package path>將人臉對齊,也就是將傾斜的人臉轉至端正的角度。
要將人臉對齊就得先定義對齊的座標 (標準臉的座標)。 參考 → Inference Demo for ArcFace models
接著用 skimage 套件 transform.SimilarityTransform() 得到要變換的矩陣,利用仿射變換進行對齊。 參考 → SKimage - transform.SimilarityTransform 相似變換 及其 人臉對齊的應用
CODE
import numpy as np
import cv2
from retinaface import RetinaFace
from skimage import transform as trans

detector = RetinaFace(quality='normal')  # init with normal accuracy option
img_path = 'database/Elon Musk/elon_musk_1.jpg'
img_rgb, detections = face_detect(img_path)
img_result = detector.draw(img_rgb, detections)
img = cv2.cvtColor(img_result, cv2.COLOR_RGB2BGR)

# 標準臉的 landmark points。許多網站都以此二維陣列作為標準臉關鍵點
src = np.array([
    [30.2946, 51.6963],
    [65.5318, 51.5014],
    [48.0252, 71.7366],
    [33.5493, 92.3655],
    [62.7299, 92.2041]], dtype=np.float32)

# 取得臉部特徵點座標 face_landmark points
face_landmarks = []
for i, face_info in enumerate(detections):
    face_landmarks = [face_info['left_eye'], face_info['right_eye'], face_info['nose'], face_info['left_lip'],
                      face_info['right_lip']]

# 將取得的 face_landmarks 作轉置 => 跟 src 矩陣一樣
dst = np.array(face_landmarks, dtype=np.float32).reshape(5, 2)

# 把 face_landmarks 跟 標準臉的 landmark points對齊
tform = trans.SimilarityTransform()  # 轉換矩陣 transformation matrix
tform.estimate(dst, src)  # 從一組對應點估計變換矩陣。 return True, if model estimation succeeds.
M = tform.params[0:2, :]  # 要用的轉換矩陣

# 仿射變換 affine transformation (原點變動,圖形及比例不變)
# cv2.warpAffine(輸入圖檔, 轉換矩陣, 輸出圖像大小, 邊界填充值)
aligned_rgb = cv2.warpAffine(img_rgb, M, (112, 112), borderValue=0)
aligned_bgr = cv2.cvtColor(aligned_rgb, cv2.COLOR_RGB2BGR)  # 轉回 bgr 才能用 opencv show 出來

# show using cv2
cv2.imshow('img', img)
cv2.imshow('aligned_bgr', aligned_bgr)
if cv2.waitKey(0) == ord('q'):  # press q to quit
    print('exit')

cv2.destroyWindow('aligned')
cv2.destroyWindow('img')
對齊 landmark points 後的 Elon Musk
模組化以方便後續調用
# in src/face_alignment.py

import cv2
import numpy as np
from skimage import transform as trans


def face_align(img_rgb, landmarks):
    src = np.array([
        [30.2946, 51.6963],
        [65.5318, 51.5014],
        [48.0252, 71.7366],
        [33.5493, 92.3655],
        [62.7299, 92.2041]], dtype=np.float32)

    dst = np.array(landmarks, dtype=np.float32).reshape(5, 2)

    tform = trans.SimilarityTransform()
    tform.estimate(dst, src)

    M = tform.params[0:2, :]

    aligned = cv2.warpAffine(img_rgb, M, (112, 112), borderValue=0)

return aligned提取人臉特徵 (landmark points)
使用 onnx ArcFace model 進行提取。以下兩種都可用
這邊選擇前者,因為若使用 onnx 官方模型需要進行更新,而更新過程非常耗時(我自己的環境相差快五六分鐘), 且更新後模型準確度較差。參考 → onnx/models#156
需進行 特徵標準化 Features Normalization
為甚麼要特徵標準化 ? Ans : 提升預測準確度。更詳細前往 → link
CODE
import onnxruntime as ort
from sklearn.preprocessing import normalize
import numpy as np
import cv2
from retinaface import RetinaFace
from skimage import transform as trans

detector = RetinaFace(quality='normal')  # init with normal accuracy option
img_path = 'database/Elon Musk/elon_musk_1.jpg'
img_rgb, detections = face_detect(img_path)

onnx_path = 'model/arcface_r100_v1.onnx'
EP_list = ['CPUExecutionProvider']

# Create inference session
sess = ort.InferenceSession(onnx_path, providers=EP_list)

# 取得臉部位置 positions 及特徵點座標 landmark points
face_positions = []
face_landmarks = []
for i, face_info in enumerate(detections):
    face_positions = [face_info['x1'], face_info['y1'], face_info['x2'], face_info['y2']]
    face_landmarks = [face_info['left_eye'], face_info['right_eye'], face_info['nose'], face_info['left_lip'],
                      face_info['right_lip']]

# 取得對齊後的圖片並作轉置
aligned = face_align(img_rgb, face_landmarks)
t_aligned = np.transpose(aligned, (2, 0, 1))

# 將轉置後的人臉轉換 dtype 為 float32,並擴充矩陣維度,因為後續函式需要二維矩陣
inputs = t_aligned.astype(np.float32)
input_blob = np.expand_dims(inputs, axis=0)

# get the outputs metadata and inputs metadata
first_input_name = sess.get_inputs()[0].name
first_output_name = sess.get_outputs()[0].name

# inference run using image_data as the input to the model
# pass a tuple rather than a single numpy ndarray.
prediction = sess.run([first_output_name], {first_input_name: input_blob})[0]

# 進行正規化並且轉成一維陣列
final_embedding = normalize(prediction).flatten()
模組化以方便後續調用
# in src/feature_extraction.py

import numpy as np
from face_alignment import face_align
from sklearn.preprocessing import normalize


def feature_extract(img_rgb, detections, sess):
    positions = []
    landmarks = []
    embeddings = np.zeros((len(detections), 512))
    for i, face_info in enumerate(detections):
        face_position = [face_info['x1'], face_info['y1'], face_info['x2'], face_info['y2']]
        face_landmarks = [face_info['left_eye'], face_info['right_eye'],
                          face_info['nose'], face_info['left_lip'], face_info['right_lip']]

        positions.append(face_position)
        landmarks.append(face_landmarks)

        aligned = face_align(img_rgb, face_landmarks)
        t_aligned = np.transpose(aligned, (2, 0, 1))

        inputs = t_aligned.astype(np.float32)
        input_blob = np.expand_dims(inputs, axis=0)

        first_input_name = sess.get_inputs()[0].name
        first_output_name = sess.get_outputs()[0].name

        prediction = sess.run([first_output_name], {first_input_name: input_blob})[0]
        final_embedding = normalize(prediction).flatten()

        embeddings[i] = final_embedding

    return positions, landmarks, embeddings
補充 : Deep Learning Training vs. Inference - Official NVDIA Blog
After training is completed, the networks are deployed into the field for “inference” — classifying data to “infer” a result
創建資料庫並放入照片以供我們後續進行比對
使用 sqlite3 及管理工具 DB Browser for sqlite
參考 → SQLite-Python、DB Browser 簡單介紹
sqlite3 中無法直接用 blob 數據存取 numpy 數組因此需要 adapter 及 converter
參考 → Python insert numpy array into sqlite3 database - Stack Overflow
CODE
import sqlite3
import io
import os
import numpy as np


def adapt_array(arr):
    out = io.BytesIO()
    np.save(out, arr)
    out.seek(0)
    return sqlite3.Binary(out.read())


def convert_array(text):
    out = io.BytesIO(text)
    out.seek(0)
    return np.load(out)


# 將 file_path 底下的資料全部存進 file_data (list)
def load_file(file_path):
    file_data = {}
    for person_name in os.listdir(file_path):
        person_file = os.path.join(file_path, person_name)

        total_pictures = []
        for picture in os.listdir(person_file):
            picture_path = os.path.join(person_file, picture)
            total_pictures.append(picture_path)

        file_data[person_name] = total_pictures

    return file_data


# converts np.array to TEXT when inserting
sqlite3.register_adapter(np.ndarray, adapt_array)

# converts TEXT to np.array when selecting
sqlite3.register_converter("ARRAY", convert_array)

# 連接到 SQLite 數據庫。 若文件不存在則會自動創建
conn_db = sqlite3.connect('database/database.db')

# 創建表
conn_db.execute('CREATE TABLE face_info \
            (ID INT PRIMARY KEY NOT NULL, \
            NAME TEXT NOT NULL, \
            Embedding ARRAY NOT NULL)')

# 將 database 載入數據庫
file_path = 'database'
if os.path.exists(file_path):
    file_data = load_file(file_path)

    for i, person_name in enumerate(file_data.keys()):
        picture_path = file_data[person_name]
        sum_embeddings = np.zeros([1, 512])

        # 將所有同對象的圖片的臉部特徵值加總
        for j, picture in enumerate(picture_path):
            img_rgb, detections = face_detect(picture)
            position, landmarks, embeddings = feature_extraction(img_rgb, detections)
            sum_embeddings += embeddings

        final_embedding = sum_embeddings / len(picture_path)  # 平均值
        adapt_embedding = adapt_array(final_embedding)

        # 插入值
        conn_db.execute("INSERT INTO face_info (ID, NAME, Embeddings) VALUES (?, ?, ?)",
                        (i, person_name, adapt_embedding))
    conn_db.commit()
    conn_db.close()
模組化以方便後續調用
# in src/database.py

import sqlite3
import os
import numpy as np
import io
from face_detection import face_detect
from feature_extraction import feature_extract


def adapt_array(arr):
    out = io.BytesIO()
    np.save(out, arr)
    out.seek(0)

    return sqlite3.Binary(out.read())


def convert_array(text):

    out = io.BytesIO(text)
    out.seek(0)
    return np.load(out)


def load_file(file_path):
    file_data = {}
    for person_name in os.listdir(file_path):
        person_dir = os.path.join(file_path, person_name)

        person_pictures = []
        for picture in os.listdir(person_dir):
            picture_path = os.path.join(person_dir, picture)
            person_pictures.append(picture_path)

        file_data[person_name] = person_pictures

    return file_data


def create_db(db_path, file_path, detector, sess):
    if os.path.exists(file_path):
        conn_db = sqlite3.connect(db_path)
        conn_db.execute("CREATE TABLE face_info \
                            (ID INT PRIMARY KEY NOT NULL, \
                             NAME TEXT NOT NULL, \
                            Embeddings ARRAY NOT NULL)")
        file_data = load_file(file_path)
        for i, person_name in enumerate(file_data.keys()):
            picture_path = file_data[person_name]
            sum_embeddings = np.zeros([1, 512])
            for j, picture in enumerate(picture_path):
                img_rgb, detections = face_detect(picture, detector)
                position, landmarks, embeddings = feature_extract(img_rgb, detections, sess)
                sum_embeddings += embeddings

            final_embedding = sum_embeddings / len(picture_path)
            adapt_embedding = adapt_array(final_embedding)

            conn_db.execute("INSERT INTO face_info (ID, NAME, Embeddings) VALUES (?, ?, ?)",
                            (i, person_name, adapt_embedding))
        conn_db.commit()
        conn_db.close()
    else:
print('database path does not exist')將輸入的照片與資料庫中的照片進行比對
使用 L2-Norm 計算之間 最佳的距離 (distance),可視為兩張人臉之 差異程度。 可以參考 → 理解 L1,L2 範數在機器學習中應用
給定 threshold,若 distance > threshold ⇒ 不同人臉,反之則視為同一張臉
比對照片找出最相似的人並判斷差異是否低於門檻
import numpy as np
import sqlite3
import io
import os

# 連接資料庫並取得內部所有資料
conn_db = sqlite3.connect('database/database.db')
cursor = conn_db.cursor()
db_data = cursor.fetchall()

# 跟 database 中的數據做比較
total_distances = []
total_names = []
for data in db_data:
    total_names.append(db_data[1])
    db_embeddings = convert_array(data[2])
    distance = round(np.linalg.norm(db_embeddings - embeddings), 2)
    total_distances.append(distance)

# 所有人比對的結果
total_resul = dict(zip(total_names, total_distances))

# 找到距離最小者,也就是最像的人臉
idx_min = np.argmin(total_distances)

# 最小距離者的名字與距離
name, distance = total_names[idx_min], total_distances[idx_min]

# set threshold
threshold = 1

# 差異是否低於門檻
if distance < threshold:
    print('Found!', name, distance, total_result)
else:
    print('Unknown person', name, distance, total_result)
做成 function 以便調用
def compare_face(embeddings, threshold):
    conn_db = sqlite3.connect('database.db')
    cursor = conn_db.cursor()
    db_data = cursor.fetchall()

    total_distances = []
    total_names = []
    for data in db_data:
        total_names.append(data[1])
        db_embeddings = convert_array(db_data[2])
        distance = round(np.linalg.norm(db_embeddings - embeddings), 2)
        total_distances.append(distance)

    total_result = dict(zip(total_names, total_distances))
    idx_min = np.argmin(total_distances)

    name, distance = total_names[idx_min], total_distances[idx_min]

    if distance > threshold:
        name = 'Unknown person'

return name, distance, total_resulttotal_result: {'Elon Musk': 1.49, 'Mark Zuckerberg': 0.6, 'Steve Jobs': 1.38}
total_result: {'Elon Musk': 0.73, 'Mark Zuckerberg': 1.48, 'Steve Jobs': 1.39}
total_result: {'Elon Musk': 1.33, 'Mark Zuckerberg': 1.43, 'Steve Jobs': 1.28}
total_result: {'Elon Musk': 1.49, 'Mark Zuckerberg': 1.49, 'Steve Jobs': 0.95}- 主要參考
- Face Detection
- retinaface : retinaface · PyPI
- RetinaFace paper : 1905.00641.pdf (arxiv.org)
- ArcFace 論文詳解 : 人臉識別:《Arcface》論文詳解,對損失層的改進有較為詳細的講解 人臉識別:《Arcface》論文詳解 - IT 閱讀 (itread01.com)
- Face Alignment
- Face Extraction
- Deep Learning Training? Inference? : What’s the Difference Between Deep Learning Training and Inference? - The Official NVIDIA Blog
- Normalization : sklearn.preprocessing 之資料預處理 | 程式前沿 (codertw.com)
- sklearn.preprocessing.normalize API : sklearn.preprocessing.normalize — scikit-learn 1.0.2 documentation
- 為甚麼要特徵標準化 : 为什么要特征标准化 (深度学习)? Why need the feature normalization (deep learning)? - YouTube
- Create Database - using SQLite
- Face Recongition
- OpenCV
- onnx
- 其他
