CamFlow uses Linux Security Module (LSM) to capture data provenance for whole-system auditing purposes. The provenance capture mechanism is highly configurable. The CamFlow Android Provenance project is a transplant of CamFlow to Android, applying the whole-system provenance concept to AOSP and capturing system-level activities.
These instructions will guide you through building and installing CamFlow in an Android environment, specifically the Android Cuttlefish virtual device.
- Ubuntu 22.04.1: we use this Ubuntu distribution as our development environment.
- Android Cuttlefish Virtual Device: a configurable virtual Android device that replicates the framework-based behavior of a real device.
- Android Kernel: build Android Kernel with the CamFlow patch. We will install the kernel part of CamFlow in the Android kernel. We use the Android kernel branch
common-android13-5.15-lts. - Android Studio: CamFlow user-space daemons are compiled and built in Android Studio.
- CamFlow: the CamFlow kernel patch used in Android is v0.8.0. The modified userspace CamFlow deamons are included in this repo and should be built in Android studio using
android-ndk-r23b.
A step by step guide of setting up CamFlow Android Provenance System on Android virtual device.
Step 1: On the Linux desktop, clone this repository and navigate to the android-cuttlefish-automation folder. Then, run the shell script.
source ./create-android-cuttlefish.shAfter executing the shell script, you should be located in the ~android-cuttlefish/cf directory. The script also copied a Makefile to this directory to help you interact with the Android Cuttlefish virtual device. Here are the commands you can run to interact with the Android virtual device:
make root                   # running as root in the shell
make shell                  # enter the shell of Android Cuttlefish
make stop                   # stop the cuttlefish device
HOME=$PWD ./bin/launch_cvd -daemon # launch a new cuttlefish virtual device after the previous one is stopped
⚠️ If you used "Set Up Android Cuttlefish - Automation", you can skip this part. For the lastest manual launch instructions, check: https://android.googlesource.com/device/google/cuttlefish/
grep -c -w "vmx\|svm" /proc/cpuinfoThis should return a non-zero value. If running on a cloud machine, this may take cloud-vendor-specific steps to enable.
sudo apt install -y git devscripts config-package-dev debhelper-compat golang curl
git clone https://github.com/google/android-cuttlefish
cd android-cuttlefish
for dir in base frontend; do
  cd $dir
  debuild -i -us -uc -b -d
  cd ..
done
sudo dpkg -i ./cuttlefish-base_*_*64.deb || sudo apt-get install -f
sudo dpkg -i ./cuttlefish-user_*_*64.deb || sudo apt-get install -f
sudo usermod -aG kvm,cvdnetwork,render $USER
sudo reboot
This script installs the Android Cuttlefish environment on a Linux-based system.
- OTA (Over-The-Air) image: this file is a system image for the Cuttlefish Virtual Device (CVD), which is a part of AOSP.
- Host package: this file is a host package for Cuttlefish. It includes binaries and scripts that need to be run on the host machine to set up and run the Cuttlefish virtual device.
-
Go to http://ci.android.com/
-
Enter a branch name. Start with
aosp-masterif you don‘t know what you’re looking for -
Navigate to
aosp_cf_x86_64_phoneand click onuserdebugfor the latest build -
Click on
Artifacts -
Scroll down to the OTA images. These packages look like
aosp_cf_x86_64_phone-img-xxxxxx.zip-- it will always haveimgin the name. Download this file -
Scroll down to
cvd-host_package.tar.gz. You should always download a host package from the same build as your images -
On your local system,
cd /path/to/android-cuttlefish, combine the packages with following codemkdir cf cd cf tar xvf /path/to/cvd-host_package.tar.gz unzip /path/to/aosp_cf_x86_64_phone-img-xxxxxx.zip
-
Launch cuttlefish virtual machine
HOME=$PWD ./bin/launch_cvd -daemon -
Enable cuttlefish root
./bin/adb root
-
Launch cuttlefish shell
./bin/adb shell
-
Stop cuttlefish virtual machine
pkill run_cvd # or HOME=$PWD ./bin/stop_cvd
Step 1: Install the Repo command to download Android Kernel source code and create a directory for Android kernel build
Repocommand page: https://gerrit.googlesource.com/git-repo/+/refs/heads/main/README.md
# Debian/Ubuntu
$ sudo apt-get install repo

# Gentoo
$ sudo emerge dev-vcs/repo
Or install repo manually using the following commands:
$ mkdir -p ~/.bin
$ PATH="${HOME}/.bin:${PATH}"
$ curl https://storage.googleapis.com/git-repo-downloads/repo > ~/.bin/repo
$ chmod a+rx ~/.bin/repo
Then at your home directory, create a directory for Android Kernel: (this directory MUST be separated from Android cuttlefish directory!)
$ cd
$ mkdir android-kernel-5.15 && cd android-kernel-5.15# Branch android13-5.15-LTS as an example
repo init -u https://android.googlesource.com/kernel/manifest -b common-android13-5.15-lts
repo sync -j12The option j12 means that the sync operation will use 12 parallel threads or jobs. If an error occurs during the sync process, you can try reducing the number of threads by lowering the number that follows the j option first.
-
Download CamFlow kernel patch from the CamFlow repository
- CamFlow is a major LSM for Linux kernel provenance
- Download one of the releases of CamFlow from the link below. In this example, we use
Camflow v0.8.0since it's compatible with the Android Kernel branchandroid13-5.15-LTS - The link of
Camflow v0.8.0patch releases is: Link
-
Install CamFlow kernel patch to kernel source code before building it
- Apply the two CamFlow patches to the
commonkernel source code directory
cd android-kernel-5.15/common git apply path/to/0001-information-flow.patch git apply path/to/0002-camflow.patch - Apply the two CamFlow patches to the
-
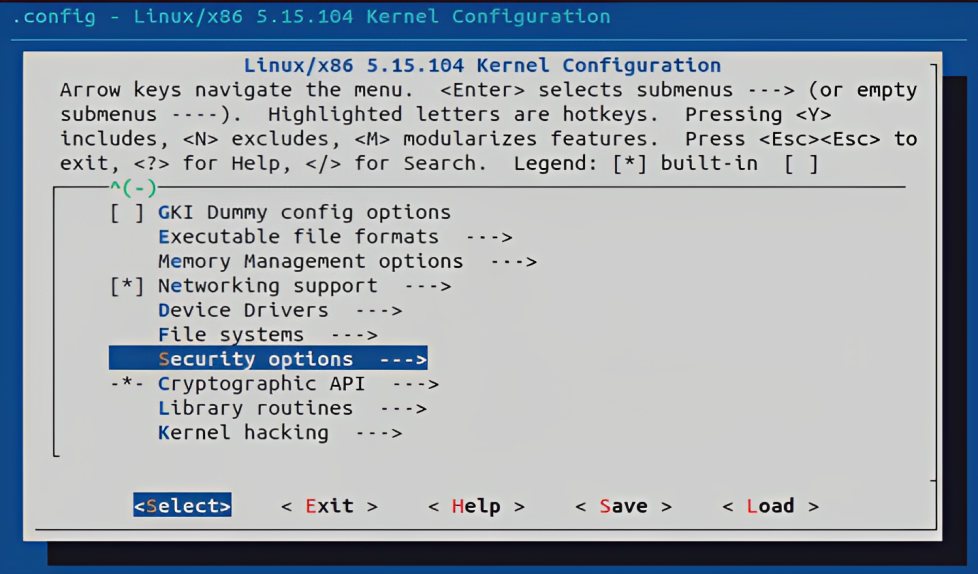
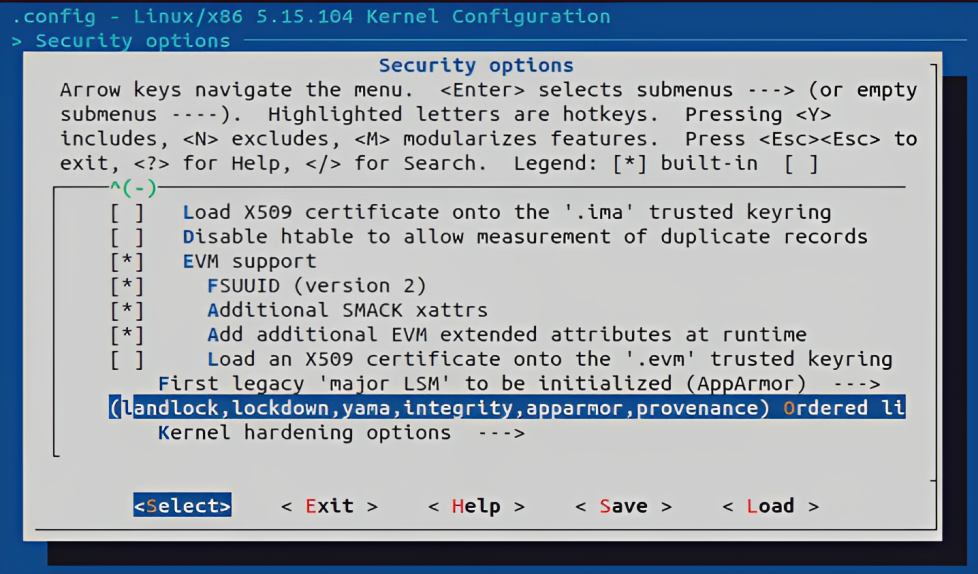
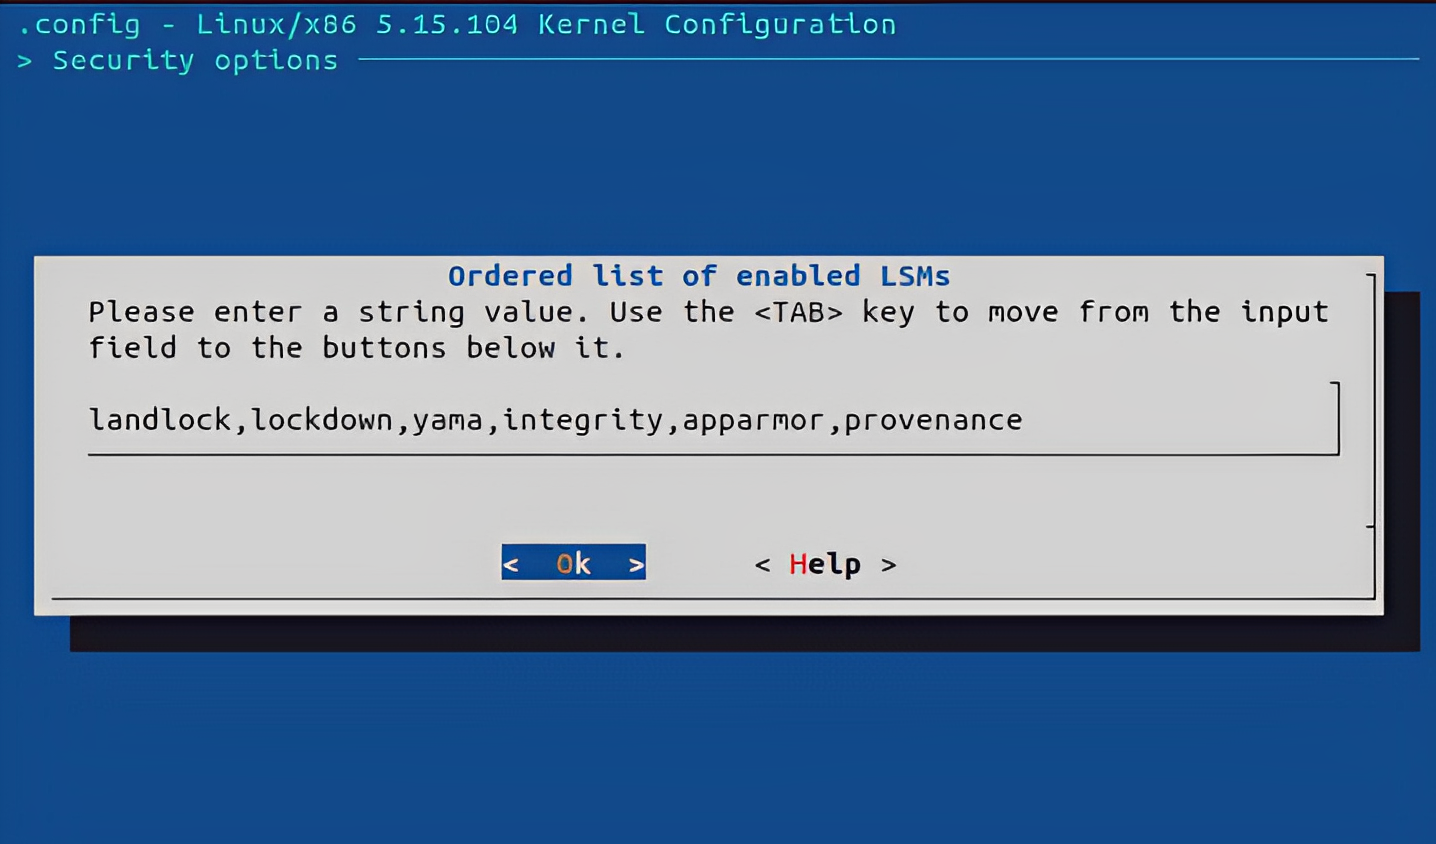
Configure the kernel configuration to ensure the camflow provenance LSM is properly loaded and is processed last
cd android-kernel-5.15/common make menuconfig- Make sure the "provenance" is added at the end of enabled LSMs list
-
Download and run this shell script to modify the
gki_defconfigto avoid the savedefconfig mismatch error
If the
gdowncommand is not working, you can obtain this shell script from thekernel-config-setting-shelldirectory at the root level of this repository.
cd ..   # go to android-kernel-5.15
gdown --id 1x2fLFHlr_UtoCa0_MmHSWHLkiDBnZrNe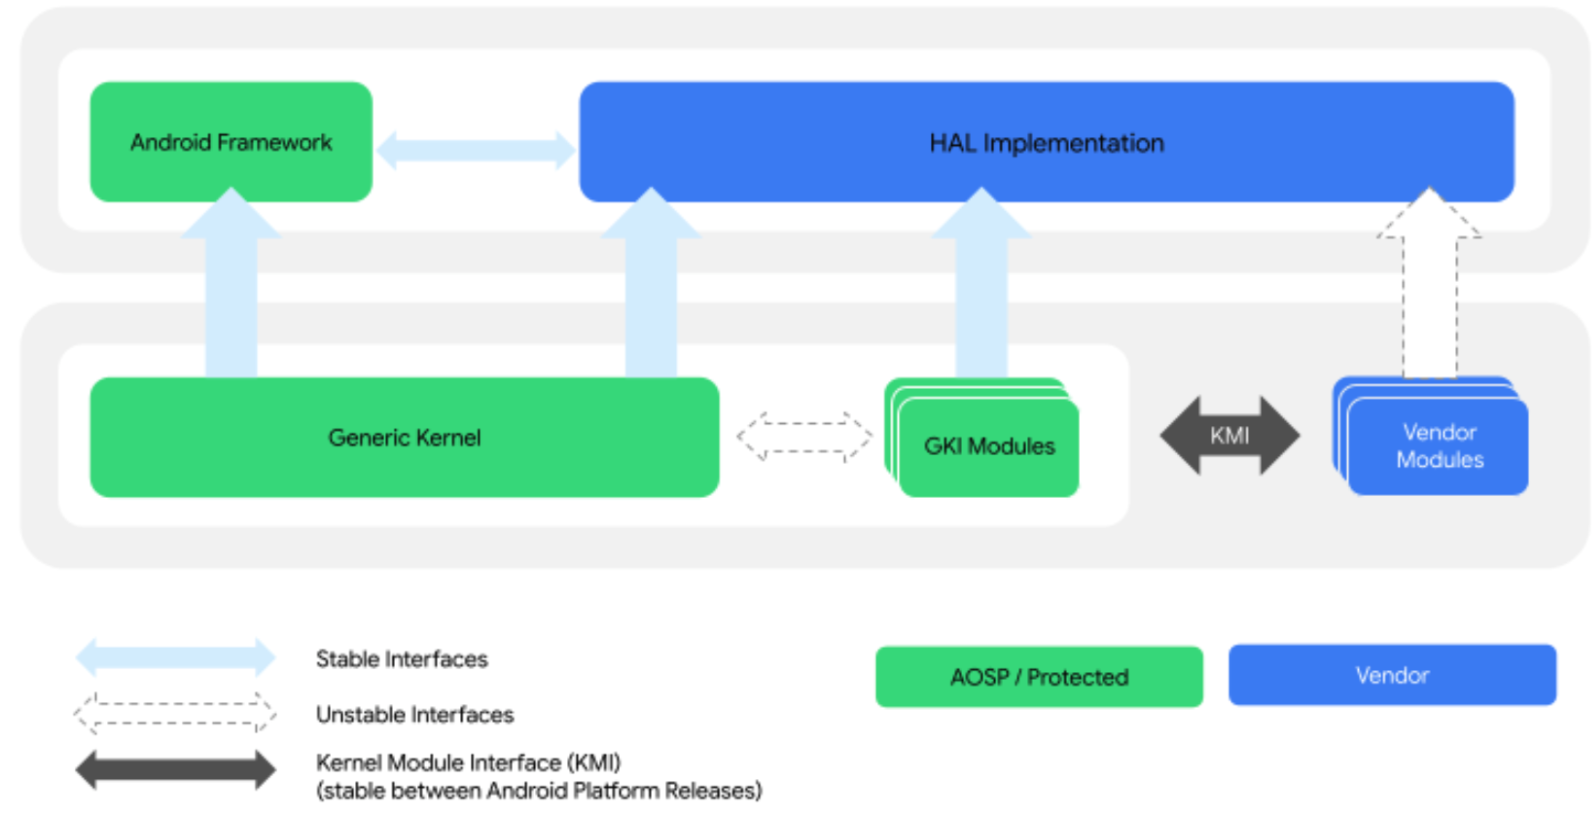
source ./modify-build-configs.shSince Android 10, Android has introduced a new Generic Kernel Image(GKI) in kernel 4.19 and above. This means that the kernel building process has been divided into two parts:
Generic KernelandVendor Modules. We have to build these two parts separately.
- GKI modules: Kernel modules built by Google that can be dynamically loaded on devices where applicable. These modules are built as artifacts of the GKI kernel and are delivered alongside GKI as the
system_dlkm_staging_archive.tar.gzarchive.- Vendor module: A hardware-specific module developed by a partner and that contains system on a chip (SoC) and device-specific functionality. A vendor module is a type of dynamically loadable kernel module.
-
Build Generic Kernel
# bazel build
tools/bazel build //common:kernel_x86_64_dist
Successful build should output the following message:
INFO: From Building GKI artifacts //common:kernel_x86_64_gki_artifacts:
Creating boot-img.tar.gz for gki-info.txt boot.img
INFO: From Building system_dlkm //common:kernel_x86_64_images_system_dlkm_image:
========================================================
Creating system_dlkm image
Target //common:kernel_x86_64_dist up-to-date:
bazel-bin/common/kernel_x86_64_dist
INFO: Elapsed time: 1377.103s, Critical Path: 1356.84s
INFO: 253 processes: 239 internal, 14 linux-sandbox.
INFO: Build completed successfully, 253 total actions
# create output distribution tools/bazel run //common:kernel_x86_64_dist -- --dist_dir=/absolute/path/to/android-kernel-5.15/vendor-build-output-x86After you run the command above, you should see a directory named
vendor-build-output-x86and a file namedbzImage. -
Build Vendor Modules for the Virtual Device
# bazel build
tools/bazel build //common-modules/virtual-device:virtual_device_x86_64_dist
Successful build should output the following message:
Target //common-modules/virtual-device:virtual_device_x86_64_dist up-to-date:
bazel-bin/common-modules/virtual-device/virtual_device_x86_64_dist
INFO: Elapsed time: 185.179s, Critical Path: 183.47s
INFO: 24 processes: 13 internal, 11 linux-sandbox.
INFO: Build completed successfully, 24 total actions
# create output distribution tools/bazel run //common-modules/virtual-device:virtual_device_x86_64_dist -- --dist_dir=/absolute/path/to/android-kernel-5.15/vendor-build-output-x86Upon successful completion of the build,
initramfs.imgshould be located at/path/to/android-kernel-5.15/vendor-build-output-x86. You can now proceed to swap this kernel into your Cuttlefish Android Virtual Device.initramfs.img: the initial RAM filesystem is a temporary in-memory file system that contains essential files and utilities required for mounting the root file system. It is compressed and stored as an image file with the name:initramfs.img.bzImage: thebzImageis a compressed Linux kernel image created during the kernel compilation process. It is designed to be small enough to fit within limited memory space during the boot process. ThebzImageis loaded by the bootloader, decompressed, and executed to initialize the system hardware and kernel before transitioning to the root file system.
-
In
~/android-cuttlefish/cfdirectory, set the environment variableDIST_FOLDERas the folder that containsinitramfs.imgandbzImageDIST_FOLDER=$(readlink -f /absolute/path/to/android-kernel-5.15/vendor-build-output-x86) -
Navigate to
android-cuttlefish/cf, and then use the following command to launch Cuttlefish using the kernel we just built.If the launch of cuttlefish failed, try to stop previously launched cuttlefish first by
pkill run_cvdorHOME=$PWD ./bin/stop_cvd# This command launches a Cuttlefish Virtual Device (CVD) in daemon mode. It's configured with 27GB of RAM, always creates a new data policy, includes a blank data image of 30GB, and use a single CPU core HOME=${PWD} ./bin/launch_cvd -daemon -initramfs_path "${DIST_FOLDER}"/initramfs.img -kernel_path "${DIST_FOLDER}"/bzImage -memory_mb 27000 -data_policy always_create -blank_data_image_mb 30000 -cpus 1
-
Launch the shell of cuttlefish and check the kernel version to verify that kernel is swapped successfully
./bin/adb shell # alternatively, make shell# run cat version before and after the kernel swap, the output should be different vsoc_x86_64:/ $ cd proc && cat version Linux version 5.15.120-maybe-dirty (build-user@build-host) (Android (8508608, based on r450784e) clang version 14.0.7 (https://android.googlesource.com/toolchain/llvm-project 4c603efb0cca074e9238af8b4106c30add4418f6), LLD 14.0.7) #1 SMP PREEMPT Thu Jan 1 00:00:00 UTC 1970
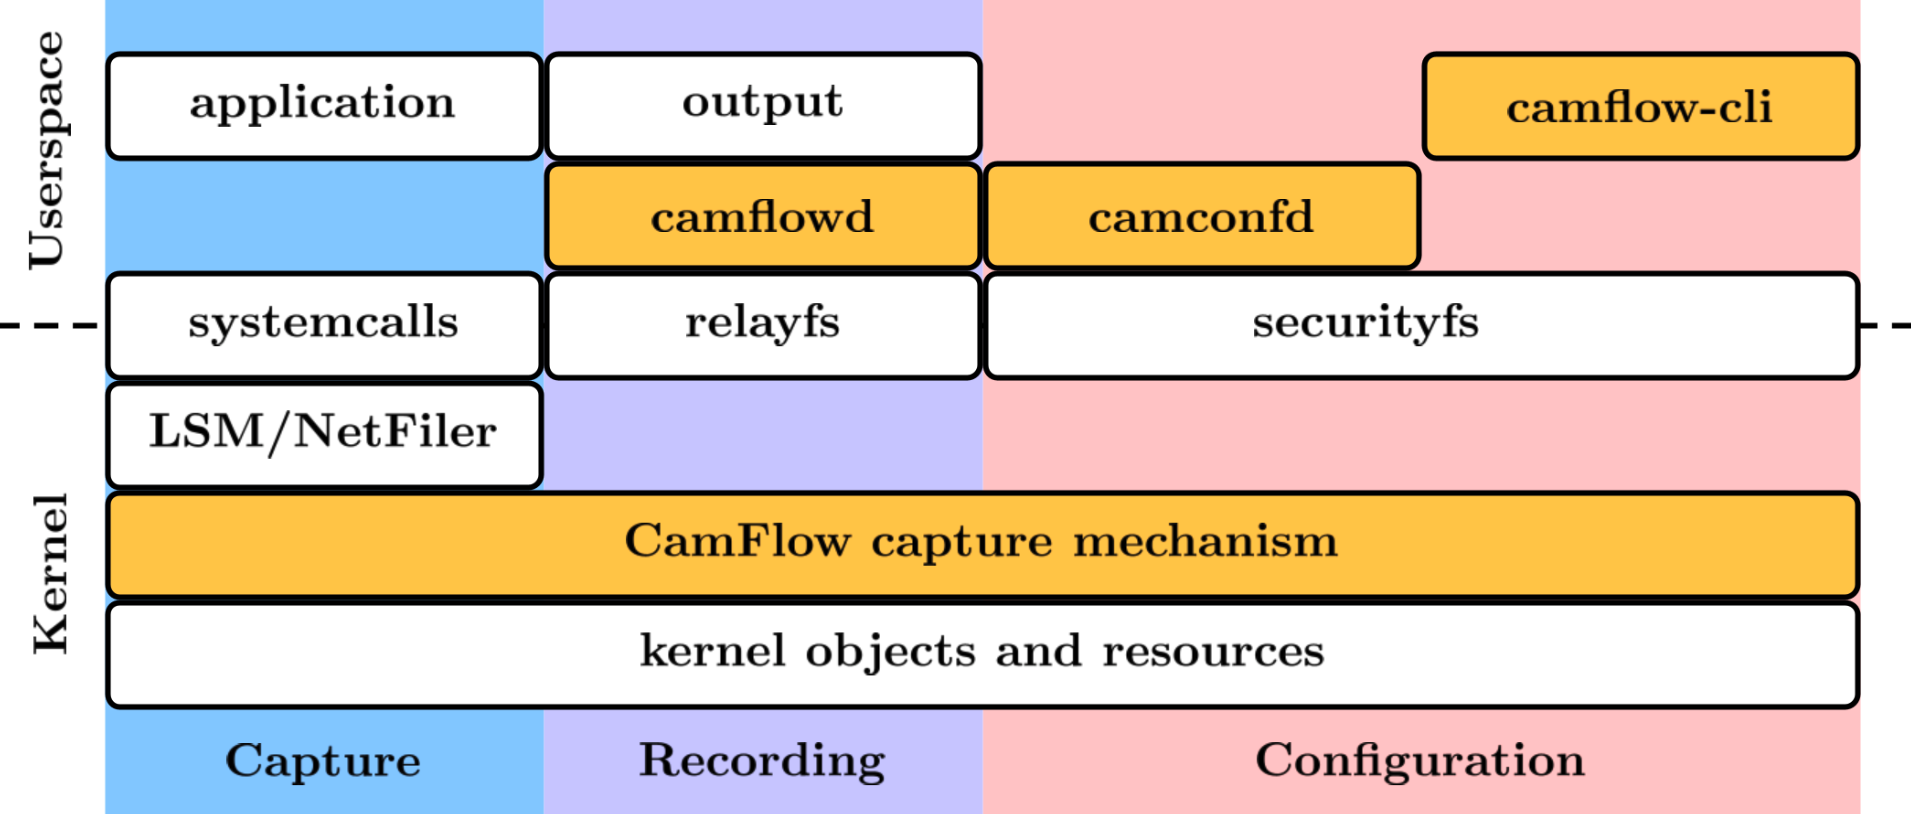
CamFlow provenance system consists of kernel space capture mechanism and user space daemons. The architecture is described below. For more information, check camflow.org
- camflowd: is a daemon responsible for recording the provenance captured in the kernel by CamFlow. Provenance records are published by CamFlow to pseudo-files in relayfs. The daemon retrieves these records, serializes them to a format specified in the configuration, and writes them to an output specified in the configuration.
- camconfd: camconfd is a daemon charged with configuring the in-kernel capture mechanism. The configuration daemon reads from
camflow.iniand loads the specified configuration into the kernel via a securityfs interface.- libprovenance: a C library implementing userspace utility functions to interact with CamFlow relayfs and securityfs interfaces.
- camflow-cli: CLI that allows the user to dynamically modify the capture configuration through the command line.
- camflow.ini: captures configuration file read during the boot process by the camconfd service, and is used to set the capture policy.
- camflowd.ini: output configuration file that specifies what and where the provenance information is published. (Currently only support log output in SPADE JSON format )
First, move all prebuilt daemons, shared library, and config files to the Downloads directory using the command below. You should execute the following command in the camflow-android-provenance directory.
# copy prebuilts to Downloads directory
cd prebuilt-userspace-daemons && cp * ~/Downloads && cd .. && cd camflow-config-files && cp * ~/Downloads && cd ..
⚠️ If you followed "Step 1a: Using Prebuilt Camflow Android User-Space Daemons", you can skip this part.
Assuming we build the user-space daemons in Android Studio on a Mac, and Android Cuttlefish runs on a Linux desktop.
- On Mac desktop,
git clonethis repo to Desktop and open this folder in Android Studio (Proceed to the next step if you have already cloned the repository)
git clone https://github.com/MichaelXi3/camflow-android-provenance.git-
Click the green hammer
Buildbutton twice on the top right corner of Android StudioClicking once builds only x86 executables. Building it again will generate x86_64 executables. We want x86_64.
BUILD SUCCESSFUL in 13s
43 actionable tasks: 43 executed
All the executables should be located at:
/Desktop/camflow-android-provenance/app/build/intermediates/cxx/Debug/k4r535v6/obj/x86_64
cd app/build/intermediates/cxx/Debug/k4r535v6/obj/x86_64The executable and shared library list should include:
camconfd camflow-cli camflowd camflowexample libprovenance.so
- Move the userspace daemons and shared library to the Linux Desktop from Mac, assume all these five files are now moved to
/Downloadsfolder on Linux Desktop - Move the configuration files
camflow.iniandcamflowd.inilocated atcamflow-config-filesfolder in this repo to/Downloadsfolder on Linux Desktop as well
-
Navigate to
android-cuttlefish/cf, enter the following commands to launch the Android virtual device with specified configurations (skip these commands is the Android virtual device is already running)# stop the previous launched Android virtual device if there is any pkill run_cvd # or HOME=$PWD ./bin/stop_cvd
# set DIST_FOLDER to the directory that contains bzImage and initramfs.img
DIST_FOLDER=$(readlink -f /path/to/android-kernel-5.15/vendor-build-output-x86)
# Launch Android cuttlefish with RAM 27GB, Disk Space 30GB, 1 CPU
HOME=${PWD} ./bin/launch_cvd -daemon -memory_mb 27000 -data_policy always_create -blank_data_image_mb 30000 -cpus 1 -initramfs_path "${DIST_FOLDER}"/initramfs.img -kernel_path "${DIST_FOLDER}"/bzImage
-
Install the shared library and user-space daemons to Android Cuttlefish
Using Makefile commands to automate is recommended. A Makefile has been placed at
android-cuttlefish/cfdirectory, you can use it right away or modify it to your needs.First:
make remount-all, or use following commands# remount Android cuttlefish device - need to install shared library ./bin/adb root ./bin/adb remount ./bin/adb reboot # mount several filesystem in Android cuttlefish device # if encounter 'Device or resource busy' error, wait a minute and try again ./bin/adb root ./bin/adb shell mount -t securityfs /sys/kernel/security ./bin/adb shell mount -t debugfs /sys/kernel/debugfs ./bin/adb shell mount -o rw,remount /system
Second:
make prepare, assume everything is located at/DownloadsdirectoryChecklist of what you need in
/Downloadsdirectory:camconfd,camflow-cli,camflowd,1ibprovenance.so,camflowexample,camflow.ini,camflowd.iniYou can execute the following commands if the files are not in the
/Downloads, but they perform the same actions asmake prepare.# install user-space daemons to android cuttlefish /data/local/tmp ./bin/adb push /path/to/camflowd /data/local/tmp ./bin/adb push /path/to/camflowexample /data/local/tmp ./bin/adb push /path/to/camconfd /data/local/tmp ./bin/adb shell "cd /data/local/tmp && chmod 755 camflowd && chmod 755 camconfd && chmod 755 camflowexample"
# install camflow-cli to android cuttlefish
./bin/adb push /path/to/camflow-cli /system/bin
./bin/adb shell "cd /system/bin && mv camflow-cli camflow && chmod 755 /system/bin/camflow"
# install libprovenance.so shared library to android cuttlefish
./bin/adb push /path/to/libprovenance.so /system/lib64
# install the camflow and camflowd configuration files ./bin/adb push /path/to/camflow.ini /data/local/tmp ./bin/adb push /path/to/camflowd.ini /data/local/tmp
- Run the
camconfddaemon to set the capture configuration. Note that in the defaultcamflow.ini, the capture-all provenance is set to false since there will be massive provenance data generated if capture-all is set to true. You can fine-tune the capture policy later by modifying the configurations listed incamflow.ini.# or, make run-camconfd ./bin/adb shell /data/local/tmp/camconfd &
- Run the
camflowddaemon to record the provenance captured in the kernel and serialize them to SPADE JSON format log in/data/local/tmp/audit.logfile.# or, make run-camflowd ./bin/adb shell /data/local/tmp/camflowd &
- Now there should be a file called
audit.loglocated at/data/local/tmp/that contains provenance log entries. Note that the log may be empty if your capture configuration is set to not capture anything, as defined in the defaultcamflow.ini.# enter android cuttlefish shell as root make root && make shell cd /data/local/tmp vi audit.log
# the provenance log should be something similar to the following
{"type":"Entity","id":"EAAAAAAAABQFFQAAAAAAAAAAAAAAAAAAAQAAAAAAAAA=","annotations": {"object_id":"5381","object_type":"machine","boot_id":0,"cf:machine_id":"cf:0","version":1,"cf:date":"2023:07:24T15:23:35","cf:taint":"0","cf:jiffies":"0","cf:epoch":0,"u_sysname":"Linux","u_nodename":"(none)","u_release":"5.15.104-maybe-dirty","u_version":"#1 SMP PREEMPT Thu Jan 1 00:00:00 UTC 1970","u_machine":"x86_64","u_domainname":"(none)","k_version":"0.8.0","l_version":"v0.5.5"}}
# to copy the provenance log file to /Documents directory
exit         # exit android cuttlefish shell, now you should at ~/android-cuttlefish/cf
make pull    # pull audit.log from cuttlefish to local machine
This section provides a walk-through of the Camflow Android Provenance System test, assuming that the user has already completed the instructions described above. Specifically, users should have launched Android cuttlefish successfully, installed all user space daemons, shared library, and executed camconfd and camflowd to apply capture configurations and generate provenance.
-
Run
camflowexamplelocated at/data/loca/tmpinstalled in the previous steps- In the
camflowexampleexecutable (the source code is located atCamFlow-Android-Provenance/app/src/main/cpp/example), it turns on thetrack-mebit, so that this process can be tracked.
# execute this command at /android-cuttlefish/cf
./bin/adb shell /data/local/tmp/camflowexample    # or, make run-example
- In the
-
Check out the provenance log generated in
audit.log# enter the android cuttlefish commandline interface ./bin/adb shell # or, make shell cd /data/local/tmp vi audit.log
-
Using Camflow Android Log Parser to parse and visualize the generated log
- Camflow Log Parser Github Link: https://github.com/MichaelXi3/android-provenance-parser

-
Start a new Android cuttlefish virtual device, and install the Android app apk by the following command at
android-cuttlefish/cfdirectory./bin/adb -s 0.0.0.0:6520 install /absolute/path/to/app-debug.apk
-
In
camflow.ini, set the capture configuration to track thebase.apkfile located at/data/app/~~lXP****==/com.prov.appname==/base.apk(The path is different for every newly launched Android cuttlefish). Then usemake run-camconfdto apply the capture configuration. Alternatively, if you want to track the provenance of an app as a user (in Android, each app is a distinct user), you need to set the user-id to track incamflow.ini. Note that if you track app as a user, you will obtain more provenance data. -
Run camflowd to relay the provenance data from kernel space to user space by
make run-camflowd -
Enter the Android cuttlefish shell by
make shell, then navigate to theaudit.loglocated atdata/local/tmp/audit.log. Currently, the log should contain only one row about the machine. -
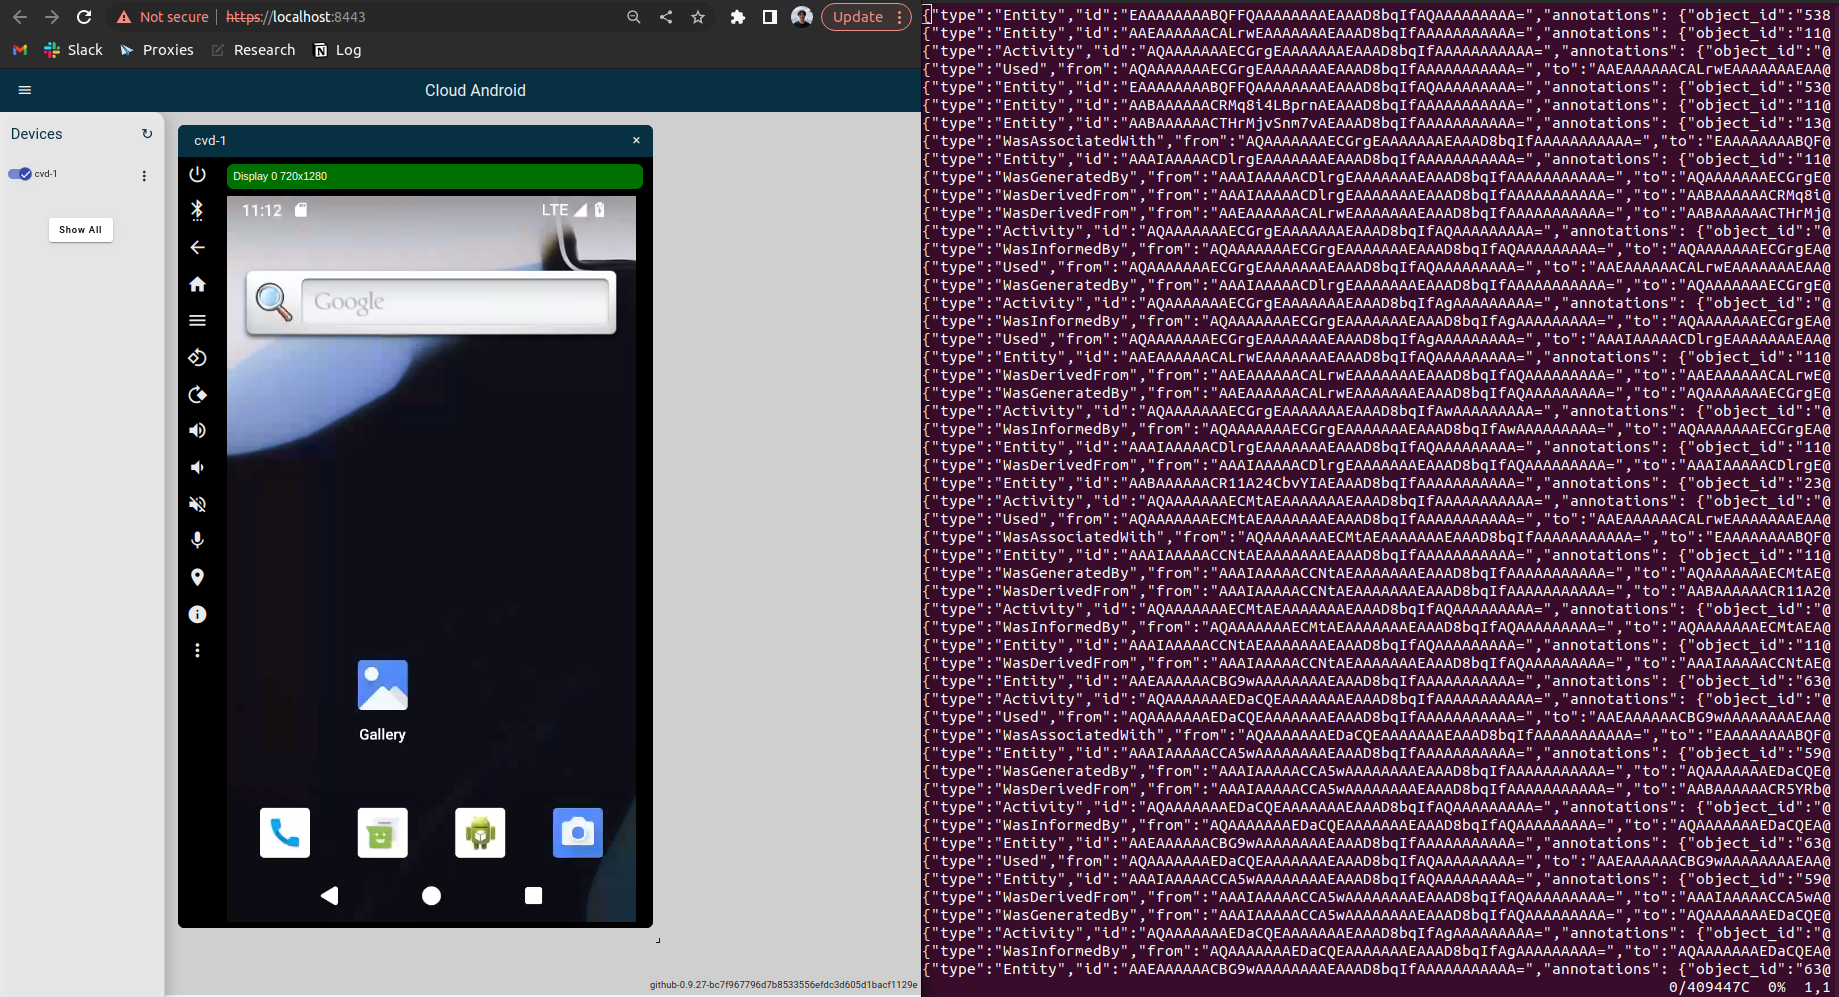
In your browser, enter https://localhost:8443/ to interact with the Android virtual device. You should see your app installed on the phone. Then, open the app, interact with it, and open
audit.logagain. You will see lots of provenance data generated by the app.
- Bazel - The build and test tool developed by Google to automate build processes for large-scale software such as Android Kernel and Modules
- CMake - The build system used for building Camflow Android user space daemons and shared library
- AndroidNDK - A cross-compiling tool for compiling code written in C/C++ for Android
At the root directory of the project, there're a few important directories:
camflow-config-files: storescamflow.iniandcamflowd.inifor capture and output configurationscamflow-makefile-example: provides a sample makefile for android-cuttlefish commandsprebuilt-userspace-daemons: provides prebuilt daemons that can be used right awayandroid-cuttlefish-automation: provides the shell script that automates the android cuttlefish launchkernel-config-setting-shell: provides a shell script that modifies Android kernel build configs, for backup purposesapp: is the directory that contains all source codes, specifically, the path isAndroidStudioProjects/camflow-android-provenance/app/src/main/cpp. ├── CMakeLists.txt ├── camconfd │ ├── CMakeLists.txt │ ├── camconf.h │ ├── config.c │ └── ini ├── camflow-cli │ ├── CMakeLists.txt │ └── camflow.c ├── camflowdd │ ├── CMakeLists.txt │ ├── camflowd-include │ │ ├── service-config.h │ │ └── service-log.h │ ├── ini │ └── main.c ├── example │ ├── CMakeLists.txt │ ├── cp.c │ ├── printf.c │ └── write.c └── provenancelib ├── CMakeLists.txt ├── camflow-dev-include │ ├── provenance_fs.h │ ├── provenance_types.h │ └── provenanceh.h ├── libprovenance-include │ ├── provenance.h │ ├── provenanceSPADEJSON.h │ ├── provenanceW3CJSON.h │ ├── provenance_utils.h │ └── provenancefilter.h ├── libprovenance.c ├── provenanceJSONcommon.h ├── provenanceSPADEJSON.c ├── provenanceW3CJSON.c ├── provenancefilter.c ├── provenanceutils.c ├── relay.c ├── threadpool │ ├── CMakeLists.txt │ ├── thpool.c │ └── thpool.h └── uthash.h