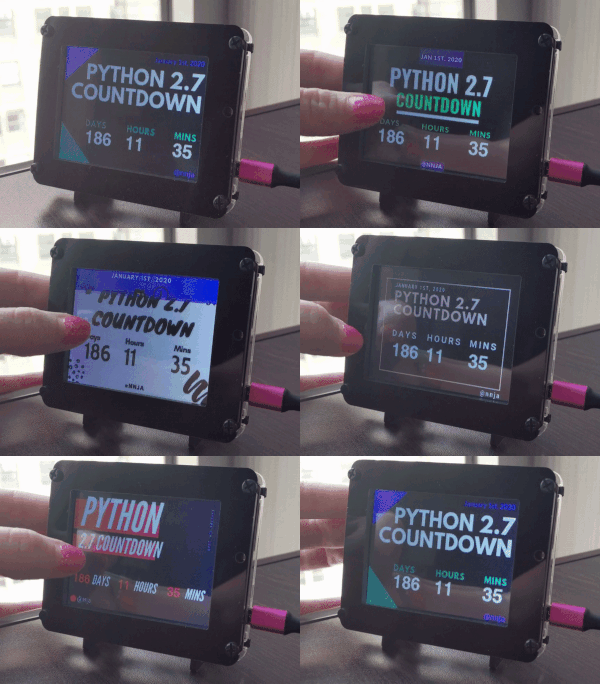
🐍 ✨Python 2.7 will not be maintained after 2020.✨
⏲ Eagerly awaiting Python 2.7's retirement? Use an Adafruit PyPortal to display a countdown timer to the big event on your desktop.
💅 Thirteen themes let you match your countdown timer to your mood. Select your theme by pressing the left and right sides of the touchscreen.
💜 Written by Nina Zakharenko. Stay in touch:
- Twitter - @nnja
- Blog - nnja.io
- #PythonHardware on Twitter
- About PyPortal and CircuitPython
- About Themes
- Dependencies and Libraries
- Adding New Fonts and Themes
- Contributions and Credits
This code is meant to run on a PyPortal.
An Adafruit PyPortal is an wifi-enabled microcontroller device featuring a 3" capacitive touchscreen and CircuitPython baked in.
It can be programmed with CircuitPython, a variant of Python that can be used to program microcontrollers, originally forked from MicroPython.
An EventTheme on the PyPortal represents a background, a text color, a font, and label positions for days, hours and minutes.
Switch to the previous theme by pressing on the left side of the touchscreen display, or the next theme by pressing on the right.
Theme backgrounds in 16-bit .bmp (Bitmap Image) format and are located in the bgs/ directory. Fonts are in .BDF (Bitmap Distribution Format) and located in the fonts/ directory.
Themes are defined in defined at the end of the themes.py file. To stop a theme from being displayed, comment out (or delete) the line where it's defined.
Looking for customization? Skip ahead to adding your own custom themes and fonts.
The PyPortal needs to connect to wifi to fetch the time from the internet using Adafruit IO.
First, rename secrets.py.sample to secrets.py.
Update secrets.py with the SSID and password for your own wifi network.
Set ssid and password for your network in the secrets dictionary in secrets.py.
If you don't have one already, create a new account on Adafruit IO.
Set your aio_username and aio_key in the secrets dictionary in secrets.py.
Tip: make sure not to commit your secrets.py file to source control.
I'm using the new speedier CircuitPython 4.1.0-beta.0 release featuring 2-5x faster code execution and faster display refreshing 🎉.
If you run into issues with the code or the PyPortal, I recommend using the latest stable release, currently CircuitPython 4.0.1.
The following libraries, compatible with CircuitPython 4.0.1 are required to be present in the lib directory. Download the library bundle.
adafruit_bus_deviceadafruit_bitmap_fontadafruit_display_textneopixeladafruit_pyportaladafruit_touchscreenadafruit_esp32spiadafruit_sdcardadafruit_io
Fonts are located in the fonts/ directory.
Added fonts must be in .BDF file (Bitmap Distribution Format).
Read more about fonts on the PyPortal, or review this guide for converting .TTF fonts to .BDF format.
Next, pass the font file-name to the Fonts constructor to use it in your themes.
Theme backgrounds are located in the bgs/ directory.
To display on the PyPortal, background images must be a 16-bit .bmp (Bitmap) file.
For quick and easy conversions between image types, use the ImageMagick command line tool by installing it on your platform.
First, install the ImageMagick command line tools.
To convert a single file:
$ convert foo.png BMP2:foo.bmpTo convert all the *.png files in a directory to 16-bit *.bmp, leaving the original images intact:
$ mogrify -format bmp -define bmp:format=bmp2 -type truecolor *.pngMake sure the background image and font you'd like to use are in the correct format, and located in the proper directory.
Next, add a new EventTheme to the ThemeManager constructor at the end of themes.py. The minimum information necessary is the background file, the label positions, and the label position axis.
Example:
EventTheme("1-green-and-purple", pos=(60, 155, 260), y_axis=185)Optionally, a font and a font color can be provided as well.
EventTheme("10-bold-black-on-white", pos=(35, 130, 235), y_axis=170, color=0x00000, font="Collegiate-50")If no font is specified, the default font is used.
Have an idea for an improvement? Contributions are welcome. File an issue, or open a pull request.
Inspired by this event countdown clock guide by John Park.
