We managed to get YOLOv7 working (using a Pytorch framework) with an NVIDIA GPU (RTX 3060) for training and inferencing on a Windows 11 OS. We used Roboflow to assist in collating the data into train, test and validation folders. We used Ananconda to create a seperate environment to manage all our depedencies. We also managed to get inferencing working on a stereo camera (ZED camera) with bounding boxes on both the RGB and Depth image to get distance of objects of interest
- YOLOV7 setup for training and inferencing
- Convert to ONNX and ONNX Inferencing
- Zed Camera Inferencing (WIP)
If you are from Redback and are currently looking at this repo you can skip Step 1 of the “YOLOV7 setup for training and inferencing” setup as the repo has already been cloned for you. Continue from “Step 2 - Setup virtual environment and install dependenices”.
Here’s the link to the YOLOv7 repo on github —> https://github.com/WongKinYiu/yolov7
Make some edits to the utils/datasets.py inside the yolov7 repo
datasets.py
commented out line 81 in datasets.py and added a hardcoded value for nw (num workers) of (nw = 4) (could go higher depending on your computer specs)
Create a new virtual environment using Anaconda Prompt (the anaconda terminal) using this command
conda create --name yolov7_test_2 python=3.10
conda activate yolov7_test_2First, create a new req.txt file to have these dependencies and versions as listed below
requirements.txt
# Please refer to the READ.md for full installation details

# This Redback's version of the requirements.txt that we found to work
# Usage: pip install -r req.txt

matplotlib==3.5.1
numpy==1.22.4
opencv-python==4.6.0.66
pandas==1.4.3
Pillow==9.2.0
protobuf==3.20.1
PyYAML==6.0
requests==2.28.1
scipy==1.7.3
seaborn==0.11.2
tensorboard==2.6.0
tqdm==4.64.0

# For ONNX conversion and inferencing
onnx==1.12.0
onnxruntime-gpu==1.12.1
onnx-simplifier==0.4.8
coremltools==5.2.0
scikit-learn==1.1.2
Install the requirements via the command
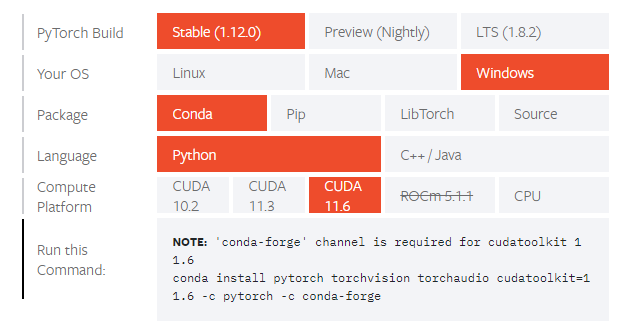
pip install -r req.txtYou will also need to install this pytorch and cuda stuff from this link https://pytorch.org/get-started/locally/. (see picture below for installation details)
simply run the given command from the website in the conda terminal like so
conda install pytorch torchvision torchaudio cudatoolkit=11.6 -c pytorch -c conda-forgeAlso install
conda install -c anaconda cudnnThis may change your numpy version so just double check by installing “req.txt” again
Since we’ve now cloned the repo and installed the necessary dependencies onto our local computer/environment the only thing we need to do now is download the custom dataset from Roboflow.
go to Roboflow.com → sign in → click “Universe” tab on the top ribbon → search for whataver dataset you want → click “Donwload this dataset” → Select the “YOLOv7” format → click on “download zip to computer”.
Once downloaded simply extract the contents into the folder where the repo was initially cloned. Here you can see my custom dataset FS_Cones sitting in the repo
yolov7
.
.
.
└───deploy
└───figure
└───FS_Cones
└───inference
└───models
.
.
.
Next we need to edit the “data.yaml” file inside the custom dataset we downloaded. We must provide the absolute path not the realtive path for the training and valid image sets. For example mine looks like:
train: C:\Users\arjun\OneDrive\University\Computer Vision Projects\Object Detection\YOLOv7_test\yolov7\FS_Cones\train\images
val: C:\Users\arjun\OneDrive\University\Computer Vision Projects\Object Detection\YOLOv7_test\yolov7\FS_Cones\valid\images

nc: 4
names: ['Cones_big', 'Cones_small_blue', 'Cones_small_orange', 'Cones_small_yellow']Simply run this command in your anaconda terminal
Make sure to edit the --data [custom dataset folder name]/data.yaml
python train.py --device 0 --batch-size 8 --data FS_Cones/data.yaml --img 640 640 --cfg cfg/training/yolov7.yaml --weights '' --hyp data/hyp.scratch.p5.yaml --epochs 50Your trained model should appear in runs\train\exp\weights
Just follow the guid in the repo (set source equal 0 for webcam)
python detect.py --weights runs/train/exp/weights/best.pt --conf 0.5 --img-size 640 --source sugma.mp4find the result in runs/detect/exp[X]
These should already be part of the req.txt file and you should already have these installed. Here they are listed again for clarity
onnx==1.12.0  # ONNX export
onnxruntime-gpu==1.12.1
onnx-simplifier==0.4.8  # ONNX simplifier
coremltools==5.2.0  # CoreML export
scikit-learn==1.1.2 # CoreML quantizationRun the export command to export the model. Note it may say it failed but if the onnx apears in your repo then it worked and its all good
- Make sure to change the —weights path to point to the desired weight file you want to change
- Change the conf-thresh to whatever confidence threshold you want from the model
python export.py --weights runs\train\exp5\weights\best.pt --grid --end2end --simplify --topk-all 100 --iou-thres 0.65 --conf-thres 0.65 --img-size 640 640 --max-wh 640Now the onnx file should appear in the same folder and specified in your --weights path
open detect_onnx.py and change:
- “w” - change to path of your onnx file
- “cap” - change to path of a video you want to inference on
This builds off the requirements of the previous 2 sections as you need the onnx model to run inferencing using the zed camera.
head on over to the zed website, click SDK downloads and install the ZED SDK for windows 10/11 that support Cuda 11.0-11.7: https://www.stereolabs.com/developers/release/
Follow steps in the github repo
https://github.com/stereolabs/zed-python-api
Nagivate to where you installed the Zed SDK
cd C:\Program Files (x86)\ZED SDKThen run the command AS ADMINISTRATOR (do this by right-clicking your anaconda terminal and clicking run as administrator)
python get_python_api.pyThen run the command suggested in the terminal. Depending on your os the command may look different to what’s listed below
python -m pip install --ignore-installed pyzed-3.7-cp310-cp310-win_amd64.whlThis may change your numpy version so just double check by installing “req.txt” again
Now you can go back to your original repo
open send_zed.py and change:
- “w” - change to path of your onnx file
Run the inferencer code by typing
python send_zed.pyYou should see two windows, an RGB and depth image window appear

