Add a preferences window to your macOS app in minutes
Just pass in some view controllers and this package will take care of the rest.
- macOS 10.12+
- Xcode 10.2+
- Swift 5+
.package(url: "https://github.com/sindresorhus/Preferences", from: "0.2.1")github "sindresorhus/Preferences"
pod 'Preferences'
Run the PreferencesExample target in Xcode to try a live example.
First, create a collection of preference pane identifiers:
import Preferences

extension PreferencePaneIdentifier {
	static let general = PreferencePaneIdentifier("general")
	static let advanced = PreferencePaneIdentifier("advanced")
}
Second, create a couple of view controllers for the preference panes you want. The only difference from implementing a normal view controller is that you have to add the PreferencePane protocol and implement the preferencePaneIdentifier, toolbarItemTitle, and toolbarItemIcon properties, as shown below. You can leave out toolbarItemIcon if you're using the .segmentedControl style.
GeneralPreferenceViewController.swift
import Cocoa
import Preferences

final class GeneralPreferenceViewController: NSViewController, PreferencePane {
	let preferencePaneIdentifier = PreferencePaneIdentifier.general
	let preferencePaneTitle = "General"
	let toolbarItemIcon = NSImage(named: NSImage.preferencesGeneralName)!

	override var nibName: NSNib.Name? {
		return "GeneralPreferenceViewController"
	}

	override func viewDidLoad() {
		super.viewDidLoad()

		// Setup stuff here
	}
}
AdvancedPreferenceViewController.swift
import Cocoa
import Preferences

final class AdvancedPreferenceViewController: NSViewController, PreferencePane {
	let preferencePaneIdentifier = PreferencePaneIdentifier.advanced
	let preferencePaneTitle = "Advanced"
	let toolbarItemIcon = NSImage(named: NSImage.advancedName)!

	override var nibName: NSNib.Name? {
		return "AdvancedPreferenceViewController"
	}

	override func viewDidLoad() {
		super.viewDidLoad()

		// Setup stuff here
	}
}
In the AppDelegate, initialize a new PreferencesWindowController and pass it the view controllers. Then add an action outlet for the Preferences… menu item to show the preferences window.
AppDelegate.swift
import Cocoa
import Preferences

@NSApplicationMain
final class AppDelegate: NSObject, NSApplicationDelegate {
	@IBOutlet private var window: NSWindow!

	lazy var preferencesWindowController = PreferencesWindowController(
		preferencePanes: [
			GeneralPreferenceViewController(),
			AdvancedPreferenceViewController()
		]
	)

	func applicationDidFinishLaunching(_ notification: Notification) {}

	@IBAction
	func preferencesMenuItemActionHandler(_ sender: NSMenuItem) {
		preferencesWindowController.show()
	}
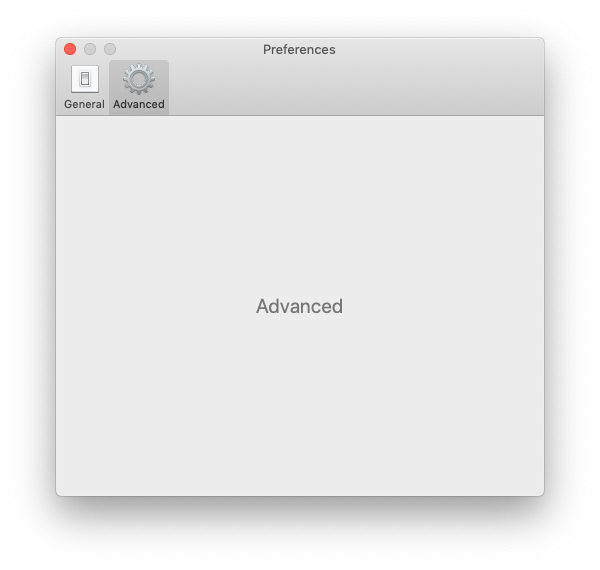
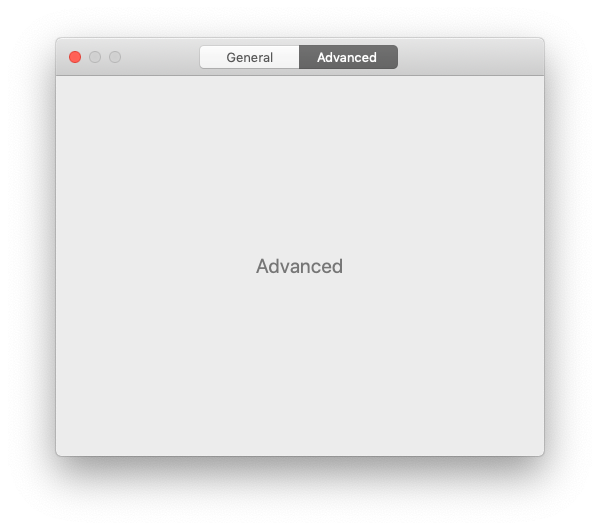
}When you create the PreferencesWindowController, you can choose between the NSToolbarItem-based style (default) and the NSSegmentedControl:
// …
lazy var preferencesWindowController = PreferencesWindowController(
	preferencePanes: [
		GeneralPreferenceViewController(),
		AdvancedPreferenceViewController()
	],
	style: .segmentedControl
)
// …
.toolbarItem style:
.segmentedControl style:
public protocol PreferencePane: AnyObject {
	var preferencePaneIdentifier: PreferencePaneIdentifier { get }
	var preferencePaneTitle: String { get }
	var toolbarItemIcon: NSImage { get } // Not required when using the .`segmentedControl` style
}

public enum PreferencesStyle {
	case toolbarItems
	case segmentedControl
}

public final class PreferencesWindowController: NSWindowController {
	init(
		preferencePanes: [PreferencePane],
		style: PreferencesStyle = .toolbarItems,
		animated: Bool = true,
		hidesToolbarForSingleItem: Bool = true
	)

	func show(preferencePane: PreferencePaneIdentifier? = nil)
}
As usual, call NSWindowController#close() to close the preferences window.
The PreferencesWindowController adheres to the Apple HIG and uses this set of rules to determine the window title:
- Multiple preference panes: Uses the currently selected
preferencePaneTitleas the window title. Localize yourpreferencePaneTitles to get localized window titles. - Single preference pane: Sets the window title to
APPNAME Preferences. The app name is obtained from your app's bundle. You can localize itsInfo.plistto customize the title. ThePreferencespart is taken from the "Preferences…" menu item, see #12. The order of lookup for the app name from your bundle:CFBundleDisplayNameCFBundleNameCFBundleExecutable- Fall back to
"<Unknown App Name>"to show you're missing some settings.
How is it better than MASPreferences?
- Written in Swift. (No bridging header!)
- Swifty API using a protocol.
- Fully documented.
- The window title is automatically localized by using the system string.
- Supports segmented control style tabs.
- Defaults - Swifty and modern UserDefaults
- LaunchAtLogin - Add "Launch at Login" functionality to your macOS app
- DockProgress - Show progress in your app's Dock icon
- More…
You might also like Sindre's apps.
- TableFlip - Visual Markdown table editor by Christian Tietze
- The Archive - Note-taking app by Christian Tietze
- Word Counter - Measuring writer's productivity by Christian Tietze
Want to tell the world about your app that is using Preferences? Open a PR!
MIT


