BakeMaster is an add-on specified for baking various texture maps
and created for Blender - open-source 3D Computer graphics software.
Along with its intuitive and convenient workflow baking process becomes a pleasure.
Created from scratch for users who can't stand wasting time,
and yearn for most functionality and cutting-edge features.
Get on Gumroad Get on BlenderMarket
Stay tuned for Announcements ✅
- Introduction
- Why Artists choose BakeMaster
- Key Features
- Even more features
- Installation
- Basic usage
- Process Flow
- Releases
- Community
- License
BakeMaster is a Blender add-on that is built on Blender Python API. It uses a native Blender baking operator for baking PBR-based maps, default Blender Cycles maps, and special mask maps.
The add-on emits and advances Blender's baking process, making it a powerful, fully-featured and one-place solution for any scene setup.
Created by artists, BakeMaster is simple, straightforward and convenient for comfortable use, yet lands with numerous tweaks and toggles to fully meet your ultimate texture baking preferences.
We gave our best shot to make you love the setup in BakeMaster, which takes only 3 steps:
- add meshes
- add maps
- set and hit Bake!
An unlimited number of objects and custom maps, each driven by unique settings - all can be configured and baked with BakeMaster!
Baking standard Cycles maps is straightforward, but what about baking dozens of them, or PBR-based that are highly relevant in physically accurate texturing? This can easily lead to losing valuable time. Having taken advantage of Blender's node-based material system, we decided to create a fast, responsive, and comfortable baking solution alongside the native baking operator.
BakeMaster makes the whole process easy to tweak and delivers more functionalities.
Never worry about the nodes again: just toggle a couple of settings and BakeMaster will configure it all for you. Cycles maps are gone? Not just yet - simpler UI and manageable settings make it feel like a new book.
Take a look at the main features of BakeMaster that make it stand out:
- Bake an unlimited number of objects and maps, each with unique settings
- 25 different map types available:
- PBR-based maps
- Default Cycles maps
- Special masks
- Bake adaptive Displacement with automatic modifiers
- Real-time map preview in the viewport
- Packing many items onto one map
- Fully customizable map bakes
- Denoise baked maps
- Bake to UDIM tiles
Expand your view onto features that make BakeMaster rock:
-
Unique Bake settings:
Choose a different bake device for each object.
Set bake samples, adaptive sampling, noise threshold and more. -
Outstanding Output settings:
Automatic material creation with all baked maps.
Automatic image color profile configuration.
Custom file formats, resolution, alpha and 32bit float use. -
Internal & External Bake:
Manage maps output directory.
Manage Subfolder creation.
Pack your maps into a .blend file. -
Fully control Map Settings:
Control Contrast, Brightness, Opacity.
Control Samples, Saturation, Distance, Coverage and much more.
Invert map colors on the fly. -
Real-time Map Preview:
No need to guess what each map setting refers to,
toggle map preview and instantly see how the output will look like. -
Denoising:
BakeMaster will denoise any baked map in seconds. -
UV Organization:
Auto unwrap models.
Pack UVs of multiple objects.
Choose UV to use for bake if an object has many. -
Baking to UDIMs:
Choose object UV type in Single or Tiled (UDIMs).
Specify custom UDIM tiles baking range for each map. -
Source to Target Bake:
Choose a source object for your target object. -
Keyword batch naming:
Custom map name keywords to be filled with all necessary information. -
Tips and Documentation:
Every property, button or field is documented with a description or instruction.
Add-on Documentation will help you find everything regarding usage and explanation. -
Blender versions compatibility:
The add-on is fully compatible with the following Blender versions:
2.83, 2.90, 2.91, 2.92, 2.93, 3.0, 3.1, 3.2, 3.3 Alpha. -
Enhanced Bake Control:
There is not a single keybinding that you can use to control the baking process. -
Responsive UI:
As you tweak the preferences either of map or object,
the interface will change to fully mirror and appropriate your actions.
To view all features and learn the ropes of BakeMaster, visit Documentation.
BakeMaster add-on works in Blender, so if you haven't got it on your device just yet, go ahead!
Make sure the Blender version you are using is compatible with BakeMaster.
If you have a previous version of BakeMaster installed, follow the steps to uninstall it:
- Open Blender
- Go to Edit > Preferences > Add-ons
- Type "BakeMaster" into the search bar
- Expand the add-on panel and click "Remove"
- Save Blender Preferences
It would be good to restart Blender after.
Download the latest BakeMaster add-on version from the Blender Market.
A demo version can be also installed from the GitHub repo:
Go to the install/ and download a zip folder.
See BakeMaster Versions for details.
- Open Blender
- Go to Edit > Preferences > Add-ons
- Click "Install"
- Specify the path to the download zipped add-on
- Enable the addon
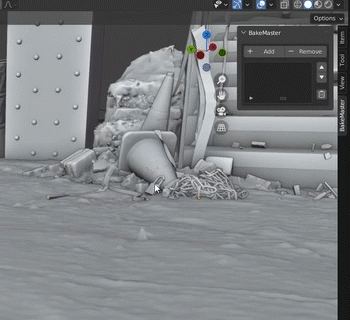
BakeMaster add-on can be accessed in the Viewport.
Hit the "N" key on your keyboard and you will see the add-on pop up on the right.
Head over to the add-on panel and you are good to go.
Once a newer version of BakeMaster becomes available, uninstall all the previous versions.
Download the newer one. Follow the steps in the sections above to install it into Blender.
A new version will be announced in the Announcements.
Below are the basic steps about how to quickly set up and get the hang of BakeMaster.
If you want to dive into every setting or toggle and become a complete BakeMaster master,
you can visit Documentation.
List of actions:
- Choose objects
- Source-target Settings
- UV Settings
- Choose maps
- Map Settings
- Bake Settings
- Baking process
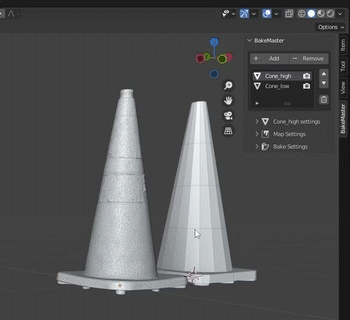
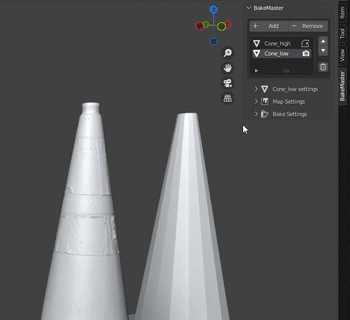
First of all, you need to choose the objects you want to perform bake for:
- Select objects in the scene
- Press the "Add" button on the BakeMaster panel
As long as objects are added to the list, you can configure their settings.
Tip: to quickly find the object you have added to the list in the outliner, just simply click it in the List of Objects, and it will be selected in the scene.
Read more about List of Objects 📖
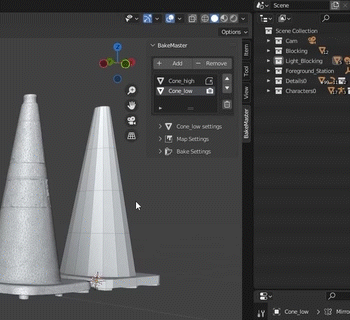
If you want to bake high-poly model details onto a low-poly model,
use Source to Target settings:
- Add both low and high-poly models to the List of Objects
- Select the low-poly in the List
- Expand Item Settings panel
- Expand Source to Target panel
- Check "Target"; set "Source" to be the high-poly.
Extrusion, Max Ray Distance and Cage object can be configured inside the Source to Target panel as well.
Read more about Source-target Settings 📖
If you want to bake to UDIM tiles, or include an object in UV Pack,
the UV Maps panel is essential:
- Select the object in the List of Objects
- Expand Item Settings panel
- Expand UV Maps panel
Inside the panel, you can choose:
- Active UV layer
- UV type (Single tile or UDIMs)
- UV Packing settings
If your object has no UVs, BakeMaster will auto-unwrap the mesh for you before baking.
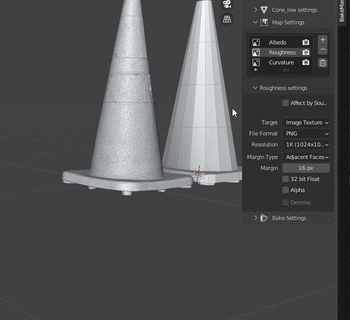
Add maps you would like to be baked in the Map Settings panel:
- Select the object in the List of Objects
- Expand Map Settings panel
- Click the "+" button to add a map pass
- Click on the map pass to set its type
If you have prepared some maps for the future and you don't want to bake them alongside others,
click the "📷" button near the map pass to toggle its "bake visibility".
Every map pass can have unique output settings.
All of them can be configured inside the Map Pass Settings panel:
- Select the object in the List of Objects
- Expand Map Settings panel
- Choose an active map pass
- Expand the Map Pass Settings panel
Map pass output settings include:
- File format
- Resolution
- Margin
- Use 32bit float bit depth
- Use Alpha Channel
- Map Denoising
- Affect by Source (apply Source to Target settings for this map pass)
- Other settings that depend on Blender version
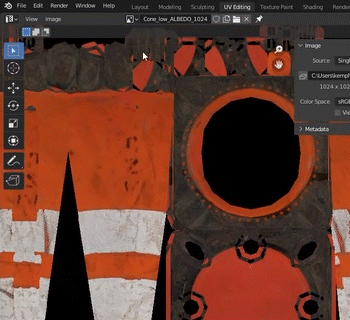
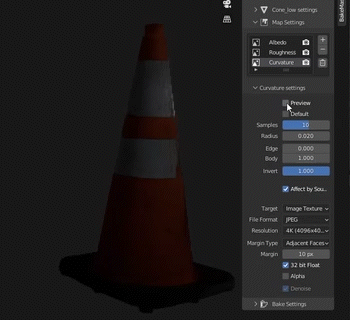
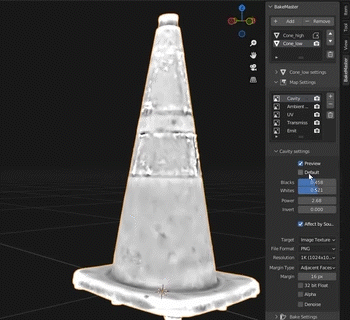
Some map passes like AO, Thickness, Displacement and others can have custom settings.
They can be also set inside the Map Pass Settings panel.
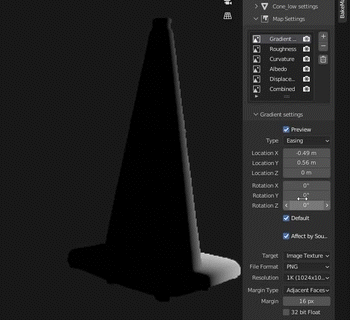
For example, Curvature Map has the following custom properties
(These settings can be toggled by unchecking "Default" inside the Map Pass Settings panel):
- Samples count (quality)
- Radius (edge radius)
- Edge contrast
- Body contrast
- Invert option
Special maps have a "Preview" toggle to turn on real-time map preview in the Viewport.
Read more about Map Settings 📖
Last but not least is the Item Bake Settings panel:
- Select the object in the List of Objects
- Expand Bake Settings panel
- Expand Item Bake Settings panel
Each object in the List of Objects can have custom Bake Settings, including:
- Material creation (create a material with all baked maps)
- Internal/External output
- Output directory and subfolder creation options for External save
- Maps Batch naming (map naming keywords)
- Bake device (CPU, GPU - depends on the system)
- Adaptive sampling, sampling
- And more
Inside the same Bake Settings panel, there are several important controls to know about:
- Reset BakeMaster option (reset BakeMaster after bake)
- Bake This Button (bake maps only for the current item in the List)
- Bake All Button (bake maps for all items)
There is also an embossed field called "Bake Instruction".
When you hover over it, you will see Baking process information and controls.
Read more about Bake Settings 📖
The baking process can be controlled from your keyboard or Blender Console.
All keybindings are presented under the "Bake Instruction" field inside the Bake Settings panel.
- Press
BACKSPACEto cancel baking all next maps- Press
ESCto cancel baking current map- Press
BACKSPACE + ESCto cancel baking
If you want to undo the bake result, press Ctrl + Z just after it has been finished or canceled.
Read more about the Baking process 📖
BakeMaster process flow is described below:
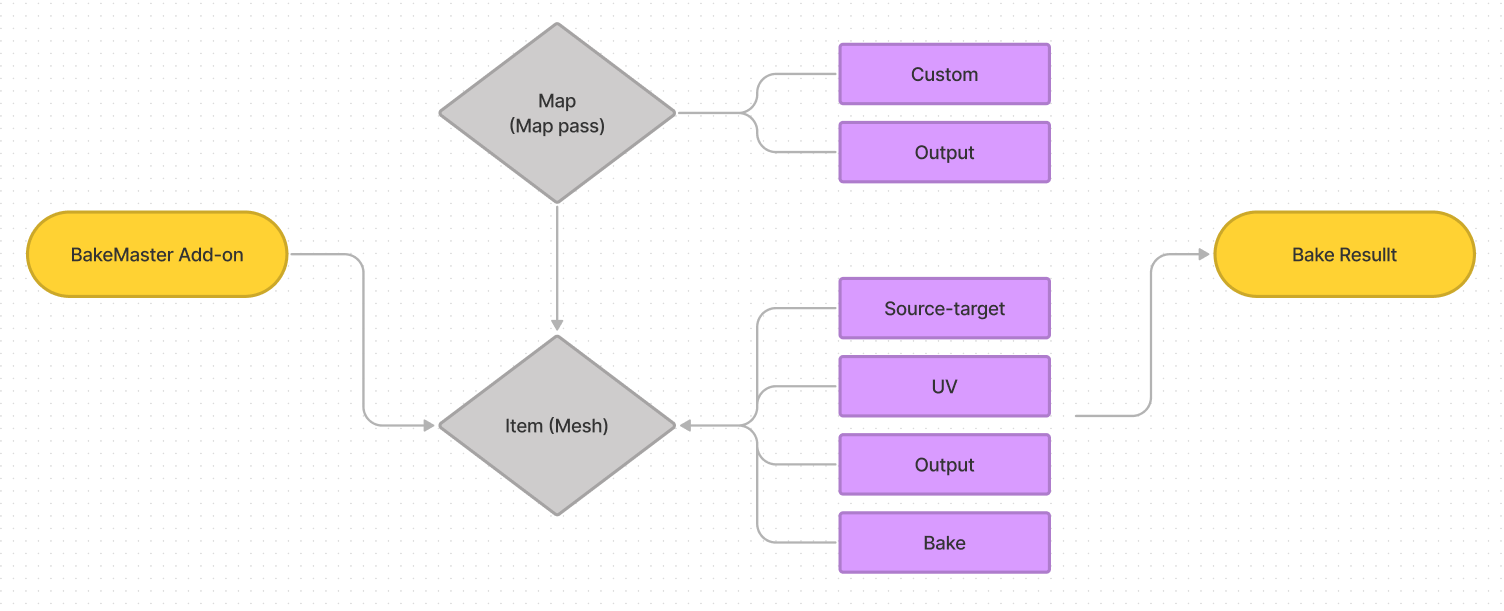
BakeMaster keeps track of all added maps and objects in a stack-like order:
- Item0
- Map0
- Map1
- Item3
- Map0
- Item2
- Map0
- Map1
The order of classes can be changed using the order controls.
Each class has its unique settings.
BakeMaster picks an Object added to the List of Objects and bakes maps added to it one by one.
This process can be shown in the following diagram:

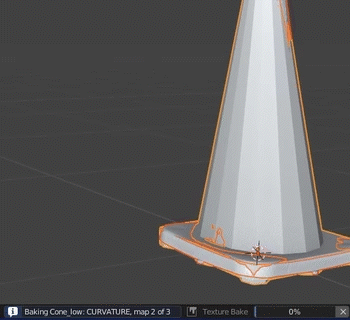
BakeMaster shows baking progress in the bottom info bar, in the style:
Baking [Object Name]: [Map Name], map [Current Map Index] of [Length of Maps] ... [Map Baking Progress]

The latest stable release of BakeMaster is the release-bakemaster-1.0
Older versions or development versions are available in the GitHub repo.
BakeMaster Changelog.
Initial release.
We highly engage users to help BakeMaster grow.
If you have a desire to say, suggest or shout out - we will appreciate it!
Enjoying the BakeMaster add-on? Submit a review at Blender Market!
Found a bug or issue? Would like to improve something? Contact us!
Have a question or just want to talk? Start conversation!
Want to contribute? Visit this page to become a contributor!
Support the BakeMaster project to lift our spirits and souls!
Purchase the license from Blender Market.
BakeMaster Demo version is under the GNU General Public License.
You receive it by downloading the Demo version.
See BakeMaster Versions for details.