HoneygainAutoClaim is a 🐍 Python script (bot) that automatically claims your daily bonus, achievements
and referrals from 🐝 Honeygain 🍯.
Honeygain is a service that allows you to 💵 earn passive income by sharing your internet connection with
others.
This script is not affiliated with or endorsed by Honeygain. Use it at your own risk and responsibility.
The author is not responsible for any consequences that may arise from using this script. If Honeygain wants me
to delete this bot, I'll do it.
This project is licensed under the MIT License. For more information, see the LICENSE file.
- Clone or download this repository.
git clone https://github.com/MrLoLf/HoneygainAutoClaim.git - Navigate in to the directory
HoneygainAutoClaimcd HoneygainAutoClaim - Install the required modules with
python3 -m pip install -r requirements.txt - If you run the cron job, it's recommended to navigate back to your home directory with:
cd ~ - Run the script with
python3 /absolut folder path/main.py - Create a schedule to run the program every day.
- Enjoy your daily bonus!
This method might be against GitHub TOS. Use it at your own risk.
- Run w/o PC, VPS, On the fly
- Keep your email, password or your token safe with env secret from GitHub
- Automatically run everyday
- Go to your Honeygain Dashboard or click here and log in to your Honeygain account
- Open the browser's console by pressing
F12button ( orFn+F12on some laptops ) - Click on the tab
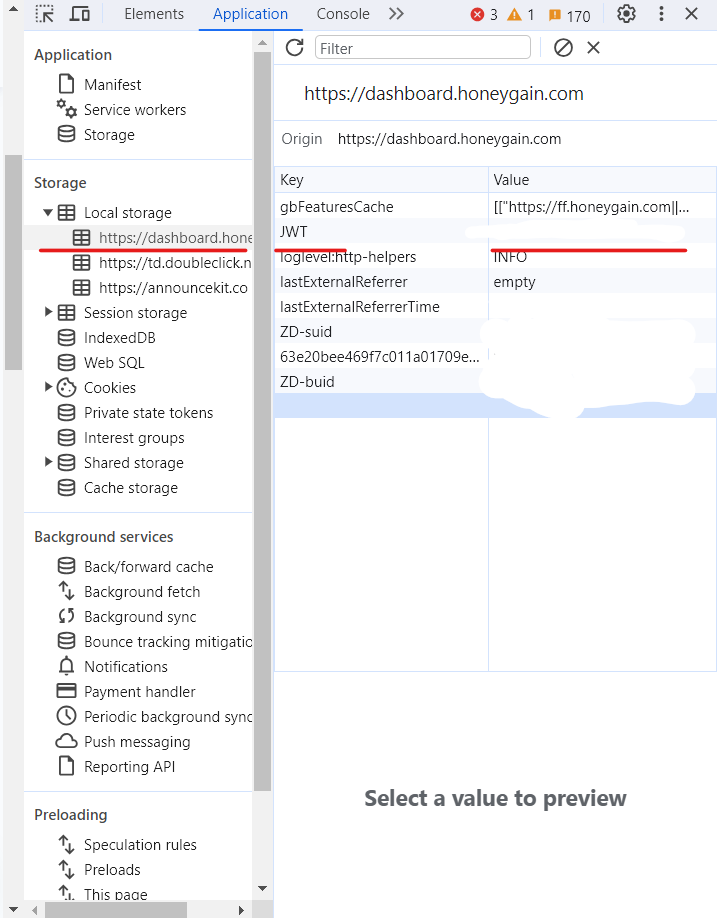
Applicationthan click toLocal storageand click tohttps://dashboard.honeygain.com; then you will see keyJWTthat includes your token, copy this for next steps - Fork this repository 🍴
- Go to your forked repository 🍴
- Go to
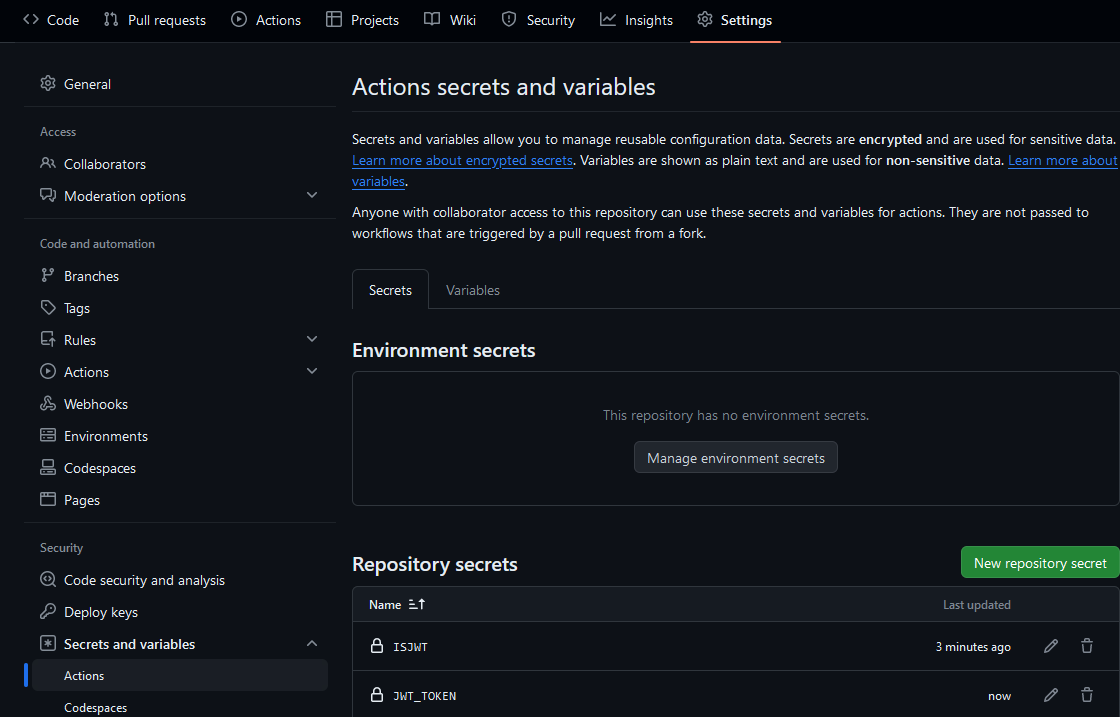
Settings > Secrets and Variables > Actions, and clickNew Repository secret - Use
JWT_TOKENand paste your JWT Token from Steps 3. Create another secret and useIsJWTset totrue. - Go to your forked repository 🍴 and go to the Actions tab and press
I understand my workflows, go ahead and enable them - Create a file in the .github folder und workflows called daily.yml and paste the below into the file. It should look like this:
name: Daily claim
on:
  schedule:
    - cron: '0 14 * * *' # <- Use UTC Time +0 , change your time here ( 14 is hour , 0 is minutes ) and use 24-hour format

jobs:
  Daily:
    runs-on: ubuntu-latest
    steps:
      - name: Check for IsJWT Secret
        id: IsJWT
        # perform secret check & put boolean result as an output
        shell: bash
        run: |
          if [ "${{ secrets.IsJWT }}" != '' ]; then
            echo "available=true" >> $GITHUB_OUTPUT;
          else
            echo "available=false" >> $GITHUB_OUTPUT;
          fi

      - name: Set IsJWT Value
        if: ${{ steps.IsJWT.outputs.available == 'true' }}
        id: IsJWTValue
        # perform secret check & put boolean result as an output
        shell: bash
        run: |
          if [ "${{ secrets.IsJWT }}" == 'false' ]; then
            echo "value=0" >> $GITHUB_OUTPUT;
          else
            echo "value=1" >> $GITHUB_OUTPUT;
          fi

      - uses: actions/checkout@v4
      - name: Run HoneygainPot with IsJWT Secret
        if: ${{ steps.IsJWT.outputs.available == 'true' }}
        run: python main.py
        env:
          MAIL: ${{ secrets.MAIL }} # <- DO NOT enter your email here, it may leak your information
          PASS: ${{ secrets.PASS }} # <- DO NOT enter your password here, it may leak your information
          JWT_TOKEN: ${{ secrets.JWT_TOKEN }} # <- DO NOT enter your JWT Token here, it may leak your information
          IsJWT: ${{ steps.IsJWTValue.outputs.value }} # <- 0 = Use Mail and Pass ; 1 = Use Token (Default is 1)

      - uses: actions/checkout@v4
      - name: Run HoneygainPot without IsJWT Secret
        if: ${{ steps.IsJWT.outputs.available != 'true' }}
        run: python main.py
        env:
          MAIL: ${{ secrets.MAIL }} # <- DO NOT enter your email here, it may leak your information
          PASS: ${{ secrets.PASS }} # <- DO NOT enter your password here, it may leak your information
          JWT_TOKEN: ${{ secrets.JWT_TOKEN }} # <- DO NOT enter your JWT Token here, it may leak your information
          IsJWT: 0 # <- 0 = Use Mail and Pass ; 1 = Use Token (Default is 1)
- Fork this repository 🍴
- Go to your forked repository 🍴
- Go to
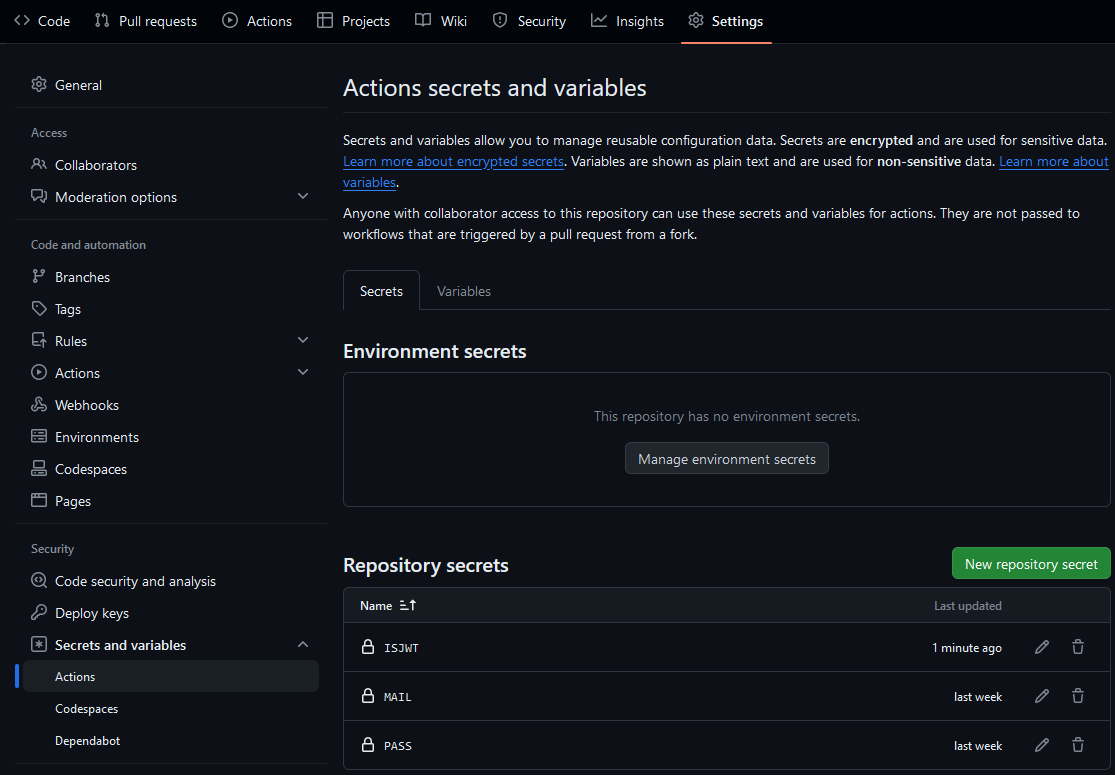
Settings > Secrets and Variables > Actions, and clickNew Repository secret - For the secret name, use
MAILand set your Honeygain email andPASSfor your password andIsJWTset tofalse. - Go to your forked repository 🍴 and go to the Actions tab and press
I understand my workflows, go ahead and enable them - See Step 9 from the Use JWT Token section
- Clone or download this repository.
or use the docker image from docker hub
git clone https://github.com/MrLoLf/HoneygainAutoClaim.gitdocker pull mrlolf/honeygainautoclaim:latest - Navigate in to the directory
HoneygainAutoClaimthis isn't needed if the image was usedcd HoneygainAutoClaim - To build the Dockerfile, run the command below (this can be skipped if the image was used):
docker build -t honeygainautoclaim . - To build it for arm64 like a raspberry pi run this command:
docker buildx build --platform linux/arm64 -t honeygainautoclaim . - To run the docker container use on of the commands below.
When using the image simply add in front of honeygainautoclaim mrlolf/ it should look like this
mrlolf/honeygainautoclaimor run it without the interactive menudocker run -it honeygainautoclaimor just with the tokendocker run -e MAIL="your@email.here" -e PASS="PASSWORD" honeygainautoclaimdocker run -e JWT_TOKEN="YOURTOKEN" honeygainautoclaim - Create a schedule to run the program every day.
- Enjoy your daily bonus!
-
Well, GitHub uses UTC time (UTC + 0) for scheduling workflows, so we should convert it to our timezone.
-
For example: If I want to set the daily trigger to trigger at 9:00 PM (UTC + 7), I have to set it to 2:00 PM or 14:00 (24-hour format) (UTC ± 0) (2 + 7 = 9).
name: Daily claim on: schedule: - cron: '0 14 * * *' # <- Use UTC Time +0 , change your time here ( 14 is hour , 0 is minutes ) and use 24-hour format -
So, if I want the daily trigger to run at 5:00 AM (UTC + 7), I have to set it to 10:00 PM (UTC ± 0) (use 24-hour format):
name: Daily claim
on:
  schedule:
    - cron: '0 22 * * *' # <- Use UTC Time +0 , change your time here ( 14 is hour , 0 is minutes ) and use 24-hour format
-
crontab -e - Add this line at the bottom
0 8 * * * python3 /absolut folder path/main.pyto run the script every day at 8:00 am.
- You can find the docker container ID by running
docker ps -a -
Or the windows equivalent via the Task Scheduler.
crontab -e - Add this line at the bottom
0 8 * * * docker start <container_id>. Make sure to replace <container_id> with the ID of your Docker container.
- Open Task Scheduler.
- Click on Create Task.
- Enter task name:
HoneygainAutoClaim. - Switch to Triggers tab.
- Click on New.
- Select On a schedule.
- Set start date to today, time to 8:00 AM.
- Select Daily in Settings.
- Click on OK.
- Switch to Actions tab.
- Click on New.
- Select Start a program.
- Enter path to Python executable, e.g.
C:\Python39\python.exe. - Enter path to, e.g.
C:\HoneygainAutoClaim\main.pyscript toAdd arguments. - Click on OK.
- Open the folder where the main.py is being located
- Navigate in to Config
- Open the file
HoneygainConfig.toml
nano /absoulut folder path/HoneygainAutoClaim/Config/HoneygainConfig.toml
Only do this if you know what you are doing. You can break the program and logging with changes made here.
- Open
main.py - Edit this line
  logging.basicConfig(filename='Logs/HoneygainAutoClaim.log', filemode='w', encoding='utf-8', level=logging.INFO,
                      format='%(levelname)s ' '%(asctime)s ' '%(message)s', datefmt='%d/%m/%Y %H:%M:%S')
- If you want to keep your old logs you can change the filemode from
wtoait uses the default python filemodes.
By changing this be sure to clean your log sometimes because it can get very large and use a lot of space. - To change the logging level simple change INFO to WARN or ERROR
- If you want to change the format you can remove the time for example by removing
%(asctime)s - To change the time that's being shown change the datefmt


