LightAPRS 2.0 is one of the most affordable, smallest, lightest, powerful and open source APRS trackers available. It makes tracking pico balloons, weather balloons, model rockets, RC aircrafts and anything else that flies simple and easy. It is able to report location, altitude, temperature and pressure to the internet (APRS-IS) or direct to an amateur radio once a minute with a solar panel/supercapacitors or just 3xAAA batteries. Because LightAPRS 2.0 is open source you can add your own custom sensors via I2C/SPI pins.

LightAPRS 2.0 is upgraded (powerful) version of LightAPRS 1.0.

LightAPRS 2.0 is available on http://shop.qrp-labs.com/aprs/lightaprs2 for order. If you need an APRS+WSPR tracker than checkout:
LightAPRS-W 1.0: https://github.com/lightaprs/LightAPRS-W-1.0
LightAPRS-W 2.0: https://github.com/lightaprs/LightAPRS-W-2.0
LoRa/LoRaWAN Tracker: https://github.com/lightaprs/LightTracker-1.0

Important : LightAPRS 2.0 uses the amateur 2 meter (VHF) radio band which requires an amateur radio license to operate.
- Software : Open Source
- Weight : 8.1 grams
- Dimensions : 33 mm x 55 mm
- IDE : Arduino
- Platform : ARM Cortex-M0 (Arduino M0)
- MCU : ATSAMD21G18
- Flash : 256 KB
- Ram : 32 kB
- EEPROM : N/A
- Operating Frequency : 48 Mhz
- Operating Voltage : 3.3 Volt
- Input Voltage : 2.7 (min) - 6 (max) Volt via USB or VBat pin (Buck-Boost regulator with power good)
- BOD : N/A
- Sensor : BMP180 (pressure and temperature)
- VHF Radio Module : Dorji DRA818V (included)
- VHF Radio Operating Frequency : 144-146 MHz (configurable by code)
- VHF Low Pass Filter : Available (7 elements)
- VHF Radio Power : 0.5 Watt or 1 Watt (configurable by code)
- VHF Power Consumption (TX) : ~450 mA (0.5 Watt) / ~750 mA (1 Watt) (Automatically selected based on input voltage by code)
- CPU Power Consumption (Idle) : ~7 mA
- GPS : Ublox MAX-M8Q (GPS-GLONASS)
- GPS Antenna Gain : 4.3 dBi
- Extended Pins : I2C, SPI, 2x Analog

To programme LightAPRS 2.0 Tracker, all you need is a micro usb (B type) cable, a few installations and configurations.
Download and install Arduino IDE. If you have already installed Arduino, please check for updates. Its version should be at least v1.8.13 or newer.
- Open the Tools > Board > Boards Manager... menu item as follows:

- Type "Arduino SAMD" in the search bar until you see the Arduino SAMD Boards (32-Bits Arm Cortex-M0+) entry and click on it.

- Click Install .
- After installation is complete, close the Boards Manager window.
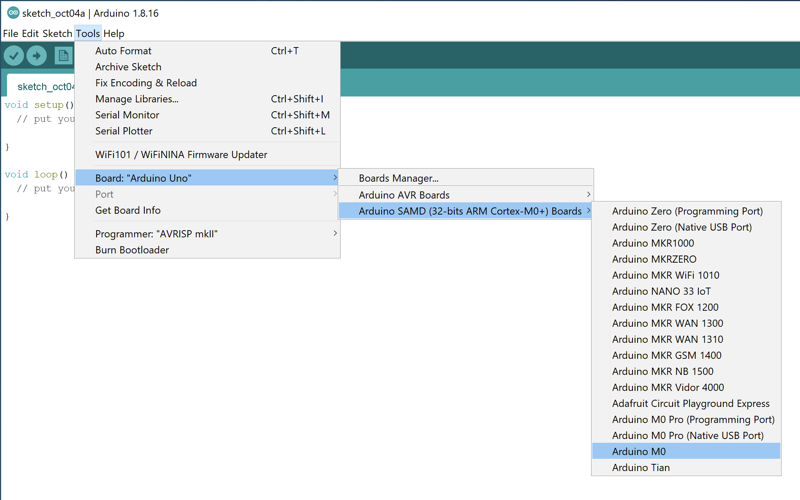
- Open the Tools > Board menu item and select Arduino SAMD Boards (32-Bits Arm Cortex-M0+) -> Arduino M0 from the the list as follows:
You are almost ready to programme LightAPRS 2.0 Tracker :)
- First download the repository to your computer using the green "clone or download" button.
- There are more than one Arduino projects optimized for different use cases. For example if you are planning to use the LightAPRS-W-2.0 tracker for a pico balloon project, then use the "LightAPRS-W-2-pico-balloon" folder.
- You will notice some folders in the "libraries" folder. You have to copy these folders (libraries) into your Arduino libraries folder on your computer. Path to your Arduino libraries:
- Windows : This PC\Documents\Arduino\libraries\
- Mac : /Users/<username>/Documents/Arduino/libraries/
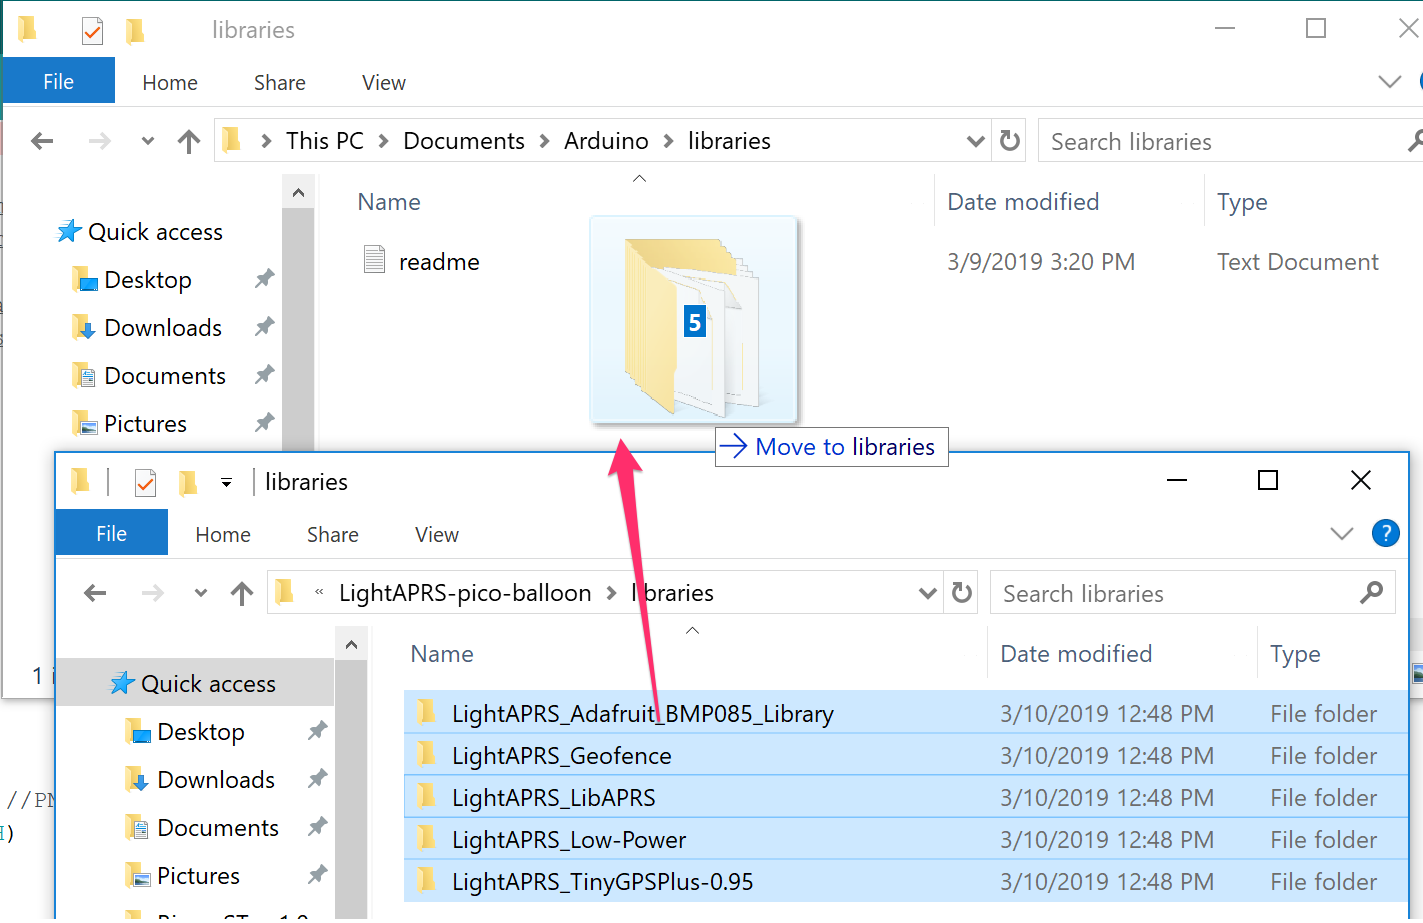

IMPORTANT : LightAPRS 2.0 uses additional libraries than LightAPRS and LightAPRS-W. So if you purchased LightAPRS or LightAPRS-W and copied libraries before, do it again for LightAPRS 2.0. Otherwise you get a compile error.
- Then open the *.ino file with Arduino IDE and change your settings (Callsign, SSID, comment, etc.)
- Click Verify (If you get compile errors, check the steps above)

- First attach an VHF antenna (at least 50cm monopole wire) to your tracker. Radio module may be damaged when not attaching an antenna, since power has nowhere to go.
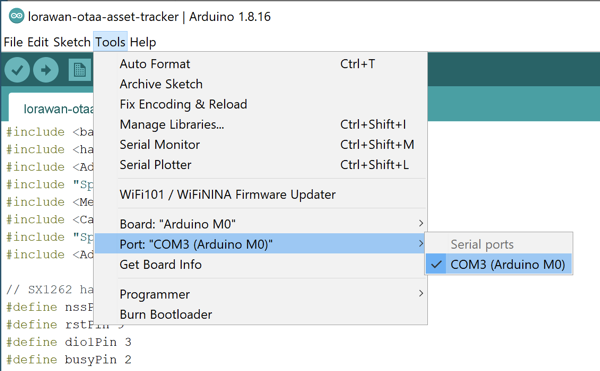
- Connect LightAPRS 2.0 Tracker to your computer with a micro USB cable, then you should see a COM port under Tools->Port menu item. Select that port.
- Click Upload

- Your tracker is ready to launch :)

If you have any questions or need support, please contact support@lightaprs.com