![]()
An entrypoint for developing with NIMs that natively scales out to full-sized labs and up to production environments. NIM Anywhere is an integration of all the tooling required to start integrating NVIDIA enterprise-ready microservices.
Get started now with the quick start instructions.

- Quick Start
- Developing Your Own Applications
- Application Configuration
- Contributing
- Managing your Development Environment
To allow AI Workbench to access NVIDIA’s cloud resources, you’ll need to
provide it with a Personal Key. These keys begin with nvapi-.
Expand this section for instructions for creating this key.
-
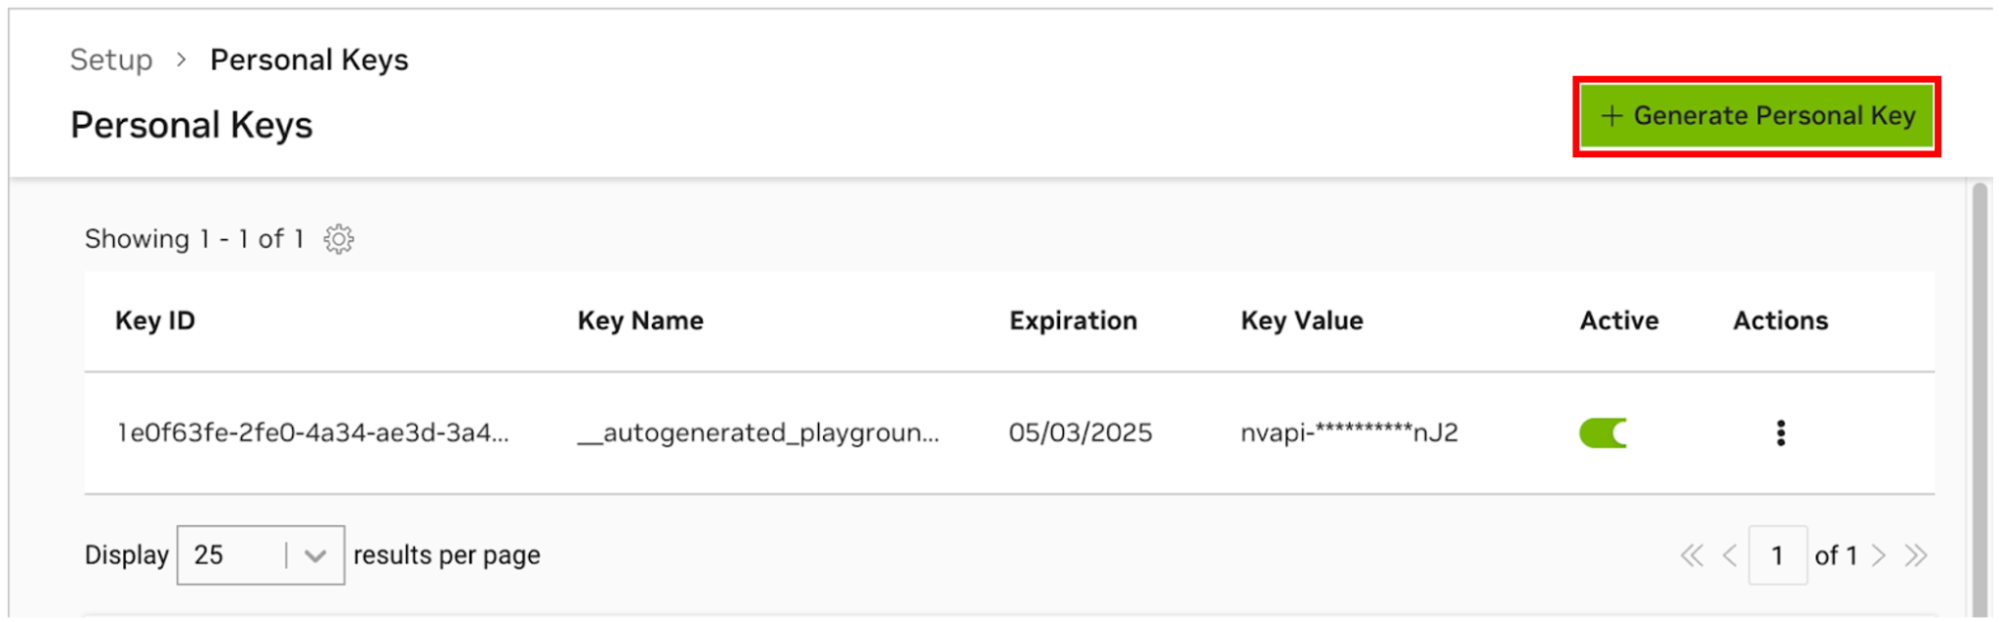
Go to the NGC Personal Key Manager. If you are prompted to, then register for a new account and sign in.
HINT You can find this tool by logging into ngc.nvidia.com, expanding your profile menu on the top right, selecting Setup, and then selecting Generate Personal Key.
-
Select Generate Personal Key.
-
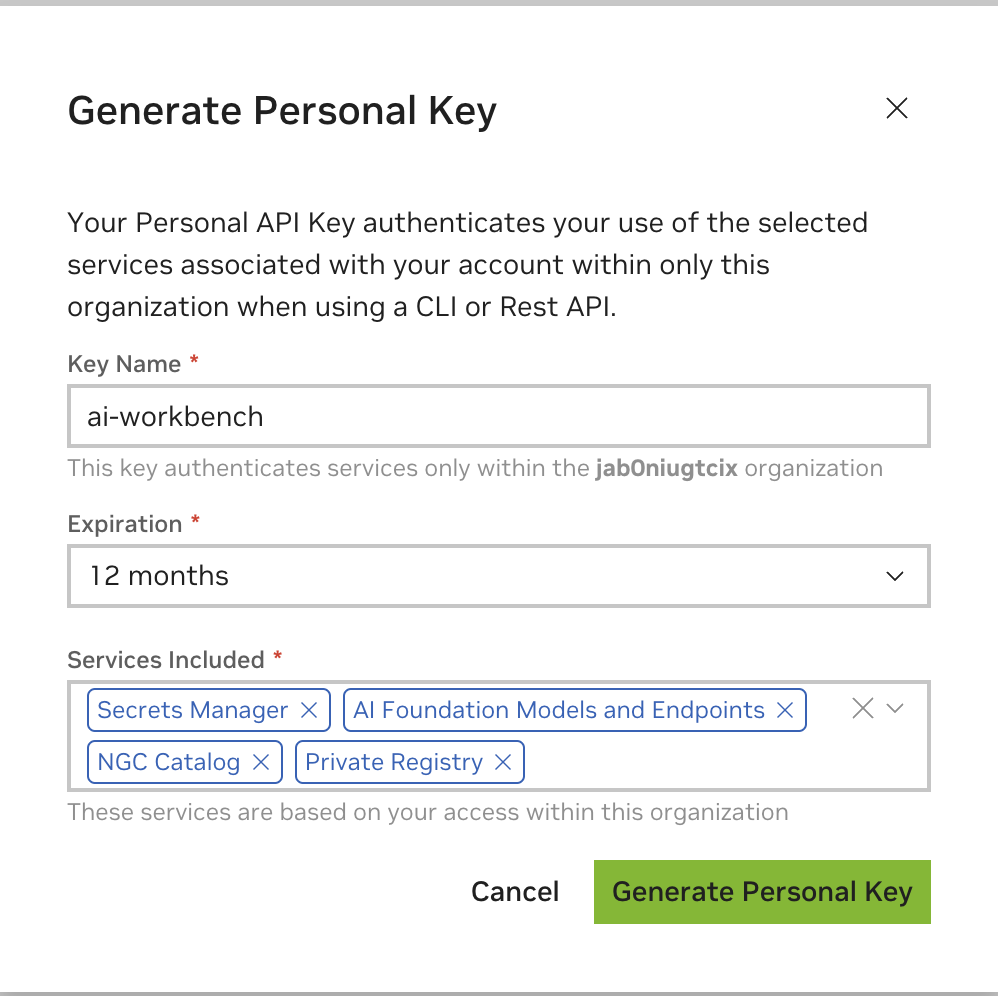
Enter any value as the Key name, an expiration of 12 months is fine, and select all four services. Press Generate Personal Key when you are finished.
-
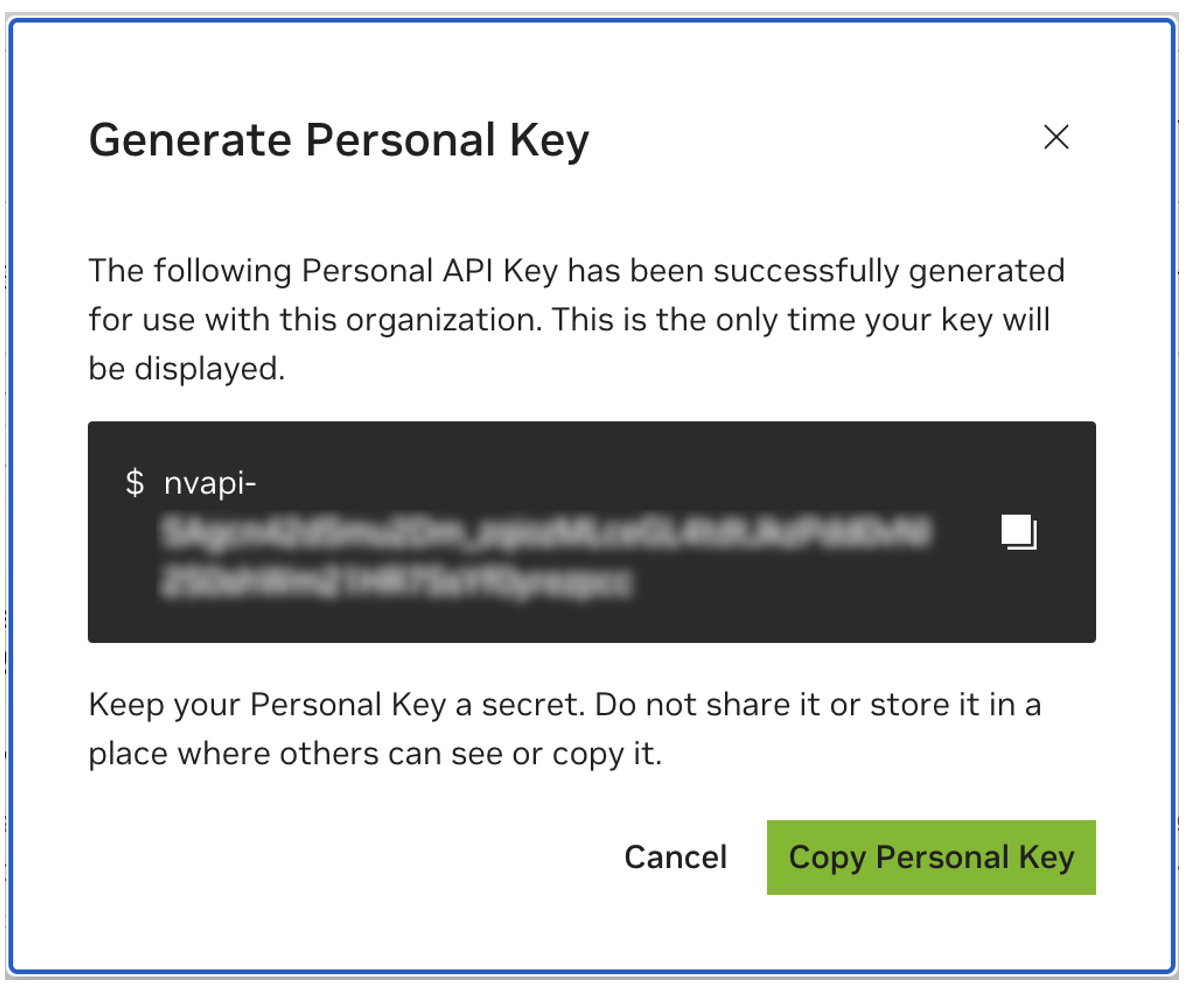
Save your personal key for later. Workbench will need it and there is no way to retrieve it later. If the key is lost, a new one must be created. Protect this key as if it were a password.


This project is designed to be used with NVIDIA AI Workbench. While this is not a requirement, running this demo without AI Workbench will require manual work as the pre-configured automation and integrations may not be available.
This quick start guide will assume a remote lab machine is being used for development and the local machine is a thin-client for remotely accessing the development machine. This allows for compute resources to stay centrally located and for developers to be more portable. Note, the remote lab machine must run Ubuntu, but the local client can run Windows, MacOS, or Ubuntu. To install this project local only, simply skip the remote install.
flowchart LR
    local
    subgraph lab environment
        remote-lab-machine
    end

    local <-.ssh.-> remote-lab-machine
Ubuntu is required if the local client will also be used for developent. When using a remote lab machine, this can be Windows, MacOS, or Ubuntu.
Expand this section for a Windows install.
For full instructions, see the NVIDIA AI Workbench User Guide.
-
Install Prerequisite Software
- If this machine has an NVIDIA GPU, ensure the GPU drivers are installed. It is recommended to use the GeForce Experience tooling to manage the GPU drivers.
- Install Docker Desktop for local container support. Please be mindful of Docker Desktop's licensing for enterprise use. Rancher Desktop may be a viable alternative.
- [OPTIONAL] If Visual Studio Code integration is desired, install Visual Studio Code.
-
Download the NVIDIA AI Workbench installer and execute it. Authorize Windows to allow the installer to make changes.
-
Follow the instructions in the installation wizard. If you need to install WSL2, authorize Windows to make the changes and reboot when requested. When the system restarts, the NVIDIA AI Workbench installer should automatically resume.
-
Select Docker as your container runtime.
-
Log into your GitHub Account by using the Sign in through GitHub.com option.
-
Enter your git author information if requested.
Expand this section for a MacOS install.
For full instructions, see the NVIDIA AI Workbench User Guide.
-
Install Prerequisite Software
- Install Docker Desktop for local container support. Please be mindful of Docker Desktop's licensing for enterprise use. Rancher Desktop may be a viable alternative.
- [OPTIONAL] If Visual Studio Code integration is desired, install Visual Studio Code. When using VSCode on a Mac, an additional step must be performed to install the VSCode CLI interface used by Workbench.
-
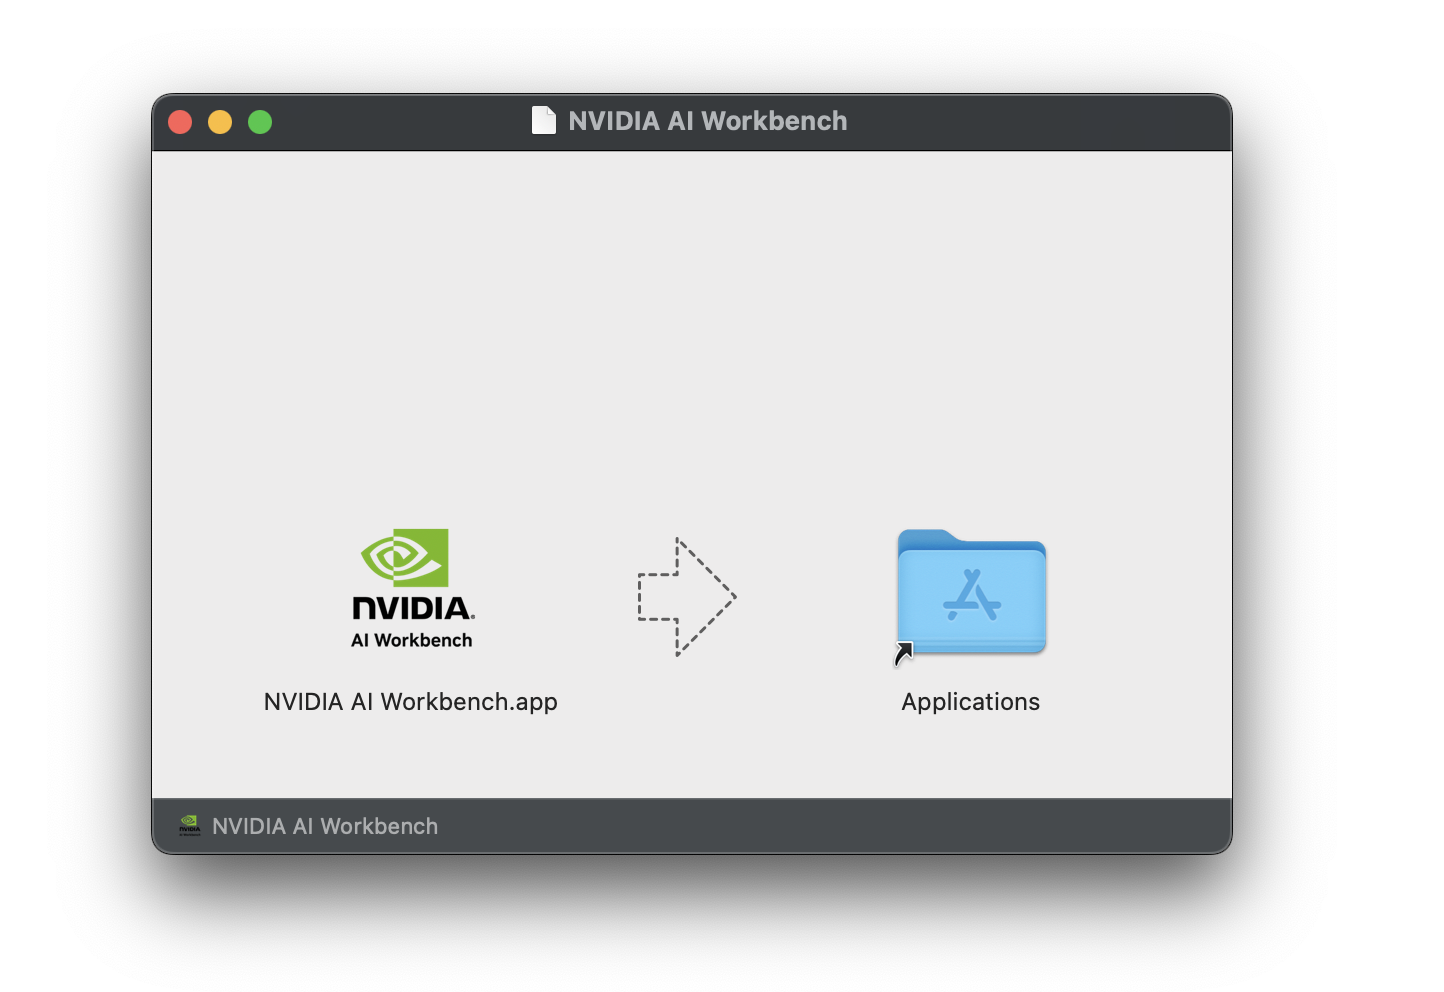
Download the NVIDIA AI Workbench disk image (.dmg file) and open it.
-
Drag AI Workbench into the Applications folder and run NVIDIA AI Workbench from the application launcher.
-
Select Docker as your container runtime.
-
Log into your GitHub Account by using the Sign in through GitHub.com option.
-
Enter your git author information if requested.

Expand this section for an Ubuntu install.
For full instructions, see the NVIDIA AI Workbench User
Guide.
Run this installation as the user who will be user Workbench. Do not run
these steps as root.
-
Install Prerequisite Software
- [OPTIONAL] If Visual Studio Code integration is desired, install Visual Studio Code.
-
Download the NVIDIA AI Workbench installer, make it executable, and then run it. You can make the file executable with the following command:
chmod +x NVIDIA-AI-Workbench-*.AppImage -
AI Workbench will install the NVIDIA drivers for you (if needed). You will need to reboot your machine after the drivers are installed and then restart the AI Workbench installation by double-clicking the NVIDIA AI Workbench icon on your desktop.
-
Select Docker as your container runtime.
-
Log into your GitHub Account by using the Sign in through GitHub.com option.
-
Enter your git author information if requested.
Only Ubuntu is supported for remote machines.
Expand this section for a remote Ubuntu install.
For full instructions, see the NVIDIA AI Workbench User
Guide.
Run this installation as the user who will be using Workbench. Do not
run these steps as root.
-
Ensure SSH Key based authentication, without a passphrase, is enabled from the local machine to the remote machine. If this is not currently enabled, the following commands will enable this is most situations.
- From a Windows local client, use the following PowerShell:
ssh-keygen -f "C:\Users\local-user\.ssh\id_rsa" -t rsa -N '""'
type $env:USERPROFILE\.ssh\id_rsa.pub | ssh REMOTE_USER@REMOTE-MACHINE "cat >> .ssh/authorized_keys"
- From a MacOS or Linux local client, use the following shell:
if [ ! -e ~/.ssh/id_rsa ]; then ssh-keygen -f ~/.ssh/id_rsa -t rsa -N ""; fi
ssh-copy-id REMOTE_USER@REMOTE-MACHINE
- From a Windows local client, use the following PowerShell:
-
SSH into the remote host. Then, use the following commands to download and execute the NVIDIA AI Workbench Installer.
mkdir -p $HOME/.nvwb/bin && \
curl -L https://workbench.download.nvidia.com/stable/workbench-cli/$(curl -L -s https://workbench.download.nvidia.com/stable/workbench-cli/LATEST)/nvwb-cli-$(uname)-$(uname -m) --output $HOME/.nvwb/bin/nvwb-cli && \
chmod +x $HOME/.nvwb/bin/nvwb-cli && \
sudo -E $HOME/.nvwb/bin/nvwb-cli install
-
AI Workbench will install the NVIDIA drivers for you (if needed). You will need to reboot your machine after the drivers are installed and then restart the AI Workbench installation by re-running the commands in the previous step.
-
Select Docker as your container runtime.
-
Log into your GitHub Account by using the Sign in through GitHub.com option.
-
Enter your git author information if requested.
-
Once the remote installation is complete, the Remote Location can be added to the local AI Workbench instance. Open the AI Workbench application, click Add Remote Location, and then enter the required information. When finished, click Add Location.
- *Location Name: * Any short name for this new location
- *Description: * Any breif metadata for this location.
- *Hostname or IP Address: * The hostname or address used to
remotely SSH. If step 1 was followed, this should be the same as
REMOTE-MACHINE. - *SSH Port: * Usually left blank. If a nonstandard SSH port is used, it can be configured here.
- *SSH Username: * The username used for making an SSH
connection. If step 1 was followed, this should be the same as
REMOTE_USER. - *SSH Key File: * The path to the private key for making SSH
connections. If step 1 was followed, this should be:
/home/USER/.ssh/id_rsa. - *Workbench Directory: * Usually left blank. This is where Workbench will remotely save state.
There are two ways to download this project for local use: Cloning and Forking.
Cloning this repository is the recomended way to start. This will not allow for local modifications, but is the fastest to get started. This also allows for the easiest way to pull updates.
Forking this repository is recomended for development as changes will be able to be saved. However, to get updates, the fork maintainer will have to regularly pull from the upstream repo. To work from a fork, follow GitHub's instructions and then reference the URL to your personal fork in the rest of this section.
Expand this section for a details on downloading this project.
-
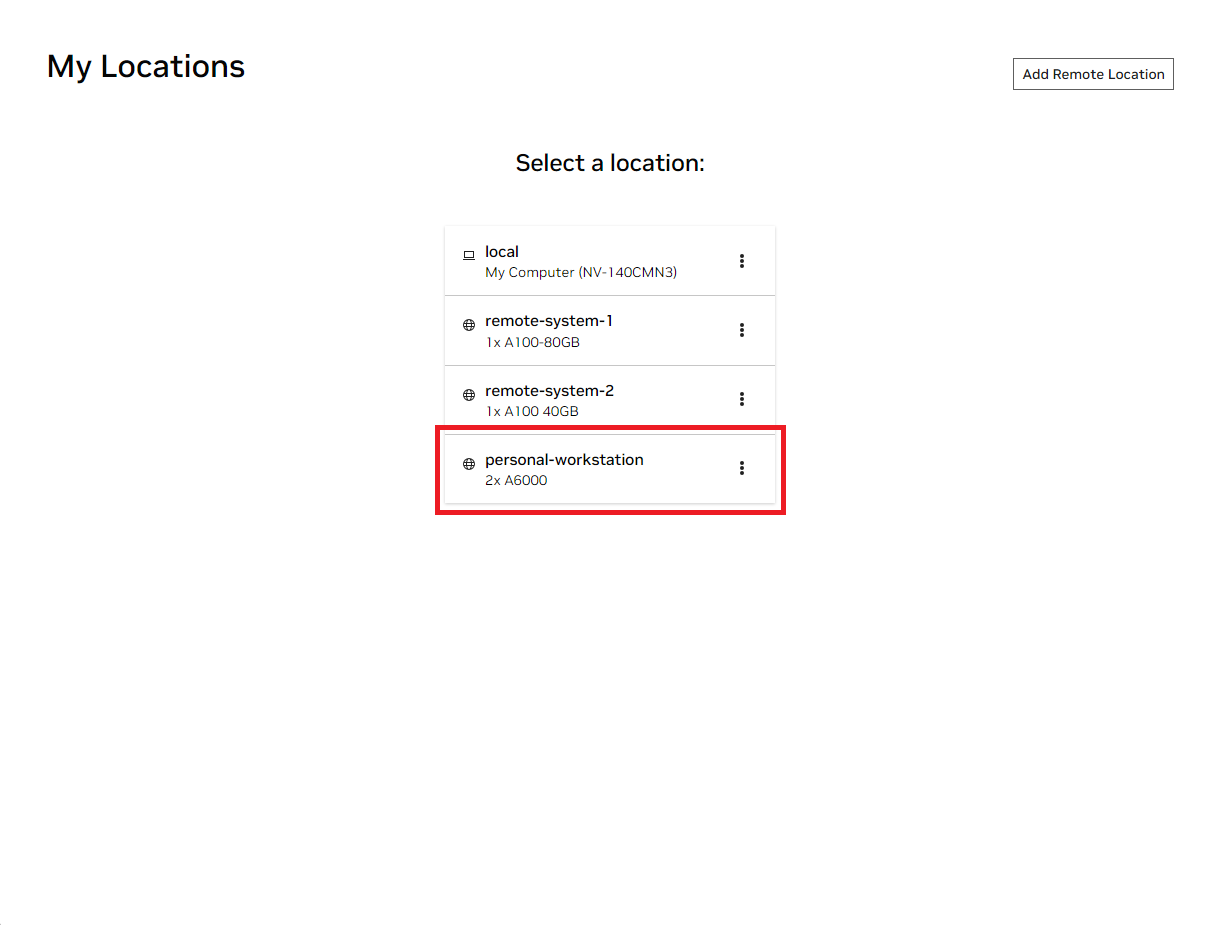
Open the local NVIDIA AI Workbench window. From the list of locations displayed, select one you would like to work in.
-
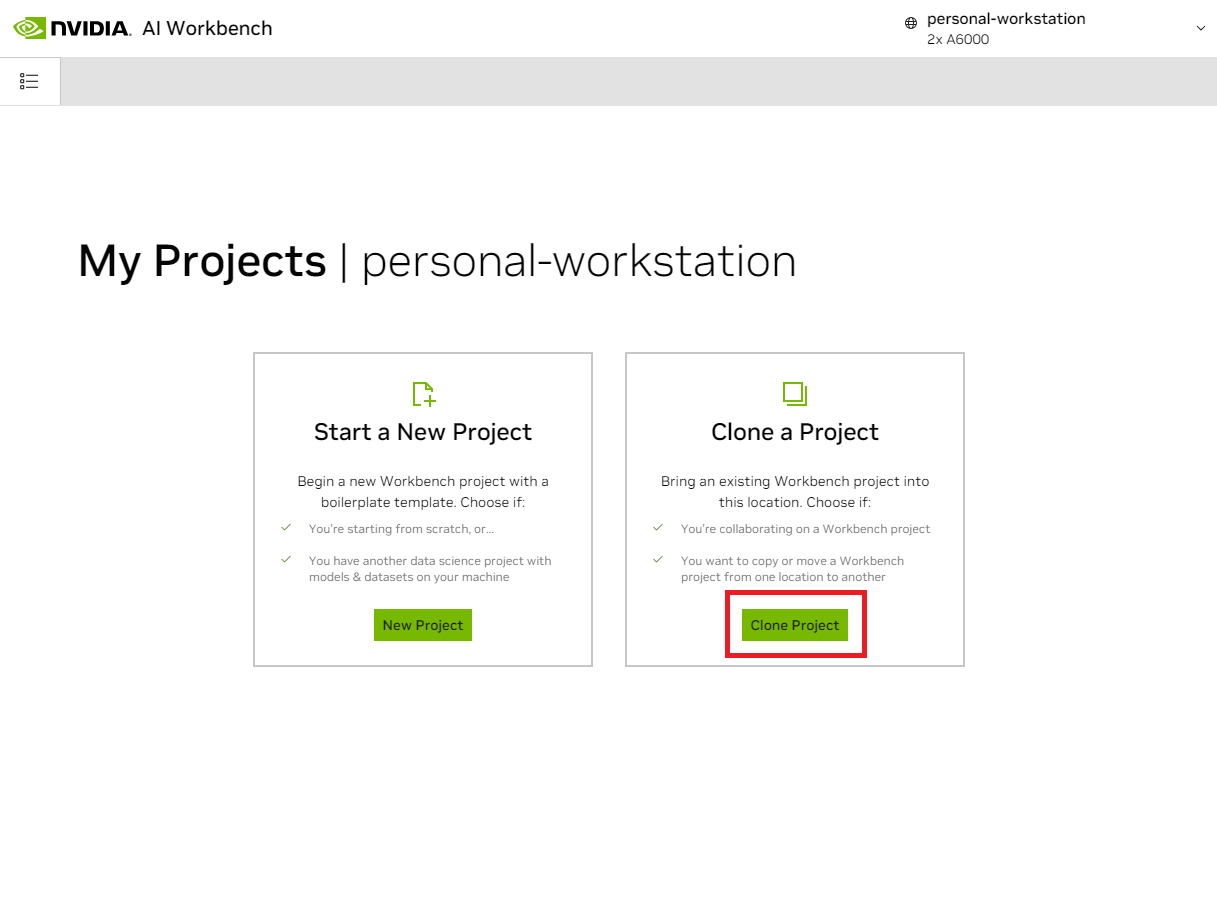
Once inside the location, select Clone Project.
-
Enter the URL of the project repository. You may leave the path as the default value. Press Clone. If you are cloning this project, the url will be:
https://github.com/NVIDIA/nim-anywhere.git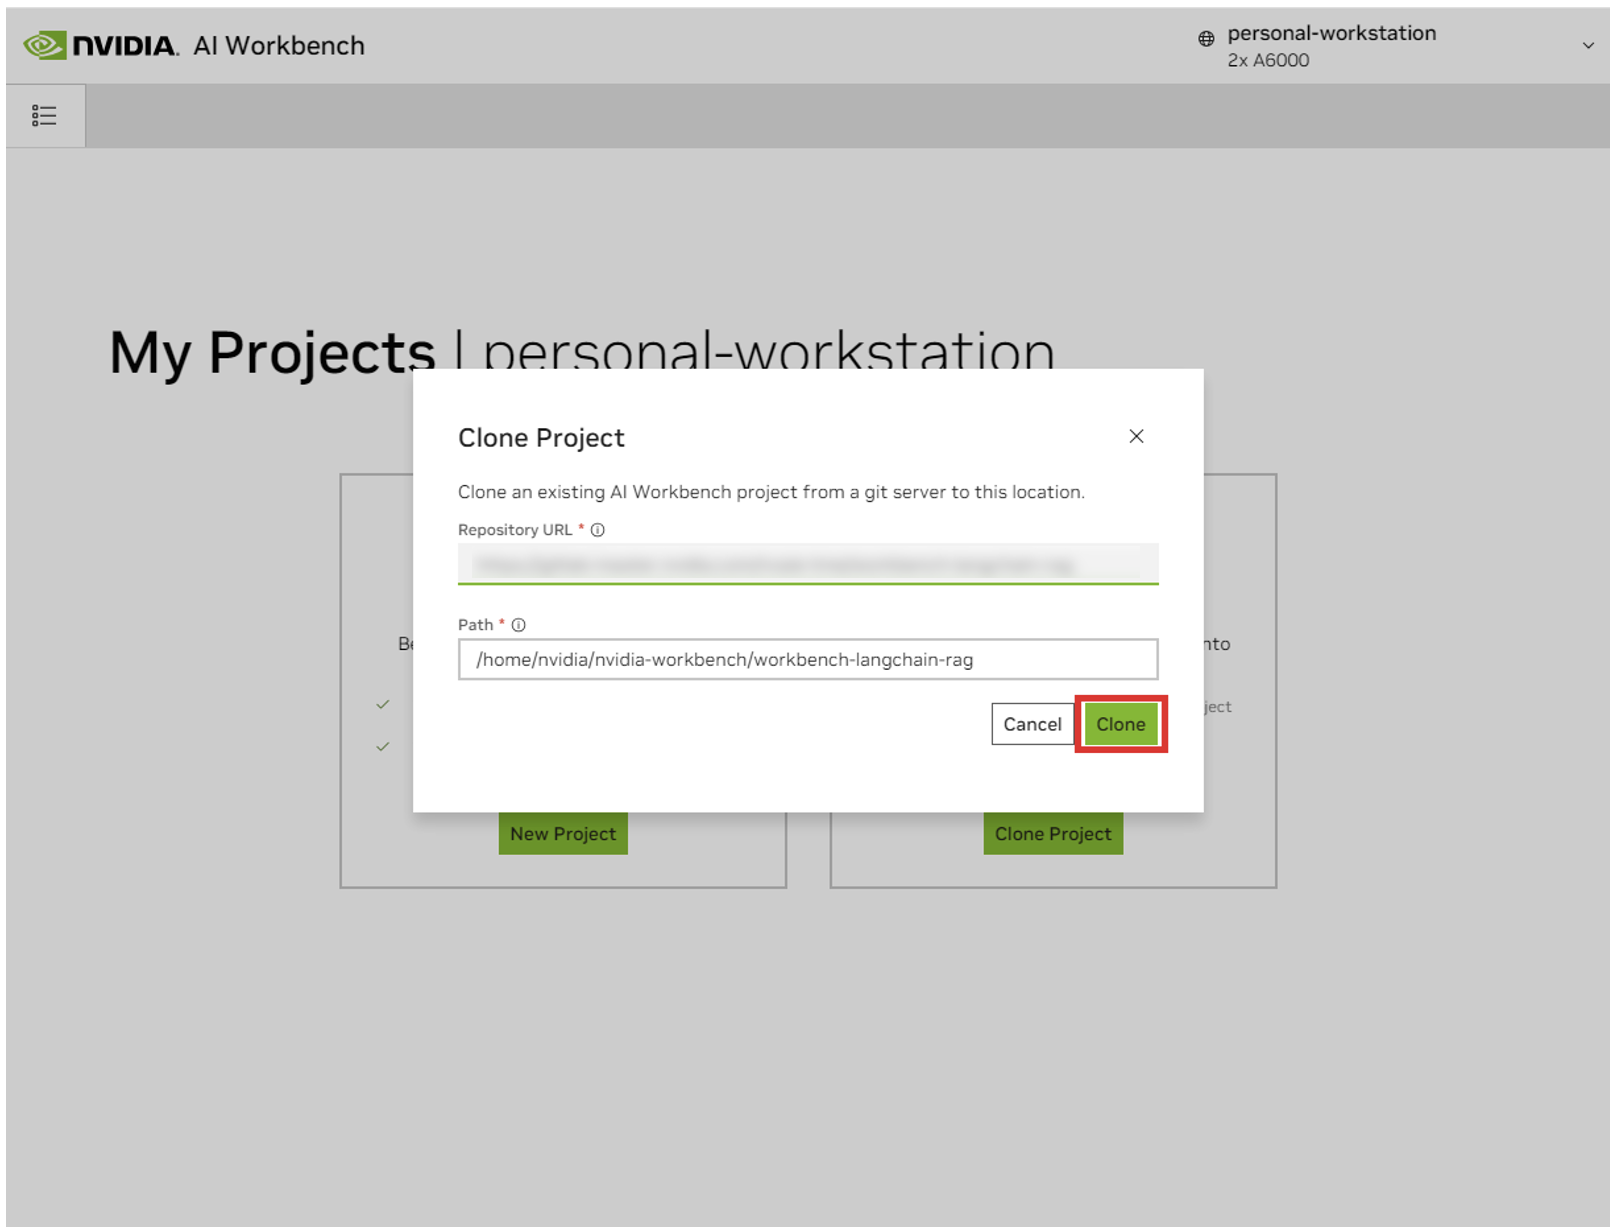
-
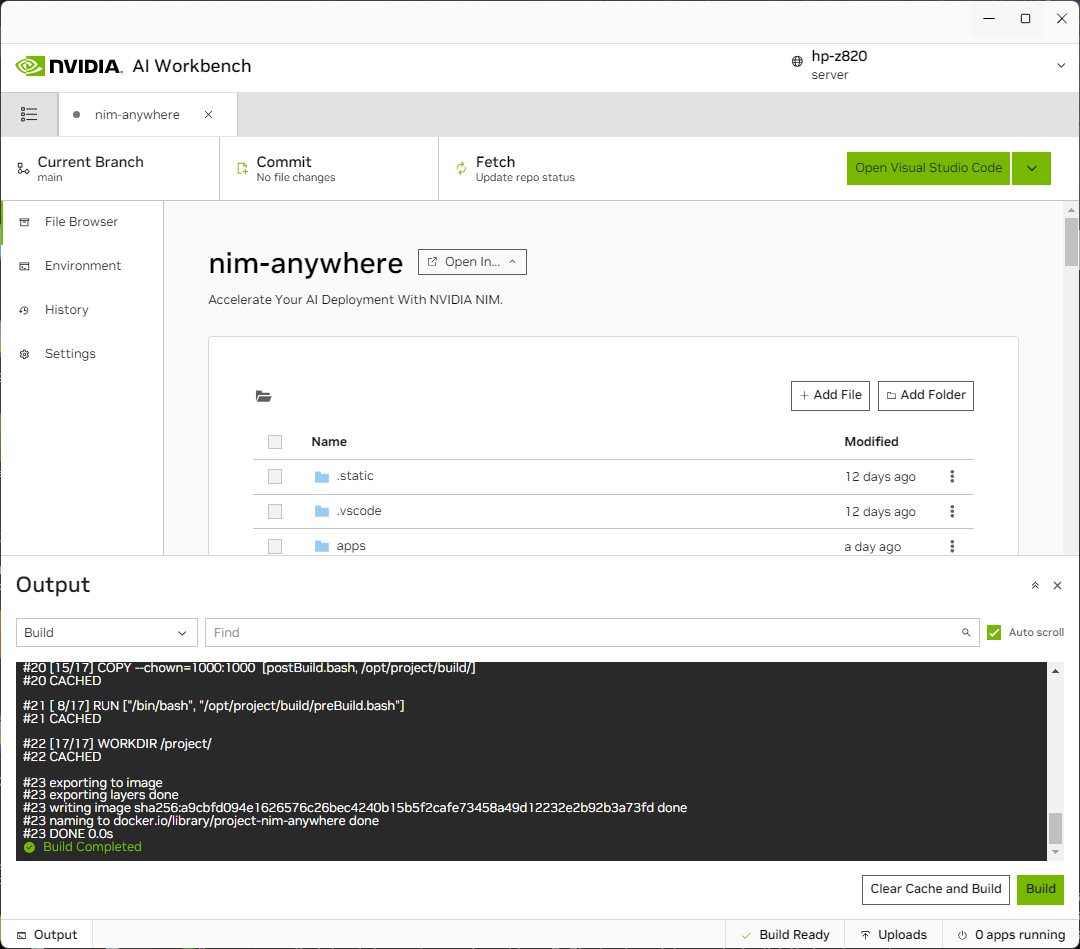
You will be redirected to the new project’s page. Workbench will automatically bootstrap the development environment. You can view real-time progress by expanding the Output from the bottom of the window.


The project must be confugred to work with local machine resources.
Expand this section for a details on configuring this project.
-
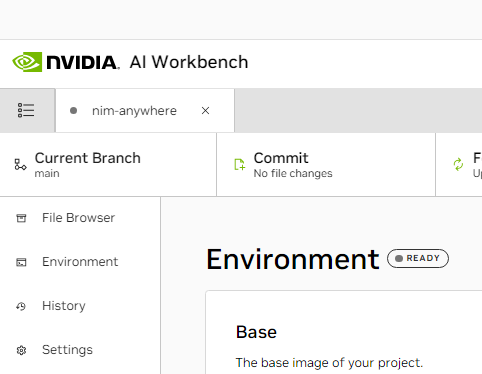
Before running for the first time, project specific configuration must be provided. Project configuration is done using the Environment tab from the left-hand panel.
-
Scroll down to the Variables section and find NGC_HOME entry. It should be set to something like
~/.cache/nvidia-nims. The value here is used by workbench. This same location also appears in the Mounts section that mounts this directory into the container. -
Scroll down to the Secrets section and find the NGC_API_KEY entry. Press Configure and provide the personal key for NGC that as generated earlier.
-
Scroll down to the Mounts section. Here, there are two mounts to configure.
a. Find the mount for /var/host-run. This is used to allow the development environment to access the host’s Docker daemon in a pattern called Docker out of Docker. Press Configure and provide the directory
/var/run.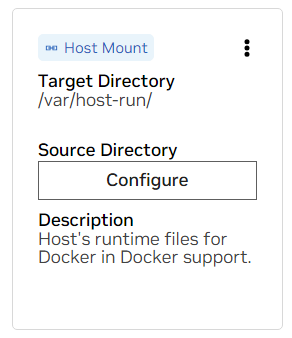
b. Find the mount for /home/workbench/.cache/nvidia-nims. This mount is used as a runtime cache for NIMs where they can cache model files. Sharing this cache with the host reduces disk usage and network bandwidth.
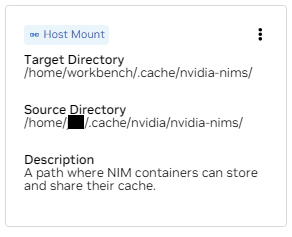
If you don't already have a nim cache, or you aren't sure, use the following commands to create one at
/home/USER/.cache/nvidia-nims.mkdir -p ~/.cache/nvidia-nims chmod 2777 ~/.cache/nvidia-nims
-
A rebuild will occur after these settings have been changed.
-
Once the build completes with a Build Ready message, all applications will be made available to you.


Even the most basic of LLM Chains depend on a few additional microservices. These can be ignored during development for in-memory alternatives, but then code changes are required to go to prodoction. Thankfully, Workbench manages those additional microservices for development environments.
Expand this section for details on starting the demo application.
HINT: For each application, the debug output can be monitored in the UI by clicking the Output link in the lower left corner, selecting the dropdown menu, and choosing the application of interest.
-
All applications bundled in this workspace can be controlled by navigating to Environment > Applications.
-
First, toggle on Milvus Vector DB and Redis. Milvus is used as an unstructured knowledge base and Redis is used to store conversation histories.
-
Once these services have been started, the Chain Server can safely be started. This contains the custom LangChain code for performing our reasoning chain. By default, it will use the local Milvus and Redis, but use ai.nvidia.com for LLM and Embedding model inferencing.
-
[OPTIONAL]: Next, start the LLM NIM. The first time the LLM NIM is started, it will take some time to download the image and the optimized models.
a. During a long start, to confirm the LLM NIM is starting, the progress can be observed by viewing the logs by using the Output pane on the bottom left of the UI.
b. If the logs indicate an authentication error, that means the provided NGC_API_KEY does not have access to the NIMs. Please verify it was generated correctly and in an NGC organization that has NVIDIA AI Enterprise support or trial.
c. If the logs appear to be stuck on
..........: Pull complete...........: Verifying complete, or..........: Download complete; this is all normal output from Docker that the various layers of the container image have been downloaded.d. Any other failures here need to be addressed.
-
Once the Chain Server is up, the Chat Interface can be started. Starting the interface will automatically open it in a browser window.

To get started developing demos, a sample dataset ir provided along with a Jupyter Notebook showing how data is ingested into a Vector Databse.
-
To import PDF documentation into the vector databse, open Jupyter using the app launcher in AI Workbench.
-
Use the Jupyter Notebook at
code/upload-pdfs.ipynbto ingest the default dataset. If using the default dataset, no changes are necessary. -
If using a custom dataset, upload it to the
data/directory in Jupyter and modify the provided notebook as necessary.
This project contains applications for a few demo services as well as integrations with external services. These are all orchestrated by NVIDIA AI Workbench.
The demo services are all in the code folder. The root level of the
code folder has a few interactive notebooks meant for technical deep
dives. The Chain Server is a sample application utilizing NIMs with
LangChain. The Chat Frontend folder contains an interactive UI server
for excersising the chain server. Finally, sample notebooks are provided
in the Evaluation directory to demonstrate retriveval scoring and
validation.
mindmap
  root((AI Workbench))
    Demo Services
        Chain Server<br />LangChain + NIMs
        Frontend<br />Interactive Demo UI
        Evaluation<br />Validate the results
        Notebooks<br />Advanced usage

    Integrations
        Redis</br>Conversation History
        Milvus</br>Vector Database
        LLM NIM</br>Optimized LLMs
The Chain Server can be configured with either a configuration file or environment variables.
By default, the application will search for a configuration file in all of the following locations. If multiple configuration files are found, values from lower files in the list will take precendence.
- ./config.yaml
- ./config.yml
- ./config.json
- ~/app.yaml
- ~/app.yml
- ~/app.json
- /etc/app.yaml
- /etc/app.yml
- /etc/app.json
An additional config file path can be specified through an environment
variable named APP_CONFIG. The value in this file will take precedence
over all the default file locations.
export APP_CONFIG=/etc/my_config.yamlConfiguration can also be set using environment variables. The variable
names will be in the form: APP_FIELD__SUB_FIELD Values specified as
environment variables will take precedence over all values from files.
# Your API key for authentication to AI Foundation.
# ENV Variables: NGC_API_KEY, NVIDIA_API_KEY, APP_NVIDIA_API_KEY
# Type: string, null
nvidia_api_key: ~

# The Data Source Name for your Redis DB.
# ENV Variables: APP_REDIS_DSN
# Type: string
redis_dsn: redis://localhost:6379/0

llm_model:
    # The name of the model to request.
    # ENV Variables: APP_LLM_MODEL__NAME
    # Type: string
    name: meta/llama3-70b-instruct

    # The URL to the model API.
    # ENV Variables: APP_LLM_MODEL__URL
    # Type: string
    url: https://integrate.api.nvidia.com/v1


embedding_model:
    # The name of the model to request.
    # ENV Variables: APP_EMBEDDING_MODEL__NAME
    # Type: string
    name: nvidia/nv-embedqa-e5-v5

    # The URL to the model API.
    # ENV Variables: APP_EMBEDDING_MODEL__URL
    # Type: string
    url: https://integrate.api.nvidia.com/v1


reranking_model:
    # The name of the model to request.
    # ENV Variables: APP_RERANKING_MODEL__NAME
    # Type: string
    name: nv-rerank-qa-mistral-4b:1

    # The URL to the model API.
    # ENV Variables: APP_RERANKING_MODEL__URL
    # Type: string
    url: https://integrate.api.nvidia.com/v1


milvus:
    # The host machine running Milvus vector DB.
    # ENV Variables: APP_MILVUS__URL
    # Type: string
    url: http://localhost:19530

    # The name of the Milvus collection.
    # ENV Variables: APP_MILVUS__COLLECTION_NAME
    # Type: string
    collection_name: collection_1


# Options for the logging levels.
# ENV Variables: APP_LOG_LEVEL
log_level: WARNING
The chat frontend has a few configuraiton options as well. They can be set in the same manner as the chain server.
# The URL to the chain on the chain server.
# ENV Variables: APP_CHAIN_URL
# Type: string
chain_url: http://localhost:3030/

# The url prefix when this is running behind a proxy.
# ENV Variables: PROXY_PREFIX, APP_PROXY_PREFIX
# Type: string
proxy_prefix: /

# Path to the chain server's config.
# ENV Variables: APP_CHAIN_CONFIG_FILE
# Type: string
chain_config_file: ./config.yaml

# Options for the logging levels.
# ENV Variables: APP_LOG_LEVEL
log_level: INFO
All feedback and contributions to this project are welcome. When making changes to this project, either for personal use or for contributing, it is recomended to work on a fork on this project. Once the changes have been completed on the fork, a Merge Request should be opened.
This project has been configured with Linters that have been tuned to help the code remain consistent while not being overly burdensome. We use the following Linters:
- Bandit is used for security scanning
- Pylint is used for Python Syntax Linting
- MyPy is used for type hint linting
- Black is configured for code styling
- A custom check is run to ensure Jupyter Notebooks do not have any output
- Another custom check is run to ensure the README.md file is up to date
The embedded VSCode environment is configured to run the linting and checking in realtime.
To manually run the linting that is done by the CI pipelines, execute
/project/code/tools/lint.sh. Individual tests can be run be specifying
them by name: /project code/tools/lint.sh [deps|pylint|mypy|black|docs|fix]. Running the lint tool in fix mode
will automatically correct what it can by running Black, updating the
README, and clearing the cell output on all Jupyter Notebooks.
The frontend has been designed in an effort to minimize the required HTML and Javascript development. A branded and styled Application Shell is provided that has been created with vanilla HTML, Javascript, and CSS. It is designed to be easy to customize, but it should never be required. The interactive components of the frontend are all created in Gradio and mounted in the app shell using iframes.
Along the top of the app shell is a menu listing the avaiable views. Each view may have its own layout consisting of one or a few pages.
Pages contain the interactive components for a demo. The code for the
pages is in the code/frontend/pages directory. To create a new page:
- Create a new folder in the pages directory
- Create an
__init__.pyfile in the new directory that uses Gradio to define the UI. The Gradio Blocks layout should be defined in a variable calledpage. - It is recomended that any CSS and JS files needed for this view be
saved in the same directory. See the
chatpage for an example. - Open the
code/frontend/pages/__init__.pyfile, import the new page, and add the new page to the__all__list.
NOTE: Creating a new page will not add it to the frontend. It must be added to a view to appear on the Frontend.
View consist of one or a few pages and should function independantly of
each other. Views are all defined in the code/frontend/server.py
module. All declared views will automatically be added to the Frontend's
menu bar and made available in the UI.
To define a new view, modify the list named views. This is a list of
View objects. The order of the objects will define their order in the
Frontend menu. The first defined view will be the default.
View objects describe the view name and layout. They can be declared as follow:
my_view = frontend.view.View(
  name="My New View",  # the name in the menu
  left=frontend.pages.sample_page,  # the page to show on the left
  right=frontend.pages.another_page,  # the page to show on the right
)
All of the page declarations, View.left or View.right, are optional.
If they are not declared, then the associated iframes in the web layout
will be hidden. The other iframes will expand to fill the gaps. The
following diagrams show the various layouts.
- All pages are defined
block-beta
    columns 1
    menu["menu bar"]
    block
        columns 2
        left right
    end
- Only left is defined
block-beta
    columns 1
    menu["menu bar"]
    block
        columns 1
        left:1
    end
The frontend contains a few branded assets that can be customized for different use cases.
The frontend contains a logo on the top left of the page. To modify the
logo, an SVG of the desired logo is required. The app shell can then be
easily modified to use the new SVG by modifying the
code/frontend/_assets/index.html file. There is a single div with an
ID of logo. This box contains a single SVG. Update this to the desired
SVG definition.
<div id="logo" class="logo">
    <svg viewBox="0 0 164 30">...</svg>
</div>The styling of the App Shell is defined in
code/frontend/_static/css/style.css. The colors in this file may be
safely modfied.
The styling of the various pages are defined in
code/frontend/pages/*/*.css. These files may also require modification
for custom color schemes.
The Gradio theme is defined in the file
code/frontend/_assets/theme.json. The colors in this file can safely
be modified to the desired branding. Other styles in this file may also
be changed, but may cause breaking changes to the frontend. The Gradio
documentation contains
more information on Gradio theming.
NOTE: This is an advanced topic that most developers will never require.
Occasionally, it may be necessary to have multiple pages in a view that
communicate with each other. For this purpose, Javascript's
postMessage messaging framework is used. Any trusted message posted to
the application shell will be forwarded to each iframe where the pages
can handle the message as desired. The control page uses this feature
to modify the configuration of the chat page.
The following will post a message to the app shell (window.top). The
message will contain a dictionary with the key use_kb and a value of
true. Using Gradio, this Javascript can be executed by any Gradio
event.
window.top.postMessage({"use_kb": true}, '*');This message will automatically be sent to all pages by the app shell.
The following sample code will consume the message on another page. This
code will run asynchronously when a message event is recieved. If the
message is trusted, a Gradio component with the elem_id of use_kb
will be updated to the value specified in the message. In this way, the
value of a Gradio component can be duplicated across pages.
window.addEventListener(
  "message",
  (event) => {
      if (event.isTrusted) {
          use_kb = gradio_config.components.find((element) => element.props.elem_id == "use_kb");
          use_kb.props.value = event.data["use_kb"];
      };
  },
false);Documentation is written in Github Flavored Markdown and then rendered to a final Markdown file by Pandoc. The documentation can be previewed in the Workbench file browser window.
The header file is the first file used to compile the documentation.
This file can be found at docs/_HEADER.md. The contents of this file
will be written verbatim, without any manipulation, to the README before
anything else.
The summary file contains quick description and graphic that describe this project. The contents of this file will be added to the README immediately after the header and just before the table of contents. This file is processed by Pandoc to embed images before writing to the README.
The most important file for the documentation is the table of contents
file at docs/_TOC.md. This file defines a list of files that should be
concatenated in order to generate the final README manual. Files must be
on this list to be included.
Save all static content, including images, to the _static folder. This
will help with organization.
It may be helpful to have documents that update and write themselves. To create a dynamic document, simply create an executable file that writes the Markdown formatted document to stdout. During build time, if an entry in the table of contents file is executable, it will be executed and its stdout will be used in its place.
Make is used to manage the generation of the README.md file. Running
the following make commands from the docs/ directory will perform the
following actions.
-
makeormake ../README.mdwill update the README file if any of the pages have changed since it was last generated. -
make cleanwill cleanup the existing README and static assets. -
make allwill force the generation of the README manual.
Most of the configuration for the development environment happens with
Environment Variables. To make permanent changes to environment
variables, modify variables.env or use the
Workbench UI.
This project uses one Python environment at /usr/bin/python3 and
dependencies are managed with pip. Becuse all development is done
inside a container, any changes to the Python environment will be
ephemeral. To permanently install a Python package, add it to the
requirements.txt file or use the Workbench UI.
The development environment is based on Ubuntu 22.04. The primary user
has password-less sudo access, but all changes to the system will be
ephemeral. To make permanent changes to installed packages, add them to
the [apt.txt] file. To make other changes to the operating system
such as manipulating files, adding environment variables, etc; use the
postBuild.bash and
preBuild.bash files.
It is typically good practice to update dependencies monthly to ensure no CVEs are exposed through misused dependencies. The following process can be used to patch this project. It is recommended to run the regression testing after the patch to ensure nothing has broken in the update.
- Update Environment: In the workbench GUI, open the project and navigate to the Environment pane. Check if there is an update available for the base image. If an updated base image is available, apply the update and rebuild the environment. Address any build errors. Ensure that all of the applications can start.
- Update Python Packages and NIMs: The Python dependencies and NIM
applications can be updated automtically by running the
/project/code/tools/bump.shscript. - Update Remaining applications: For the remaining applications, manually check their default tag and compare to the latest. Update where appropriate and ensure that the applications still start up successfully.
- Restart and rebuild the environment.
- Audit Python Envitonment: It is now best to check the installed
versions of ALL Python packages, not just the direct dependencies.
To accomplish this, run
/project/code/tools/audit.sh. This script will print out a report of all Python packages in a warning state and all packages in an error state. Anything in an error state must be resolved as it will have active CVEs and known vulnerabilities. - Check Dependabot Alerts: Check all of the Dependabot alerts and ensure they should be resolved.
- Regression testing: Run through the entire demo, from document ingesting to the frontend, and ensure it is still functional and that the GUI looks correct.