- Develop a sample business service using Core Data & Services (CDS), Node.js, and SQLite, by using the SAP Cloud Application Programming Model (CAP) and developing on your local environment.
- Deploy your SAP Cloud Application Programming Model (CAP) application into the Cloud Foundry environment of SAP Cloud Platform.
- You've installed Node.js. Use latest long-term support (LTS) version. In case of problems, see the Troubleshooting guide for CAP.
- You've installed the latest version of Visual Studio Code.
- (For Windows users only) You've installed the SQLite tools for Windows. Find the steps how to install it in the Troubleshooting guide in section How Do I Install SQLite in the CAP documentation.
- You've installed Postman application or any other HTTP client.
- How to develop a sample business service using CAP and
Node.js - How to define a simple data model and a service that exposes the entities you created in your data model
- How to run your service locally
- How to deploy the data model to an
SQLitedatabase - How to add custom handlers to serve requests that aren't handled automatically
Before you start, make sure that you've completed the prerequisites.
-
Open a command line window and install the
cdsdevelopment kit globally by executing the following command:npm i -g @sap/cds-dkThis process takes some minutes installing the
cdscommand, which you will use in the next steps.On MacOS/Linux, you may need to follow the steps as described here.
If there's an older
@sap/cdspackage already installed on the machine, you may have to remove it first; if so, you'll be instructed to do so.In case of problems, see the Troubleshooting guide for CAP.
-
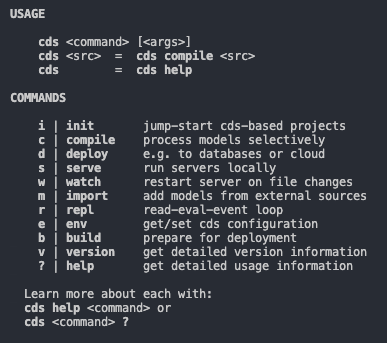
To verify that the installation was successful, run
cdswithout arguments:cdsThis lists the available
cdscommands. For example, usecds versionto check the version that you've installed. To know what is the latest version, see the Release Notes for CAP.
-
Go to Visual Studio Marketplace.
-
Choose Install.
Visual Studio Code opens the extensions details page.
- In Visual Studio Code choose Install to enable the extension for CDS Language Support.
If the extension is already installed and enabled in VS Code, it will be updated automatically.
With your installed CDS command line tool, you can now create a new CAP-based project, in the form of a new directory with various things preconfigured.
-
Open a command line window and run the following command in a folder of your choice to create the project:
cds init my-bookshopThis creates a folder
my-bookshopin the current directory. -
Open Visual Studio Code, go to File > Open Folder and choose the
my-bookshopfolder. -
Go to Terminal > New Terminal to open a command line window within Visual Studio Code and run the following command in the root level of your project:
npm install -
In the command line window run the following:
cds watchThis command tries to start a
cdsserver. Whenever you feed your project with new content, for example, by adding or modifying.cds,.json, or.jsfiles, the server automatically restarts to serve the new content. As there's no content in the project so far, it just keeps waiting for content with a message as shown below:[cds] - running nodemon... --ext cds,csn,csv,ts,mjs,cjs,js,json,properties,edmx,xml No models found at db/,srv/,app/,schema,services. Waiting for some to arrive...
[MacOS and Linux]
-
Open a command line window and run the following command in a folder of your choice to create the project:
cds init my-bookshopThis creates a folder
my-bookshopin the current directory. -
Open Visual Studio Code, go to File > Open and choose the
my-bookshopfolder. -
Go to View > Command Palette > Terminal: Create New Integrated Terminal to open a command line window within Visual Studio Code and run the following command in the root level of your project:
npm install -
In the command line window run the following:
cds watchThis command tries to start a
cdsserver process. As there's no content in the project so far, it just keeps waiting for content with a message as shown below:[cds] - running nodemon... --ext cds,csn,csv,ts,mjs,cjs,js,json,properties,edmx,xml No models found at db/,srv/,app/,schema,services. Waiting for some to arrive...
After initializing the project, you should see the following empty folders:
app: for UI artifactsdb: for the database level schema modelsrv: for the service definition layer
-
Let's feed it by adding a simple domain model. In the
srvfolder choose the New File icon in Visual Studio Code and create a new file calledcat-service.cds. -
Add the following code to the file
cat-service.cds:using { Country, managed } from '@sap/cds/common'; service CatalogService { entity Books { key ID : Integer; title : localized String; author : Association to Authors; stock : Integer; } entity Authors { key ID : Integer; name : String; books : Association to many Books on books.author = $self; } entity Orders : managed { key ID : UUID; book : Association to Books; country : Country; amount : Integer; } }
Remember to save your files (keyboard shortcut CTRL+S).
-
As soon as you've saved your file, the still running
cds watchreacts immediately with some new output as shown below:[cds] - connect to db { database: ':memory:' } /> successfully deployed to sqlite in-memory db [cds] - serving CatalogService { at: '/catalog' } [cds] - launched in: 696.753ms [cds] - server listening on { url: 'http://localhost:4004' } [ terminate with ^C ]This means,
cds watchdetected the changes insrv/cat-service.cdsand automatically bootstrapped an in-memory SQLite database when restarting the server process. -
To test your service, go to: http://localhost:4004
You won't see data, because you haven't added a data model yet. However, click on the available links to see the service is running.
Add service provider logic to return mock data.
-
In the
srvfolder, create a new file calledcat-service.js. -
Add the following code to the file
cat-service.js:module.exports = (srv) => { // Reply mock data for Books... srv.on ('READ', 'Books', ()=>[ { ID:201, title:'Wuthering Heights', author_ID:101, stock:12 }, { ID:251, title:'The Raven', author_ID:150, stock:333 }, { ID:252, title:'Eleonora', author_ID:150, stock:555 }, { ID:271, title:'Catweazle', author_ID:170, stock:222 }, ]) // Reply mock data for Authors... srv.on ('READ', 'Authors', ()=>[ { ID:101, name:'Emily Brontë' }, { ID:150, name:'Edgar Allen Poe' }, { ID:170, name:'Richard Carpenter' }, ]) }
Remember to save your files.
-
To test your service, click on these links:
You should see the mock data that you've added for the
BooksandAuthorsentities.
To get started quickly, you've already added a simplistic all-in-one service definition. However, you would usually put normalized entity definitions into a separate data model and have your services expose potentially de-normalized views on those entities.
-
In the
dbfolder choose the New File icon in Visual Studio Code and create a new file calleddata-model.cds. -
Add the following code to the file
data-model.cds:namespace my.bookshop; using { Country, managed } from '@sap/cds/common'; entity Books { key ID : Integer; title : localized String; author : Association to Authors; stock : Integer; } entity Authors { key ID : Integer; name : String; books : Association to many Books on books.author = $self; } entity Orders : managed { key ID : UUID; book : Association to Books; country : Country; amount : Integer; }
-
Open the file
cat-service.cdsand replace the existing code with:using my.bookshop as my from '../db/data-model'; service CatalogService { entity Books @readonly as projection on my.Books; entity Authors @readonly as projection on my.Authors; entity Orders @insertonly as projection on my.Orders; }
Remember to save your files.
In Visual Studio Code you will add plain CSV files in folder db/csv to fill your database tables with initial data.
-
In the
dbfolder, choose New File and entercsv/my.bookshop-Authors.csvto create a new foldercsvwith the file namedcsv/my.bookshop-Authors.csv. Add the following to the file:ID;name 101;Emily Brontë 107;Charlote Brontë 150;Edgar Allen Poe 170;Richard Carpenter -
In the newly created
csvfolder, choose New File and create a file calledmy.bookshop-Books.csv. Add the following to the file:ID;title;author_ID;stock 201;Wuthering Heights;101;12 207;Jane Eyre;107;11 251;The Raven;150;333 252;Eleonora;150;555 271;Catweazle;170;22Remember to save your files.
Make sure that you now have a folder hierarchy
db/csv/.... Remember that thecsvfiles must be named like the entities in your data model and must be located inside thedb/csvfolder.After you added these files,
cds watchrestarts the server with an output, telling that the files have been detected and their content been loaded into the database automatically:[cds] - connect to sqlite db { database: ':memory:' } > filling my.bookshop.Authors from db/csv/my.bookshop-Authors.csv > filling my.bookshop.Books from db/csv/my.bookshop-Books.csv /> successfully deployed to sqlite in-memory db [cds] - serving CatalogService { at: '/catalog', impl: 'srv/cat-service.js' } [cds] - launched in: 751.073ms [cds] - server listening on { url: 'http://localhost:4004' } [ terminate with ^C ] -
Remove the code with mock data in
cat-service.js, because you want to see the data loaded from thecsvfiles. -
To test your service, open a web browser and go to:
http://localhost:4004/catalog/Books
http://localhost:4004/catalog/Authors
As you now have a fully capable SQL database with some initial data, you can send complex OData queries, served by the built-in generic providers.
http://localhost:4004/catalog/Authors?$expand=books($select=ID,title)
You should see a book titled Jane Eyre. If not, make sure you've removed the mock data from
cat-service.js.
Before you continue, make sure that you've completed the prerequisites and installed SQLite (for Windows users only).
Instead of using in-memory, you can also use persistent databases.
-
If
cds watchis running, press CTRL+C in the command line to stop the service. -
Install
SQLite3packages.npm i sqlite3 -D -
Deploy the data model to an
SQLitedatabase:cds deploy --to sqlite:db/my-bookshop.dbYou've now created an
SQLitedatabase file underdb/my-bookshop.db.This configuration is saved in your
package.jsonas your default data source. For subsequent deployments using the default configuration, you just need to runcds deploy. The difference to the automatically provided in-memory database is that you now get a persistent database stored in the local file. -
Open
SQLiteand view the newly created database:sqlite3 db/my-bookshop.db -cmd .dumpIf this doesn't work, check if you have SQLite installed. On Windows, you might need to enter the full path to SQLite, for example:
C:\sqlite\sqlite3 db/my-bookshop.db -cmd .dump. -
To stop
SQLiteand go back to your project directory, press CTRL+C. -
Run your service.
cds watch[cds] - using bindings from: { registry: '~/.cds-services.json' } [cds] - connect to sqlite db { database: 'db/my-bookshop.db' } [cds] - serving CatalogService { at: '/catalog', impl: 'srv/cat-service.js' } [cds] - launched in: 610.318ms [cds] - server listening on { url: 'http://localhost:4004' } [ terminate with ^C ]
You can now see the generic handlers shipped with CAP in action.
-
Open the Postman application.
You can use any other HTTP client than Postman.
-
Click on the following link and save the file to a folder of your choice: 'postman.json'.
-
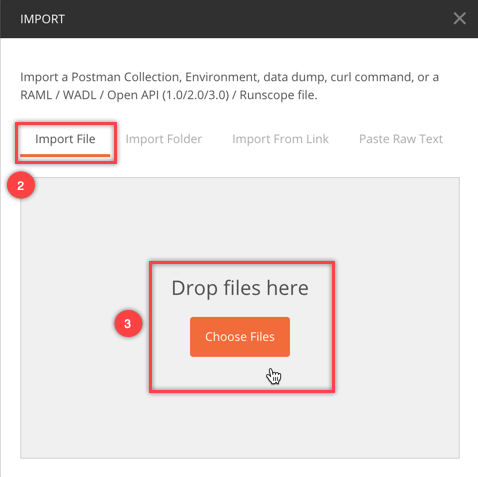
In the Postman app, use the Import button in the toolbar:
-
Choose Import File in the wizard. Click on Choose Files and select the file that you've saved before.
-
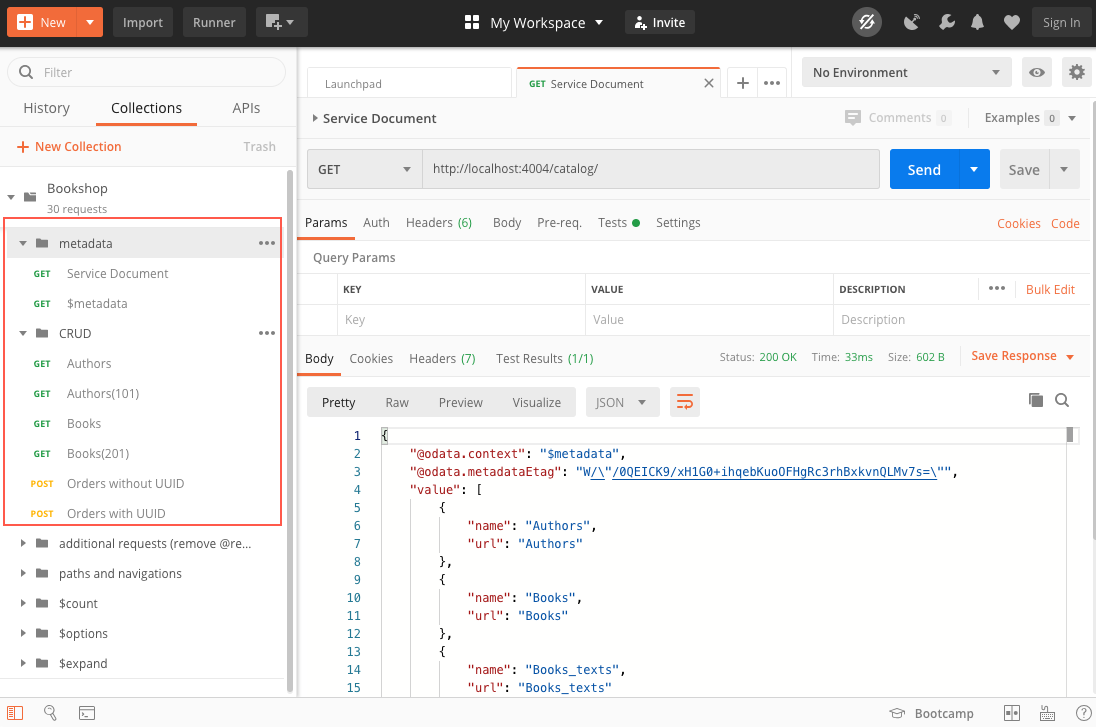
In the imported collection, execute the various requests in the
metadataandCRUDgroups. They should all return proper responses.With your current service implementation, you can get only
POSTorders. AnyGETorDELETEto an order fails, since you've specified theOrdersentity to be@insertonlyinsrv/cat-service.cds.
-
In Visual Studio Code open the file
cat-service.jsand replace the existing code with::module.exports = (srv) => { const {Books} = cds.entities ('my.bookshop') // Reduce stock of ordered books srv.before ('CREATE', 'Orders', async (req) => { const order = req.data if (!order.amount || order.amount <= 0) return req.error (400, 'Order at least 1 book') const tx = cds.transaction(req) const affectedRows = await tx.run ( UPDATE (Books) .set ({ stock: {'-=': order.amount}}) .where ({ stock: {'>=': order.amount},/*and*/ ID: order.book_ID}) ) if (affectedRows === 0) req.error (409, "Sold out, sorry") }) // Add some discount for overstocked books srv.after ('READ', 'Books', each => { if (each.stock > 111) each.title += ' -- 11% discount!' }) }
Remember to save your files.
Whenever orders are created, this code is triggered. It updates the book stock by the given amount, unless there aren't enough books left.
-
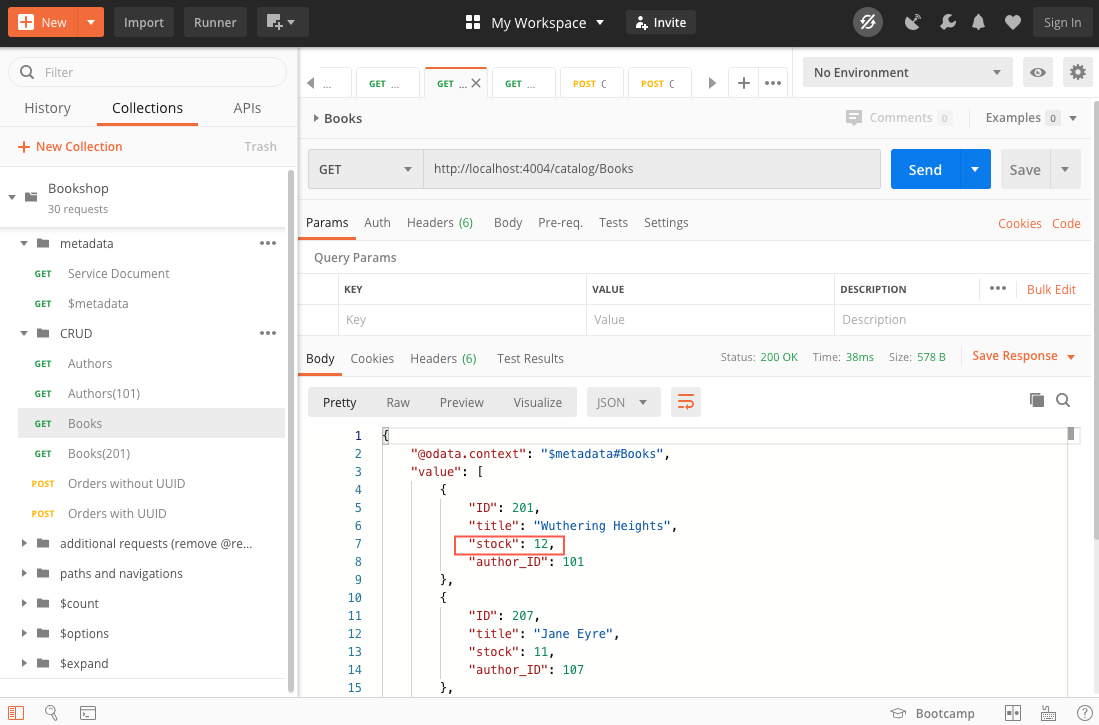
In Postman, execute the
GET Booksrequest.Look at the stock of book
201. -
Execute one of the
POST Ordersrequests.This triggers the logic above and reduce the stock.
-
Execute the
GET Booksrequest again.The stock of book
201is lower than before.
It’s now time to switch to SAP HANA as a database.
-
If
cds watchis still running in Visual Studio Code, press CTRL+C in the command line to stop the service. -
In Visual Studio Code add the following configuration in the file package.json of your my-bookshop project. Overwrite any existing cds configuration:
"cds": {
    "requires": {
      "db": {
        "kind": "sql"
      }
    }
kind:sql declares the requirement for an SQL database. It evaluates to sqlite in the development profile (active by default), while in production it equals hana. This way you don’t need to modify this file if you want to switch between the two databases.
- In the command line add the SAP HANA driver as a dependency to your project:
npm add @sap/hana-client --saveThe latest nodejs version is 14.x currently but SAP HANA client supports 10.x or 12.x. So downgrade your nodejs to install this client
-
The Cloud Foundry API endpoint is required so that you can log on to your SAP Cloud Platform Cloud Foundry space through Cloud Foundry CLI.
-
Go to the SAP Cloud Platform Trial Cockpit and choose Enter Your Trial Account.
-
Navigate to your Subaccount:
-
Copy the Cloud Foundry API Endpoint value:
-
Go back to Visual Studio Code to the command line. Authenticate with your login credentials using the following command:
cf loginCloud Foundry environment of SAP Cloud Platform has a built-in cf push command to deploy applications. It needs the application files plus an optional manifest.yml file to push the application code and to bind the relevant services to the application.
- As cf push can only bind but not create services, you need to create the SAP HANA service manually (along with an HDI container and a database schema). In the command line add:
cf create-service hanatrial hdi-shared my-bookshop-db-hdi-container- Now, build and deploy both the database part and the actual application and add:
CDS_ENV=production cds build && cf push -f gen/db && cf push -f gen/srv --random-routeThis process takes some minutes. The first part of the command creates the SAP HANA table and view definitions along with manifest.yaml files in both in gen/db and gen/srv folders. Look at gen/db/manifest.yaml and see that it binds to the my-bookshop-db-hdi-container service that you’ve created in the previous step. Troubleshooting: If gen/db doesn't exist then put this in .cdsrc.json
{
    "build": {
        "target": "gen",
        "tasks": [
          {"src":"srv","for":"node-cf","options":{"model":["db","srv","app"]}},
          {"src":"db","for":"hana","options":{"model":["db","srv","app"]}}
        ]
      }
}- In the deploy log, find the application URL in the routes line at the end:
name:              my-bookshop-srv
requested state:   started
routes:            my-bookshop-srv-....cfapps.sap.hana.ondemand.com
- Open this URL in the browser and try out the provided links, for example, .../catalog/Books. Application data is fetched from SAP HANA.


