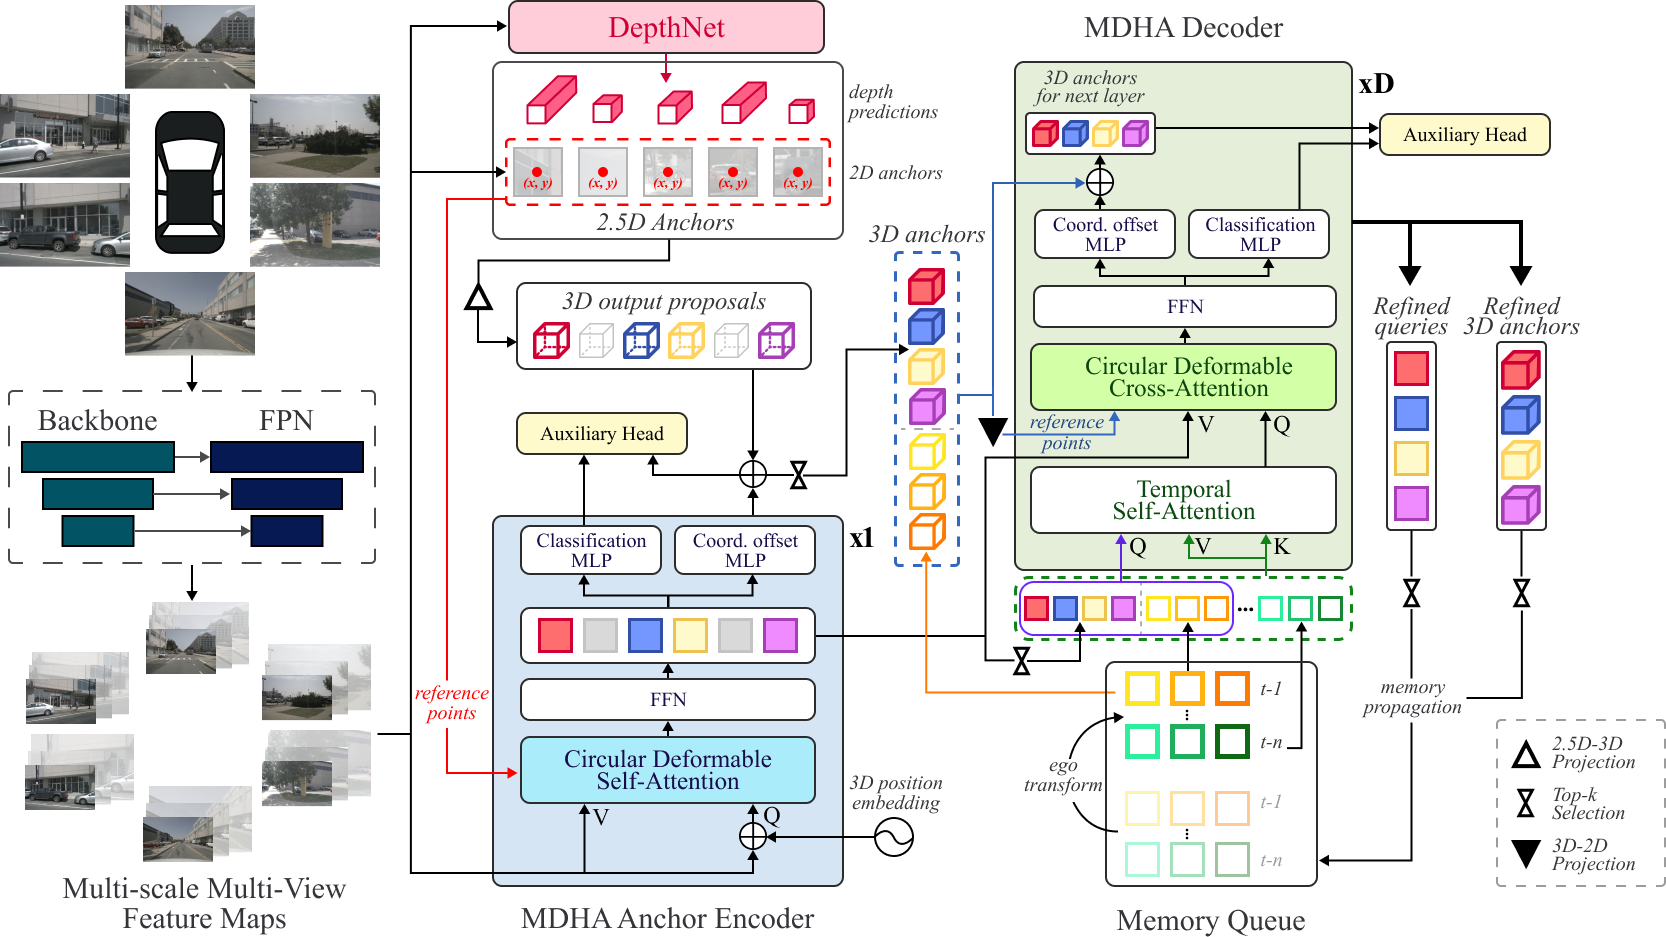
MDHA is a novel sparse query-based framework for 3D object detection which constructs adaptive 3D output proposals using hybrid anchors from multi-view, multi-scale input. Moreover, we propose a Circular Deformable Attention mechanism for efficient multi-view attention. Our model diagram is shown below:
Create a conda environment:
conda create -n mdha python=3.8 -y
conda activate mdha
Install dependencies:
pip install -r requirements.txt
Note: please ensure torch is installed correctly. Note that we use CUDA 11.1, if you require a different CUDA version then follow the official instructions though we do not guarantee the model will successfully run/train.
Clone the repo:
git clone https://github.com/NaomiEX/MDHA
Navigate to the project folder:
cd path/to/MDHA/
Compile CUDA ops for CDA:
cd projects/mmdet3d_plugin/attentions/ops
./make.sh
cd ../../../../
Create a data directory:
mkdir ./data
Download nuScenes dataset to ./data directory.
- (Preferred) download
TrainvalandTestsplits for the nuScenes Full dataset (v1.0) into./data/nuscenesand./data/nuscenes/testrespectively [WARNING: this will download a large amount of data ~ 340GB] - (Not Recommended) download the
Minisplit for the nuScenes Full dataset (v1.0). This is a subset of trainval with only 10 scenes. You may have to adjust some of the following steps if you choose to download theMinisplit.
Our data preparation is a modification of StreamPETR which additionally aligns the cameras to follow circular order as outlined in the paper.
python tools/create_data_nusc.py --trainval-path data/nuscenes --test-path data/nuscenes/test --out-dir data/nuscenes/anno --version v1.0 --with_circular_cams
Weights are loaded from the ckpt folder:
mkdir ./ckpt
Download the backbone pre-trained ResNet-50 weights from PyTorch into ckpt/:
wget https://download.pytorch.org/models/resnet50-19c8e357.pth -O ckpt/resnet50-19c8e357.pth
The depth coordinates are only used for MDHA-fixed.
Create experiments/depth_coords folder
mkdir -p experiments/depth_coords
cd experiments/depth_coords
Download depth coords from here into the experiments/depth_coords folder.
At this point your project folder structure should look like this:
├── ckpt/
|   ├── resnet50-19c8e357.pth
├── data/
|   ├── nuscenes/
|   |   ├── anno/
|   |   |   ├── nuscenes_circular_infos_test.pkl
|   |   |   ├── nuscenes_circular_infos_train.pkl
|   |   |   ├── nuscenes_circular_infos_val.pkl
|   |   ├── maps/
|   |   ├── samples/
|   |   ├── sweeps/
|   |   ├── v1.0-trainval/
|   |   ├── test/
|   |   |   ├── maps/
|   |   |   ├── samples/
|   |   |   ├── sweeps/
|   |   |   ├── v1.0-test
├── projects/
├── tools/
You can train the model on a local machine with 1 GPU as follows:
tools/dist_train.sh projects/configs/execution/local/cmdha_4ptenc_24ptdec_anchorref_updatepos_convdepth_mult_wrap_newproj_1gpu2bs.py 1 --work-dir work_dirs/test
Or with 2 GPUs as follows:
tools/dist_train.sh projects/configs/execution/local/cmdha_4ptenc_24ptdec_anchorref_updatepos_convdepth_mult_wrap_newproj_2gpu2bs.py 2 --work-dir work_dirs/test
Note 1: we also provide slurm_train.sh in tools/ directory to train on a cluster using SLURM.
Note 2: by default, local training will only train with batch size of 2 for 25 epochs due to the long training time. Our paper results were obtained by training on a cluster using 4 A100s for 100 epochs. Set projects/configs/execution/hpc for training configs with bigger batch sizes
tools/dist_test.sh /path/to/execution/config /path/to/model/checkpoint 1 --eval bbox
