The native QGIS importer creates separate layers for each folder within a KML/KMZ. If there are hundreds or thousands of layers, the import can be very slow, crash QGIS, or create an undesirable number of layers. This plugin only creates one point layer, one line layer, and one polygon layer. This makes the KML/KMZ import very quick. It adds the nested folder structure to a field in the QGIS layer which can then be used for sorting and filtering based on the folder structure in the KML. A KMZ can be exported with simple, categorized, and graduated QGIS styling for points, lines and polygons. Limited support has been added to convert embedded ground overlay images into GeoTIFF images.
KML Tools can be found in the QGIS menu under Vector->KML Tools and Raster->KML tools, on the tool bar, or in the Processing Toolbox under KML Tools. It has three vector tools and two raster tools. This shows the tools in the Processing Toolbox.
This functions as the name implies. It's interface is simple. Click on the ... button on the right of Import KML/KMZ file to select your file. Note that the file name extension must be *.kml, *.txt, or *.kmz. Choose whether you want to include points, lines or polygons from the KML as QGIS output layers. If the KML file does not contain one of these geometry types, then the associated layer will not be created anyway.
This attempts to expand HTML tag/value pairs into separate fields. Before this can be run, the KML needs to be imported into QGIS with Import KML/KMZ. Next select from How to expand the description field option one of the following:
- Expand from a 2 column HTML table - If the KML has a description entry that contains an HTML table with two columns were the first column represents a table or field name and the second column its value, then this option will parse these fields and add them to a new attribute table field. This is an example of data that it expands.
    <table>
        <tr><td>City</td><td>Provo</td></tr>
        <tr><td>State</td><td>Utah</td></tr>
    </table>
- Expand from "tag = value" pairs - If the KML has a description entry that contains "tag = value" entries separated by new paragraphs, line breaks, or entries in a single table column, then this option will parse these fields and add them to a new attribute table field. This is an example of data that it expands.
    <b>City<b/> = Provo<br/>
    <b>State<b/> = Utah<br/>
- Expand from "tag: value" pairs - If the KML has a description entry that contains "tag: value" entries separated by new paragraphs, line breaks, or entries in a single table column, then this option will parse these fields and add them to a new attribute table field. This is an example of data that it expands.
    <b>City:<b/> Provo<br/>
    <b>State:<b/> Utah<br/>
This can either be run from the menu, tool bar, or Processing Toolbox; however, running it from the menu or tool bar provides user interaction during the conversion to select which fields they want to expand. During expansion some of the expansion names may already exist in the table. If that is the case then an '_' followed by a number is appended to the end.
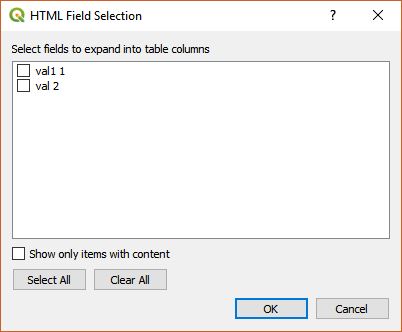
Select the input layer and the field that has an HTML table of tag/value rows. Press OK and it will look through all records and find all possible tag values. If it finds tags, then it will pop up a menu for you to select which tags you want expanded into table entries like this.
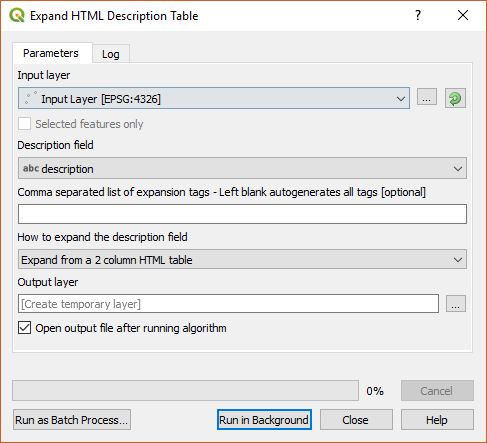
The Processing Toolbox version of Expand HTML description table operates a little differently because processing routines cannot be interactive. In this case it will expand all possible tags that are found. Optionally, you can include a list of name tags you want expanded if you know them ahead of time. This is the Processing expansion dialog box.
Because there is no standard way of including additional information in the KML description entry, it is difficult to come up with a way to expand all cases. Right now this just works with two column HTML tables, tag=value, and tag: value pairs, but please let us know if there are other description formats that you would like us to tackle.
This provides the ability to export a QGIS point, line, or polygon layer as a Google Earth KMZ file. It can export single, categorized, and graduated QGIS symbology. For others it will default to not exporting the symbology. For points it captures the entire symbol, but for lines and polygons only simple line colors, line widths, simple line outlines and solid polygon fills can be exported due the limitations of the KML specification. It can export date and time in one or two fields as a time stamp, time begin and time end. It also handles altitude either from QGIS Z geometries or from an attribute field and eventually add a constant quantity.
The following describes some of the functionality.
- Name/Label field - This is the name or label that will be displayed in Google Earth.
- Use hidden points to display polygon labels - Labels on polygons are not normally displayed in Google Earth. By checking this box a hidden point will be created at the polygon's centroid so that a label will be displayed over the polygon.
- Description fields - By default all fields are selected to be included in the KMZ. When the user clicks on a placemark in Google Earth, these fields will be displayed. If only one field is specified then it will be treated as a description field.
- Export style for single, categorized, and graduated symbols - Select this if you want to export the QGIS style information to KML. Note that for lines and polygons, you can only use simple styles. If the style is not single, categorized, or graduated, then no style information will be exported.
- Point layers: Use the following Google icon, but use QGIS icon color and size - Rather than display the QGIS icon shape, you can select one of the Google Earth icon shapes to be displayed for point features. The size and color of the icon will be determined by QGIS.
- Specify whether to include altitude in the KMZ - If altitude is available in the QGIS geometry as a Z attribute or is available in the attribute table, then it can be included in the KMZ. Note that the altitude value must be in meters; otherwise, it will not be displayed correctly. The KML Altitude Mode also affects how altitude is interpreted.
- Default altitude mode when not obtained from the attribute table - When altitude is not obtained from a field in the attribute table, then this value is used.
- Altitude mode field - Specify a field in the attribute table to be used as the altitude mode.
- Altitude field - Specify a field in the attribute table to be used as the altitude. This value must be in meters.
- Altitude addend - Specify a quantity to be used as addend for altitude (from Altitude field or Z attribute). This value must be in meters.
- Extend sides to ground - When checked, points, lines and polygon edges will be extruded to the ground.
- Date/Time stamp field - This specifies a field in the attribute table that contains a date and time. This can be a QGIS QDateTime field, QDate field, QString field, int or double field. It attempts to smartly parse any string field. If the field is an int or double then at assumes the value is EPOCH time in seconds. In the advanced parameters, separate date and time fields can be used.
- Date/Time span begin field - This selects a field for the date/time span begin field.
- Date/Time span end field - This selects a field for the date/time span end field.
- Image path/name field - This specifies the complete path to an image which will be included in to KMZ and will be displayed in the Google Earth placemark popup. As an example, if you have a directory of georeferenced images, you can run Import geotagged photos from the QGIS processing toolbox. This creates a Photo attribute which can be used for Export KMZ. Be careful that you only use small images for this purpose because all the images in the table will be copied into the KMZ and they will not be downsized.
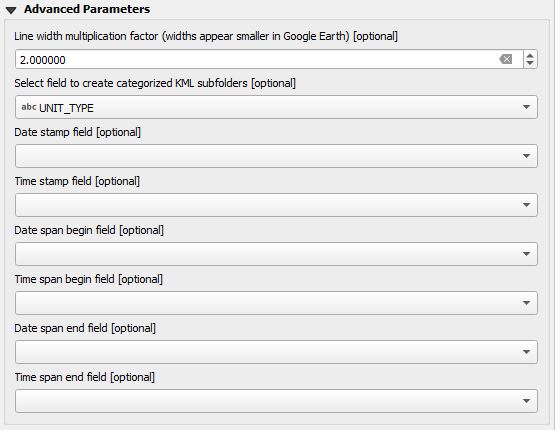
Advanced Parameters
-
Line width multiplication factor - Line widths in Google Earth visually appear smaller than in QGIS so this provides a method to make them look similar. By default this is set to 2.
-
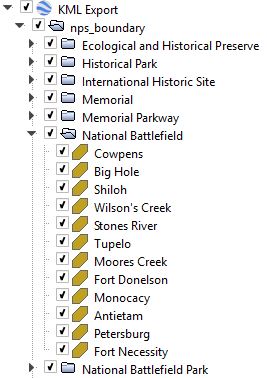
Select field to create categorized KML subfolders - You can select an attribute to create categorized folders in the output KML. This is an example of National Parks layer exporated as a KML and displayed in Google Earth. You can see the National Parks categorized by their type.
-
The rest of the advanced parameters allow the use of separate date and time fields to be combined into a single KML time stamp, time span begin, or time span end field.
KML Tools does not implement the entire KML specification. It focuses on point, line and polygon geometries within the KML. If for some reason you find that it is missing something, let us know and perhaps we can add it.
Note that these tools are only available in QGIS 3.14.0 later.
This algorithm looks through the KML/KMZ for KML GroundOverlay tags and if the associated image is embedded in the KMZ or is on the local file system it will convert it to a GeoTIFF according to the LatLonBox parameters. Note that this algorithm will not follow and extract http(s) linked images. The following shows the KML tags that are extracted. In this case etna.jpg is converted to etna.tif.
    <Icon>
      <href>etna.jpg</href>
    </Icon>
    <LatLonBox>
      <north>37.91904192681665</north>
      <south>37.46543388598137</south>
      <east>15.35832653742206</east>
      <west>14.60128369746704</west>
      <rotation>-0.1556640799496235</rotation>
    </LatLonBox>
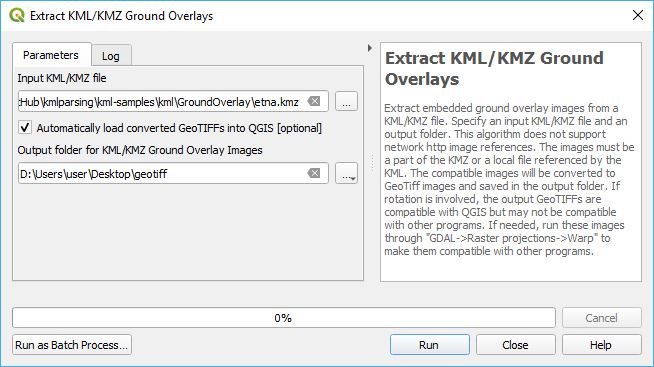
The parameters are the input KML or KMZ and the location of a folder to store the images in. You can also specify whether to automatically load the converted GeoTIFF images into QGIS or not. If any images are found that cannot be converted, they will be reported in the algorithm log. If rotation is involved in the conversion process, the output GeoTIFFs are compatible with QGIS, but may not be compatible with other programs. If needed, run these images through GDAL->Raster projections->Warp to make them compatible with other programs.
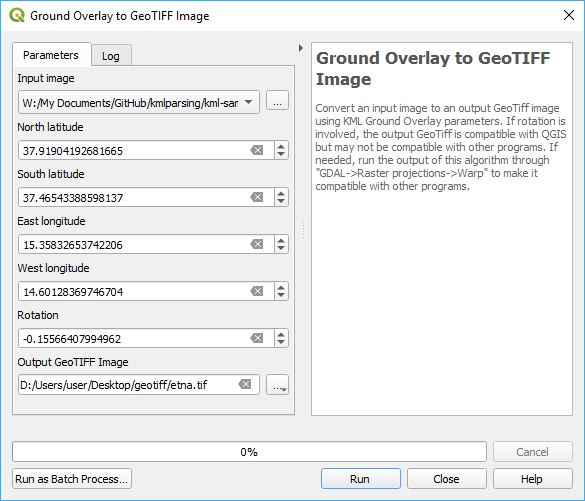
This algorithm manually allows the user to specify an image and enter the north, south, east, west and rotation parameters to convert the input image into a GeoTIFF image. If rotation is not zero, the output GeoTiff is compatible with QGIS, but may not be compatible with other programs. If needed, run the output of this algorithm through GDAL->Raster projections->Warp to make it compatible with other programs.


