Xamarin and MvvMCross plugin for accessing the fingerprint or other biometric sensors.
| Type | Stable | Pre release |
|---|---|---|
| vanilla |  |
 |
| MvvmCross |  |
 |
If you like the quality and code you can support me
Thanks!
The plugin supports the listed platforms.
| Platform | Version |
|---|---|
| Xamarin.Android | 6.0 |
| Xamarin.iOS | 8.0 |
| Xamarin.Mac | 10.12 |
| Windows UWP | 10 |
Add NSFaceIDUsageDescription to your Info.plist to describe the reason your app uses Face ID. (see Documentation). Otherwise the App will crash when you start a Face ID authentication on iOS 11.3+.
<key>NSFaceIDUsageDescription</key>
<string>Need your face to unlock secrets!</string>Set Target SDK version
The target SDK version has to be >= 6.0. I recomment to use always the latest stable SDK version, if possible. You can set the target SDK version in your Android project properties.
Install Android X Migration
Since version 2, this plugin uses Android X. You have to install Xamarin.AndroidX.Migration in your Android project.
Request the permission in AndroidManifest.xml
<uses-permission android:name="android.permission.USE_FINGERPRINT" />Set the resolver of the current Activity
Skip this, if you use the MvvMCross Plugin or don't use the dialog.
We need the current activity to display the dialog. You can use the Current Activity Plugin from James Montemagno or implement your own functionality to retrieve the current activity. See Sample App for details.
CrossFingerprint.SetCurrentActivityResolver(() => CrossCurrentActivity.Current.Activity);var request = new AuthenticationRequestConfiguration ("Prove you have fingers!", "Because without it you can't have access");
var result = await CrossFingerprint.Current.AuthenticateAsync(request);
if (result.Authenticated)
{
// do secret stuff :)
}
else
{
// not allowed to do secret stuff :(
}var fpService = Mvx.Resolve<IFingerprint>(); // or use dependency injection and inject IFingerprint
var request = new AuthenticationRequestConfiguration ("Prove you have mvx fingers!", "Because without it you can't have access");
var result = await fpService.AuthenticateAsync(request);
if (result.Authenticated)
{
// do secret stuff :)
}
else
{
// not allowed to do secret stuff :(
}The API is defined by the IFingerprint interface:
/// <summary>
/// Checks the availability of fingerprint authentication.
/// Checks are performed in this order:
/// 1. API supports accessing the fingerprint sensor
/// 2. Permission for accessint the fingerprint sensor granted
/// 3. Device has sensor
/// 4. Fingerprint has been enrolled
/// <see cref="FingerprintAvailability.Unknown"/> will be returned if the check failed
/// with some other platform specific reason.
/// </summary>
/// <param name="allowAlternativeAuthentication">
/// En-/Disables the use of the PIN / Passwort as fallback.
/// Supported Platforms: iOS, Mac
/// Default: false
/// </param>
Task<FingerprintAvailability> GetAvailabilityAsync(bool allowAlternativeAuthentication = false);

/// <summary>
/// Checks if <see cref="GetAvailabilityAsync"/> returns <see cref="FingerprintAvailability.Available"/>.
/// </summary>
/// <param name="allowAlternativeAuthentication">
/// En-/Disables the use of the PIN / Passwort as fallback.
/// Supported Platforms: iOS, Mac
/// Default: false
/// </param>
/// <returns><c>true</c> if Available, else <c>false</c></returns>
Task<bool> IsAvailableAsync(bool allowAlternativeAuthentication = false);

/// <summary>
/// Requests the authentication.
/// </summary>
/// <param name="reason">Reason for the fingerprint authentication request. Displayed to the user.</param>
/// <param name="cancellationToken">Token used to cancel the operation.</param>
/// <returns>Authentication result</returns>
Task<FingerprintAuthenticationResult> AuthenticateAsync(string reason, CancellationToken cancellationToken = default(CancellationToken));

/// <summary>
/// Requests the authentication.
/// </summary>
/// <param name="authRequestConfig">Configuration of the dialog that is displayed to the user.</param>
/// <param name="cancellationToken">Token used to cancel the operation.</param>
/// <returns>Authentication result</returns>
Task<FingerprintAuthenticationResult> AuthenticateAsync(AuthenticationRequestConfiguration authRequestConfig, CancellationToken cancellationToken = default(CancellationToken));
The returned FingerprintAuthenticationResult contains information about the authentication.
/// <summary>
/// Indicatates whether the authentication was successful or not.
/// </summary>
public bool Authenticated { get { return Status == FingerprintAuthenticationResultStatus.Succeeded; } }

/// <summary>
/// Detailed information of the authentication.
/// </summary>
public FingerprintAuthenticationResultStatus Status { get; set; }

/// <summary>
/// Reason for the unsucessful authentication.
/// </summary>
public string ErrorMessage { get; set; }var request = new AuthenticationRequestConfiguration ("Prove you have fingers!", "Because without it you can't have access");
var result = await CrossFingerprint.Current.AuthenticateAsync(request);
if (result.Authenticated)
{
// do secret stuff :)
}
else
{
// not allowed to do secret stuff :(
}var fpService = Mvx.Resolve<IFingerprint>(); // or use dependency injection and inject IFingerprint
var request = new AuthenticationRequestConfiguration ("Prove you have mvx fingers!", "Because without it you can't have access");
var result = await fpService.AuthenticateAsync(request);
if (result.Authenticated)
{
// do secret stuff :)
}
else
{
// not allowed to do secret stuff :(
}//Create mock with LigthMock (http://www.lightinject.net/)
var mockFingerprintContext = new MockContext<IFingerprint>();
var mockFingerprint = new CrossFingerprintMock(mockFingerprintContext);
mockFingerprintContext.Current = mockFingerprint;You can't create a custom dialog. The standard iOS Dialog will be shown.
- cancelable programmatically with passed CancellationToken
- custom fallback button title
- custom cancel button title
You can't use the alternative authentication method.
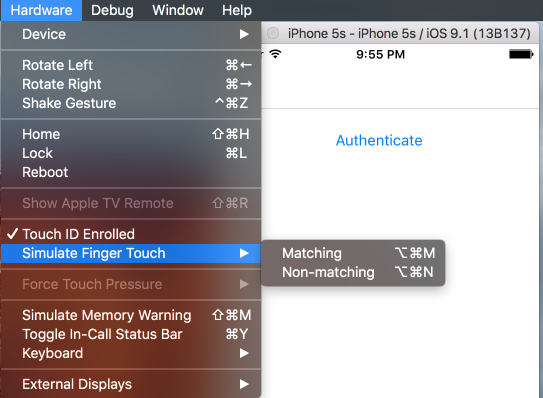
With the Hardware menu you can
- Toggle the enrollment status
- Trigger valid (⌘ ⌥ M) and invalid (⌘ ⌥ N) fingerprint sensor events
- start the emulator (Android >= 6.0)
- open the settings app
- go to Security > Fingerprint, then follow the enrollment instructions
- when it asks for touch
- open command prompt
telnet 127.0.0.1 <emulator-id>(adb devicesprints "emulator-<emulator-id>")finger touch 1finger touch 1
Sending fingerprint sensor events for testing the plugin can be done with the telnet commands, too.
Note for Windows users: You have to enable telnet: Programs and Features > Add Windows Feature > Telnet Client
If you use the plugin with Link all, Release Mode and ProGuard/r8 enabled, you may have to do the following:
- Create a
proguard.cfgfile in your android project and add the following:
    -dontwarn com.samsung.**
    -keep class com.samsung.** {*;}
- Include it to your project
- Properties > Build Action > ProguardConfiguration


